
jQuery를 사용하여 돋보기 효과를 얻는 방법
- 一个新手원래의
- 2017-10-11 10:09:022270검색
구현 원리
먼저 돋보기 효과를 구현하는 방법을 설명하겠습니다.
방법 1: 원본 이미지에 마우스를 올려놓으면 해당 이미지를 로드하여 표시합니다. 큰 이미지의 위치.
방법 2: 원본 이미지를 확대합니다. 즉, 원본 이미지의 길이와 너비를 조정합니다.
위에서 돋보기 효과를 얻는 두 가지 방법을 소개했습니다. 다음으로 위의 두 가지 방법을 jQuery 플러그인에 적용합니다.
먼저 원본 이미지 객체를 표시하려면 img 요소가 필요하고, 표시 상자에 큰 이미지 객체가 저장되는 컨테이너가 필요합니다. 원본 이미지 위로 마우스를 이동하면 큰 이미지의 절대 위치 지정으로 해당 부분이 표시되어 돋보기와 같은 효과를 얻을 수 있습니다.
다음으로 Index.html 페이지를 정의해 보겠습니다. 구체적인 구현은 다음과 같습니다.
<!doctype html>
<html lang="en-US">
<head>
  <meta http-equiv="Content-Type" content="text/html;charset=utf-8">
  <title>jQuery Image Zoom Demo</title>
  <meta name="author" content="Jackson Huang">
</head>
<body>
<p class="magnify">
<p class="large"></p>
<img  class="small lazy"  src="/static/imghwm/default1.png"  data-src="./img/1.jpg"       style="max-width:90%" / alt="jQuery를 사용하여 돋보기 효과를 얻는 방법" >
</p>
</body>
</html>
위에서 원본 이미지를 표시하기 위한 작은 개체와 해당 위치를 표시하는 표시 상자로 큰 개체를 정의했습니다. 큰 이미지의
mousemove 이벤트
다음으로 jQuery 플러그인을 사용하여 작은 개체 위로 마우스를 이동하면 큰 이미지의 해당 위치가 큰 개체에 표시됩니다. . 여기에는 mousemove 이벤트가 포함되므로 mousemove 이벤트의 모니터링 방법을 구현해야 합니다. (jQuery 플러그인 정의 방법은 "jQuery 플러그인 사용자 정의 단계"를 참조하세요. by Step》).
이제 jquery.imagezoom.js 플러그인을 구현해 보겠습니다!
(function ($) {

    $.fn.imageZoom = function (options) {

    // The native width and height of the image.
    var native_width = 0,
        native_height = 0,
        current_width = 0,
        current_height = 0,
        $small = $(".small"),
        $large = $(".large");

    $(".magnify").mousemove(function (e) {
        /* Act on the event */
        if (!native_width && !native_height) {
            var image_object = new Image();
            image_object.src = $small.attr('src');

            // Gets the image native height and width.
            native_height = image_object.height;
            native_width = image_object.width;

            // Gets the image current height and width.
            current_height = $small.height();
            current_width = $small.width();

        } else {

            // Gets .maginfy offset coordinates.
            var magnify_offset = $(this).offset(),

                // Gets coordinates within .maginfy.
                mx = e.pageX - magnify_offset.left,
                my = e.pageY - magnify_offset.top;

            // Checks the mouse within .maginfy or not.
            if (mx < $(this).width() && my < $(this).height() && mx > 0 && my > 0) {
                $large.fadeIn(100);
            } else {
                $large.fadeOut(100);
            } if ($large.is(":visible")) {
                /* Gets the large image coordinate by ratio
                   small.x / small.width = large.x / large.width
                   small.y / small.height = large.y / large.height
                   then we need to keep pointer in the centre,
                   so deduct the half of .large width and height.
                */
                var rx = Math.round(mx / $small.width() * native_width - $large.width() / 2) * -1,
                    ry = Math.round(my / $small.height() * native_height - $large.height() / 2) * -1,
                    bgp = rx + "px " + ry + "px",
                    px = mx - $large.width() / 2,
                    py = my - $large.height() / 2;
                $large.css({
                    left: px,
                    top: py,
                    backgroundPosition: bgp
                });
            }

        }
    });
});
위에서는 마우스가 확대 개체로 이동할 때 현재 마우스의 상대 좌표 위치를 가져오는 방법을 그림을 사용하여 설명하겠습니다. 마우스의 좌표 위치.
그림 1 마우스 상대 좌표 위치
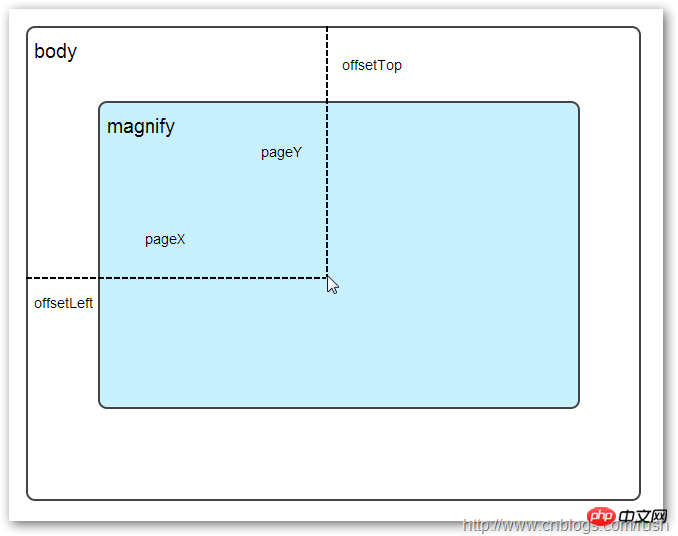
마우스가 Magnify 개체로 이동하면 Magnify Relative 좌표 위치에서 마우스를 가져와야 합니다. 상대 좌표는 (mx,my)입니다. 위 그림에서 상대 좌표는 (pageX - offsetLeft, pageY - offsetTop)과 동일하다는 것을 알 수 있습니다.
이제 확대 개체에서 마우스의 좌표 값을 얻었습니다. 다음으로 큰 그림의 해당 좌표를 얻어야 합니다. 여기서는 큰 그림의 해당 좌표를 (rx, ry)로 정의합니다. (rx,ry)의 값은 비례 관계를 통해 얻을 수 있습니다.
my / small.height (원본 이미지의 길이) = ry / Native_height (대형 이미지의 길이)
위의 비례 관계를 통해 우리는 큰 그림의 좌표(rx, ry)가 (mx/small.width*native_width, my/small.height*native_height)와 동일하다는 것을 알 수 있습니다. 위 수식을 통해 큰 이미지의 해당 좌표 위치를 얻을 수 있습니다. 마우스를 확대 대상으로 이동하면 큰 이미지의 해당 부분이 표시됩니다. 영상. 배경 위치 속성대형 이미지의 로딩 및 표시를 구현하기 전에 먼저 CSS에서 배경 위치 배경 위치에 대한 지식을 소개하세요. + CSS background-position위에는 4가지 색상으로 구성된 100x100픽셀 이미지가 있는데, 각 색상은 50x50픽셀을 차지합니다. 다음으로, 이미지를 수정하여 서로 다른 위치를 표시하겠습니다. 이미지 CSS의 배경 위치 속성 값입니다.
큰 정사각형 아래에 두 개의 작은 정사각형 행이 있고 서로 다른 색상 위치를 표시하는 것을 볼 수 있습니다. 여기서는 각 p 요소 CSS의 background-position 속성 값을 수정하여 이를 달성합니다. 
例如:第一行的蓝色方形,我们设置CSS的background-position属性为:0px -50px;这相当于原图往上移动50px,第一行的其他方形也通过左右和上下移动实现的。
但第二行的方形就显得更加奇怪了,因为它们都由四种颜色组成,而且颜色的位置都不一样,这究竟是怎样实现的呢?
例如:第二行的第一个方形,我们设置CSS的background-position属性为:25px 25px;这相当于原图向下和向右移动了25px,由于image wrap的作用它会填充剩余位置的颜色。
现在,我们已经了解到了CSS的background-position属性的作用,所以我们通过修改large对象的background-position属性来显示对应的图像部分,具体实现如下:
$large.css({
    left: px,
    top: py,
    backgroundPosition: bgp
});
上面,我们通过加载大图的方式来实现放大镜效果,接下来,我们将介绍通过调整原图的长和宽来实现放大镜效果。
mousewheel事件
前面,我们通过mousemove事件来放大图片,这里我们将通过鼠标的滚轮事件实现图片放大效果。
由于,不同的浏览器有不同的滚轮事件。主要是有三种:onmousewheel(IE 6/7/8)、mousewheel(IE9,Chrome,Safari和Opera)和DOMMouseScroll(只有Firefox支持),关于这三个事件这里不做详细的介绍了。
由于不同浏览器之间存在着差异,为了实现浏览器之间的兼容,所以,我们需要监听以上三种滚轮事件(onmousewheel,mousewheel和DOMMouseScroll),具体实现如下:
$(".magnify").bind('DOMMouseScroll mousewheel onmousewheel', function(e) {
});
上面,我们实现了兼容不同浏览器的滚轮事件监听方法,接下来,判断滚轮向上或向下也要考虑不同浏览器的兼容性,主流的览器(IE、Opera、Safari、Firefox、Chrome)中Firefox 使用detail,其余四类使用wheelDelta;两者只在取值上不一致,代表含义一致,detail与wheelDelta只各取两个值,detail只取±3,wheelDelta只取±120,其中正数表示为向上,负数表示向下。
由于detail和wheelDelta都有两个值表示向上或向下滚动,所以不同浏览器间可以通过以下方式实现兼容,具体实现如下:
$(".magnify").bind('DOMMouseScroll mousewheel onmousewheel', function(e) {

    // cross-browser wheel delta
    var e = window.event || e; // old IE support.
    var delta = Math.max(-1, Math.min(1, (e.wheelDelta || -e.detail)));
});
上面,我们已经处理了不同浏览器滚轮监听方法,当用户滚动滚轮时需要动态地修改原图的尺寸,这里我们定义缩放比scaling为0.3,也就是说每当用户滚动一下滚轮原图就按0.3的比例进行缩放,具体实现如下:
// Gets the image scaling height and width.
native_height += (native_height * scaling * delta);
native_width += (native_width * scaling * delta);

// Update backgroud image size.
$large.css('background-size', native_width + "px " + native_height + "px");
现在,我们已经实现了通过滚轮对图片进行缩放查看的效果,完整的实现如下:
(function($) {
$.fn.imageZoom = function(options) {
// The native width and height of the image.
var defaults = {
scaling: 0.3
};
// Combines object defaults and options.
options = $.extend(defaults, options),
native_width = 0,
native_height = 0,
current_width = 0,
current_height = 0,
$small = $(".small"),
$large = $(".large");
$(".magnify").mousemove(function(e) {
/* Act on the event */
if (!native_width && !native_height) {
var image_object = new Image();
image_object.src = $small.attr('src');
// Gets the image native height and width.
native_height = image_object.height;
native_width = image_object.width;
// Gets the image current height and width.
current_height = $small.height();
current_width = $small.width();
} else {
// Gets .maginfy offset coordinates.
var magnify_offset = $(this).offset(),
// Gets coordinates within .maginfy.
mx = e.pageX - magnify_offset.left,
my = e.pageY - magnify_offset.top;
// Checks the mouse within .maginfy or not.
if (mx < $(this).width() && my < $(this).height() && mx > 0 && my > 0) {
$large.fadeIn(100);
} else {
$large.fadeOut(100);
}
if ($large.is(":visible")) {
/* Gets the large image coordinate by ratio
small.x / small.width = large.x / large.width
small.y / small.height = large.y / large.height
then we need to keep pointer in the centre,
so deduct the half of .large width and height.
*/
var rx = Math.round(mx / $small.width() * native_width - $large.width() / 2) * -1,
ry = Math.round(my / $small.height() * native_height - $large.height() / 2) * -1,
bgp = rx + "px " + ry + "px",
px = mx - $large.width() / 2,
py = my - $large.height() / 2;
$large.css({
left: px,
top: py,
backgroundPosition: bgp
});
}
}
});
$(".magnify").bind('DOMMouseScroll mousewheel onmousewheel', function(e) {
var image_object = new Image();
image_object.src = $large.attr('src');
// cross-browser wheel delta
e = window.event || e; // old IE support.
var delta = Math.max(-1, Math.min(1, (e.wheelDelta || -e.detail)));
// Gets the image scaling height and width.
native_height += (native_height * defaults.scaling * delta);
native_width += (native_width * defaults.scaling * delta);
// The image can't smaller than the original.
if (native_height < current_height) {
native_height = current_height;
}
if (native_width < current_width) {
native_width = current_width;
}
// console.log("native_height: " + native_height + " native_width: " + native_width);
// Gets .maginfy offset coordinates.
var magnify_offset = $(this).offset(),
mx = e.pageX - magnify_offset.left,
my = e.pageY - magnify_offset.top;
// Update backgroud image size.
$large.css('background-size', native_width + "px " + native_height + "px");
/* Gets the large image coordinate by ratio
small.x / small.width = large.x / large.width
small.y / small.height = large.y / large.height
then we need to keep pointer in the centre,
so deduct the half of .large width and height.
*/
var rx = Math.round(mx / $small.width() * native_width - $large.width() / 2) * -1,
ry = Math.round(my / $small.height() * native_height - $large.height() / 2) * -1,
bgp = rx + "px " + ry + "px",
px = mx - $large.width() / 2,
py = my - $large.height() / 2;
$large.css({
left: px,
top: py,
backgroundPosition: bgp
});
});
};
})(jQuery);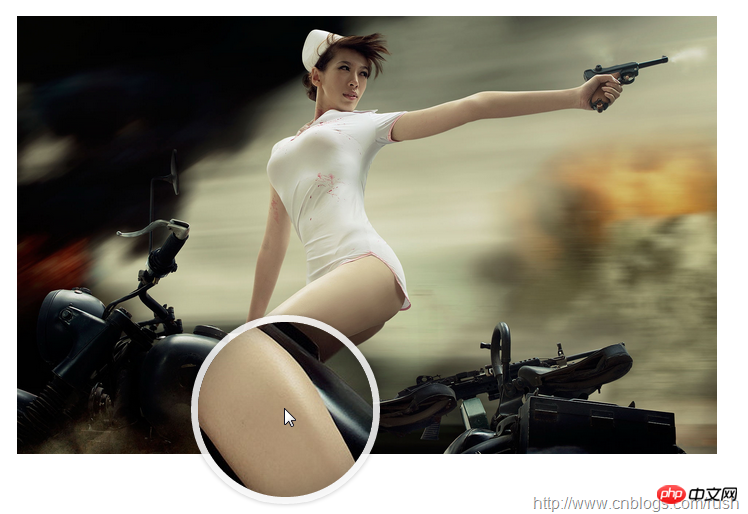
上面,我们实现了放大镜效果,当我们鼠标停留在图片上方会自动放大图片的相应部位,当然我们可以通过滚轮调整放大的比例。
위 내용은 jQuery를 사용하여 돋보기 효과를 얻는 방법의 상세 내용입니다. 자세한 내용은 PHP 중국어 웹사이트의 기타 관련 기사를 참조하세요!