Java에서 Rabbitmq를 원격으로 연결하고 호출하는 방법을 공유하시겠습니까?
- 黄舟원래의
- 2018-05-24 11:51:253256검색
RabbitMQ 원격 호출 테스트는 외부 머신 192.168.174.132에서 RabbitMQ를 사용하세요. 사용하기 전에 원격 호출을 구성해야 합니다. 작업 과정은 블로그 게시물 "RabbitMQ에 대한 원격 액세스 문제 해결"을 참조하세요.
SendTest:
package com.mq.rabbitmq.rabbitmqtest;

import java.util.Date;

import com.rabbitmq.client.ConnectionFactory;
import com.rabbitmq.client.Connection;
import com.rabbitmq.client.Channel;
import com.rabbitmq.client.QueueingConsumer;

public class ReceiveTest {
    private final static String QUEUE_NAME = "ftpAgent";
    private final static String userName = "admin";
    private final static String password = "admin";
    private final static String virtualHost = "/";
    private final static int portNumber = 5672;
    private final static String hostName = "master";
    private final static String host = "192.168.174.132";

    public static void main(String[] argv) throws java.io.IOException,
            java.lang.InterruptedException {

        ConnectionFactory factory = new ConnectionFactory();
//      factory.setHost("192.168.174.160");
        factory.setUsername(userName);
        factory.setPassword(password);
//      factory.setVirtualHost(virtualHost);
        factory.setHost(host);
        factory.setPort(portNumber);
        Connection connection = factory.newConnection();
        Channel channel = connection.createChannel();
//      channel.queueDeclare(QUEUE_NAME, false, false, false, null);

        System.out.println(" [*] Waiting for messages. To exit press CTRL+C");

        QueueingConsumer consumer = new QueueingConsumer(channel);
        channel.basicConsume(QUEUE_NAME, true, consumer);

        Date nowTime = new Date();

        while (true) {
          QueueingConsumer.Delivery delivery = consumer.nextDelivery();
          String message = new String(delivery.getBody());
          System.out.println("RecieveTime: " + nowTime);
          System.out.println(" [x] Received '" + message + "'");
        }

    }
}
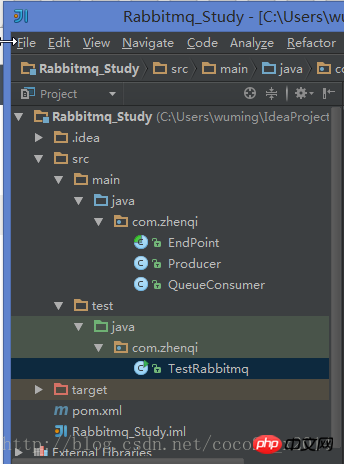
IDEA를 열고 Maven 프로젝트를 만듭니다(Java는 괜찮습니다).

pom.xml 파일은 다음과 같습니다
<project xmlns="http://maven.apache.org/POM/4.0.0" xmlns:xsi="http://www.w3.org/2001/XMLSchema-instance"
 xsi:schemaLocation="http://maven.apache.org/POM/4.0.0 http://maven.apache.org/xsd/maven-4.0.0.xsd">
 <modelVersion>4.0.0</modelVersion>

 <groupId>com.zhenqi</groupId>
 <artifactId>rabbitmq-study</artifactId>
 <version>1.0-SNAPSHOT</version>
 <packaging>jar</packaging>

 <name>rabbitmq-study</name>
 <url>http://maven.apache.org</url>

 <properties>
  <project.build.sourceEncoding>UTF-8</project.build.sourceEncoding>
 </properties>

 <dependencies>
  <dependency>
   <groupId>junit</groupId>
   <artifactId>junit</artifactId>
   <version>4.12</version>
   <scope>test</scope>
  </dependency>

  <!-- https://mvnrepository.com/artifact/com.rabbitmq/amqp-client -->
  <dependency>
   <groupId>com.rabbitmq</groupId>
   <artifactId>amqp-client</artifactId>
   <version>4.1.0</version>
   <exclusions>
    <exclusion>
     <groupId>org.slf4j</groupId>
     <artifactId>slf4j-api</artifactId>
    </exclusion>
   </exclusions>
  </dependency>

  <dependency>
   <groupId>org.slf4j</groupId>
   <artifactId>slf4j-log4j12</artifactId>
   <version>1.7.21</version>
  </dependency>

  <dependency>
   <groupId>commons-lang</groupId>
   <artifactId>commons-lang</artifactId>
   <version>2.6</version>
  </dependency>

 </dependencies>
</project>
rabbitmq에 원격으로 접속하려면 /etc/rabbitmq/rabbitmq.conf를 편집하고 다음 내용을 추가해야 합니다.
[
  {rabbit, [{tcp_listeners, [5672]}, {loopback_users, ["asdf"]}]}
 ]
관리자 역할 추가
rabbitmqctl set_user_tags openstack administrator
추상 대기열 생성 EndPoint.java
package com.zhenqi;
import com.rabbitmq.client.Channel;
import com.rabbitmq.client.Connection;
import com.rabbitmq.client.ConnectionFactory;
/**
 * Created by wuming on 2017/7/16.
 */
public abstract class EndPoint {

  protected Channel channel;
  protected Connection connection;
  protected String endPointName;

  public EndPoint(String endpointName) throws Exception {

    this.endPointName = endpointName;

    //创建一个连接工厂 connection factory
    ConnectionFactory factory = new ConnectionFactory();

    //设置rabbitmq-server服务IP地址
    factory.setHost("192.168.146.128");
    factory.setUsername("openstack");
    factory.setPassword("rabbitmq");
    factory.setPort(5672);
    factory.setVirtualHost("/");

    //得到 连接
    connection = factory.newConnection();

    //创建 channel实例
    channel = connection.createChannel();

    channel.queueDeclare(endpointName, false, false, false, null);
  }

  /**
   * 关闭channel和connection。并非必须,因为隐含是自动调用的。
   * @throws IOException
   */
  public void close() throws Exception{
    this.channel.close();
    this.connection.close();
  }
}
Producer Producer.java
생산자 클래스의 작업은 대기열
package com.zhenqi;
import org.apache.commons.lang.SerializationUtils;
import java.io.Serializable;
/**
 * Created by wuming on 2017/7/16.
 */
public class Producer extends EndPoint {

  public Producer(String endpointName) throws Exception {
    super(endpointName);
  }

  public void sendMessage(Serializable object) throws Exception {
    channel.basicPublish("",endPointName, null, SerializationUtils.serialize(object));
  }
}
Consumer QueueConsumer에 메시지를 쓰는 것입니다. java
소비자는 스레드 모드에서 실행할 수 있으며 다양한 이벤트에 대해 다양한 콜백 함수를 사용할 수 있습니다. 그 중 가장 중요한 것은 새 메시지가 도착할 때 이벤트를 처리하는 것입니다.
package com.zhenqi;

import com.rabbitmq.client.AMQP;
import com.rabbitmq.client.Consumer;
import com.rabbitmq.client.Envelope;
import com.rabbitmq.client.ShutdownSignalException;
import org.apache.commons.lang.SerializationUtils;
import org.apache.log4j.Logger;
import java.io.IOException;
import java.util.HashMap;
import java.util.Map;
/**
 * Created by wuming on 2017/7/16.
 */
public class QueueConsumer extends EndPoint implements Runnable, Consumer {

  private Logger LOG=Logger.getLogger(QueueConsumer.class);

  public QueueConsumer(String endpointName) throws Exception {
    super(endpointName);
  }

  public void handleConsumeOk(String s) {

  }

  public void handleCancelOk(String s) {

  }

  public void handleCancel(String s) throws IOException {

  }

  public void handleShutdownSignal(String s, ShutdownSignalException e) {

  }

  public void handleRecoverOk(String s) {
    LOG.info("Consumer "+s +" registered");
  }

  public void handleDelivery(String s, Envelope envelope, AMQP.BasicProperties basicProperties, byte[] bytes) throws IOException {
    Map map = (HashMap) SerializationUtils.deserialize(bytes);
    LOG.info("Message Number "+ map.get("message number") + " received.");
  }

  public void run() {
    try{
      channel.basicConsume(endPointName, true,this);
    }catch(IOException e){
      e.printStackTrace();
    }
  }
}
테스트
소비자 스레드를 실행한 다음 소비자가 가져갈 대량의 메시지 생성을 시작합니다
package com.zhenqi;

import java.util.HashMap;

/**
 * Created by wuming on 2017/7/16.
 */
public class TestRabbitmq {

  public static void main(String[] args){
    try{
      QueueConsumer consumer = new QueueConsumer("queue");
      Thread consumerThread = new Thread(consumer);
      consumerThread.start();

      Producer producer = new Producer("queue");

      for (int i = 0; i < 100000; i++){
        HashMap message = new HashMap();
        message.put("message number", i);
        producer.sendMessage(message);
        System.out.println("Message Number "+ i +" sent.");
      }
    }catch(Exception e){
      e.printStackTrace();
    }

  }
}
위 내용은 Java에서 Rabbitmq를 원격으로 연결하고 호출하는 방법을 공유하시겠습니까?의 상세 내용입니다. 자세한 내용은 PHP 중국어 웹사이트의 기타 관련 기사를 참조하세요!
성명:
본 글의 내용은 네티즌들의 자발적인 기여로 작성되었으며, 저작권은 원저작자에게 있습니다. 본 사이트는 이에 상응하는 법적 책임을 지지 않습니다. 표절이나 침해가 의심되는 콘텐츠를 발견한 경우 admin@php.cn으로 문의하세요.

