집 >데이터 베이스 >MySQL 튜토리얼 >MongoDB에서 oplog 메커니즘을 사용한 데이터 모니터링의 예를 공유하세요.
MongoDB에서 oplog 메커니즘을 사용한 데이터 모니터링의 예를 공유하세요.
- 零下一度원래의
- 2017-07-03 16:43:592143검색
MongoDB의 복제는 로그를 통해 쓰기 작업을 저장합니다. 이 로그를 oplog라고 합니다. 다음 기사에서는 준실시간 데이터 작업 모니터링을 달성하기 위해 MongoDB에서 oplog 메커니즘을 사용하는 방법에 대한 관련 정보를 주로 소개합니다. 참고로 아래를 살펴보겠습니다.
머리말
최근 MongoDB에 새로 삽입된 데이터를 실시간으로 얻어야 할 필요성이 있는데, 삽입 프로그램 자체에 이미 처리 로직이 설정되어 있어서 삽입에 직접 관련 프로그램을 작성하는 것이 불편합니다. 전통적인 데이터베이스 대부분은 이런 종류의 trigger 메커니즘과 함께 제공되지만 Mongo에는 사용할 관련 기능이 없습니다(아마 제가 너무 적게 알고 있을 수도 있습니다. 수정해 주세요). python이므로 해당 구현을 수집하고 컴파일했습니다.
1. 소개
우선, 이 요구 사항은 실제로 데이터베이스의 마스터-슬레이브 백업 메커니즘과 매우 유사하다고 생각할 수 있습니다. 슬레이브 데이터베이스가 마스터 데이터베이스를 동기화할 수 있는 이유입니다. 우리는 MongoDB를 알고 있습니다. 기성 트리거는 없지만 마스터-슬레이브 백업을 달성할 수 있으므로 마스터-슬레이브 백업 메커니즘부터 시작합니다.
2. OPLOG
먼저 마스터 모드에서 mongod 데몬을 열어야 합니다. 명령줄에서 –master를 사용하거나 구성 파일에서 마스터 키를 true로 추가하세요.
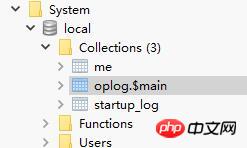
이제 Mongo의 시스템 라이브러리 로컬에서 새로운 컬렉션인 oplog를 볼 수 있습니다. 이때 oplog 정보는 If Mongo가 있는 경우 oplog.$main에 저장됩니다. 여기서는 마스터-슬레이브 동기화가 아니기 때문에 이러한 세트는 존재하지 않습니다. oplog.$main里就会存储进oplog信息,如果此时还有充当从数据库的Mongo存在,就会还有一些slaves的信息,由于我们这里并不是主从同步,所以不存在这些集合。

再来看看oplog结构:
"ts" : Timestamp(6417682881216249, 1), 时间戳
"h" : NumberLong(0), 长度
"v" : 2,
"op" : "n", 操作类型
"ns" : "", 操作的库和集合
"o2" : "_id" update条件
"o" : {} 操作值,即document
这里需要知道op的几种属性:
insert,'i'
update, 'u'
remove(delete), 'd'
cmd, 'c'
noop, 'n' 空操作
从上面的信息可以看出,我们只要不断读取到ts来做对比,然后根据op即可判断当前出现的是什么操作,相当于使用程序实现了一个从数据库的接收端。
三、CODE
在Github上找到了别人的实现方式,不过它的函数库太老旧,所以在他的基础上进行修改。
Github地址:github.com/RedBeard0531/mongo-oplog-watcher
mongo_oplog_watcher.py如下:
#!/usr/bin/python
import pymongo
import re
import time
from pprint import pprint # pretty printer
from pymongo.errors import AutoReconnect

class OplogWatcher(object):
  def init(self, db=None, collection=None, poll_time=1.0, connection=None, start_now=True):
    if collection is not None:
      if db is None:
        raise ValueError('must specify db if you specify a collection')
      self._ns_filter = db + '.' + collection
    elif db is not None:
      self._ns_filter = re.compile(r'^%s\.' % db)
    else:
      self._ns_filter = None

    self.poll_time = poll_time
    self.connection = connection or pymongo.Connection()

    if start_now:
      self.start()

  @staticmethod
  def get_id(op):
    id = None
    o2 = op.get('o2')
    if o2 is not None:
      id = o2.get('_id')

    if id is None:
      id = op['o'].get('_id')

    return id

  def start(self):
    oplog = self.connection.local['oplog.$main']
    ts = oplog.find().sort('$natural', -1)[0]['ts']
    while True:
      if self._ns_filter is None:
        filter = {}
      else:
        filter = {'ns': self._ns_filter}
      filter['ts'] = {'$gt': ts}
      try:
        cursor = oplog.find(filter, tailable=True)
        while True:
          for op in cursor:
            ts = op['ts']
            id = self.get_id(op)
            self.all_with_noop(ns=op['ns'], ts=ts, op=op['op'], id=id, raw=op)
          time.sleep(self.poll_time)
          if not cursor.alive:
            break
      except AutoReconnect:
        time.sleep(self.poll_time)

  def all_with_noop(self, ns, ts, op, id, raw):
    if op == 'n':
      self.noop(ts=ts)
    else:
      self.all(ns=ns, ts=ts, op=op, id=id, raw=raw)

  def all(self, ns, ts, op, id, raw):
    if op == 'i':
      self.insert(ns=ns, ts=ts, id=id, obj=raw['o'], raw=raw)
    elif op == 'u':
      self.update(ns=ns, ts=ts, id=id, mod=raw['o'], raw=raw)
    elif op == 'd':
      self.delete(ns=ns, ts=ts, id=id, raw=raw)
    elif op == 'c':
      self.command(ns=ns, ts=ts, cmd=raw['o'], raw=raw)
    elif op == 'db':
      self.db_declare(ns=ns, ts=ts, raw=raw)

  def noop(self, ts):
    pass

  def insert(self, ns, ts, id, obj, raw, **kw):
    pass

  def update(self, ns, ts, id, mod, raw, **kw):
    pass

  def delete(self, ns, ts, id, raw, **kw):
    pass

  def command(self, ns, ts, cmd, raw, **kw):
    pass

  def db_declare(self, ns, ts, **kw):
    pass

class OplogPrinter(OplogWatcher):
  def all(self, **kw):
    pprint (kw)
    print #newline

if name == 'main':
  OplogPrinter()
首先是实现一个数据库的初始化,设定一个延迟时间(准实时):
self.poll_time = poll_time
self.connection = connection or pymongo.MongoClient()
主要的函数是start()

oplog 구조를 살펴보겠습니다.
start() 로, 시간 비교를 구현하고 해당 필드를 처리합니다. 🎜🎜🎜🎜rrreee🎜이 시작 함수를 반복하면 여기에 해당 모니터링을 작성할 수 있습니다. all_with_noop 처리 로직에서. 🎜🎜이런 방식으로 간단한 준실시간 Mongo🎜데이터베이스 작업🎜모니터를 구현할 수 있습니다. 다음 단계에서는 새로 입력된 프로그램을 다른 작업과 연계하여 처리할 수 있습니다. 🎜위 내용은 MongoDB에서 oplog 메커니즘을 사용한 데이터 모니터링의 예를 공유하세요.의 상세 내용입니다. 자세한 내용은 PHP 중국어 웹사이트의 기타 관련 기사를 참조하세요!

