JavaScript 프로토타입 상속 예제에 대한 자세한 설명
- 零下一度원래의
- 2017-07-02 10:24:111623검색
이 글에서는 JavaScript프로토타입 상속 관련 정보를 주로 소개합니다. 관심 있는 친구들이 참고할 수 있습니다.
Java, C++와 같은 전통적인 클래스 기반 언어에서 상속의 본질은 다음과 같습니다. 기존 클래스를 확장하고 새 하위 클래스를 생성합니다.
이 유형의 언어는 클래스와 인스턴스를 엄격하게 구분하므로 상속은 실제로 유형의 확장입니다. 그러나 JavaScript에서는 프로토타입 상속을 사용하므로 Class 유형이 전혀 존재하지 않기 때문에 클래스를 직접 확장할 수 없습니다.
하지만 아직 방법이 있습니다. 먼저 Student constructor:
function Student(props) {
  this.name = props.name || 'Unnamed';
}

Student.prototype.hello = function () {
  alert('Hello, ' + this.name + '!');
}
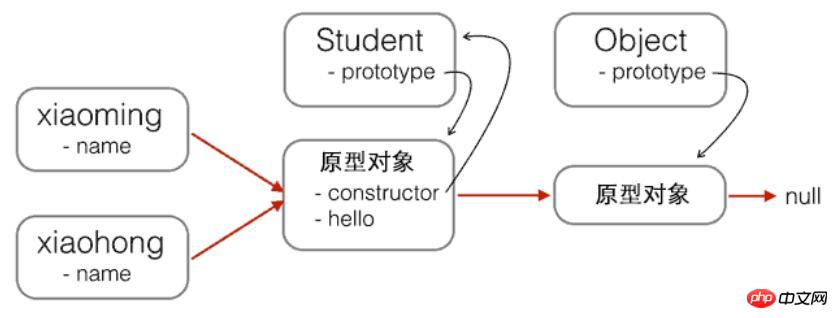
과 Student의 프로토타입 체인을 검토해 보겠습니다.

이제 이를 기반으로 하겠습니다. 학생 PrimaryStudent 를 확장하면 먼저 PrimaryStudent를 정의할 수 있습니다.
function PrimaryStudent(props) {
  // 调用Student构造函数,绑定this变量:
  Student.call(this, props);
  this.grade = props.grade || 1;
}
그러나 Student 생성자를 호출한다고 해서 Student가 상속되는 것은 아닙니다. , 초등학생 createdobject 의 프로토타입은 다음과 같습니다.
new PrimaryStudent() ----> PrimaryStudent.prototype ----> Object.prototype ----> 프로토타입 체인을 :
new PrimaryStudent() ----> PrimaryStudent.prototype ----> Object.prototype ---->
PrimaryStudent
를 기반으로 생성된 새 개체는 PrimaryStudent.prototype에서 정의한 메서드뿐만 아니라 Student.prototype에서 정의한 메서드도 호출할 수 있습니다. 가장 간단하고 투박한 방법으로 하고 싶다면: PrimaryStudent.prototype = Student.prototype;
작동하지 않습니다! 그렇다면
PrimaryStudent
와 Student가 프로토타입 객체를 공유하는데 왜 PrimaryStudent를 정의해야 할까요? 올바른 프로토타입 체인을 구현하려면 중간 개체를 사용해야 합니다. 이 중간 개체의 프로토타입은 Student.prototype을 가리켜야 합니다. 이를 달성하기 위해 Dao Ye(JSON을 발명한 Douglas)의 코드를 참조하면 중간 개체는 빈 함수 F로 구현할 수 있습니다.
// PrimaryStudent构造函数:
function PrimaryStudent(props) {
  Student.call(this, props);
  this.grade = props.grade || 1;
}

// 空函数F:
function F() {
}

// 把F的原型指向Student.prototype:
F.prototype = Student.prototype;

// 把PrimaryStudent的原型指向一个新的F对象,F对象的原型正好指向Student.prototype:
PrimaryStudent.prototype = new F();

// 把PrimaryStudent原型的构造函数修复为PrimaryStudent:
PrimaryStudent.prototype.constructor = PrimaryStudent;

// 继续在PrimaryStudent原型(就是new F()对象)上定义方法:
PrimaryStudent.prototype.getGrade = function () {
  return this.grade;
};

// 创建xiaoming:
var xiaoming = new PrimaryStudent({
  name: '小明',
  grade: 2
});
xiaoming.name; // '小明'
xiaoming.grade; // 2

// 验证原型:
xiaoming.proto === PrimaryStudent.prototype; // true
xiaoming.proto.proto === Student.prototype; // true

// 验证继承关系:
xiaoming instanceof PrimaryStudent; // true
xiaoming instanceof Student; // true
그림을 사용하여 새 프로토타입 체인을 나타냅니다.
상속 작업을 
함수로 캡슐화하면 F의 정의를 숨기고 코드를 단순화할 수도 있습니다.
function inherits(Child, Parent) {
  var F = function () {};
  F.prototype = Parent.prototype;
  Child.prototype = new F();
  Child.prototype.constructor = Child;
}
这个inherits()函数可以复用:
function Student(props) {
  this.name = props.name || 'Unnamed';
}

Student.prototype.hello = function () {
  alert('Hello, ' + this.name + '!');
}

function PrimaryStudent(props) {
  Student.call(this, props);
  this.grade = props.grade || 1;
}

// 实现原型继承链:
inherits(PrimaryStudent, Student);

// 绑定其他方法到PrimaryStudent原型:
PrimaryStudent.prototype.getGrade = function () {
  return this.grade;
};
요약
JavaScript는
2 프로토타입 체인 상속을 구현하는 것이 좋습니다. 캡슐화 상속 함수가 완료되었습니다.
3. 새 생성자의 프로토타입에 대해 계속해서 새 메서드를 정의합니다.
위 내용은 JavaScript 프로토타입 상속 예제에 대한 자세한 설명의 상세 내용입니다. 자세한 내용은 PHP 중국어 웹사이트의 기타 관련 기사를 참조하세요!

