스트럿츠2란 무엇인가요? 사용하는 방법?
- 零下一度원래의
- 2017-06-25 10:54:113043검색
1. struts2란
1. 개념
2. struts2 사용의 장점과 역사
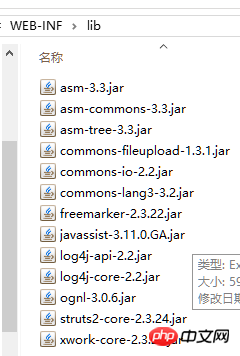
2. struts2 프레임워크 구축 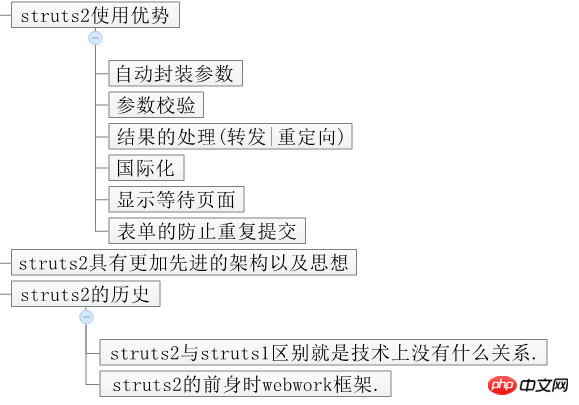
1. ㅋㅋㅋ 코드 보기
3. src/를 작성하세요 struts.xml (dtd 제약 조건을 추가하는 것을 기억하세요)
public class HelloAction {public String hello(){

        System.out.println("hello world!");        return "success";
    }
}
 4. struts2 코어 필터를 web.xml로 구성
filter - 수업이 기억나지 않으면 전체 클래스 이름을 찾으려면 strutsPre를 입력하세요


<?xml version="1.0" encoding="UTF-8"?><!DOCTYPE struts PUBLIC
    "-//Apache Software Foundation//DTD Struts Configuration 2.3//EN"
    "http://struts.apache.org/dtds/struts-2.3.dtd"><struts><package name="hello" namespace="/hello" extends="struts-default" ><action name="HelloAction" class="cn.itheima.a_hello.HelloAction" method="hello" ><result name="success" type="dispatcher" >/hello.jsp</result></action></package></struts>
코드 보기5. Test


3. struts2 액세스 프로세스 및 struts2 아키텍처

 1.struts2 아키텍처
2.Aop 프로그래밍(관점 지향)

4. 상세 구성 설명
1.struts. xml 구성 상세 설명
  <!-- struts2核心过滤器 -->
  <filter>  <filter-name>struts2</filter-name>  <filter-class>org.apache.struts2.dispatcher.ng.filter.StrutsPrepareAndExecuteFilter</filter-class>
  </filter>
  <filter-mapping>  <filter-name>struts2</filter-name>  <url-pattern>/*</url-pattern>
  </filter-mapping>
코드 보기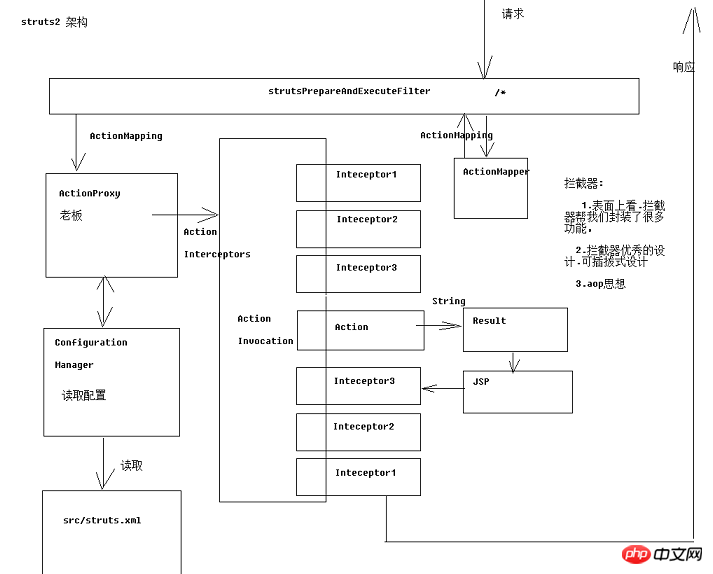
2.struts2 상수 구성
2.1 struts2 기본 상수 구성 위치 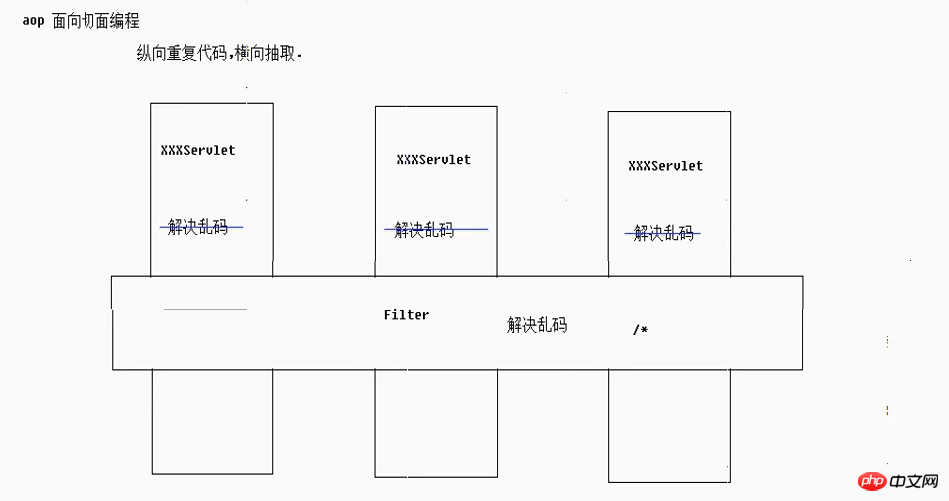
2.2 struts2 상수 구성 수정(순서대로 메서드 로드 주문) in in inings src/struts <?xml version="1.0" encoding="UTF-8"?><!DOCTYPE struts PUBLIC
"-//Apache Software Foundation//DTD Struts Configuration 2.3//EN"
"http://struts.apache.org/dtds/struts-2.3.dtd"><struts><!-- i18n:国际化. 解决post提交乱码 --><constant name="struts.i18n.encoding" value="UTF-8"></constant><!-- 指定反问action时的后缀名
http://localhost:8080/struts2_day01/hello/HelloAction.do--><constant name="struts.action.extension" value="action"></constant><!-- 指定struts2是否以开发模式运行
1.热加载主配置.(不需要重启即可生效)
2.提供更多错误信息输出,方便开发时的调试 --><constant name="struts.devMode" value="true"></constant><!-- package:将Action配置封装.就是可以在Package中配置很多action.
name属性: 给包起个名字,起到标识作用.随便起.不能其他包名重复.
namespace属性:给action的访问路径中定义一个命名空间
extends属性: 继承一个 指定包
abstract属性:包是否为抽象的; 标识性属性.标识该包不能独立运行.专门被继承 --><package name="hello" namespace="/hello" extends="struts-default" ><!-- action元素:配置action类
name属性: 决定了Action访问资源名.
class属性: action的完整类名
method属性: 指定调用Action中的哪个方法来处理请求 --><action name="HelloAction" class="cn.itheima.a_hello.HelloAction" method="hello" ><!-- result元素:结果配置
name属性: 标识结果处理的名称.与action方法的返回值对应.
type属性: 指定调用哪一个result类来处理结果,默认使用转发.
标签体:填写页面的相对路径--><result name="success" type="dispatcher" >/hello.jsp</result></action></package><!-- 引入其他struts配置文件 --><include file="cn/itheima/b_dynamic/struts.xml"></include><include file="cn/itheima/c_default/struts.xml"></include></struts>
顺序:

2.3 常量配置


    <!-- i18n:国际化. 解决post提交乱码 --><constant name="struts.i18n.encoding" value="UTF-8"></constant><!-- 指定反问action时的后缀名
        http://localhost:8080/struts2_day01/hello/HelloAction.do--><constant name="struts.action.extension" value="action"></constant><!-- 指定struts2是否以开发模式运行
            1.热加载主配置.(不需要重启即可生效)
2.提供更多错误信息输出,方便开发时的调试 --><constant name="struts.devMode" value="true"></constant>3.struts2配置的进阶
3.1动态方法调用(重要)


        <!-- 配置动态方法调用是否开启常量
                默认是关闭的,需要开启         --><constant name="struts.enable.DynamicMethodInvocation" value="true"></constant>

            <!-- 动态方法调用方式2:通配符方式
使用{1} 取出第一个星号通配的内容 --><action name="Demo1Action_*" class="cn.itheima.b_dynamic.Demo1Action" method="{1}" ><result name="success" >/hello.jsp</result></action>3.2struts2中的默认配置(了解)


<package name="default" namespace="/default" extends="struts-default" ><!-- 找不到包下的action,会使用Demo2Action作为默认action处理请求 --><default-action-ref name="Demo2Action"></default-action-ref><!-- method属性:execute --><!-- result的name属性:success --><!-- result的type属性:dispatcher 转发 --><!-- class属性:com.opensymphony.xwork2.ActionSupport --><action name="Demo2Action" ><result >/hello.jsp</result></action></package>
五、action类详解
Action类的书写方式


//方式1: 创建一个类.可以是POJO//POJO:不用继承任何父类.也不需要实现任何接口.//使struts2框架的代码侵入性更低.public class Demo3Action {

}

//方式2: 实现一个接口Action// 里面有execute方法,提供action方法的规范.// Action接口预置了一些字符串.可以在返回结果时使用.为了方便public class Demo4Action implements Action {
    @Overridepublic String execute() throws Exception {return null;
    }
}

//方式3: 继承一个类.ActionSupport// 帮我们实现了 Validateable, ValidationAware, TextProvider, LocaleProvider .//如果我们需要用到这些接口的实现时,不需要自己来实现了.public class Demo5Action  extends ActionSupport{

}
六、练习:客户列表
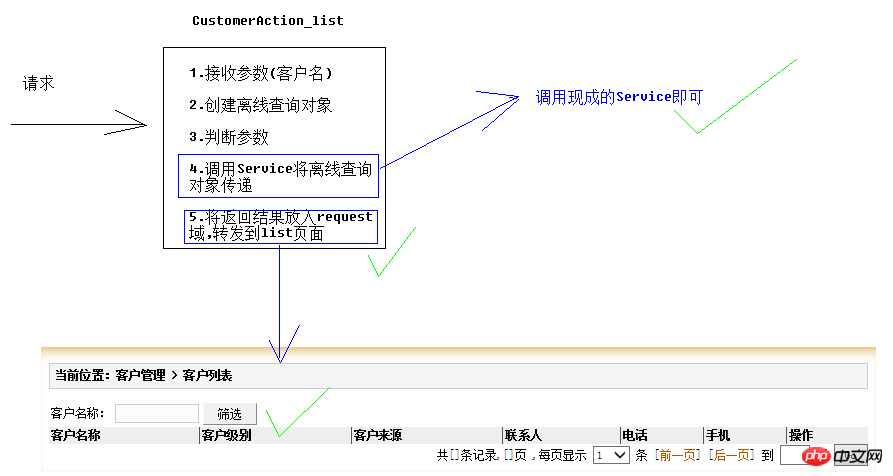
图解:
实现:


public class CustomerAction extends ActionSupport {private CustomerService cs = new CustomerServiceImpl();    public String list() throws Exception {//1 接受参数String cust_name = ServletActionContext.getRequest().getParameter("cust_name");//2 创建离线查询对象DetachedCriteria dc =DetachedCriteria.forClass(Customer.class);//3 判断参数拼装条件if(StringUtils.isNotBlank(cust_name)){
            dc.add(Restrictions.like("cust_name", "%"+cust_name+"%"));
        }//4 调用Service将离线对象传递List<Customer> list = cs.getAll(dc);//5 将返回的list放入request域.转发到list.jsp显示ServletActionContext.getRequest().setAttribute("list", list);return "list";
    }
}

    public List<Customer> getAll(DetachedCriteria dc) {
        Session session =  HibernateUtils.getCurrentSession();//打开事务Transaction tx = session.beginTransaction();

        List<Customer> list = customerDao.getAll(dc);        //关闭事务                tx.commit();return list;
    }

    public List<Customer> getAll(DetachedCriteria dc) {//1 获得sessionSession session = HibernateUtils.getCurrentSession();//2 将离线对象关联到sessionCriteria c = dc.getExecutableCriteria(session);//3 执行查询并返回return c.list();
    }
위 내용은 스트럿츠2란 무엇인가요? 사용하는 방법?의 상세 내용입니다. 자세한 내용은 PHP 중국어 웹사이트의 기타 관련 기사를 참조하세요!

