hibernate5.2의 기본 구성에 대한 자세한 설명
- 零下一度원래의
- 2017-06-25 10:59:142129검색
목표: 데이터베이스에 Student 엔터티 개체 추가
1 먼저 hibernate, slf4j, mysql의 세 가지를 다운로드해야 합니다.
2. 패키지를 가져와 새로 생성된 프로젝트로 가져옵니다. 여기에 있는 버전은 slf4j-1.7.25 아래의 hibernate-release-5.2.10 및 slf4j-nop-에 필요한 모든 파일입니다. .1.7.25.jar MySQL의 mysql-connector-java-5.1.42-bin.jar
3. src 아래에 hibernate.cfg.xml을 구성합니다(문서를 직접 복사한 후 변경하는 것이 좋습니다)
<?xml version='1.0' encoding='utf-8'?> <!DOCTYPE hibernate-configuration PUBLIC"-//Hibernate/Hibernate Configuration DTD 3.0//EN" "http://www.hibernate.org/dtd/hibernate-configuration-3.0.dtd"> <hibernate-configuration> <session-factory> <!-- Database connection settings --> <property name="connection.driver_class">com.mysql.jdbc.Driver</property> <property name="connection.url">jdbc:mysql://localhost/text02</property><property name="connection.username">root</property> <property name="connection.password">6530033197</property> <!-- JDBC connection pool (use the built-in) --> <!-- <property name="connection.pool_size">1</property> --> <!-- SQL dialect --> <property name="dialect">org.hibernate.dialect.MySQLDialect</property> <!-- Enable Hibernate's automatic session context management --> <!-- <property name="current_session_context_class">thread</property> --> <!-- Disable the second-level cache --> <property name="cache.provider_class">org.hibernate.cache.internal.NoCacheProvider</property> <!-- Echo all executed SQL to stdout --> <property name="show_sql">true</property> <!-- Drop and re-create the database schema on startup --> <!-- <property name="hbm2ddl.auto">update</property> --> <mapping resource="student/Student.hbm.xml"/> </session-factory> </hibernate-configuration>
4.mysql에서 학생 테이블을 만듭니다. 필드: ID age name
5. 자신만의 엔터티 클래스를 만들고 src 아래에 학생 패키지를 만든 다음 클래스: Student.java
package student;public class Student {private int id;private int age;private String name;public int getId() {return id;
}public void setId(int id) {this.id = id;
}public int getAge() {return age;
}public void setAge(int age) {this.age = age;
}public String getName() {return name;
}public void setName(String name) {this.name = name;
}public Student(int id, int age, String name) {super();this.id = id;this.age = age;this.name = name;
}public Student() {// TODO Auto-generated constructor stub}

}
6을 만듭니다. 해당 패키지에서 Student 다음 구성 파일: Student.hbm.xml
<?xml version="1.0"?>
<!DOCTYPE hibernate-mapping PUBLIC"-//Hibernate/Hibernate Mapping DTD 3.0//EN"
"http://www.hibernate.org/dtd/hibernate-mapping-3.0.dtd">

<hibernate-mapping package="student">
<class name="Student" table="student">
<id name="id" column="id">
</id>
<property name="name" type="string" column="name"/>
<property name="age" type="int" column="age"/>
</class>
</hibernate-mapping>
7 테스트 클래스 생성: StudentText.java
package student;import org.hibernate.Session;import org.hibernate.SessionFactory;import org.hibernate.cfg.Configuration;public class StudentText {public static void main(String[] args) {
Student stu = new Student();
stu.setId(4);
stu.setName("小明");
stu.setAge(12);

Configuration con = new Configuration();
SessionFactory sf = con.configure().buildSessionFactory();
Session s = sf.openSession();
s.beginTransaction();
s.save(stu);
s.getTransaction().commit();
s.close();
sf.close();

}

}
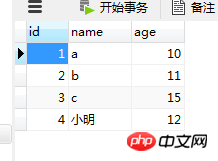
출력 결과:
위 내용은 hibernate5.2의 기본 구성에 대한 자세한 설명의 상세 내용입니다. 자세한 내용은 PHP 중국어 웹사이트의 기타 관련 기사를 참조하세요!
성명:
본 글의 내용은 네티즌들의 자발적인 기여로 작성되었으며, 저작권은 원저작자에게 있습니다. 본 사이트는 이에 상응하는 법적 책임을 지지 않습니다. 표절이나 침해가 의심되는 콘텐츠를 발견한 경우 admin@php.cn으로 문의하세요.

