


프로젝트 이름, 프로젝트 그룹 이름, 프로젝트 ID를 입력하고 클릭하여 다음 단계로 진행하세요
다음 페이지는 종속성 추가 페이지이며 필요에 따라 종속성을 추가할 수 있습니다. 또는 pom.xml 파일에 추가할 수 있습니다. 주로 포함: Core(core dependency), SQL, NOSQL
 2. 해당 디렉터리에 example.java를 생성합니다. 코드는 다음과 같습니다:
package com.example.demo;

import org.slf4j.Logger;
import org.slf4j.LoggerFactory;
import org.springframework.boot.autoconfigure.EnableAutoConfiguration;
import org.springframework.web.bind.annotation.PathVariable;
import org.springframework.web.bind.annotation.RequestMapping;
import org.springframework.web.bind.annotation.RestController;

@RestController
@EnableAutoConfiguration
public class Example {
    @RequestMapping("/")
    String home() {
        return "Hello World!";
    }

    @RequestMapping("/hello/{myName}")
    String index(@PathVariable String myName) {
        return "Hello "+myName+"!!!";
    }
}
3. 프로젝트를 실행하고 SpringbootTestApplication.java를 선택한 다음 마우스 오른쪽 버튼을 클릭하고 'SpringbootTestApplication'을 실행하거나 표시된 대로 버튼을 클릭합니다. 


🎜🎜테스트에 성공했습니다! ! ! 🎜🎜 마지막으로 참고용으로 pom.xml 코드도 첨부합니다. 🎜🎜
<?xml  version="1.0" encoding="UTF-8"?>
<project>
   <modelversion>4.0.0</modelversion>

   <groupid>com.example</groupid>
   <artifactid>springboot_test</artifactid>
   <version>0.0.1-SNAPSHOT</version>
   <packaging>jar</packaging>

   <name>springboot_test</name>
   <description>Demo project for Spring Boot</description>

   <parent>
      <groupid>org.springframework.boot</groupid>
      <artifactid>spring-boot-starter-parent</artifactid>
      <version>1.5.4.RELEASE</version>
      <relativepath></relativepath> <!-- lookup parent from repository -->
   </parent>

   <properties>
      <project.build.sourceencoding>UTF-8</project.build.sourceencoding>
      <project.reporting.outputencoding>UTF-8</project.reporting.outputencoding>
      <java.version>1.8</java.version>
   </properties>

   <dependencies>
      <!--这个就是我们刚刚勾选依赖时选择的 Web-->
      <dependency>
         <groupid>org.springframework.boot</groupid>
         <artifactid>spring-boot-starter-web</artifactid>
      </dependency>

      <dependency>
         <groupid>org.springframework.boot</groupid>
         <artifactid>spring-boot-starter-test</artifactid>
         <scope>test</scope>
      </dependency>
   </dependencies>

   <build>
      <plugins>
         <plugin>
            <groupid>org.springframework.boot</groupid>
            <artifactid>spring-boot-maven-plugin</artifactid>
         </plugin>
      </plugins>
   </build>
</project>
🎜🎜 저는 SpringBoot 아키텍처를 처음 접했습니다. 나중에 잊지 않도록 먼저 적어 두세요🎜
위 내용은 SpringBoot 시작하기 1장: Hello World의 상세 내용입니다. 자세한 내용은 PHP 중국어 웹사이트의 기타 관련 기사를 참조하세요!

 怎么使用SpringBoot+Canal实现数据库实时监控May 10, 2023 pm 06:25 PM
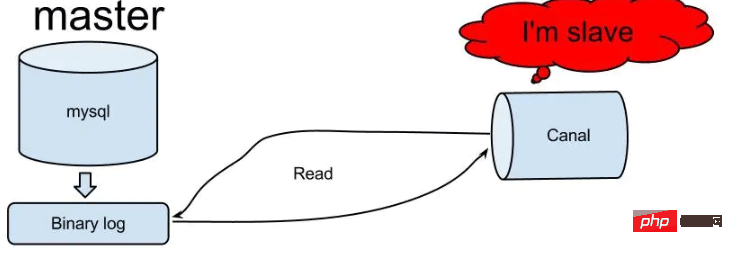
Canal工作原理Canal模拟MySQLslave的交互协议,伪装自己为MySQLslave,向MySQLmaster发送dump协议MySQLmaster收到dump请求,开始推送binarylog给slave(也就是Canal)Canal解析binarylog对象(原始为byte流)MySQL打开binlog模式在MySQL配置文件my.cnf设置如下信息:[mysqld]#打开binloglog-bin=mysql-bin#选择ROW(行)模式binlog-format=ROW#配置My
 Spring Boot怎么使用SSE方式向前端推送数据May 10, 2023 pm 05:31 PM
前言SSE简单的来说就是服务器主动向前端推送数据的一种技术,它是单向的,也就是说前端是不能向服务器发送数据的。SSE适用于消息推送,监控等只需要服务器推送数据的场景中,下面是使用SpringBoot来实现一个简单的模拟向前端推动进度数据,前端页面接受后展示进度条。服务端在SpringBoot中使用时需要注意,最好使用SpringWeb提供的SseEmitter这个类来进行操作,我在刚开始时使用网上说的将Content-Type设置为text-stream这种方式发现每次前端每次都会重新创建接。最
 SpringBoot怎么实现二维码扫码登录May 10, 2023 pm 08:25 PM
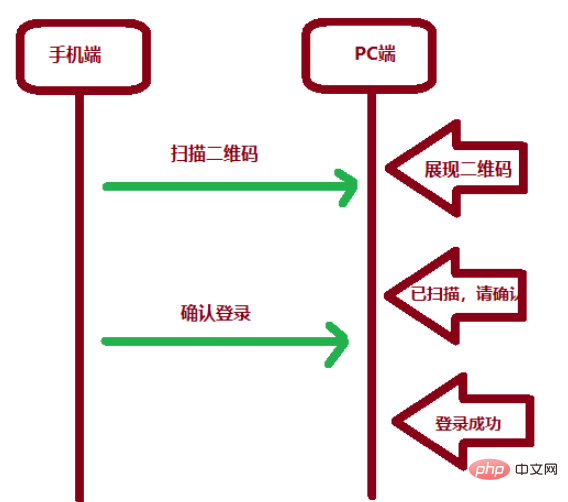
一、手机扫二维码登录的原理二维码扫码登录是一种基于OAuth3.0协议的授权登录方式。在这种方式下,应用程序不需要获取用户的用户名和密码,只需要获取用户的授权即可。二维码扫码登录主要有以下几个步骤:应用程序生成一个二维码,并将该二维码展示给用户。用户使用扫码工具扫描该二维码,并在授权页面中授权。用户授权后,应用程序会获取一个授权码。应用程序使用该授权码向授权服务器请求访问令牌。授权服务器返回一个访问令牌给应用程序。应用程序使用该访问令牌访问资源服务器。通过以上步骤,二维码扫码登录可以实现用户的快
 SpringBoot/Spring AOP默认动态代理方式是什么May 10, 2023 pm 03:52 PM
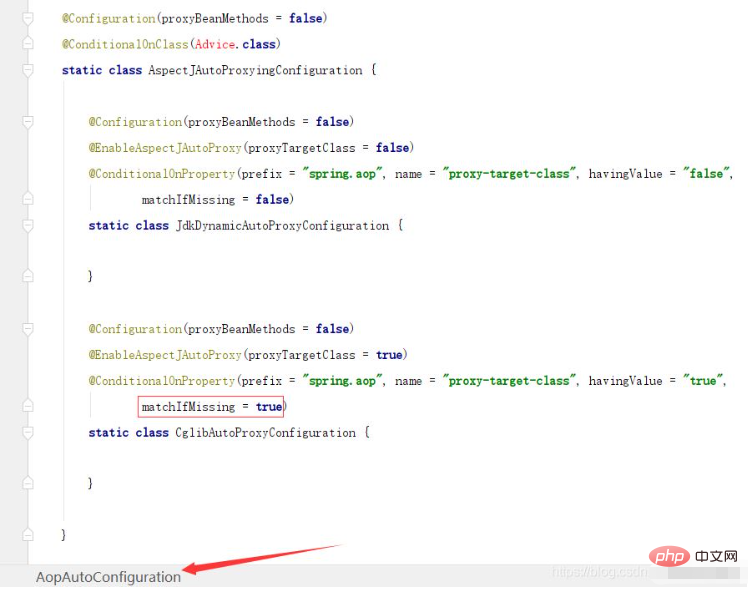
1.springboot2.x及以上版本在SpringBoot2.xAOP中会默认使用Cglib来实现,但是Spring5中默认还是使用jdk动态代理。SpringAOP默认使用JDK动态代理,如果对象没有实现接口,则使用CGLIB代理。当然,也可以强制使用CGLIB代理。在SpringBoot中,通过AopAutoConfiguration来自动装配AOP.2.Springboot1.xSpringboot1.xAOP默认还是使用JDK动态代理的3.SpringBoot2.x为何默认使用Cgl
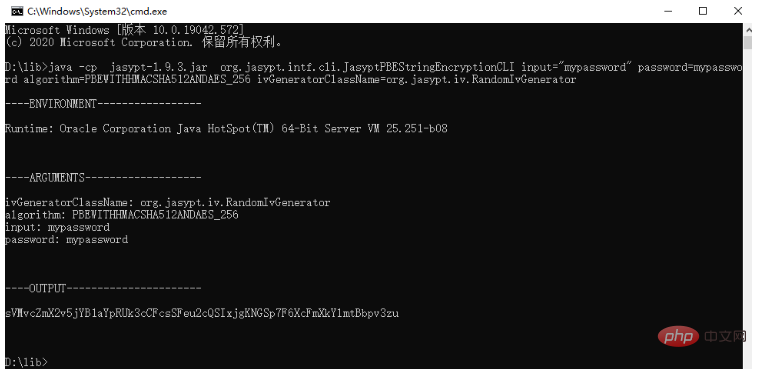 spring boot怎么对敏感信息进行加解密May 10, 2023 pm 02:46 PM
我们使用jasypt最新版本对敏感信息进行加解密。1.在项目pom文件中加入如下依赖:com.github.ulisesbocchiojasypt-spring-boot-starter3.0.32.创建加解密公用类:packagecom.myproject.common.utils;importorg.jasypt.encryption.pbe.PooledPBEStringEncryptor;importorg.jasypt.encryption.pbe.config.SimpleStrin
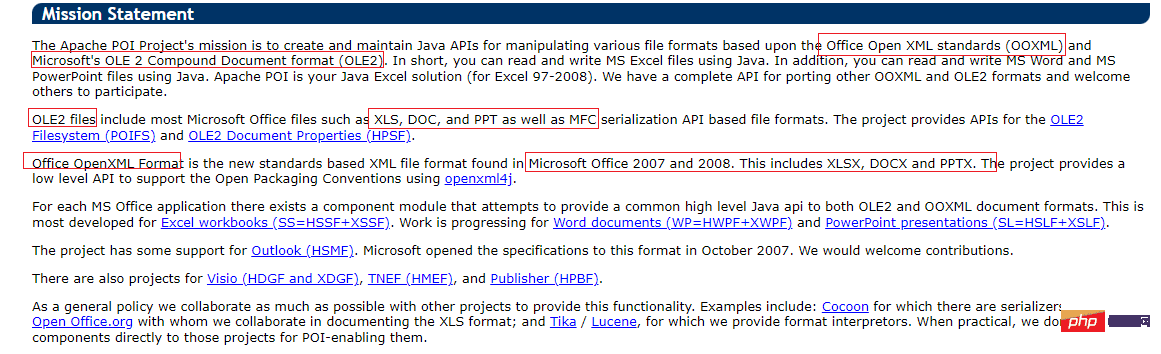 使用Java SpringBoot集成POI实现Word文档导出Apr 21, 2023 pm 12:19 PM
知识准备需要理解ApachePOI遵循的标准(OfficeOpenXML(OOXML)标准和微软的OLE2复合文档格式(OLE2)),这将对应着API的依赖包。什么是POIApachePOI是用Java编写的免费开源的跨平台的JavaAPI,ApachePOI提供API给Java程序对MicrosoftOffice格式档案读和写的功能。POI为“PoorObfuscationImplementation”的首字母缩写,意为“简洁版的模糊实现”。ApachePOI是创建和维护操作各种符合Offic
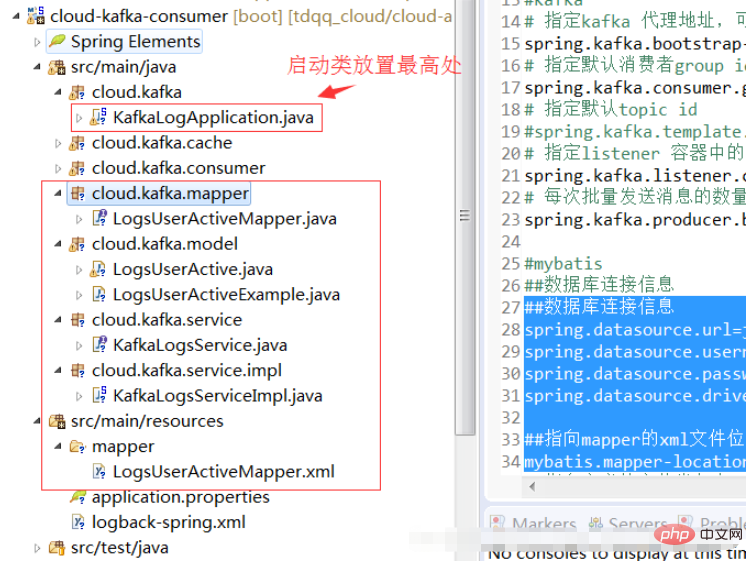 springboot怎么配置mybatis和事务管理May 10, 2023 pm 07:13 PM
一、springboot与mybatis的配置1.首先,springboot配置mybatis需要的全部依赖如下:org.springframework.bootspring-boot-starter-parent1.5.1.RELEASEorg.springframework.bootspring-boot-starter-web1.5.1.RELEASEorg.mybatis.spring.bootmybatis-spring-boot-starter1.2.0com.oracleojdbc
 springboot怎么整合shiro实现多验证登录功能May 10, 2023 pm 04:19 PM
1.首先新建一个shiroConfigshiro的配置类,代码如下:@ConfigurationpublicclassSpringShiroConfig{/***@paramrealms这儿使用接口集合是为了实现多验证登录时使用的*@return*/@BeanpublicSecurityManagersecurityManager(Collectionrealms){DefaultWebSecurityManagersManager=newDefaultWebSecurityManager();


핫 AI 도구

Undresser.AI Undress
사실적인 누드 사진을 만들기 위한 AI 기반 앱

AI Clothes Remover
사진에서 옷을 제거하는 온라인 AI 도구입니다.

Undress AI Tool
무료로 이미지를 벗다

Clothoff.io
AI 옷 제거제

AI Hentai Generator
AI Hentai를 무료로 생성하십시오.

인기 기사
뜨거운 도구

SublimeText3 영어 버전
권장 사항: Win 버전, 코드 프롬프트 지원!

SecList
SecLists는 최고의 보안 테스터의 동반자입니다. 보안 평가 시 자주 사용되는 다양한 유형의 목록을 한 곳에 모아 놓은 것입니다. SecLists는 보안 테스터에게 필요할 수 있는 모든 목록을 편리하게 제공하여 보안 테스트를 더욱 효율적이고 생산적으로 만드는 데 도움이 됩니다. 목록 유형에는 사용자 이름, 비밀번호, URL, 퍼징 페이로드, 민감한 데이터 패턴, 웹 셸 등이 포함됩니다. 테스터는 이 저장소를 새로운 테스트 시스템으로 간단히 가져올 수 있으며 필요한 모든 유형의 목록에 액세스할 수 있습니다.

Dreamweaver Mac版
시각적 웹 개발 도구

Eclipse용 SAP NetWeaver 서버 어댑터
Eclipse를 SAP NetWeaver 애플리케이션 서버와 통합합니다.

SublimeText3 Linux 새 버전
SublimeText3 Linux 최신 버전

