Anglejs의 격리 범위 및 바인딩 전략에 대한 자세한 소개
- 黄舟원래의
- 2017-06-01 09:36:511212검색
이 글은 주로 격리 범위 이해와 바인딩 전략을 자세한 설명으로 소개합니다angularjs, 관심 있는 친구들은 참고할 수 있습니다.
먼저 다음 예를 살펴보겠습니다.
<!doctype html>
<html ng-app="MyModule">
 <head>
  <meta charset="utf-8">
  <link rel="stylesheet" href="css/bootstrap-3.0.0/css/bootstrap.css" rel="external nofollow" rel="external nofollow" rel="external nofollow" rel="external nofollow" >
 </head>
 <body>
  <hello></hello>
  <hello></hello>
  <hello></hello>
  <hello></hello>
 </body>
 <script src="framework/angular-1.3.0.14/angular.js"></script>
 <script src="IsolateScope.js"></script>
</html>
우리는 찾고 있습니다. IsolateScope의 코드에서:
var myModule = angular.module("MyModule", []);
myModule.directive("hello", function() {
return {
restrict: 'AE',
template: '<p><input type="text" ng-model="userName"/>{{userName}}</p>',
replace: true
}
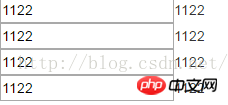
});페이지를 실행할 때 한 입력의 입력이 변경되는 한 모든 nput의 내용도 변경됩니다.

이것은 문제에 직면하게 됩니다. 우리의 지침은 단독으로 사용되므로 독립적인 범위라는 개념이 있습니다.
var myModule = angular.module("MyModule", []);
myModule.directive("hello", function() {
return {
restrict: 'AE',
scope:{},
template: '<p><input type="text" ng-model="userName"/>{{userName}}</p>',
replace: true
}
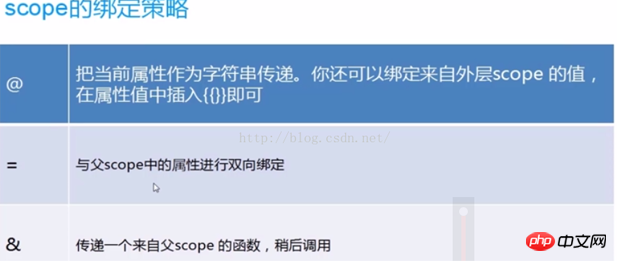
});범위를 {}로 설정하면 각 명령마다 고유한 독립적인 범위 공간이 있으므로 서로 영향을 미치지 않습니다. 하지만 Anglejs에서 가장 중요한 개념은 바인딩 전략입니다. 여기에는 다음과 같은 바인딩 전략이 있습니다.

1단계: 위의 세 가지 바인딩 방법을 사용하지 않고 원래 방식을 살펴보겠습니다.
<!doctype html>
<html ng-app="MyModule">
<head>
<meta charset="utf-8">
<link rel="stylesheet" href="css/bootstrap-3.0.0/css/bootstrap.css" rel="external nofollow" rel="external nofollow" rel="external nofollow" rel="external nofollow" >
</head>
<body>
<!--控制器MyCtrl下面有指令drink,同时指令drink还有自定义的属性flavor,其值为‘百威'-->
<p ng-controller="MyCtrl">
<drink flavor="{{ctrlFlavor}}"></drink>
</p>
</body>
<script src="framework/angular-1.3.0.14/angular.js"></script>
<script src="ScopeAt.js"></script>
</html>ScopeAt의 콘텐츠를 살펴보세요.
var myModule = angular.module("MyModule", []);
myModule.controller('MyCtrl', ['$scope', function($scope){
 $scope.ctrlFlavor="百威";
 //在控制器中$scope中设置了ctrlFlavor属性
}])
//定义了drink指令
myModule.directive("drink", function() {
 return {
  restrict:'AE',
  template:"<p>{{flavor}}</p>" ,
   link:function(scope,element,attrs){
   scope.flavor=attrs.flavor;
   //链接的时候把drink指令上的flavor属性放在scope中,然后在template中显示
   }
 }
});
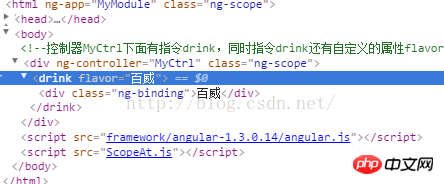
This DOM

그러나 이 메소드에서는 이 명령어의 속성 값을 얻기 위해 attrs.flavor가 필요하며, 이 속성 값은 범위 객체에 바인딩되어야 하며 마지막으로 이를 수행할 수 있습니다. {{}}이 형식으로 범위의 값을 가져옵니다!
2단계: 매번 링크 함수를 자체적으로 지정해야 하기 때문에 위의 @를 사용하여 첫 번째 메서드를 대체합니다. :
var myModule = angular.module("MyModule", []);
myModule.controller('MyCtrl', ['$scope', function($scope){
 $scope.ctrlFlavor="百威";
 //在控制器中$scope中设置了ctrlFlavor属性
}])
//定义了drink指令
myModule.directive("drink", function() {
 return {
  restrict:'AE',
  scope:{
   flavor:'@'
  },
  template:"<p>{{flavor}}</p>"
 }
});
이 방법은 음료 명령의 플레이버 속성 값을 범위 객체에 바인딩하는 것이며, 이는 자동으로 ng에 의해 바인딩됩니다. 하지만 @binding은 객체가 아닌 문자열을 바인딩합니다!
3단계:양방향데이터 바인딩에 대해 알아봅시다
<!doctype html>
<html ng-app="MyModule">
 <head>
  <meta charset="utf-8">
  <link rel="stylesheet" href="css/bootstrap-3.0.0/css/bootstrap.css" rel="external nofollow" rel="external nofollow" rel="external nofollow" rel="external nofollow" >
 </head>
 <body>
 <!--指定了控制器MyCtrl-->
  <p ng-controller="MyCtrl">
   Ctrl:
   <br>
   <!--第一个输入框输入值绑定到ctrlFlavor,也就是控制器MyCtrl对应的ctrlFlavor值中-->
   <input type="text" ng-model="ctrlFlavor">
   <br>
   Directive:
   <br>
   <!--第二个输入框还是通过指令的方式来完成的-->
   <drink flavor="ctrlFlavor"></drink>
  </p>
 </body>
 <script src="framework/angular-1.3.0.14/angular.js"></script>
 <script src="ScopeEqual.js"></script>
</html>
컨트롤러의 내용을 살펴보겠습니다
var myModule = angular.module("MyModule", []);
//指定了控制器对象
myModule.controller('MyCtrl', ['$scope', function($scope){
$scope.ctrlFlavor="百威";
}])
//指定了指令
myModule.directive("drink", function() {
return {
restrict:'AE',
scope:{
flavor:'='
//这里通过'='指定了drink指令的flavor和scope中的双向数据绑定!
},
template:'<input type="text" ng-model="flavor"/>'
}
}); 이것은 ' =' 바인딩 방법. 양방향 데이터 바인딩 전략을 구현합니다. 최종 DOM 구조가 어떤지 살펴보겠습니다.

실제로 양방향 데이터 바인딩 bb6e8512793f61e89c7392b9e58ff1dd10181768d89159b14dd1703c78b4f259 바인딩을 잘 이해해야 합니다(명령어와 컨트롤러 간의 양방향 데이터 바인딩)
4단계: 우리는 컨트롤러 상위 메소드에 대한 호출을 완료하기 위해 & 바인딩 전략을 사용합니다.
<!doctype html>
<html ng-app="MyModule">
 <head>
  <meta charset="utf-8">
  <link rel="stylesheet" href="css/bootstrap-3.0.0/css/bootstrap.css" rel="external nofollow" rel="external nofollow" rel="external nofollow" rel="external nofollow" >
 </head>
 <body>
  <p ng-controller="MyCtrl">
  <!--接下来是三个自定义的指令greeting指令-->
   <greeting greet="sayHello(name)"></greeting>
   <greeting greet="sayHello(name)"></greeting>
   <greeting greet="sayHello(name)"></greeting>
  </p>
 </body>
 <script src="framework/angular-1.3.0.14/angular.js"></script>
 <script src="ScopeAnd.js"></script>
</html>
세 가지 명령어 인사말이 정의되어 있으며, 각 명령어는 모두 컨트롤러에서 sayHello 메소드를 호출해야 합니다. (Angularjs에서 컨트롤러와 명령 간의 상호 작용을 구현하는 방법은 속성을 정의하여 컨트롤러와 명령 간의 상호 작용을 달성할 수 있다고 지적하지만 여기서는 동일한 작업을 수행할 수 있습니다. 간단한 & 함수 사용) 및 다양한 매개변수 이름 값을 전달합니다.
var myModule = angular.module("MyModule", []);
//为控制器指定了一个sayHello方法,同时为这个方法可以传入一个参数
myModule.controller('MyCtrl', ['$scope', function($scope){
$scope.sayHello=function(name){
alert("Hello "+name);
}
}])
myModule.directive("greeting", function() {
return {
restrict:'AE',
scope:{
greet:'&'//传递一个来自父scope的函数用于稍后调用,获取greet参数,得到sayHello(name)函数
},
//在template中我们在ng-click中指定一个参数,其指定方式为调用controller中greet方法,传入的参数name值为username
//也就是ng-model='userName'中指定的参数
template:'<input type="text" ng-model="userName" /><br/>'+
'<button class="btn btn-default" ng-click="greet({name:userName})">Greeting</button><br/>'
}
});컨트롤러와 컨트롤러 간의 통신을 완료하기 위해 명령어의 속성을 지정하는 기존 방법을 사용하는 대신 &를 통해 상위 작업 메서드에 대한 호출을 완료할 수 있습니다. 지시!
위 내용은 Anglejs의 격리 범위 및 바인딩 전략에 대한 자세한 소개의 상세 내용입니다. 자세한 내용은 PHP 중국어 웹사이트의 기타 관련 기사를 참조하세요!

