


이 글에서는 WebApi2 파일과 이미지 업로드 및 다운로드 기능을 주로 소개합니다. 필요한 친구들은
Asp.Net Framework webapi2 파일 업로드 및 다운로드 프론트 엔드 인터페이스는 Ajax 방식으로 실행됩니다
1. 프로젝트 구조
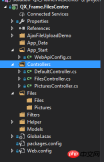
1.App_Start는 도메인 간 문제로 인해 제출할 수 없는 요청을 방지하기 위해 도메인 간 액세스로 구성됩니다. 구체적인 크로스 도메인 구성 방법은 다음과 같으니, 아시는 분은 직접 건너뛰시기 바랍니다.
교차 도메인 구성: NewGet은 Microsofg.AspNet.Cors

dll을 설치합니다. 그런 다음 App_Start 폴더 아래의 WebApiConfig.cs에 교차 도메인 구성 코드를 작성합니다.
public static class WebApiConfig
  {
    public static void Register(HttpConfiguration config)
    {
      // Web API configuration and services
      // Web API routes
      config.MapHttpAttributeRoutes();
      // Web API configuration and services
      //跨域配置 //need reference from nuget
      config.EnableCors(new EnableCorsAttribute("*", "*", "*"));
      config.Routes.MapHttpRoute(
        name: "DefaultApi",
        routeTemplate: "api/{controller}/{id}",
        defaults: new { id = RouteParameter.Optional }
      );
      //if config the global filter input there need not write the attributes
      //config.Filters.Add(new App.WebApi.Filters.ExceptionAttribute_DG());
    }
  }
크로스도메인이 완료되더라도 직접 테스트해보시기 바랍니다.
2. PicturesController.cs와 FilesController.cs라는 두 개의 새로운 컨트롤러를 만듭니다. 물론 여기서는 사진과 파일이 다른 방식으로 처리됩니다. 다른 방법을 찾았습니다. 여기에 더 좋은 방법이 있는 사람이 있으면 알려 주시기 바랍니다.
2. 프로젝트 코드
1. 먼저 이미지 업로드 및 다운로드 컨트롤러 인터페이스에 대해 이야기하겠습니다. 여기서는 실제로 말할 것이 없습니다. 파일을 가져오려면 매개변수가 전체 이름입니다. 파일을 업로드하려면 코드를 직접 입력하세요.
using QX_Frame.App.WebApi;
using QX_Frame.FilesCenter.Helper;
using QX_Frame.Helper_DG;
using QX_Frame.Helper_DG.Extends;
using System;
using System.Collections.Generic;
using System.Diagnostics;
using System.IO;
using System.Linq;
using System.Net;
using System.Net.Http;
using System.Net.Http.Headers;
using System.Text;
using System.Threading.Tasks;
using System.Web.Http;
/**
* author:qixiao
* create:2017-5-26 16:54:46
* */
namespace QX_Frame.FilesCenter.Controllers
{
public class PicturesController : WebApiControllerBase
{
//Get : api/Pictures
public HttpResponseMessage Get(string fileName)
{
HttpResponseMessage result = null;
DirectoryInfo directoryInfo = new DirectoryInfo(IO_Helper_DG.RootPath_MVC + @"Files/Pictures");
FileInfo foundFileInfo = directoryInfo.GetFiles().Where(x => x.Name == fileName).FirstOrDefault();
if (foundFileInfo != null)
{
FileStream fs = new FileStream(foundFileInfo.FullName, FileMode.Open);
result = new HttpResponseMessage(HttpStatusCode.OK);
result.Content = new StreamContent(fs);
result.Content.Headers.ContentType = new System.Net.Http.Headers.MediaTypeHeaderValue("application/octet-stream");
result.Content.Headers.ContentDisposition = new ContentDispositionHeaderValue("attachment");
result.Content.Headers.ContentDisposition.FileName = foundFileInfo.Name;
}
else
{
result = new HttpResponseMessage(HttpStatusCode.NotFound);
}
return result;
}
//POST : api/Pictures
public async Task<IHttpActionResult> Post()
{
if (!Request.Content.IsMimeMultipartContent())
{
throw new Exception_DG("unsupported media type", 2005);
}
string root = IO_Helper_DG.RootPath_MVC;
IO_Helper_DG.CreateDirectoryIfNotExist(root + "/temp");
var provider = new MultipartFormDataStreamProvider(root + "/temp");
// Read the form data.
await Request.Content.ReadAsMultipartAsync(provider);
List<string> fileNameList = new List<string>();
StringBuilder sb = new StringBuilder();
long fileTotalSize = 0;
int fileIndex = 1;
// This illustrates how to get the file names.
foreach (MultipartFileData file in provider.FileData)
{
//new folder
string newRoot = root + @"Files/Pictures";
IO_Helper_DG.CreateDirectoryIfNotExist(newRoot);
if (File.Exists(file.LocalFileName))
{
//new fileName
string fileName = file.Headers.ContentDisposition.FileName.Substring(1, file.Headers.ContentDisposition.FileName.Length - 2);
string newFileName = Guid.NewGuid() + "." + fileName.Split('.')[1];
string newFullFileName = newRoot + "/" + newFileName;
fileNameList.Add($"Files/Pictures/{newFileName}");
FileInfo fileInfo = new FileInfo(file.LocalFileName);
fileTotalSize += fileInfo.Length;
sb.Append($" #{fileIndex} Uploaded file: {newFileName} ({ fileInfo.Length} bytes)");
fileIndex++;
File.Move(file.LocalFileName, newFullFileName);
Trace.WriteLine("1 file copied , filePath=" + newFullFileName);
}
}
return Json(Return_Helper.Success_Msg_Data_DCount_HttpCode($"{fileNameList.Count} file(s) /{fileTotalSize} bytes uploaded successfully! Details -> {sb.ToString()}", fileNameList, fileNameList.Count));
}
}
}도움말 클래스에 일부 코드가 작성되어 있을 수 있습니다. 실제로는 폴더가 없다고 판단되면 서버 루트 경로를 얻어서 디렉토리를 생성하는 것뿐입니다.
 public static string RootPath_MVC
     {
       get { return System.Web.HttpContext.Current.Server.MapPath("~"); }
     }
//create Directory
    public static bool CreateDirectoryIfNotExist(string filePath)
    {
      if (!Directory.Exists(filePath))
      {
        Directory.CreateDirectory(filePath);
      }
      return true;
    }
2. 파일 업로드 및 다운로드 인터페이스는 사진과 유사합니다.
using QX_Frame.App.WebApi;
using QX_Frame.FilesCenter.Helper;
using QX_Frame.Helper_DG;
using System.Collections.Generic;
using System.Diagnostics;
using System.IO;
using System.Linq;
using System.Net;
using System.Net.Http;
using System.Net.Http.Headers;
using System.Text;
using System.Threading.Tasks;
using System.Web;
using System.Web.Http;
/**
 * author:qixiao
 * create:2017-5-26 16:54:46
 * */
namespace QX_Frame.FilesCenter.Controllers
{
  public class FilesController : WebApiControllerBase
  {
    //Get : api/Files
    public HttpResponseMessage Get(string fileName)
    {
      HttpResponseMessage result = null;
      DirectoryInfo directoryInfo = new DirectoryInfo(IO_Helper_DG.RootPath_MVC + @"Files/Files");
      FileInfo foundFileInfo = directoryInfo.GetFiles().Where(x => x.Name == fileName).FirstOrDefault();
      if (foundFileInfo != null)
      {
        FileStream fs = new FileStream(foundFileInfo.FullName, FileMode.Open);
        result = new HttpResponseMessage(HttpStatusCode.OK);
        result.Content = new StreamContent(fs);
        result.Content.Headers.ContentType = new System.Net.Http.Headers.MediaTypeHeaderValue("application/octet-stream");
        result.Content.Headers.ContentDisposition = new ContentDispositionHeaderValue("attachment");
        result.Content.Headers.ContentDisposition.FileName = foundFileInfo.Name;
      }
      else
      {
        result = new HttpResponseMessage(HttpStatusCode.NotFound);
      }
      return result;
    }
    //POST : api/Files
    public async Task<IHttpActionResult> Post()
    {
      //get server root physical path
      string root = IO_Helper_DG.RootPath_MVC;
      //new folder
      string newRoot = root + @"Files/Files/";
      //check path is exist if not create it
      IO_Helper_DG.CreateDirectoryIfNotExist(newRoot);
      List<string> fileNameList = new List<string>();
      StringBuilder sb = new StringBuilder();
      long fileTotalSize = 0;
      int fileIndex = 1;
      //get files from request
      HttpFileCollection files = HttpContext.Current.Request.Files;
      await Task.Run(() =>
      {
        foreach (var f in files.AllKeys)
        {
          HttpPostedFile file = files[f];
          if (!string.IsNullOrEmpty(file.FileName))
          {
            string fileLocalFullName = newRoot + file.FileName;
            file.SaveAs(fileLocalFullName);
            fileNameList.Add($"Files/Files/{file.FileName}");
            FileInfo fileInfo = new FileInfo(fileLocalFullName);
            fileTotalSize += fileInfo.Length;
            sb.Append($" #{fileIndex} Uploaded file: {file.FileName} ({ fileInfo.Length} bytes)");
            fileIndex++;
            Trace.WriteLine("1 file copied , filePath=" + fileLocalFullName);
          }
        }
      });
      return Json(Return_Helper.Success_Msg_Data_DCount_HttpCode($"{fileNameList.Count} file(s) /{fileTotalSize} bytes uploaded successfully!   Details -> {sb.ToString()}", fileNameList, fileNameList.Count));
    }
  }
}
위의 두 컨트롤러 코드를 구현한 후 연결을 디버그하기 위한 프런트엔드 코드가 필요합니다. 코드는 다음과 같습니다.
<!doctype>
<head>
<script src="jquery-3.2.0.min.js"></script>
<!--<script src="jquery-1.11.1.js"></script>-->
<!--<script src="ajaxfileupload.js"></script>-->
<script>
$(document).ready(function () {
var appDomain = "http://localhost:3997/";
$("#btn_fileUpload").click(function () {
/**
* 用ajax方式上传文件 -----------
* */
//-------asp.net webapi fileUpload
//
var formData = new FormData($("#uploadForm")[0]);
$.ajax({
url: appDomain + 'api/Files',
type: 'POST',
data: formData,
async: false,
cache: false,
contentType: false,
processData: false,
success: function (data) {
console.log(JSON.stringify(data));
},
error: function (data) {
console.log(JSON.stringify(data));
}
});
//----end asp.net webapi fileUpload
//----.net core webapi fileUpload
// var fileUpload = $("#files").get(0);
// var files = fileUpload.files;
// var data = new FormData();
// for (var i = 0; i < files.length; i++) {
// data.append(files[i].name, files[i]);
// }
// $.ajax({
// type: "POST",
// url: appDomain+'api/Files',
// contentType: false,
// processData: false,
// data: data,
// success: function (data) {
// console.log(JSON.stringify(data));
// },
// error: function () {
// console.log(JSON.stringify(data));
// }
// });
//--------end net core webapi fileUpload
/**
* ajaxfileupload.js 方式上传文件
* */
// $.ajaxFileUpload({
// type: 'post',
// url: appDomain + 'api/Files',
// secureuri: false,
// fileElementId: 'files',
// success: function (data) {
// console.log(JSON.stringify(data));
// },
// error: function () {
// console.log(JSON.stringify(data));
// }
// });
});
//end click
})
</script>
</head>
<title></title>
<body>
<article>
<header>
<h2 id="article-form">article-form</h2>
</header>
<p>
<form action="/" method="post" id="uploadForm" enctype="multipart/form-data">
<input type="file" id="files" name="files" placeholder="file" multiple>file-multiple属性可以选择多项<br><br>
<input type="button" id="btn_fileUpload" value="fileUpload">
</form>
</p>
</article>
</body>이 시점에서 모든 기능이 구현되었으므로 테스트해 보겠습니다.

파일이 성공적으로 업로드되어 예상 형식으로 반환된 것을 볼 수 있습니다!
다음으로 단일 이미지 업로드를 테스트합니다.>

그런 다음 반환된 주소를 눌러 이미지 주소에 액세스합니다.

부담감이 전혀 없다는 걸 알게 됐어요!
아래에서 여러 이미지 업로드 테스트 ->

완벽해요~
이제 WebApi2 파일 및 이미지 업로드 및 다운로드 기능을 모두 구현했습니다.
여기서 Web.config 구성 업로드 파일이 지원하는 전체 크기에 주의해야 합니다. 여기서 제가 구성한 것은 최대 지원 파일 크기가 1MB라는 것입니다
<requestFiltering>
  <requestLimits maxAllowedContentLength="1048576" />
</requestFiltering>
  <system.webServer>
   <handlers>
    <remove name="ExtensionlessUrlHandler-Integrated-4.0" />
    <remove name="OPTIONSVerbHandler" />
    <remove name="TRACEVerbHandler" />
    <add name="ExtensionlessUrlHandler-Integrated-4.0" path="*." verb="*" type="System.Web.Handlers.TransferRequestHandler" preCondition="integratedMode,runtimeVersionv4.0" />
   </handlers>
   <security>
   <requestFiltering>
    <requestLimits maxAllowedContentLength="1048576" /><!--1MB-->
    </requestFiltering>
  </security>
  </system.webServer>
[관련 권장 사항]
2.ASP.NET MVC에 대한 자세한 소개--Routing
3.ASP.NET MVC에 대한 자세한 소개--Controller
4. MVC--보기위 내용은 WebApi2 파일 및 이미지 공유 업로드 및 다운로드 기능 예시의 상세 내용입니다. 자세한 내용은 PHP 중국어 웹사이트의 기타 관련 기사를 참조하세요!

 .NET 내의 C# 코드 : 프로그래밍 프로세스 탐색Apr 12, 2025 am 12:02 AM
.NET에서 C#의 프로그래밍 프로세스에는 다음 단계가 포함됩니다. 1) C# 코드 작성, 2) 중간 언어 (IL)로 컴파일하고 .NET 런타임 (CLR)에 의해 실행됩니다. .NET에서 C#의 장점은 현대적인 구문, 강력한 유형 시스템 및 .NET 프레임 워크와의 긴밀한 통합으로 데스크탑 응용 프로그램에서 웹 서비스에 이르기까지 다양한 개발 시나리오에 적합합니다.
 C# .NET : 핵심 개념 탐색 및 프로그래밍 기초Apr 10, 2025 am 09:32 AM
C#은 Microsoft가 개발 한 최신 객체 지향 프로그래밍 언어이며 .NET 프레임 워크의 일부로 개발되었습니다. 1.C#은 캡슐화, 상속 및 다형성을 포함한 객체 지향 프로그래밍 (OOP)을 지원합니다. 2. C#의 비동기 프로그래밍은 응용 프로그램 응답 성을 향상시키기 위해 비동기 및 키워드를 기다리는 키워드를 통해 구현됩니다. 3. LINQ를 사용하여 데이터 컬렉션을 간결하게 처리하십시오. 4. 일반적인 오류에는 NULL 참조 예외 및 인덱스 외 예외가 포함됩니다. 디버깅 기술에는 디버거 사용 및 예외 처리가 포함됩니다. 5. 성능 최적화에는 StringBuilder 사용 및 불필요한 포장 및 Unboxing을 피하는 것이 포함됩니다.
 C# .NET 응용 프로그램 테스트 : 장치, 통합 및 엔드 투 엔드 테스트Apr 09, 2025 am 12:04 AM
C#.NET 애플리케이션에 대한 테스트 전략에는 단위 테스트, 통합 테스트 및 엔드 투 엔드 테스트가 포함됩니다. 1. 단위 테스트를 통해 MSTEST, NUNIT 또는 XUNIT 프레임 워크를 사용하여 코드의 최소 단위가 독립적으로 작동합니다. 2. 통합 테스트는 일반적으로 사용되는 시뮬레이션 된 데이터 및 외부 서비스를 결합한 여러 장치의 기능을 확인합니다. 3. 엔드 투 엔드 테스트는 사용자의 완전한 작동 프로세스를 시뮬레이션하며 셀레늄은 일반적으로 자동 테스트에 사용됩니다.
 Advanced C# .NET 튜토리얼 : ACE 귀하의 다음 선임 개발자 인터뷰Apr 08, 2025 am 12:06 AM
C# 수석 개발자와의 인터뷰에는 비동기 프로그래밍, LINQ 및 .NET 프레임 워크의 내부 작업 원리와 같은 핵심 지식을 마스터하는 것이 필요합니다. 1. 비동기 프로그래밍은 비동기를 통해 작업을 단순화하고 응용 프로그램 응답 성을 향상시키기 위해 기다리고 있습니다. 2.linq는 SQL 스타일로 데이터를 운영하고 성능에주의를 기울입니다. 3. Net Framework의 CLR은 메모리를 관리하며 가비지 컬렉션은주의해서 사용해야합니다.
 C# .NET 인터뷰 질문 및 답변 : 전문 지식 레벨 업Apr 07, 2025 am 12:01 AM
C#.NET 인터뷰 질문 및 답변에는 기본 지식, 핵심 개념 및 고급 사용이 포함됩니다. 1) 기본 지식 : C#은 Microsoft가 개발 한 객체 지향 언어이며 주로 .NET 프레임 워크에 사용됩니다. 2) 핵심 개념 : 위임 및 이벤트는 동적 바인딩 방법을 허용하고 LINQ는 강력한 쿼리 기능을 제공합니다. 3) 고급 사용 : 비동기 프로그래밍은 응답 성을 향상시키고 표현 트리는 동적 코드 구성에 사용됩니다.
 C# .NET을 사용하여 마이크로 서비스 구축 : 건축가를위한 실용 가이드Apr 06, 2025 am 12:08 AM
C#.net은 강력한 생태계와 풍부한 지원으로 인해 마이크로 서비스를 구축하는 데 인기있는 선택입니다. 1) ASP.NETCORE를 사용하여 RESTFULAPI를 작성하여 주문 생성 및 쿼리를 처리하십시오. 2) GRPC를 사용하여 마이크로 서비스 간의 효율적인 통신을 달성하고 주문 서비스를 정의하고 구현하십시오. 3) Docker Containerized 마이크로 서비스를 통해 배포 및 관리를 단순화합니다.
 C# .NET 보안 모범 사례 : 일반적인 취약점 방지Apr 05, 2025 am 12:01 AM
C# 및 .NET의 보안 모범 사례에는 입력 확인, 출력 인코딩, 예외 처리, 인증 및 인증이 포함됩니다. 1) 일반 표현식 또는 내장 방법을 사용하여 악성 데이터가 시스템에 들어가는 것을 방지하기 위해 입력을 확인하십시오. 2) XSS 공격을 방지하기 위해 출력 인코딩 httputility.htmlencode 메서드를 사용하십시오. 3) 예외 처리는 정보 유출을 피하고 오류를 기록하지만 자세한 정보를 사용자에게 반환하지는 않습니다. 4) ASP.NETIDENITY 및 CAMPLES 기반 승인을 사용하여 신청서를 무단 액세스로부터 보호합니다.
 C 언어 : 무엇을 의미 하는가Apr 03, 2025 pm 07:24 PM
C 언어의 결장의 의미 ( ':') : 조건부 명세서 : 조건부 표현 및 명령문 분리 블록 루프 문 : 초기화, 조건부 및 증분 표현식 매크로 정의 분리 : 매크로 이름 및 매크로 값 단일 라인 주석 설명 : 콜론에서 라인으로의 내용을 주석 차원으로 표현


핫 AI 도구

Undresser.AI Undress
사실적인 누드 사진을 만들기 위한 AI 기반 앱

AI Clothes Remover
사진에서 옷을 제거하는 온라인 AI 도구입니다.

Undress AI Tool
무료로 이미지를 벗다

Clothoff.io
AI 옷 제거제

AI Hentai Generator
AI Hentai를 무료로 생성하십시오.

인기 기사
뜨거운 도구

Eclipse용 SAP NetWeaver 서버 어댑터
Eclipse를 SAP NetWeaver 애플리케이션 서버와 통합합니다.

PhpStorm 맥 버전
최신(2018.2.1) 전문 PHP 통합 개발 도구

안전한 시험 브라우저
안전한 시험 브라우저는 온라인 시험을 안전하게 치르기 위한 보안 브라우저 환경입니다. 이 소프트웨어는 모든 컴퓨터를 안전한 워크스테이션으로 바꿔줍니다. 이는 모든 유틸리티에 대한 액세스를 제어하고 학생들이 승인되지 않은 리소스를 사용하는 것을 방지합니다.

Dreamweaver Mac版
시각적 웹 개발 도구

MinGW - Windows용 미니멀리스트 GNU
이 프로젝트는 osdn.net/projects/mingw로 마이그레이션되는 중입니다. 계속해서 그곳에서 우리를 팔로우할 수 있습니다. MinGW: GCC(GNU Compiler Collection)의 기본 Windows 포트로, 기본 Windows 애플리케이션을 구축하기 위한 무료 배포 가능 가져오기 라이브러리 및 헤더 파일로 C99 기능을 지원하는 MSVC 런타임에 대한 확장이 포함되어 있습니다. 모든 MinGW 소프트웨어는 64비트 Windows 플랫폼에서 실행될 수 있습니다.

