
Spring Bean 확장 인터페이스 메소드 소개

- Y2J원래의
- 2017-05-11 09:55:001746검색
이 글에서는 주로 자주 사용되는 Spring Bean 확장 인터페이스와 간단한 사용법을 소개하며 참고할만한 가치가 있습니다. 아래 에디터로 살펴보자
서문
Spring은 거의 모든 기업 수준의 Java 프로젝트에서 Spring을 사용하는 매우 강력한 프레임워크라고 할 수 있습니다. , Bean은 Spring 프레임워크의 핵심입니다.
Spring 프레임워크는 많은 디자인 패턴을 사용합니다. 전체적으로 해당 디자인은 OCP----열기 및 닫기 원칙, 즉
1을 엄격하게 따릅니다. .수정이 가능하지 않은지 확인하세요. 즉, Spring의 전체 작업 프로세스를 외부에서 수정할 수 없습니다.
2. 확장이 가능합니다. 즉, 에서 상속하고 많은 기능을 구현할 수 있습니다. Spring에서 제공하는 추상 클래스 인터페이스를 사용하여 클래스 로딩의 동작 변경
Spring 소스 코드를 읽는 것이 도움이 됩니다. 각 수업마다 세부적으로 전반적인 과정을 정리할 수 있습니다.) 개인에게 레벨의 향상은 매우 도움이 되며, 동시에 직장에서 흔하지 않은 Spring 문제를 발견하고 해결할 수 있습니다. 그러나 이 글의 목적은 Spring 프로세스를 정리하는 것이 아니라, Spring이 개발자에게 제공하는 다양한 기능을 더 잘 활용할 수 있도록 일반적으로 사용되는 몇 가지 Spring Bean 도구 클래스를 소개하는 것입니다. 시작되었습니다.InitialingBean과 DisposableBean
InitialingBean은 PropertiesSet() 이후에 고유한 메서드를 제공하는 인터페이스입니다. DisposableBean은 독특한 destroy() 메소드를 제공하는 인터페이스이기도 합니다. 이 두 인터페이스는 유사한 기능을 가진 세트이므로 함께 배치됩니다. 전자는 이름에서 알 수 있듯이 afterPropertiesSet() 메소드를 호출하여 Bean 속성 이후에 일부 초기화 작업을 수행합니다. > Bean라이프 사이클이 끝나기 전에 일부 마무리 작업을 수행하기 위해 destroy() 메소드가 호출됩니다. afterPropertiesSet() 메소드를 언제 호출해야 하는지 명확하게 알기 위해 예를 살펴보겠습니다. 속성을 추가하고 속성 set 메소드를 제공하고 set 메소드에 일부 내용을 인쇄합니다. /**
* @author 五月的仓颉 http://www.cnblogs.com/xrq730/p/5721366.html
*/
public class LifecycleBean implements InitializingBean, DisposableBean
{
@SuppressWarnings("unused")
private String lifeCycleBeanName;
public void setLifeCycleBeanName(String lifeCycleBeanName)
{
System.out.println("Enter LifecycleBean.setLifeCycleBeanName(), lifeCycleBeanName = " + lifeCycleBeanName);
this.lifeCycleBeanName = lifeCycleBeanName;
}
public void destroy() throws Exception
{
System.out.println("Enter LifecycleBean.destroy()");
}
public void afterPropertiesSet() throws Exception
{
System.out.println("Enter LifecycleBean.afterPropertiesSet()");
}
public void beanStart()
{
System.out.println("Enter LifecycleBean.beanStart()");
}
public void beanEnd()
{
System.out.println("Enter LifecycleBean.beanEnd()");
}
} spring.xml:
<?xml version="1.0" encoding="UTF-8"?>
<beans xmlns="http://www.springframework.org/schema/beans"
  xmlns:xsi="http://www.w3.org/2001/XMLSchema-instance"
  xsi:schemaLocation="http://www.springframework.org/schema/beans
  http://www.springframework.org/schema/beans/spring-beans-4.1.xsd">

  <bean id="lifeCycleBean" class="org.xrq.bean.lifecycle.LifecycleBean">
    <property name="lifeCycleBeanName" value="lifeCycleBean" />
  </bean>
</beans>
Spring 컨테이너를 시작하면 LifecycleBean의 실행 결과는 다음과 같습니다.
Enter LifecycleBean.setLifeCycleBeanName(), lifeCycleBeanName = lifeCycleBean
Enter LifecycleBean.afterPropertiesSet()
Enter LifecycleBean.beanStart()
Enter LifecycleBean.destroy()
Enter LifecycleBean.beanEnd()
실행 결과는 이름처럼 afterPropertiesSet() 메서드와 동일합니다. 이는
이 Bean의 속성이 설정될 때까지 호출되지 않음을 나타냅니다. 이 두 인터페이스에 대해 몇 가지 사항을 요약합니다.
1. Init-method 및 destroy-method와 함께 InitializingBean 인터페이스와 Disposable 인터페이스를 사용할 수 있습니다. 구성
보다 우선합니다. 2. InitializingBean 인터페이스와 Disposable 인터페이스의 하위 계층은
메서드 이름()을 사용하여 직접 메서드를 호출합니다. init-method 및 destroy-method리플렉션 사용 전자는 Spring과 더 많이 결합되지만 더 효율적입니다. 그러나 어느 것을 사용할지는 효율성이 떨어집니다. 개인 취향에 따라 3. 특정 Bean의 afterPropertiesSet() 메소드는 다음 Bean의 afterPropertiesSet() 메소드가 실행될 때까지 실행되지 않습니다. 따라서 처리 시간이 너무 오래 걸리는 afterPropertiesSet() 메소드는 작성하지 않는 것이 좋습니다. 인터페이스는 그룹이고 비슷한 기능을 갖고 있기 때문에 함께 작성됩니다.
"Aware"는 "인식하다"라는 의미이므로 이 세 가지 인터페이스의 의미를 이해하는 것은 어렵지 않습니다.
1. BeanNameAware 인터페이스를 구현하는 Bean은 Bean 로딩 프로세스 중에 얻을 수 있습니다. Bean의 ID 2. ApplicationContextAware 인터페이스를 구현하는 Bean의 경우 Bean 로드 프로세스 중에 Spring의 ApplicationContext를 얻을 수 있습니다. 이는 특히 중요한 Spring 애플리케이션 컨텍스트입니다. Bean을 포함한 대량의 Spring 컨테이너 컨텐츠 및 정보를 포함하는 ApplicationContext
3. BeanFactoryAware 인터페이스를 구현하는 Bean의 경우 Bean 로딩 프로세스 중에 해당 Bean을 로드하는 BeanFactory를 얻을 수 있습니다
예를 살펴보세요:
/**
 * @author 五月的仓颉 http://www.cnblogs.com/xrq730/p/5721366.html
 */
public class AwareBean implements BeanNameAware, BeanFactoryAware, ApplicationContextAware
{
  private String           beanName;

  private ApplicationContext    applicationContext;

  private BeanFactory        beanFactory;

  public void setBeanName(String beanName)
  {
    System.out.println("Enter AwareBean.setBeanName(), beanName = " + beanName + "\n");
    this.beanName = beanName;
  }

  public void setApplicationContext(ApplicationContext applicationContext) throws BeansException
  {
    System.out.println("Enter AwareBean.setApplicationContext(), applicationContext = " + applicationContext + "\n");
    this.applicationContext = applicationContext;
  }

  public void setBeanFactory(BeanFactory beanFactory) throws BeansException
  {
    System.out.println("Enter AwareBean.setBeanFactory(), beanfactory = " + beanFactory + "\n");
    this.beanFactory = beanFactory;
  }
}
Spring.xml 구성:
<?xml version="1.0" encoding="UTF-8"?>
<beans xmlns="http://www.springframework.org/schema/beans"
  xmlns:xsi="http://www.w3.org/2001/XMLSchema-instance"
xsi:schemaLocation="http://www.springframework.org/schema/beans
http://www.springframework.org/schema/beans/spring-beans-4.1.xsd">
<bean id="AwareBean" class="org.xrq.bean.aware.AwareBean" />
</beans>
Spring 컨테이너를 시작한 후 실행 결과는 다음과 같습니다.
Enter AwareBean.setBeanName(), beanName = AwareBean

Enter AwareBean.setBeanFactory(), beanfactory = org.springframework.beans.factory.support.DefaultListableBeanFactory@2747fda0: defining beans [AwareBean,org.springframework.context.annotation.internalConfigurationAnnotationProcessor,org.springframework.context.annotation.internalAutowiredAnnotationProcessor,org.springframework.context.annotation.internalRequiredAnnotationProcessor,org.springframework.context.annotation.internalCommonAnnotationProcessor,org.springframework.context.annotation.ConfigurationClassPostProcessor.importAwareProcessor,org.springframework.context.annotation.ConfigurationClassPostProcessor.enhancedConfigurationProcessor]; root of factory hierarchy

Enter AwareBean.setApplicationContext(), applicationContext = org.springframework.context.support.GenericApplicationContext@5514cd80: startup date [Mon Aug 08 19:23:30 CST 2016]; root of context hierarchy
이 세 가지 인터페이스에 대해 위의 인쇄 정보에 대해 몇 가지 사항을 요약합니다.
1. BeanName, ApplicationContext 및 BeanFactory가 유용하다면
변수를 정의하여 저장하세요. 그런 다음 Spring
에 의해 주입된 매개변수를 클릭하기만 하면 됩니다. 2. Bean이 초기화Bean도 구현하는 경우
컨테이너는 BeanName, ApplicationContext를 보장합니다. afterPropertiesSet() 메소드
FactoryBean을 호출할 때 BeanFactory가 삽입됩니다. FactoryBean在Spring中是非常有用的,使用Eclipse/MyEclipse的朋友可以对FactoryBean使用ctrl+t查看一下,FactoryBean这个接口在Spring容器中有大量的子实现。 传统的Spring容器加载一个Bean的整个过程,都是由Spring控制的,换句话说,开发者除了设置Bean相关属性之外,是没有太多的自主权的。FactoryBean改变了这一点,开发者可以个性化地定制自己想要实例化出来的Bean,方法就是实现FactoryBean接口。 看一下代码例子,为了讲清楚FactoryBean,内容相对多一些,首先定义一个接口Animal: 定义两个实现类Monkey和Tiger: 写一个实现类,实现FactoryBean接口: 配置一个spring.xml,注入属性Tiger: 写一个JUnit的测试类: 查看一下运行结果: 看到最后得到的并不是FactoryBean本身,而是FactoryBean的泛型对象,这就是FactoryBean的作用。FactoryBean的几个方法: 1、getObject()方法是最重要的,控制Bean的实例化过程 2、getObjectType()方法获取接口返回的实例的class 3、isSingleton()方法获取该Bean是否为一个单例的Bean 像我这段代码的功能就是传入一个String类型的参数,可以动态控制生成出来的是接口的哪种子类。有了FactoryBean,同样的我们也可以灵活地操控Bean的生成。 BeanPostProcessor 之前的InitializingBean、DisposableBean、FactoryBean包括init-method和destory-method,针对的都是某个Bean控制其初始化的操作,而似乎没有一种办法可以针对每个Bean的生成前后做一些逻辑操作,PostProcessor则帮助我们做到了这一点,先看一个简单的BeanPostProcessor。 网上有一张图画了Bean生命周期的过程,画得挺好,原图出处: BeanPostProcess接口有两个方法,都可以见名知意: 1、postProcessBeforeInitialization:在初始化Bean之前 2、postProcessAfterInitialization:在初始化Bean之后 值得注意的是,这两个方法是有返回值的,不要返回null,否则getBean的时候拿不到对象。 写一段测试代码,首先定义一个普通的Bean,为了后面能区分,给Bean加一个属性: 定义一个PostProcess,实现BeanPostProcess接口: 配置一个spring.xml,给CommonBean的commonName赋予不同的值以区分: 运行一个Spring容器, 初始化结果为: 看到每个Bean初始化前后都会分别执行postProcessorBeforeInitiallization()方法与postProcessorAfterInitialization()方法,最后两行出现原因是,PostProcessorBean本身也是一个Bean。 BeanFactoryPostProcessor 接下来看另外一个PostProcessor----BeanFactoryPostProcessor。 Spring允许在Bean创建之前,读取Bean的元属性,并根据自己的需求对元属性进行改变,比如将Bean的scope从singleton改变为prototype,最典型的应用应当是PropertyPlaceholderConfigurer,替换xml文件中的占位符,替换为properties文件中相应的key对应的value,这将会在下篇文章中专门讲解PropertyPlaceholderConfigurer的作用及其原理。 BeanFactoryPostProcessor就可以帮助我们实现上述的功能,下面来看一下BeanFactoryPostProcessor的使用,定义一个BeanFactoryPostProcessor的实现类: spring.xml里面配置一下这个Bean,就不写了,运行一下Spring容器,结果为: 从执行结果中可以看出两点: 1、BeanFactoryPostProcessor的执行优先级高于BeanPostProcessor 2、BeanFactoryPostProcessor的postProcessBeanFactory()方法只会执行一次 注意到postProcessBeanFactory方法是带了参数ConfigurableListableBeanFactory的,这就和我之前说的可以使用BeanFactoryPostProcessor来改变Bean的属性相对应起来了。ConfigurableListableBeanFactory功能非常丰富,最基本的,它携带了每个Bean的基本信息,比如我简单写一段代码: 看一下执行结果: 这样就获取了Bean的生命周期以及重新设置了Bean的生命周期。ConfigurableListableBeanFactory还有很多的功能,比如添加BeanPostProcessor,可以自己去查看。 InstantiationAwareBeanPostProcessor 最后写一个叫做InstantiationAwareBeanPostProcessor的PostProcessor。 InstantiationAwareBeanPostProcessor又代表了Spring的另外一段生命周期:实例化。先区别一下Spring Bean的实例化和初始化两个阶段的主要作用: 1、实例化----实例化的过程是一个创建Bean的过程,即调用Bean的构造函数,单例的Bean放入单例池中 2、初始化----初始化的过程是一个赋值的过程,即调用Bean的setter,设置Bean的属性 之前的BeanPostProcessor作用于过程(2)前后,现在的InstantiationAwareBeanPostProcessor则作用于过程(1)前后,看一下代码,给前面的CommonBean加上构造函数: 实现InstantiationAwareBeanPostProcessor接口: 配置一下spring.xml: 启动容器,观察一下运行结果为: 最后三行的运行结果不去关注,看到很明显的,InstantiationAwareBeanPostProcessor作用的是Bean实例化前后,即: 1、Bean构造出来之前调用postProcessBeforeInstantiation()方法 2、Bean构造出来之后调用postProcessAfterInstantiation()方法 不过通常来讲,我们不会直接实现InstantiationAwareBeanPostProcessor接口,而是会采用继承InstantiationAwareBeanPostProcessorAdapter这个抽象类的方式来使用。 后记 如果只会写个Bean,配置在xml文件里面,注入一下,那是最最基础的Spring开发者。一个中级、高级的Spring开发者,必然会对Spring中的多个扩展点有所了解,并利用这些扩展点更好地为项目服务,使得整个代码结构更加地优雅,并且可读性、可维护性更好。 【相关推荐】 1. Java免费视频教程 2. JAVA教程手册 3. 全面解析Java注解public interface Animal
{
public void move();
}public class Monkey implements Animal
{
public void move()
{
System.out.println("Monkey move!");
}
}public class Tiger implements Animal
{
public void move()
{
System.out.println("Tiger move!");
}
}/**
* @author 五月的仓颉 http://www.cnblogs.com/xrq730/p/5721366.html
*/
public class AnimalFactoryBean implements FactoryBean<Animal>
{
private String animal;
public Animal getObject() throws Exception
{
if ("Monkey".equals(animal))
{
return new Monkey();
}
else if ("Tiger".equals(animal))
{
return new Tiger();
}
else
{
return null;
}
}
public Class<?> getObjectType()
{
return Animal.class;
}
public boolean isSingleton()
{
return true;
}
public void setAnimal(String animal)
{
this.animal = animal;
}
}<?xml version="1.0" encoding="UTF-8"?>
<beans xmlns="http://www.springframework.org/schema/beans"
xmlns:xsi="http://www.w3.org/2001/XMLSchema-instance"
xsi:schemaLocation="http://www.springframework.org/schema/beans
http://www.springframework.org/schema/beans/spring-beans-4.1.xsd">
<bean id="animal" class="org.xrq.bean.factory.AnimalFactoryBean">
<property name="animal" value="Tiger"/>
</bean>
</beans>@RunWith(SpringJUnit4ClassRunner.class)
@ContextConfiguration(locations = {
"classpath*:spring.xml",
})
public class BaseTest
{
@Resource
private Animal animal;
@Test
public void aa()
{
animal.move();
}
}Tiger move!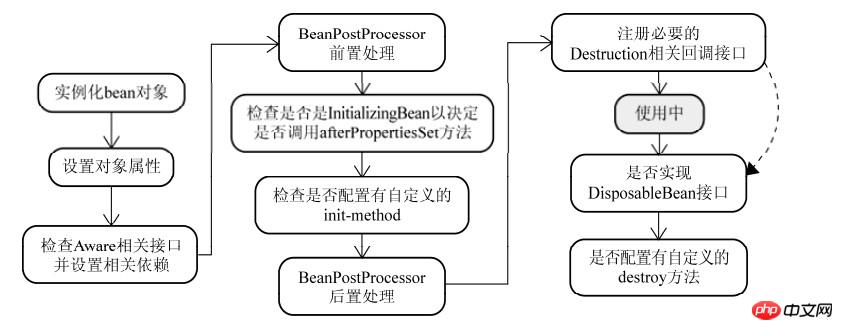
public class CommonBean
{
  private String commonName;
  public void setCommonName(String commonName)
  {
    this.commonName = commonName;
  }
  public void initMethod()
  {
    System.out.println("Enter CommonBean.initMethod(), commonName = " + commonName);
  }
}/**
* @author 五月的仓颉 http://www.cnblogs.com/xrq730/p/5721366.html
*/
public class PostProcessorBean implements BeanPostProcessor
{
public Object postProcessAfterInitialization(Object bean, String beanName) throws BeansException
{
System.out.println("Enter ProcessorBean.postProcessAfterInitialization()\n");
return bean;
}
public Object postProcessBeforeInitialization(Object bean, String beanName) throws BeansException
{
System.out.println("Enter ProcessorBean.postProcessBeforeInitialization()");
return bean;
}
}<?xml version="1.0" encoding="UTF-8"?>
<beans xmlns="http://www.springframework.org/schema/beans"
xmlns:xsi="http://www.w3.org/2001/XMLSchema-instance"
xsi:schemaLocation="http://www.springframework.org/schema/beans
http://www.springframework.org/schema/beans/spring-beans-4.1.xsd">
<bean id="common0" class="org.xrq.bean.common.CommonBean" init-method="initMethod">
<property name="commonName" value="common0"/>
</bean>
<bean id="common1" class="org.xrq.bean.common.CommonBean" init-method="initMethod">
<property name="commonName" value="common1"/>
</bean>
<bean id="postProcessorBean" class="org.xrq.bean.processor.PostProcessorBean" />
</beans>Enter ProcessorBean.postProcessBeforeInitialization()
Enter CommonBean.initMethod(), commonName = common0
Enter ProcessorBean.postProcessAfterInitialization()
Enter ProcessorBean.postProcessBeforeInitialization()
Enter CommonBean.initMethod(), commonName = common1
Enter ProcessorBean.postProcessAfterInitialization()
Enter ProcessorBean.postProcessBeforeInitialization()
Enter ProcessorBean.postProcessAfterInitialization()
/**
* @author 五月的仓颉 http://www.cnblogs.com/xrq730/p/5721366.html
*/
public class FactoryPostProcessorBean implements BeanFactoryPostProcessor
{
public void postProcessBeanFactory(ConfigurableListableBeanFactory configurablelistablebeanfactory)
throws BeansException
{
System.out.println("Enter FactoryPostProcessorBean.postProcessBeanFactory()\n");
}
}Enter FactoryPostProcessorBean.postProcessBeanFactory()
Enter ProcessorBean.postProcessBeforeInitialization()
Enter CommonBean.initMethod(), commonName = common0
Enter ProcessorBean.postProcessAfterInitialization()

Enter ProcessorBean.postProcessBeforeInitialization()
Enter CommonBean.initMethod(), commonName = common1
Enter ProcessorBean.postProcessAfterInitialization()
Enter ProcessorBean.postProcessBeforeInitialization()
Enter ProcessorBean.postProcessAfterInitialization()
/**
 * @author 五月的仓颉 http://www.cnblogs.com/xrq730/p/5721366.html
 */
public void postProcessBeanFactory(ConfigurableListableBeanFactory configurablelistablebeanfactory)
      throws BeansException
{
  BeanDefinition beanDefinition = configurablelistablebeanfactory.getBeanDefinition("common0");
  MutablePropertyValues beanProperty = beanDefinition.getPropertyValues();
  System.out.println("scope before change:" + beanDefinition.getScope());
  beanDefinition.setScope("singleton");
  System.out.println("scope after change:" + beanDefinition.getScope());
  System.out.println("beanProperty:" + beanProperty);
}scope before change:
scope after change:singleton
beanProperty:PropertyValues: length=1; bean property 'commonName'
public class CommonBean
{
  public CommonBean()
  {
    System.out.println("Enter CommonBean's constructor");
  }

  private String commonName;

  public void setCommonName(String commonName)
  {
    System.out.println("Enter CommonBean.setCommonName(), commonName = " + commonName);
    this.commonName = commonName;
  }
  public void initMethod()
  {
    System.out.println("Enter CommonBean.initMethod(), commonName = " + commonName);
  }
}/**
* @author 五月的仓颉 http://www.cnblogs.com/xrq730/p/5721366.html
*/
public class InstantiationAwareBeanPostProcessorBean implements InstantiationAwareBeanPostProcessor
{
public Object postProcessAfterInitialization(Object bean, String beanName) throws BeansException
{
System.out.println("Enter InstantiationAwareBeanPostProcessorBean.postProcessAfterInitialization()");
return bean;
}
public Object postProcessBeforeInitialization(Object bean, String beanName) throws BeansException
{
System.out.println("Enter InstantiationAwareBeanPostProcessorBean.postProcessBeforeInitialization()");
return bean;
}
public boolean postProcessAfterInstantiation(Object bean, String beanName) throws BeansException
{
System.out.println("Enter InstantiationAwareBeanPostProcessorBean.postProcessAfterInstantiation()");
return true;
}
public Object postProcessBeforeInstantiation(Class<?> bean, String beanName) throws BeansException
{
System.out.println("Enter InstantiationAwareBeanPostProcessorBean.postProcessBeforeInstantiation()");
return null;
}
public PropertyValues postProcessPropertyValues(PropertyValues pvs, PropertyDescriptor[] pd, Object bean,
String beanName) throws BeansException
{
return pvs;
}
}<?xml version="1.0" encoding="UTF-8"?>
<beans xmlns="http://www.springframework.org/schema/beans"
xmlns:xsi="http://www.w3.org/2001/XMLSchema-instance"
xsi:schemaLocation="http://www.springframework.org/schema/beans
http://www.springframework.org/schema/beans/spring-beans-4.1.xsd">
<bean id="common" class="org.xrq.bean.common.CommonBean">
<property name="commonName" value="common"/>
</bean>
<bean class="org.xrq.bean.processor.InstantiationAwareBeanPostProcessorBean" />
</beans>Enter InstantiationAwareBeanPostProcessorBean.postProcessBeforeInstantiation()
Enter CommonBean's constructor
Enter InstantiationAwareBeanPostProcessorBean.postProcessAfterInstantiation()
Enter CommonBean.setCommonName(), commonName = common
Enter InstantiationAwareBeanPostProcessorBean.postProcessBeforeInitialization()
Enter InstantiationAwareBeanPostProcessorBean.postProcessAfterInitialization()
Enter InstantiationAwareBeanPostProcessorBean.postProcessAfterInstantiation()
Enter InstantiationAwareBeanPostProcessorBean.postProcessBeforeInitialization()
Enter InstantiationAwareBeanPostProcessorBean.postProcessAfterInitialization()
위 내용은 Spring Bean 확장 인터페이스 메소드 소개의 상세 내용입니다. 자세한 내용은 PHP 중국어 웹사이트의 기타 관련 기사를 참조하세요!