JPA를 통한 Java 데이터베이스 작업의 예에 대한 자세한 설명
- Y2J원래의
- 2017-05-06 13:19:153114검색
오늘은 SpringBoot에서 Mysql 데이터베이스에 접속하는 방법과 JPA를 이용해 데이터베이스 관련 작업을 수행하는 방법을 소개하겠습니다.
오늘은 SpringBoot에서 Mysql 데이터베이스에 접속하는 방법과 JPA를 이용해 데이터베이스 관련 작업을 수행하는 방법을 소개하겠습니다.
1단계: pom.xml 파일에 관련 Jar 패키지 종속성을 추가합니다. 구체적인 추가 위치는 다음과 같습니다. .
<!--数据库相关配置-->
    <dependency>
      <groupId>org.springframework.boot</groupId>
      <artifactId>spring-boot-starter-web</artifactId>
    </dependency>
    <dependency>
      <groupId>org.springframework.boot</groupId>
      <artifactId>spring-boot-starter-data-jpa</artifactId>
    </dependency>
    <dependency>
      <groupId>mysql</groupId>
      <artifactId>mysql-connector-java</artifactId>
    </dependency>
    <dependency>
      <groupId>org.apache.poi</groupId>
      <artifactId>poi</artifactId>
      <version>3.11</version>
    </dependency>
2단계: application.properties 구성 파일에 해당 데이터베이스 구성을 추가합니다. 구성 정보는 다음과 같습니다.
spring.datasource.url = jdbc:mysql://localhost:3306/webtest
spring.datasource.username = root
spring.datasource.password = 220316
spring.datasource.driverClassName = com.mysql.jdbc.Driver
# Specify the DBMS
spring.jpa.database = MYSQL
# Show or not log for each sql query
spring.jpa.show-sql = true
# Hibernate ddl auto (create, create-drop, update)
spring.jpa.hibernate.ddl-auto = update
# Naming strategy
spring.jpa.hibernate.naming-strategy = org.hibernate.cfg.ImprovedNamingStrategy
# stripped before adding them to the entity manager)
spring.jpa.properties.hibernate.dialect = org.hibernate.dialect.MySQL5Dialect
설명은 다음과 같습니다. webtest는 데이터베이스 이름을 나타내고, root는 사용자 이름, 220316은 비밀번호입니다.
3단계: 데이터베이스 작업 의 엔터티 클래스, 엔터티 클래스의 구체적인 정보는 다음과 같습니다.
package example.entity;
import javax.persistence.*;
import javax.validation.constraints.NotNull;
import java.math.BigDecimal;
import java.util.Date;
@Entity
@Table(name = "user")
public class User {
  @Id
  @GeneratedValue(strategy = GenerationType.AUTO)
  private int id;

  @Column(name = "name", nullable = true, length = 30)
  private String name;

  @Column(name = "height", nullable = true, length = 10)
  private int height;

  @Column(name = "sex", nullable = true, length = 2)
  private char sex;

  @Temporal(TemporalType.DATE)
  private Date birthday;

  @Temporal(TemporalType.TIMESTAMP)
  private Date sendtime; // 日期类型,格式:yyyy-MM-dd HH:mm:ss

  @Column(name = "price", nullable = true, length = 10)
  private BigDecimal price;

  @Column(name = "floatprice", nullable = true, length = 10)
  private float floatprice;


  @Column(name = "doubleprice", nullable = true, length = 10)
  private double doubleprice;

  public Date getSendtime() {
    return sendtime;
  }

  public void setSendtime(Date sendtime) {
    this.sendtime = sendtime;
  }

  public BigDecimal getPrice() {
    return price;
  }

  public void setPrice(BigDecimal price) {
    this.price = price;
  }

  public float getFloatprice() {
    return floatprice;
  }

  public void setFloatprice(float floatprice) {
    this.floatprice = floatprice;
  }

  public double getDoubleprice() {
    return doubleprice;
  }

  public void setDoubleprice(double doubleprice) {
    this.doubleprice = doubleprice;
  }

  public User() { }

  public char getSex() {
    return sex;
  }

  public void setSex(char sex) {
    this.sex = sex;
  }

  public Date getBirthday() {
    return birthday;
  }

  public void setBirthday(Date birthday) {
    this.birthday = birthday;
  }

  public User(int id) {
    this.id = id;
  }

  public int getId() {
    return id;
  }

  public void setId(int id) {
    this.id = id;
  }

  public String getName() {
    return name;
  }

  public void setName(String name) {
    this.name = name;
  }

  public int getHeight() {
    return height;
  }

  public void setHeight(int height) {
    this.height = height;
  }
}
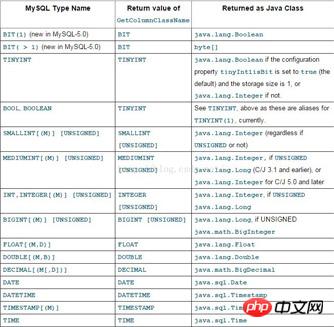
여기서 모두가 주목해야 할 것은 클래스 이름과 필드 속성 엔터티 클래스의 필드는 데이터베이스의 테이블과 일치해야 합니다. 필드는 서로 일치합니다. 다음은 MYSQL-JAVA의 다양한 속성에 대한 대응도이다.

4단계: dao 레이어의 데이터 연산 클래스, dao 데이터 쓰기 오퍼레이션 클래스는 다음과 같습니다:
package example.dao;
import example.entity.User;
import org.springframework.data.repository.CrudRepository;
import javax.transaction.Transactional;
import java.math.BigDecimal;
import java.util.Date;
import java.util.List;

@Transactional
public interface UserDao extends CrudRepository<User, Integer> {
  public List<User> findByName(String name);
  public List<User> findBySex(char sex);
  public List<User> findByBirthday(Date birthday);
  public List<User> findBySendtime(Date sendtime);
  public List<User> findByPrice(BigDecimal price);
  public List<User> findByFloatprice(float floatprice);
  public List<User> findByDoubleprice(double doubleprice);
}
여기서 질문이 있을 수 있습니다. CrudRepository0e4b54218c9a07445335f10bb61dc1ba를 상속해야 하는 이유와 구체적인 역할은 무엇입니까?
여기에서는 JPA의 몇 가지 일반적인 사용 및 사용 지침에 대해 간략하게 소개하겠습니다.
1. two 두 매개변수의 구체적인 의미는 첫 번째 매개변수는 운용되는 엔터티 클래스의 이름을 나타내고, 두 번째 매개변수는 엔터티 클래스의 기본키 유형을 나타낸다.
2. 상속 후 상위 클래스에서 상속된 일부 메소드를 사용할 수 있습니다. 예를 들어 위와 같이 findBy+ "필드 이름을 쿼리하고 싶습니다. >", 이를 통해 SQL 쿼리의 기능을 쉽게 구현할 수 있는 방법이다.
5단계: 컨트롤 클래스 컨트롤러를 작성합니다. 컨트롤 클래스의 구체적인 정보는 다음과 같습니다.
package example.controller;
import example.dao.UserDao;
import example.entity.User;
import org.springframework.beans.factory.annotation.Autowired;
import org.springframework.stereotype.Controller;
import org.springframework.web.bind.annotation.RequestMapping;
import org.springframework.web.bind.annotation.ResponseBody;
import java.math.BigDecimal;
import java.text.ParseException;
import java.text.SimpleDateFormat;
import java.util.Date;
import java.util.List;
@Controller
public class UserController {
  @Autowired
  private UserDao userDao;
  @RequestMapping("/getName")
  @ResponseBody
  public String getByName(String name) {
    List<User> userList = userDao.findByName(name);
    if (userList != null && userList.size()!=0) {
      return "The user length is: " + userList.size();
    }
    return "user " + name + " is not exist.";
  }

  @RequestMapping("/getSex")
  @ResponseBody
  public String getBySex(char sex) {
    List<User> userList = userDao.findBySex(sex);
    if (userList != null && userList.size()!=0) {
      return "The user length is: " + userList.size();
    }
    return "user " + sex + " is not exist.";
  }

  @RequestMapping("/getBirthday")
  @ResponseBody
  public String findByBirthday(String birthday) {
    System.out.println("birthday:"+birthday);
    SimpleDateFormat formate=new SimpleDateFormat("yyyy-MM-dd");
    List<User> userList = null;
    try {
      userList = userDao.findByBirthday(formate.parse(birthday));
    } catch (ParseException e) {
      e.printStackTrace();
    }
    if (userList != null && userList.size()!=0) {
      return "The user length is: " + userList.size();
    }
    return "user " + birthday + " is not exist.";
  }

  @RequestMapping("/getSendtime")
  @ResponseBody
  public String findBySendtime(String sendtime) {
    System.out.println("sendtime:"+sendtime);
    SimpleDateFormat formate=new SimpleDateFormat("yyyy-MM-dd HH:mm:ss");
    List<User> userList = null;
    try {
      userList = userDao.findBySendtime(formate.parse(sendtime));
    } catch (ParseException e) {
      e.printStackTrace();
    }
    if (userList != null && userList.size()!=0) {
      return "The user length is: " + userList.size();
    }
    return "user " + sendtime + " is not exist.";
  }

  @RequestMapping("/getPrice")
  @ResponseBody
  public String findByPrice(BigDecimal price) {
    List<User> userList = null;
    userList = userDao.findByPrice(price);
    if (userList != null && userList.size()!=0) {
      return "The user length is: " + userList.size();
    }
    return "user " + price + " is not exist.";
  }

  @RequestMapping("/getFloatprice")
  @ResponseBody
  public String findFloatprice(float floatprice) {
    List<User> userList = null;
    userList = userDao.findByFloatprice(floatprice);
    if (userList != null && userList.size()!=0) {
      return "The user length is: " + userList.size();
    }
    return "user " + floatprice + " is not exist.";
  }

  @RequestMapping("/getDoubleprice")
  @ResponseBody
  public String findByPrice(double doubleprice) {
    List<User> userList = null;
    userList = userDao.findByDoubleprice(doubleprice);
    if (userList != null && userList.size()!=0) {
      return "The user length is: " + userList.size();
    }
    return "user " + doubleprice + " is not exist.";
  }
}
여기서 큰 질문이 있을 수 있습니다. 나는 또한 처음에 이 문제를 깊이 무시했습니다. 즉, 왜 userDao를 인스턴스화하지 않고 직접 사용할 수 있습니까? . userDao 위에 @Autowired 속성만 추가하면 인터페이스를 자동으로 인스턴스화할 수 있으므로 이전처럼 userDaoImp와 같은 구현 클래스를 작성할 필요가 없습니다. 이를 통해 코드의 단순성과 개발 속도를 크게 향상시킬 수 있습니다.
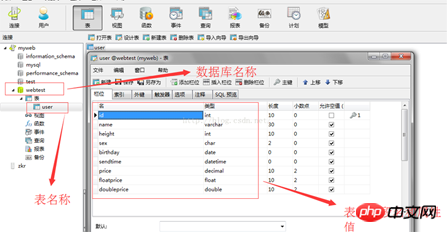
6단계: 데이터베이스의 테이블 이름과 필드 정보는 다음과 같습니다.

위 내용은 JPA를 통한 Java 데이터베이스 작업의 예에 대한 자세한 설명의 상세 내용입니다. 자세한 내용은 PHP 중국어 웹사이트의 기타 관련 기사를 참조하세요!

