집 >위챗 애플릿 >미니 프로그램 개발 >WeChat 애플릿 보기 컨테이너 구성 요소의 예제 코드에 대한 자세한 설명
WeChat 애플릿 보기 컨테이너 구성 요소의 예제 코드에 대한 자세한 설명
- 高洛峰원래의
- 2017-03-15 16:27:252863검색
이 글에서는 위챗 애플릿 보기 컨테이너 구성 요소에 대한 자세한 설명과 예제 코드 관련 정보를 주로 소개합니다. 여기에는 기본 지식과 간단한 예제 코드에 대한 자세한 소개가 나와 있습니다. 다음
WeChat 애플릿의 뷰 컨테이너 구성 요소에 대한 자세한 설명:
애플릿에서 제공하는 세 가지 뷰 컨테이너 구성 요소가 있습니다: , :
보기 컨테이너
는 HTML과 동일합니다. 태그에는

및 속성이 있습니다. 🎜>hover- class는 클릭 효과와 관련이 있습니다. hover는 클릭 효과 활성화 여부를 설정하고 hover-class는 클릭 효과를 설정합니다.
hover-start-time 및 hover-stay-time은 클릭 효과의 시간과 관련이 있습니다. hover-start-time은 클릭 후 설정 hover-stay-time 클릭 효과 지속 시간을 설정합니다. 단위는 밀리초입니다. 테스트할 프로젝트 만들기:
index.w<view class="container"> <view class="flex-item bc_green" hover="true" hover-class="green_hover">1</view> <view class="flex-item bc_red" hover="true" hover-class="red_hover" hover-start-time="400" hover-stay-time="1000">2</view> <view class="flex-item bc_blue">3</view> </view>index.
.flex-item{
 width: 100%;
 height: 100px;
 box-sizing: border-box;
}
.bc_green{
 background-color: green;
}
.bc_red{
 background-color: red;
}
.bc_blue{
 background-color: blue;
}
.green_hover{
 border: 5px solid black;
}
.red_hover{
 border: 5px solid black;
}
효과는 다음과 같습니다.
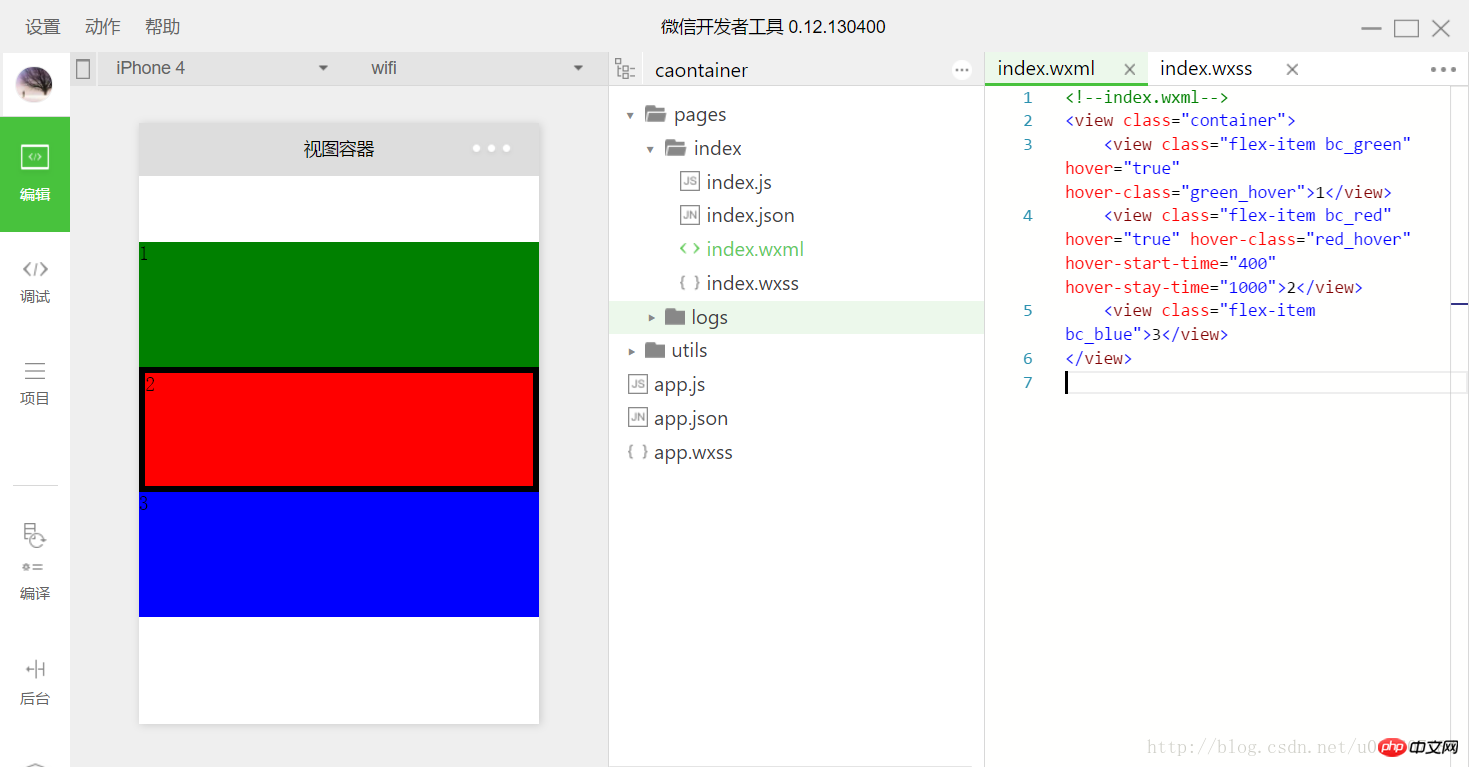 첫 번째와 두 번째 하위 보기의 클릭 효과를 설정합니다. 두 번째 클릭 효과의 시간이 서로 다릅니다. 세 번째는 다른 클릭 효과가 없어서 기본값으로 사용되는 것으로, 기본적으로는 클릭 효과가 없습니다.
에는 다음과 같은 속성이 있습니다.
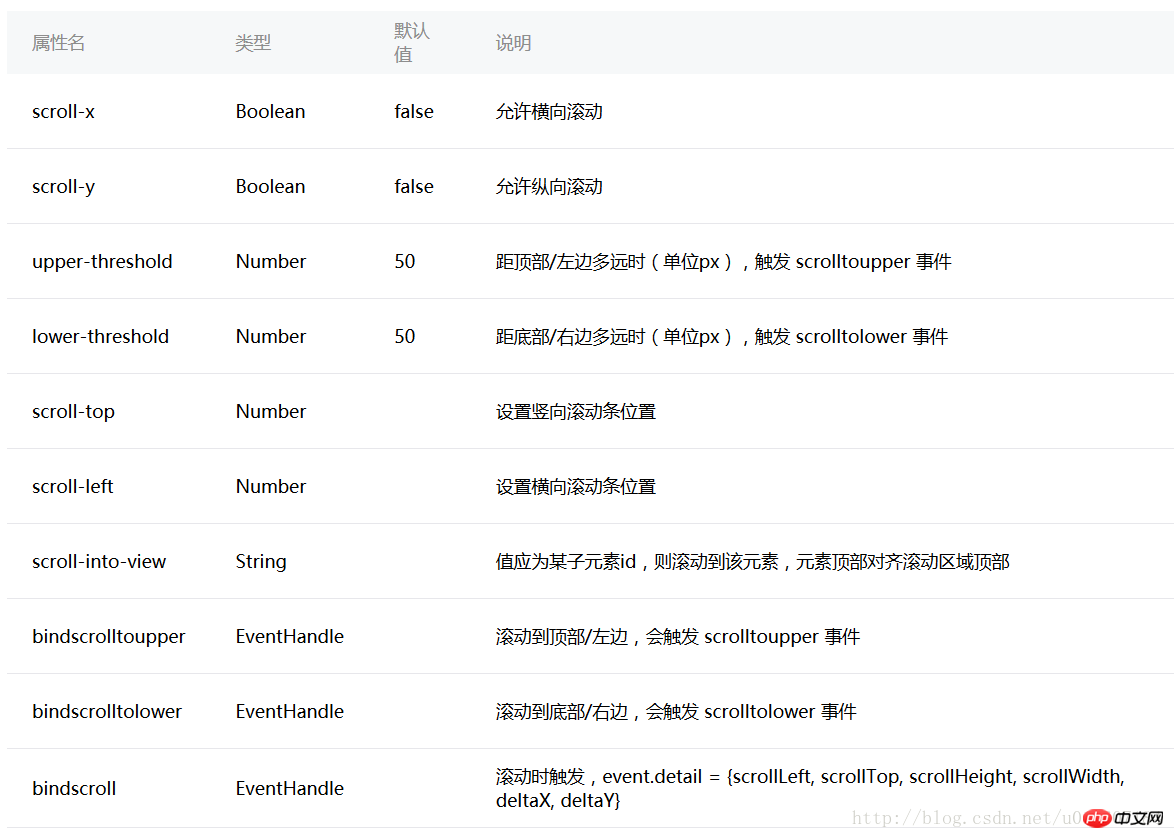 마찬가지로 위 속성의 사용을 이해하기 위해 프로젝트를 만듭니다.
안되요 index.wxss
<view class="container">
 <scroll-view class="srcoll_view" scroll-y="true" lower-threshold="100" bindscrolltolower="lower" scroll-top="{{scrollTop}}" scroll-into-view="{{toView}}">
 <view id="green" class="flex-item bc_green">1</view>
 <view id="red" class="flex-item bc_red">2</view>
 <view id="blue" class="flex-item bc_blue">3</view>
 <view id="yellow" class="flex-item bc_yellow">4</view>
 </scroll-view>
 <view class="clickItem" bindtap="clickAdd">点击向下滚动</view>
 <view class="clickItem" bindtap="clickTo">点击滚动到下一个子view</view>
</view>
index.js.srcoll_view{
height: 200px;
}
.flex-item{
width: 100%;
height: 100px;
box-sizing: border-box;
}
.bc_green{
background-color: green;
}
.bc_red{
background-color: red;
}
.bc_blue{
background-color: blue;
}
.bc_yellow{
background-color: yellow;
}
.clickItem{
margin-top: 20px;
background-color: grey;
height: 20px;
border-radius: 5px;
}
페이지 효과는 다음과 같습니다.
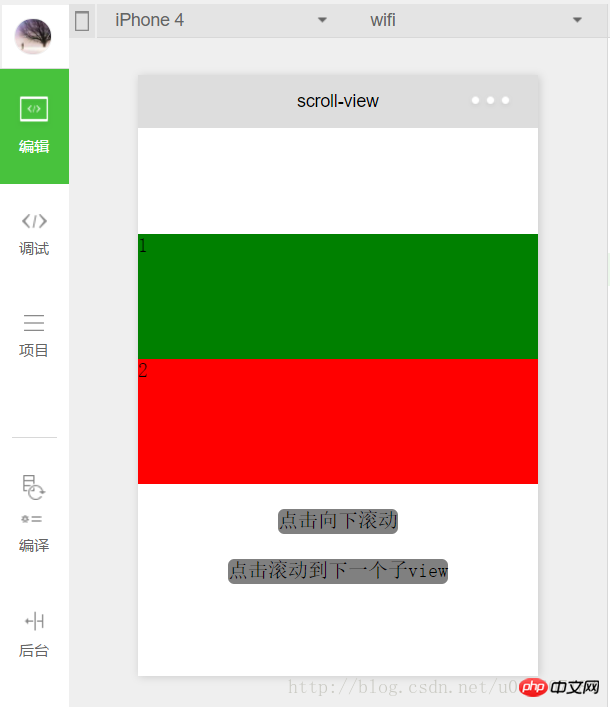
먼저 의 scroll-y="true"를 설정합니다. , 또한 수직 스크롤입니다. index.wxss에서 높이는 200px로 설정되어 있으며 각 하위 의 높이는 100px입니다. 이는 두 개의 완전한 하위 를 수용할 수 있습니다. x="true"는 가로 스크롤을 의미하고 스크롤 상단은
왼쪽세로 스크롤입니다. 스크롤 막대 위치. 기본값은 0입니다. 마찬가지로 스크롤 왼쪽은 위 프로그램에서 스크롤 상단="{{scrollTop}}"이 설정되고 더 나은 결과를 위해 데이터에서 스크롤 상단이 얻어집니다. , 함수 를 새로운 에 바인딩합니다:
var app = getApp();
var order = ['green','red', 'blue','yellow','green'];
Page({
 data: {
 scrollTop: 0,
 toView:"green"
 },

 onLoad: function () {
 },

 lower: function(e) {
 console.log(e)
 },

 clickAdd:function(){
 this.setData({
  scrollTop: this.data.scrollTop+20
 });
 console.log("this.data.scrollTop:" + this.data.scrollTop);
 },

 clickTo: function(e) {
 for (var i = 0; i < order.length; i++) {
 if (order[i] === this.data.toView) {
 this.setData({
  toView: order[i + 1]
 })
 break
 }
 }
 },

})
이 함수는 scrollTop의 값을 점진적으로 변경합니다. 🎜>
<view class="clickItem" bindtap="clickAdd">点击向下滚动</view>클릭할 때마다 scrollTop이 20씩 늘어나므로 20px 아래로 스크롤하세요
scroll-into-view的值为某个子元素的id,表明滚动到该元素,元素顶部对齐滚动区域顶部。上述程序中设置了scroll-into-view="{{toView}}",toView从数据中获取。
新建一个并绑定一个函数:
<view class="clickItem" bindtap="clickTo">点击滚动到下一个子view</view>
1
函数的功能为按顺序滚动到对应的子元素:
clickTo: function(e) {
 for (var i = 0; i < order.length; i++) {
 if (order[i] === this.data.toView) {
 this.setData({
  toView: order[i + 1]
 })
 break
 }
 }
 },
var order = ['green','red', 'blue','yellow'];
bindscrolltolower和bindscrolltoupper
bindscrolltolower和bindscrolltoupper为事件绑定:bindscrolltolower是滚动到底部/右边时触发;bindscrolltoupper是滚动到顶部/左边时触发。另外还有一个bindscroll是只要滚动时就会触发。
以bindscrolltolower为例,bindscrolltolower表示滚动到底部或右边时触发,这个底部或右边是如何定义的呢?这时就需要用到lower-threshold,lower-threshold表示距底部/右边多远时(单位px),触发 scrolltolower 事件,默认值为50,上述代码中我们定义了lower-threshold="100",由于子的高度就是100px,所以正好出现最后一个子时就会触发事件:
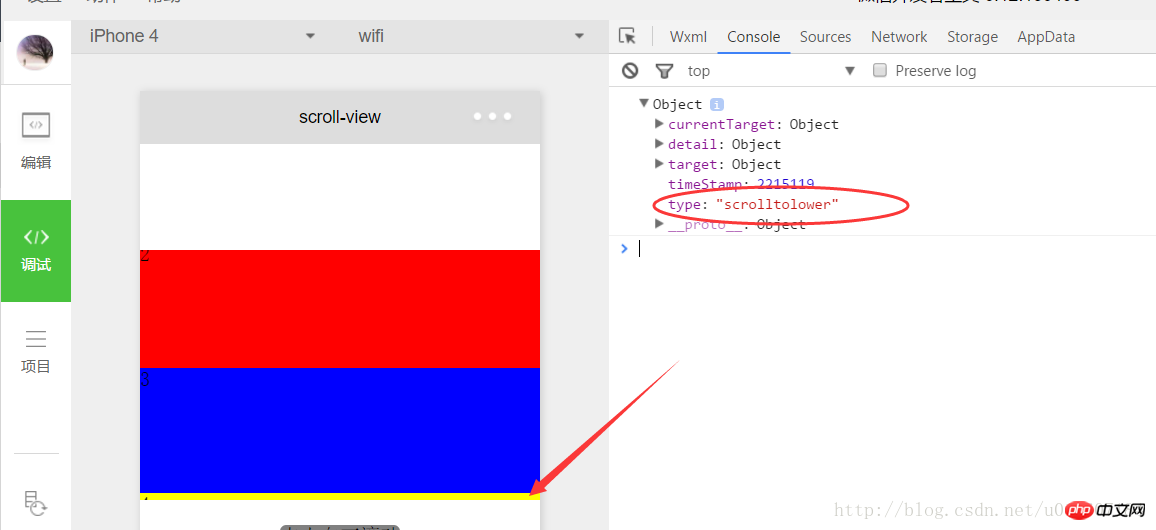
3、 滑块视图容器
其实就是微信小程序封装的幻灯片轮播功能,并给出了几个可供开发者设置的属性:
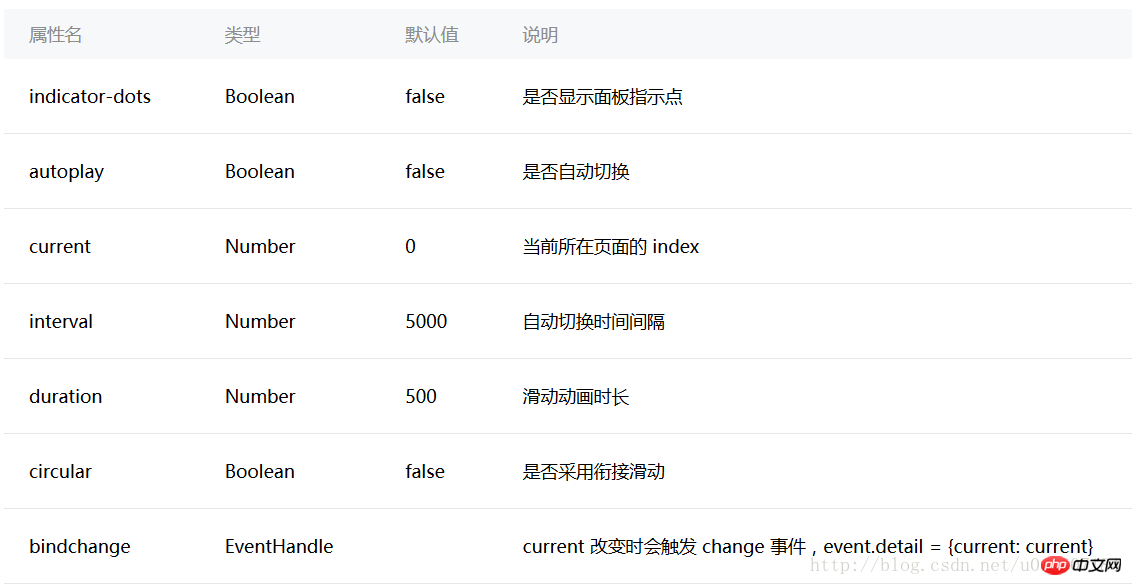
用户可以根据自己需求设置相应的属性值即可,示例代码如下:
swiper.wxml
<view class="container">
 <swiper indicator-dots="{{indicatorDots}}"
 autoplay="{{autoplay}}" interval="{{interval}}" duration="{{duration}}" circular="{{circular}}" bindchange="change">
 <block wx:for="{{imgUrls}}">
  <swiper-item>
  <image src="{{item}}" />
  </swiper-item>
 </block>
 </swiper>
</view>
swiper.wxss
swiper{
 height: 150px;
 width:100%;
}
swiper.js
Page({
 data: {
 imgUrls: [
 'http://img02.tooopen.com/images/20150928/tooopen_sy_143912755726.jpg',
 'http://img06.tooopen.com/images/20160818/tooopen_sy_175866434296.jpg',
 'http://img06.tooopen.com/images/20160818/tooopen_sy_175833047715.jpg'
 ],
 indicatorDots: true,
 autoplay: true,
 interval: 2000,
 duration: 500,
 circular:true
 },

 change:function(e){
 console.log(e);
 }

})
由于绑定了change函数,所以每次切换时,都会触发change事件:
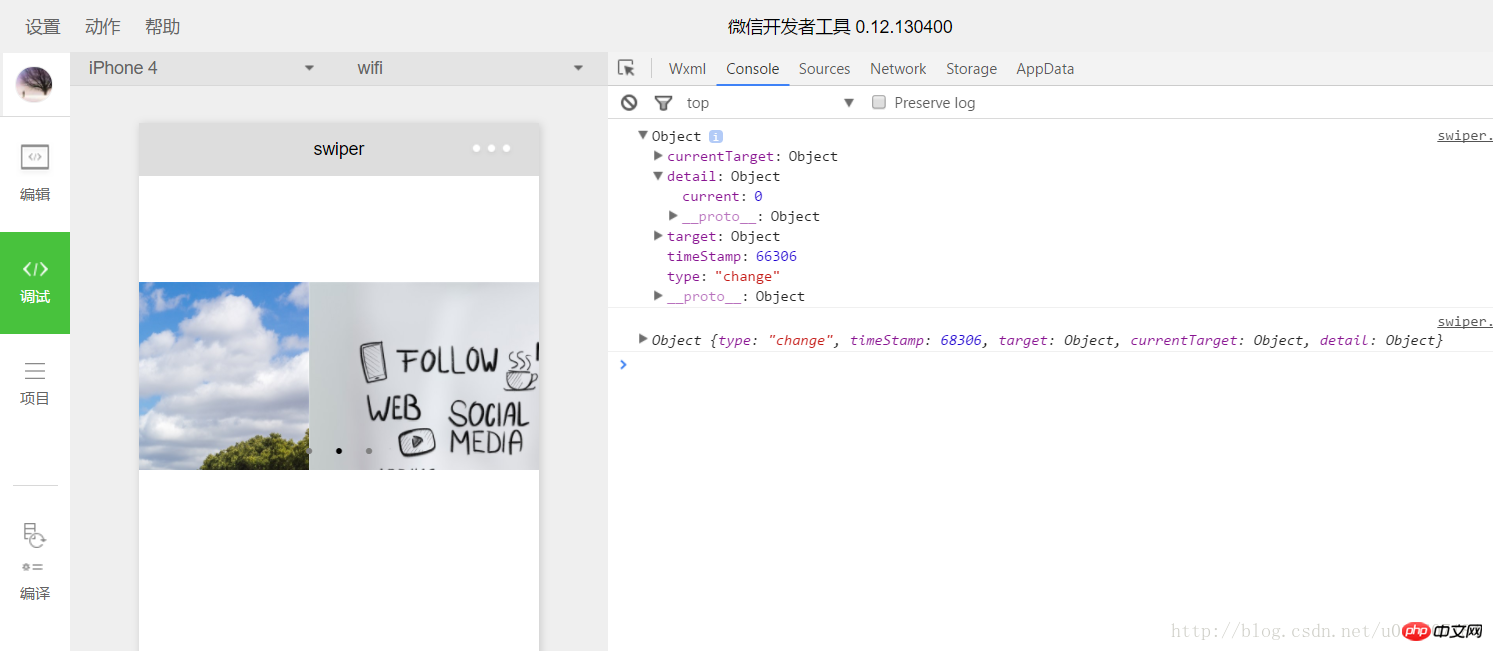
感谢阅读,希望能帮助到大家,谢谢大家对本站的支持!
위 내용은 WeChat 애플릿 보기 컨테이너 구성 요소의 예제 코드에 대한 자세한 설명의 상세 내용입니다. 자세한 내용은 PHP 중국어 웹사이트의 기타 관련 기사를 참조하세요!

