CSS3의 새로운 기능을 적용한 전환 및 애니메이션
- 高洛峰원래의
- 2017-02-23 10:47:561556검색
1. 이징 효과
이지,이지 인,이지 아웃,이지 아웃 및 선형을 기본으로 지원하는 베지어 곡선을 배우고 활용하세요
베지어 곡선의 시작점과 끝점을 맞춤 설정할 수 있는 큐빅-베이저도 제공합니다
Css는 하나의 베지어 곡선 이동만 지원합니다. 여러 연속 세그먼트가 있습니다
Cubase-beizer에서 제어 앵커 포인트의 수평 좌표와 수직 좌표를 교환하면 모든 조정 함수의 역 버전을 얻을 수 있습니다. Cuban-beizer(.1 ,.25,1,.25)는 여유의 역조정 기능입니다
수평좌표는 0~1 범위에서만 가능합니다. 시간
세로 좌표가 이 범위를 초과할 수 있으며 이동 거리로 표시됩니다
샘플 코드
<head>
    <meta charset="UTF-8">
    <title>Document</title>
    <style>
        @keyframes bounce{
            60%, 80%, to{
                transform: translateY(350px);
                animation-timing-function: ease-out; /*加速*/
            }
            70%{ transform: translateY(250px); }
            90%{ transform: translateY(300px) }
        }
        .ball{
            display: inline-block;
            animation: bounce 3s ease-in; /*减速*/
            width: 20px;
            height: 20px;
            border-radius: 50%;
            background: red;
        }
        @keyframes bounceEase{
            60%, 80%, to{
                transform: translateY(400px);
                animation-timing-function: ease;
            }
            70% { transform: translateY(300); }
            90% { transform: translateY(350px); }
        }
        .ball02{
            display: inline-block;
            animation: bounceEase 3s cubic-bezier(.1,.25,1,.25);/*反向ease*/
            margin-left: 60px;
            width: 20px;
            height: 20px;
            border-radius: 50%;
            background: gray;
        }
    </style></head><body>
    <p class="ball">
    </p>
    <p class="ball02"></p></body>

을 달성하려면 전환을 사용하세요. 전환에 주의하세요. -property의 기본값은 all이며 전환 가능한 모든 속성이 필터링됩니다.
샘플 코드:

2. 프레임별 애니메이션
애니메이션 타이밍의 단계 기능 -함수는 주로 프레임 애니메이션을 구현하는 데 사용됩니다.
타이밍 함수는 전체 애니메이션 프로세스가 아닌 두 키 프레임 사이에서 작동합니다. 🎜>
- 매개변수 1: 시간 함수의 간격 수를 나타내는 숫자(양수여야 함)
- 매개변수 2: 두 값 허용 : start 및 end, 지정 각 간격의 시작점 또는 끝점에서 단계 변경이 발생합니다. 기본 end, step-start 및 step-end는 각각 단계(1, start) 및 단계(1, end)의 약어입니다.
- 샘플 코드:
<head>
    <meta charset="UTF-8">
    <title>Document</title>
    <style>
        input:not(:focus) + .callout{
            transform: scale(0);
            transition-duration: .25s; /*覆盖默认的.5s时间*/
            transition-property: transform; /*只过渡transform属性,不过滤背景等其他属性*/
        }
        .callout{
            transition: .5s cubic-bezier(.25,.1,.3,1.5); /*光标输出input时,有动画*/
            transition-property: transform;/*只过渡transform属性,不过滤背景等其他属性*/
        }
        input{
            display: block;
        }
        .callout{
            background: #fed;
            position: absolute;
            max-width: 14em;
            padding: .6em, .8em;
        }
    </style></head><body>
    <label>
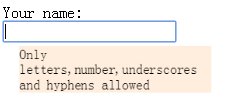
        Your name:        <input type="text" id="username" />
        <span class="callout">Only letters,number,underscores and hyphens allowed</span>
    </label></body>
3. 두 가지 깜박임 효과를 달성합니다. 하나는 부드러운 깜박임, 다른 하나는 프레임 깜박임(현실에 더 가깝습니다)
- 부드러운 깜박임
- 주로 animation-iteration 사용 - count와 animation-direction이라는 두 가지 속성으로 구현됩니다.
2.animation-direction: 애니메이션을 역방향으로 재생하기 위해 애니메이션을 회전할지 여부를 나타냅니다. 값이번갈아가면 animation- iteration-count 는 짝수여야 합니다. 홀수는 정상적으로 재생되므로 짝수는 역순으로 재생됩니다.
- 코드는 다음과 같습니다.
<head>
    <meta charset="UTF-8">
    <title>Document</title>
    <style>
        @keyframes loader{
            to{ background-position: -128px 0; }
        }
        .wrap{
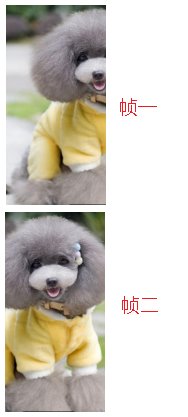
            background: url("../img/frameAnimate.png") no-repeat;
            width: 32px;
            height: 50px;
            background-position: 0px 0px;
            animation: loader 1s infinite steps(4);
        }
    </style></head><body>
    <p class="wrap"></p></body>
- 프레임 깜박임
- animation-timing-function 속성의 단계를 사용합니다. 두 개의 키 프레임을 여러 세그먼트로 나누어 애니메이션을 실행합니다
- 코드는 다음과 같습니다.
<style>
    @keyframes blink-smooth{
        to{ color: transparent; }
    }
    .wrap{
        animation: 1s blink-smooth;
        animation-iteration-count: 6;
        animation-direction: alternate;
    }</style><p class="wrap">我是平滑的显示和隐藏三次</p>
<style>
@keyframes blink-smooth02{
50% { color: transparent; }
}
.wrap02{
animation: 1s blink-smooth02;
animation-iteration-count: 3;
animation-timing-function: steps(1);
}</style><p class="wrap">我是逐帧的显示和隐藏三次</p>4. 타이핑 효과(한 줄 영어만 지원)
다음 기능:
1. 고정폭 글꼴에 ch 단위를 추가합니다. ch는 문자 '0'의 너비를 의미합니다.2. 애니메이션을 사용하여 요소의 너비를 0에서 최대 너비로 변경합니다.
3. 다음과 같이 (1) 단계를 사용하여 각 키 프레임에 대한 애니메이션 코드를 생성합니다.
 5 . 상태 부드러운 애니메이션
animation-play-state 속성을 사용하여 애니메이션의 일시 정지 및 재생 기능을 구현하고 배경 위치를 변경합니다. 샘플 코드는 다음과 같습니다.
93f0f5c25f18dab9d176bd4f6de5d30e
    a80eb7cbb6fff8b0ff70bae37074b813
    b2386ffb911b14667cb8f0f91ea547a7Document6e916e0f7d1e588d4f442bf645aedb2f
    c9ccee2e6ea535a969eb3f532ad9fe89
        @keyframes typing {
            from{ width: 0; }
        }
        @keyframes cart{
            50%{ border-color: currentColor; } /*利用steps在关键帧位置发生动画实现*/
        }
        .wrap{
            width: 14ch;
            animation: typing 8s steps(14) , cart 1s steps(1) infinite;
            white-space: nowrap;
            overflow: hidden;
            border-right:1px solid transparent;
            font-family: Courier New, Courier, monospace;
        }
    531ac245ce3e4fe3d50054a55f2659279c3bca370b5104690d9ef395f2c5f8d16c04bd5ca3fcae76e30b72ad730ca86d
    50b854f2b7f30b77542681f667e9f1e5Css is awesome94b3e26ee717c64999d7867364b1b4a336cc49f0c466276486e50c850b7e4956
 6. 원형 경로를 따라 번역하는 애니메이션
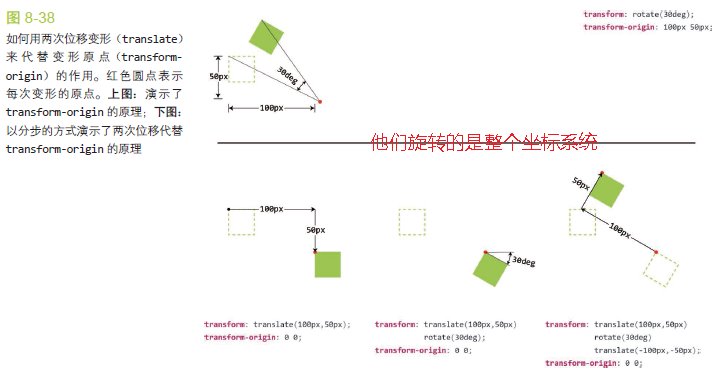
이것은 매우 흥미롭습니다. 중요한 점은 변환의 변형 기능(예: 회전, 이동 등)이 요소의 전체 좌표계에 영향을 미친다는 것입니다. 즉, 회전이 회전하면 전체 좌표계가 회전됩니다. 이는 원형 경로를 따라 요소를 이동하는 기본입니다. 개략도는 다음과 같습니다.

- 두 요소 구성인 변환 원본 + 회전을 구현할 수 있지만 html 구조에는 다음과 같이 두 요소가 필요합니다. 다음 코드에 표시됩니다.
<head>
    <meta charset="UTF-8">
    <title>Document</title>
    <style>
        @keyframes mic{
            to{ background-position: 100% 0; }
        }
        .wrap{
            background: url("../img/cat.png");
            background-repeat: no-repeat;
            background-size: auto 100%;
            width: 100px;
            height: 200px;
            animation: mic 5s linear infinite alternate; /*直线运动,永不停止,偶数反向运动*/
            animation-play-state: paused;
        }
        .wrap:hover, .wrap:active{
            animation-play-state: running;
        }
    </style></head><body>
    <p class="wrap"></p></body>
说明:
1..spin的transform-origin: 50% 150px;是进行变换原点的定位;
2.由于需要实现spin环形运动,transform本质特性是元素+元素内部子元素都要随着变换,因此需要对img元素进行反向变形
3.实现两种反向变形的方式:A:写一个反向变形动画;B:继承父级的动画,用animation-direction指定位reverse进行反向。
单个元素方案,利用translate和rotate(多次利用),html结构只有一层,代码如下:
<head>
    <meta charset="UTF-8">
    <title>Document</title>
    <style>
        /*反向旋转必须有,不然位置不对*/
        @keyframes spinc{
            from{
                transform: translate(50%, 150px)
                            rotate(0turn)
                            translate(-50%, -150px)
                            translate(50%, 50%)
                            rotate(1turn)
                            translate(-50%, -50%); /*前三个第一轮旋转,后三个第二轮旋转*/
            }
            to{
                transform: translate(50%, 150px)
                            rotate(1turn)
                            translate(-50%, -150px)
                            translate(50%, 50%)
                            rotate(0turn)
                            translate(-50%, -50%);
            }
        }
        .wrap{
            width: 300px;
            height: 300px;
            background: yellow;
            border-radius: 50%;
            overflow: hidden;
            padding: 20px; /*加大窗口的宽和高,利用背景从边框开始的原理,让运动图片与边框有一定的距离*/
        }
        .avatar{
            width: 30px;
            height: 30px;
            border-radius: 50%;
            overflow: hidden;
            margin: 0px auto; /*运行元素居中*/
            display: block;
            animation: spinc 5s linear infinite;
        }
    </style></head><body>
    <p class="wrap">
        <img src="../img/cat.png" alt="" class="avatar" />
    </p></body>
说明:
1.一个img然后即要沿环型路径运动,本身又不能随着旋转,那么就需要两组位移和旋转
2.第一组位移 + 旋转,实现img元素沿环形路径运动
translate(50%, 150px)
rotate(0turn)
translate(-50%, -150px)
3.第二组位移 + 旋转,实现img元素本身定位不动
translate(50%, 50%)
rotate(1turn)
translate(-50%, -50%)
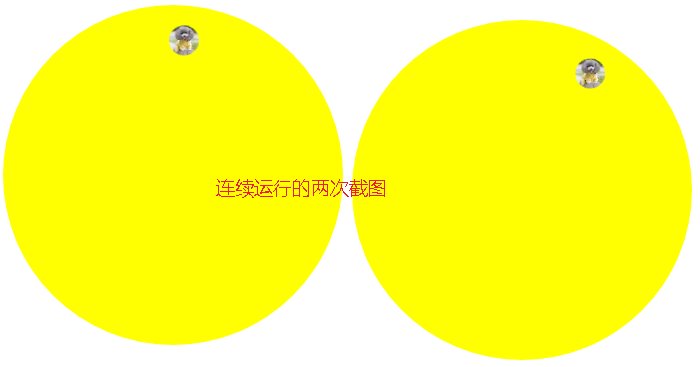
两个元素方案主单个元素方案效果图如下:

更多Css3新特性应用之过渡与动画 相关文章请关注PHP中文网!

