측면 슬라이딩 기능이 있는 Android DrawerLayout 레이아웃 클래스 (1)
- 高洛峰원래의
- 2017-01-07 14:32:231819검색
DrawerLayout은 이름에서 알 수 있듯이 레이아웃 관리자입니다. 사용법은 다른 레이아웃 클래스와 유사할 수 있습니다.
DrawerLayout에는 슬라이딩 기능이 있습니다. DrawerLayout의 규정된 레이아웃 방법에 따라 레이아웃을 작성하면 측면 슬라이딩 효과를 얻을 수 있습니다.
DrawerLayout을 루트 레이아웃으로 직접 사용하고 그 안에
첫 번째 뷰는 콘텐츠 영역
두 번째 뷰는 왼쪽 메뉴
세 가지 보기는 오른쪽의 슬라이딩 메뉴입니다.
세 번째 보기는 현재 선택 사항입니다.
사용된 패키지는 다음과 같습니다.
import android.support.v4.widget.DrawerLayout;
이러한 패키지를 사용할 때 오류가 보고되는 경우가 있습니다. 이때 android.support.v4가 최신 버전인지 확인하세요.
지원 패키지를 업데이트할 수 있으며 파일은 sdk/extres/support에 저장됩니다.
그런 다음 eclipse>프로젝트를 마우스 오른쪽 버튼으로 클릭>Android 도구>지원 라이브러리 추가...
를 사용하거나 파일을 프로젝트의 libs 폴더에 직접 복사할 수 있습니다. 즉
<android.support.v4.widget.DrawerLayout
 xmlns:android="http://schemas.android.com/apk/res/android"
 android:id="@+id/drawer_layout"
 android:layout_width="match_parent"
 android:layout_height="match_parent">
 <FrameLayout
  android:id="@+id/content_frame"
  android:layout_width="match_parent"
  android:layout_height="match_parent" />
 <ListView
  android:id="@+id/left_drawer"
  android:layout_width="240dp"
  android:layout_height="match_parent"
  android:layout_gravity="start"
  android:choiceMode="singleChoice"
  android:divider="@android:color/transparent"
  android:dividerHeight="0dp"
  android:background="#111"/>
</android.support.v4.widget.DrawerLayout>
android:layout_gravity="start"는 왼쪽 메뉴를 오른쪽으로 밀어 왼쪽/시작(오른쪽/오른쪽/오른쪽) 메뉴를 표시하는 것과 같습니다. END)
그러면 레이아웃 파일을 보면 알 수 있습니다.
FrameLayout은 콘텐츠 영역이고 ListView는 왼쪽 메뉴입니다.
콘텐츠를 로드하려면 프래그먼트를 만들어야 합니다.
왼쪽 메뉴에서 SelectItem을 선택하면 해당 값이 콘텐츠 영역에 표시되는 코드를 보면 알 수 있습니다. .
코드의 page_fragment_layout.xml은 FrameLayout에 TextView만 추가하므로 코드가 게시되지 않습니다.
public class PageFragment extends Fragment {
  public final static String ITEM_POSITION_NUMBER = "item_position_num";
  public PageFragment(){}
  @Override
  public View onCreateView(LayoutInflater inflater, ViewGroup container,
    Bundle savedInstanceState) {
   View convertView = inflater.inflate(R.layout.page_fragment_layout, null);
   TextView tv = (TextView) convertView.findViewById(R.id.textView);
   int num = getArguments().getInt(ITEM_POSITION_NUMBER);
   //从res/array中获取list数据
   String[] dynastyList = getResources().getStringArray(R.array.list_item);
   tv.setText(dynastyList[num]);
   return convertView;
  }
 }
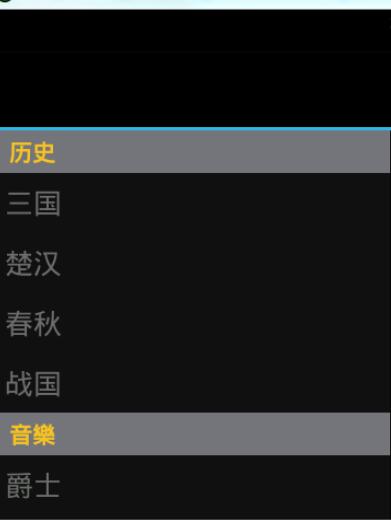
이 데이터 채우기가 좀 귀찮습니다. ListAdapter를 사용자 정의한 다음 이를 적용합니다.
데이터는 res/values/arrays.xml에 있습니다
private ListView menuList;
private String[] mMenuTitles;
private String[] historyTitles;
private String[] musicTitles;
private String[] movieTitles;
private String[] listTitles;
     // 历史栏
  historyTitles = getResources().getStringArray(R.array.history);
  // 音乐栏
  musicTitles = getResources().getStringArray(R.array.music);
  // 电影栏
  movieTitles = getResources().getStringArray(R.array.movie);
  // 标题数组
  mMenuTitles = getResources().getStringArray(R.array.title);
  // 每一項的標題
  listTitles = getResources().getStringArray(R.array.list_item);

  drawLayout = (DrawerLayout) findViewById(R.id.drawer_layout);
  menuList = (ListView) findViewById(R.id.left_menu);

  // 设置菜单阴影效果
  // drawLayout.setDrawerShadow(R.drawable.drawer_shadow,
  // GravityCompat.START);
  List<Item> list = new ArrayList<Item>();
  // 菜单加入历史标题和历史项
  HeaderItem historyHeader = new HeaderItem(mMenuTitles[0]);
  list.add(historyHeader);
  for (int i = 0; i < historyTitles.length; i++) {
   EventItem historyitem = new EventItem(historyTitles[i]);
   list.add(historyitem);
  }

  // 菜单加入音乐标题和音乐项
  HeaderItem musicHeader = new HeaderItem(mMenuTitles[1]);
  list.add(musicHeader);
  for (int i = 0; i < musicTitles.length; i++) {
   EventItem musicItem = new EventItem(musicTitles[i]);
   list.add(musicItem);
  }

  // 菜单加入电影标题和电影项
  HeaderItem movieHeader = new HeaderItem(mMenuTitles[2]);
  list.add(movieHeader);
  for (int i = 0; i < movieTitles.length; i++) {
   EventItem movieItem = new EventItem(movieTitles[i]);
   list.add(movieItem);
  }

  MyListAdapter adapter = new MyListAdapter(this, list);
  menuList.setAdapter(adapter);
listView의 모니터링이 있습니다.
<?xml version="1.0" encoding="utf-8"?>
<resources>
 <string-array name="history">
  <item >三国</item>
  <item >楚汉</item>
  <item >春秋</item>
  <item >战国</item>
 </string-array>
  <string-array name="music">
  <item >爵士</item>
  <item >古典</item>
  <item >现代</item>
  <item >民谣</item>
 </string-array>
  <string-array name="movie">
  <item >悬疑</item>
  <item >爱情</item>
  <item >历史</item>
  <item >恐怖</item>
 </string-array>
 <string-array name="title">
  <item >历史</item>
  <item >音樂</item>
  <item >电影</item>
 </string-array>
 <string-array name="list_item">
  <item >歷史</item>
  <item >三国</item>
  <item >楚汉</item>
  <item >春秋</item>
  <item >战国</item>
  <item >音樂</item>
  <item >爵士</item>
  <item >古典</item>
  <item >现代</item>
  <item >民谣</item>
  <item >電影</item>
  <item >悬疑</item>
  <item >爱情</item>
  <item >历史</item>
  <item >恐怖</item>
 </string-array>
</resources>
우리가 관심을 갖는 것은 항목이 코드란 무엇입니까?
 private void initListener() {
 // 菜单单击事件监听器
 menuList.setOnItemClickListener(new DrawerItemClickListener());
}

/* The click listner for ListView in the navigation drawer */
private class DrawerItemClickListener implements
  ListView.OnItemClickListener {
 @Override
 public void onItemClick(AdapterView<?> parent, View view, int position,
   long id) {
  Log.i("Light", "position:" + position);
  selectItem(position);
 }
}

private void selectItem(int position) {
 // update the main content by replacing fragments
 PageFragment fragment = new PageFragment();
 // 将当前选择的项传递到Fragment
 Bundle args = new Bundle();
 args.putInt(PageFragment.ITEM_POSITION_NUMBER, position);
 fragment.setArguments(args);

 FragmentTransaction ft = MainActivity.this.getSupportFragmentManager()
   .beginTransaction();
 ft.replace(R.id.content_frame, fragment).commit();

 drawLayout.closeDrawer(menuList);
 // update selected item and title, then close the drawer
 menuList.setItemChecked(position, true);
 // 注意这里改变的是ActionBar的标题
 getActionBar().setTitle(listTitles[position]);
}
코드에서 알 수 있듯이 1. 먼저 new PageFragment();를 통해 콘텐츠 영역을 얻습니다.
2. Bundle을 통해 데이터를 압축하고 조각이 이 데이터를 얻을 수 있도록 조각.setArguments(args)에 삽입합니다.private void selectItem(int position) {
// update the main content by replacing fragments
PageFragment fragment = new PageFragment();
// 将当前选择的项传递到Fragment
Bundle args = new Bundle();
args.putInt(PageFragment.ITEM_POSITION_NUMBER, position);
fragment.setArguments(args);
FragmentTransaction ft = MainActivity.this.getSupportFragmentManager()
.beginTransaction();
ft.replace(R.id.content_frame, fragment).commit();
drawLayout.closeDrawer(menuList);
// update selected item and title, then close the drawer
menuList.setItemChecked(position, true);
// 注意这里改变的是ActionBar的标题
getActionBar().setTitle(listTitles[position]);
} 전달된 값은 프래그먼트 클래스의 getArguments().getInt(ITEM_POSITION_NUMBER)를 통해 얻을 수 있습니다. 3. 그런 다음 ft.replace(R.id.content_frame,fragment).commit()를 통해 콘텐츠를 이전에 정의한 PageFragment로 교체합니다.
4. 전체에서 drawLayout.closeDrawer(menuList)를 통해 메뉴를 닫습니다. code DrawLayout
5 함수만 사용합니다. 동시에 ActionBar의 제목을 selectedItem에 해당하는 값으로 변경합니다.
*이때 누군가가 왜 ListView와 DrawerLayout 사이에 바인딩 작업이 없는지 묻습니다. 또한 DrawerLayout의 두 번째 시작은 내부적으로 바인딩된 View 메뉴라고 앞서 말한 바 있습니다.
이 콘텐츠를 사용하면 왼쪽 및 오른쪽 메뉴를 슬라이딩하는 효과를 얻을 수 있습니다.
 사이드 슬라이딩 기능이 있는 더 많은 Android DrawerLayout 레이아웃 클래스(1)를 보려면 PHP 중국어 웹사이트에서 관련 기사를 주목하세요!

