QQ 빠른 로그인을 구현하는 PHP 방법
- 高洛峰원래의
- 2016-12-30 13:49:352270검색
머리말:
PHP는 세 가지 방법을 나열하는 QQ 빠른 로그인을 구현합니다.
방법 1: 프로세스 지향, 콜백 주소 및 첫 번째 트리거 로그인이 방법 페이지에 기록됩니다. 판단],
방법 2와 3: 객체 지향
1. 먼저 로그인 방법을 호출하고 Tencent에 요청을 보냅니다.
2. 본 웹사이트의 해당 매개변수 OPENID, ACCESSTOKEN을 확인하고 해당 콜백 페이지
로 돌아갑니다. 3. 콜백 페이지는 Tencent의 매개변수를 수신한 후 이 두 매개변수를 사용하여 사용자 데이터 쿼리 등 해당 요청을 발행합니다.
4. Tencent는 사용자의 데이터를 귀하에게 반환하는 등 해당 작업을 수행합니다.
귀하가 이해하지 못하더라도 아래 절차에 따라 확인하십시오. 그것을 달성할 수 있습니다.
초기 준비:
Tencent의 기능을 사용할 때는 먼저 인사를 해야 합니다!
QQ 인터넷 홈페이지: http://connect.qq.com/
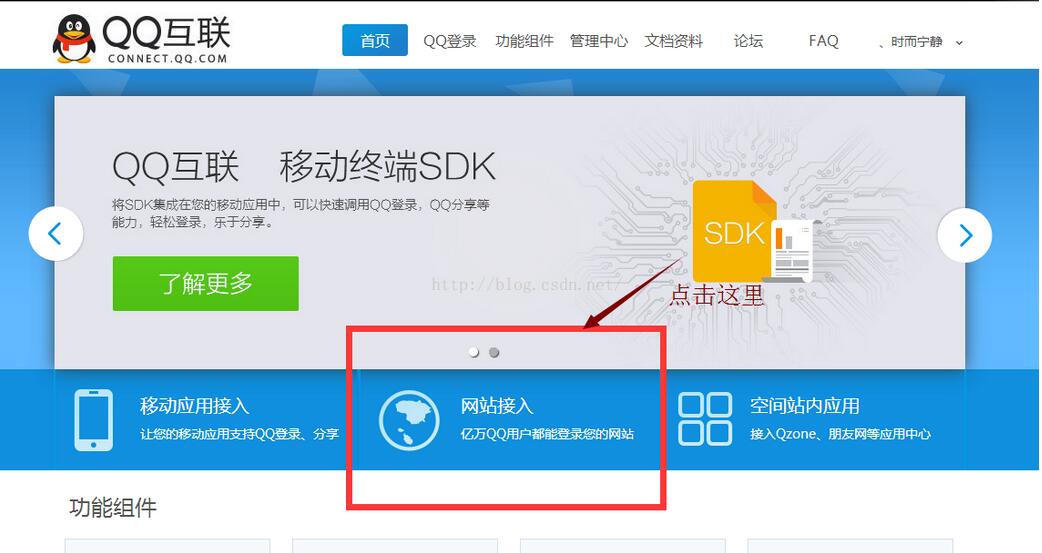
홈페이지에 접속하신 후, 다음과 같이 해주세요.
1. 공식 홈페이지에 접속하세요

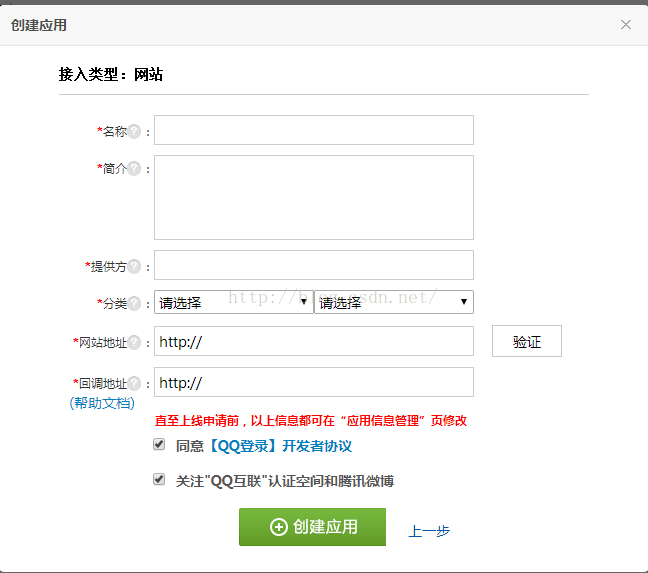
2. [웹사이트] 애플리케이션 만들기 신청

필요한 정보를 입력하세요
웹사이트 주소를 기록하세요. 빠른 로그인을 위해 URL을 설정해야 합니다. 예: http://www.test.com
콜백 주소: QQ 빠른 로그인을 보낸 후 Tencent에서 알려드립니다. 이 정보는 이 페이지에서 허용됩니다. 예: http://www.test.com/accept_info.php
[자세한 지원서 작성 방법은 공식 팁을 참조하세요. 여기서는 설명하지 않습니다.]

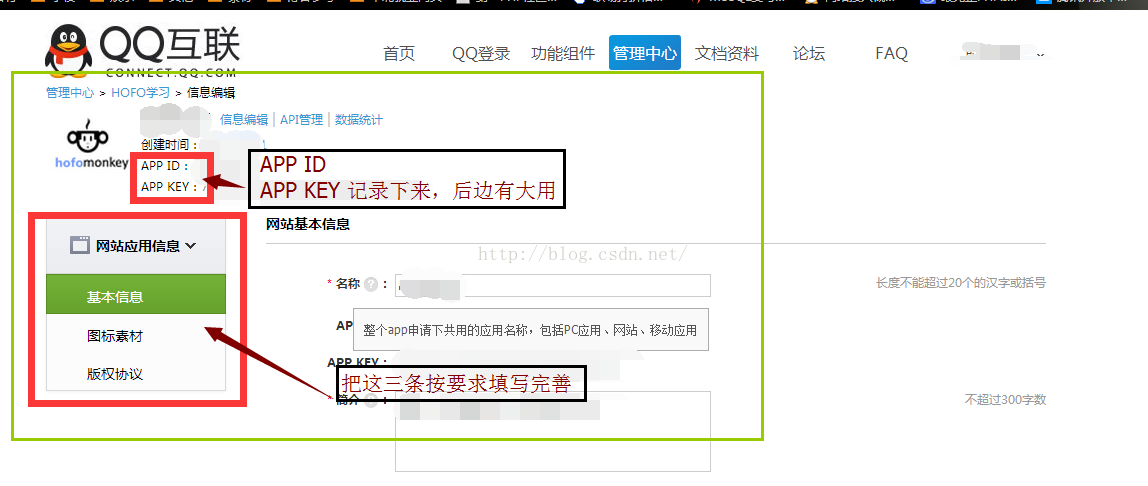
4. 신청 성공 후

최종 요구 사항을 완료하고 APP_ID, APP_KEY
를 얻습니다.5. >
해당 PHP 파일에 다음과 같이 작성합니다방법 1, 프로세스 중심 방법
사용법: $app_id, $app_secret, $my_url을 구성한 후 나머지는 그대로 복사하고, $ user_data는 반환된 로그인 정보입니다
코드:
//应用的APPID
$app_id = "你的APPID";
//应用的APPKEY
$app_secret = "你的APPKEY";
//【成功授权】后的回调地址,即此地址在腾讯的信息中有储存
$my_url = "你的回调网址";
//Step1:获取Authorization Code
session_start();
$code = $_REQUEST["code"];//存放Authorization Code
if(empty($code))
{
//state参数用于防止CSRF攻击,成功授权后回调时会原样带回
$_SESSION['state'] = md5(uniqid(rand(), TRUE));
//拼接URL
$dialog_url = "https://graph.qq.com/oauth2.0/authorize?response_type=code&client_id="
. $app_id . "&redirect_uri=" . urlencode($my_url) . "&state="
. $_SESSION['state'];
echo("<script> top.location.href='" . $dialog_url . "'</script>");
}
//Step2:通过Authorization Code获取Access Token
if($_REQUEST['state'] == $_SESSION['state'] || 1)
{
//拼接URL
$token_url = "https://graph.qq.com/oauth2.0/token?grant_type=authorization_code&"
. "client_id=" . $app_id . "&redirect_uri=" . urlencode($my_url)
. "&client_secret=" . $app_secret . "&code=" . $code;
$response = file_get_contents($token_url);
if (strpos($response, "callback") !== false)//如果登录用户临时改变主意取消了,返回true!==false,否则执行step3
{
$lpos = strpos($response, "(");
$rpos = strrpos($response, ")");
$response = substr($response, $lpos + 1, $rpos - $lpos -1);
$msg = json_decode($response);
if (isset($msg->error))
{
echo "<h3>error:</h3>" . $msg->error;
echo "<h3>msg :</h3>" . $msg->error_description;
exit;
}
}
//Step3:使用Access Token来获取用户的OpenID
$params = array();
parse_str($response, $params);//把传回来的数据参数变量化
$graph_url = "https://graph.qq.com/oauth2.0/me?access_token=".$params['access_token'];
$str = file_get_contents($graph_url);
if (strpos($str, "callback") !== false)
{
$lpos = strpos($str, "(");
$rpos = strrpos($str, ")");
$str = substr($str, $lpos + 1, $rpos - $lpos -1);
}
$user = json_decode($str);//存放返回的数据 client_id ,openid
if (isset($user->error))
{
echo "<h3>error:</h3>" . $user->error;
echo "<h3>msg :</h3>" . $user->error_description;
exit;
}
//echo("Hello " . $user->openid);
//echo("Hello " . $params['access_token']);
//Step4:使用<span style="font-family: Arial, Helvetica, sans-serif;">openid,</span><span style="font-family: Arial, Helvetica, sans-serif;">access_token来获取所接受的用户信息。</span>
$user_data_url = "https://graph.qq.com/user/get_user_info?access_token={$params['access_token']}&oauth_consumer_key={$app_id}&openid={$user->openid}&format=json";
$user_data = file_get_contents($user_data_url);//此为获取到的user信息
}
else
{
echo("The state does not match. You may be a victim of CSRF.");
}방법 2, QQ_LoginAction.class 클래스를 사용하는 객체 지향사용 방법:
1. APPID, APPKEY CALLBACK(콜백)을 올바르게 구성합니다. URL) in QQ_LoginAction.class
2. 호출 메소드에서 코드는
$qq_login = new \Component\QQ_LoginAction();    //引入此类文件即可
$qq_login->qq_login();          //调用登录方法,向腾讯发出快速登录请求
3입니다. 콜백 페이지에서 코드는
$qc = new \Component\QQ_LoginAction();
$acs = $qc->qq_callback();<span style="white-space:pre">    //access_token
$oid=$qc->get_openid();<span style="white-space:pre">     //openid
$user_data = $qc->get_user_info();<span style="white-space:pre">  //get_user_info()为获得该用户的信息,其他操作方法见API文档
4입니다. $user_data는 반환된 사용자 데이터입니다.
5.QQ_LoginAction.class.php 파일 코드: [ThinkPHP3.2 사용]
<?php
namespace Component;
session_start();
define('APPID','XXXX'); //appid
define('APPKEY','XXXX'); //appkey
define('CALLBACK','XXXX'); //回调地址
define('SCOPE','get_user_info,list_album,add_album,upload_pic,add_topic,add_weibo'); //授权接口列表
class QQ_LoginAction {
const GET_AUTH_CODE_URL = "https://graph.qq.com/oauth2.0/authorize";
const GET_ACCESS_TOKEN_URL = "https://graph.qq.com/oauth2.0/token";
const GET_OPENID_URL = "https://graph.qq.com/oauth2.0/me";
private $APIMap = array(
"get_user_info" => array( //获取用户资料
"https://graph.qq.com/user/get_user_info",
array("format" => "json"),
),
"add_t" => array( //发布一条普通微博
"https://graph.qq.com/t/add_t",
array("format" => "json", "content","#clientip","#longitude","#latitude","#compatibleflag"),
"POST"
),
"add_pic_t" => array( //发布一条图片微博
"https://graph.qq.com/t/add_pic_t",
array("content", "pic", "format" => "json", "#clientip", "#longitude", "#latitude", "#syncflag", "#compatiblefalg"),
"POST"
),
"del_t" => array( //删除一条微博
"https://graph.qq.com/t/del_t",
array("id", "format" => "json"),
"POST"
),
"get_repost_list" => array( //获取单条微博的转发或点评列表
"https://graph.qq.com/t/get_repost_list",
array("flag", "rootid", "pageflag", "pagetime", "reqnum", "twitterid", "format" => "json")
),
"get_info" => array( //获取当前用户资料
"https://graph.qq.com/user/get_info",
array("format" => "json")
),
"get_other_info" => array( //获取其他用户资料
"https://graph.qq.com/user/get_other_info",
array("format" => "json", "#name-1", "#fopenid-1")
),
"get_fanslist" => array(
"https://graph.qq.com/relation/get_fanslist", //我的微博粉丝列表
array("format" => "json", "reqnum", "startindex", "#mode", "#install", "#sex")
),
"get_idollist" => array(
"https://graph.qq.com/relation/get_idollist", //我的微博收听列表
array("format" => "json", "reqnum", "startindex", "#mode", "#install")
),
"add_idol" => array(
"https://graph.qq.com/relation/add_idol", //微博收听某用户
array("format" => "json", "#name-1", "#fopenids-1"),
"POST"
),
"del_idol" => array( //微博取消收听某用户
"https://graph.qq.com/relation/del_idol",
array("format" => "json", "#name-1", "#fopenid-1"),
"POST"
)
);
private $keysArr;
function __construct(){
if($_SESSION["openid"]){
$this->keysArr = array(
"oauth_consumer_key" => APPID,
"access_token" => $_SESSION['access_token'],
"openid" => $_SESSION["openid"]
);
}else{
$this->keysArr = array(
"oauth_consumer_key" => APPID
);
}
}
public function qq_login(){
//-------生成唯一随机串防CSRF攻击
$_SESSION['state'] = md5(uniqid(rand(), TRUE));
$keysArr = array(
"response_type" => "code",
"client_id" => APPID,
"redirect_uri" => CALLBACK,
"state" => $_SESSION['state'],
"scope" => SCOPE
);
$login_url = self::GET_AUTH_CODE_URL.'?'.http_build_query($keysArr);
header("Location:$login_url");
}
public function qq_callback(){
//--------验证state防止CSRF攻击
if($_GET['state'] != $_SESSION['state']){
return false;
}
//-------请求参数列表
$keysArr = array(
"grant_type" => "authorization_code",
"client_id" => APPID,
"redirect_uri" => CALLBACK,
"client_secret" => APPKEY,
"code" => $_GET['code']
);
//------构造请求access_token的url
$token_url = self::GET_ACCESS_TOKEN_URL.'?'.http_build_query($keysArr);
$response = $this->get_contents($token_url);
if(strpos($response, "callback") !== false){
$lpos = strpos($response, "(");
$rpos = strrpos($response, ")");
$response = substr($response, $lpos + 1, $rpos - $lpos -1);
$msg = json_decode($response);
if(isset($msg->error)){
$this->showError($msg->error, $msg->error_description);
}
}
$params = array();
parse_str($response, $params);
$_SESSION["access_token"]=$params["access_token"];
$this->keysArr['access_token']=$params['access_token'];
return $params["access_token"];
}
public function get_contents($url){
if (ini_get("allow_url_fopen") == "1") {
$response = file_get_contents($url);
}else{
$ch = curl_init();
curl_setopt($ch, CURLOPT_SSL_VERIFYPEER, FALSE);
curl_setopt($ch, CURLOPT_RETURNTRANSFER, TRUE);
curl_setopt($ch, CURLOPT_URL, $url);
$response = curl_exec($ch);
curl_close($ch);
}
if(empty($response)){
return false;
}
return $response;
}
public function get_openid(){
//-------请求参数列表
$keysArr = array(
"access_token" => $_SESSION["access_token"]
);
$graph_url = self::GET_OPENID_URL.'?'.http_build_query($keysArr);
$response = $this->get_contents($graph_url);
//--------检测错误是否发生
if(strpos($response, "callback") !== false){
$lpos = strpos($response, "(");
$rpos = strrpos($response, ")");
$response = substr($response, $lpos + 1, $rpos - $lpos -1);
}
$user = json_decode($response);
if(isset($user->error)){
$this->showError($user->error, $user->error_description);
}
//------记录openid
$_SESSION['openid']=$user->openid;
$this->keysArr['openid']=$user->openid;
return $user->openid;
}
/**
* showError
* 显示错误信息
* @param int $code 错误代码
* @param string $description 描述信息(可选)
*/
public function showError($code, $description = '$'){
echo "<meta charset=\"UTF-8\">";
echo "<h3>error:</h3>$code";
echo "<h3>msg :</h3>$description";
exit();
}
/**
* _call
* 魔术方法,做api调用转发
* @param string $name 调用的方法名称
* @param array $arg 参数列表数组
* @since 5.0
* @return array 返加调用结果数组
*/
public function __call($name,$arg){
//如果APIMap不存在相应的api
if(empty($this->APIMap[$name])){
$this->showError("api调用名称错误","不存在的API: <span style='color:red;'>$name</span>");
}
//从APIMap获取api相应参数
$baseUrl = $this->APIMap[$name][0];
$argsList = $this->APIMap[$name][1];
$method = isset($this->APIMap[$name][2]) ? $this->APIMap[$name][2] : "GET";
if(empty($arg)){
$arg[0] = null;
}
$responseArr = json_decode($this->_applyAPI($arg[0], $argsList, $baseUrl, $method),true);
//检查返回ret判断api是否成功调用
if($responseArr['ret'] == 0){
return $responseArr;
}else{
$this->showError($responseArr['ret'], $responseArr['msg']);
}
}
//调用相应api
private function _applyAPI($arr, $argsList, $baseUrl, $method){
$pre = "#";
$keysArr = $this->keysArr;
$optionArgList = array();//一些多项选填参数必选一的情形
foreach($argsList as $key => $val){
$tmpKey = $key;
$tmpVal = $val;
if(!is_string($key)){
$tmpKey = $val;
if(strpos($val,$pre) === 0){
$tmpVal = $pre;
$tmpKey = substr($tmpKey,1);
if(preg_match("/-(\d$)/", $tmpKey, $res)){
$tmpKey = str_replace($res[0], "", $tmpKey);
$optionArgList[]= $tmpKey;
}
}else{
$tmpVal = null;
}
}
//-----如果没有设置相应的参数
if(!isset($arr[$tmpKey]) || $arr[$tmpKey] === ""){
if($tmpVal == $pre){
continue;
}else if($tmpVal){//则使用默认的值
$arr[$tmpKey] = $tmpVal;
}else{
$this->showError("api调用参数错误","未传入参数$tmpKey");
}
}
$keysArr[$tmpKey] = $arr[$tmpKey];
}
//检查选填参数必填一的情形
if(count($optionArgList)!=0){
$n = 0;
foreach($optionArgList as $val){
if(in_array($val, array_keys($keysArr))){
$n++;
}
}
if(!$n){
$str = implode(",",$optionArgList);
$this->showError("api调用参数错误",$str."必填一个");
}
}
if($method == "POST"){
$response = $this->post($baseUrl, $keysArr, 0);
}else if($method == "GET"){
$baseUrl=$baseUrl.'?'.http_build_query($keysArr);
$response = $this->get_contents($baseUrl);
}
return $response;
}
public function post($url, $keysArr, $flag = 0){
$ch = curl_init();
if(! $flag) curl_setopt($ch, CURLOPT_SSL_VERIFYPEER, FALSE);
curl_setopt($ch, CURLOPT_RETURNTRANSFER, TRUE);
curl_setopt($ch, CURLOPT_POST, TRUE);
curl_setopt($ch, CURLOPT_POSTFIELDS, $keysArr);
curl_setopt($ch, CURLOPT_URL, $url);
$ret = curl_exec($ch);
curl_close($ch);
return $ret;
}
}방법 3, Tencent에서 제공하는 SDK를 이용한 객체 지향사용 방법: Tencent SDK, API 글 내용이 매우 자세해서 자세한 내용은 다루지 않겠습니다.
주소: http://wiki.connect.qq.com/%E7%BD%91%E7%AB%99%E6%8E%A5%E5% 85%A5%E6 %A6%82%E8%BF%B0
불명확한 내용이 있으면 공식 소개를 읽어보세요.
방법: HOST 구성 파일 수정
1. 열기 C :WindowsSystem32driversetchost
2. 127.0.0.1 www.test.com
을 추가하면 완료됩니다.

