PHP 디자인 패턴 어댑터 패턴
- 高洛峰원래의
- 2016-11-17 10:23:161187검색
소개
어댑터 패턴(때때로 래퍼 스타일 또는 래퍼라고도 함)은 사용자가 기대하는 대로 클래스의 인터페이스를 조정합니다. 적응을 통해 일반적으로 호환되지 않는 인터페이스로 인해 함께 작동하지 않는 클래스가 함께 작동할 수 있습니다.
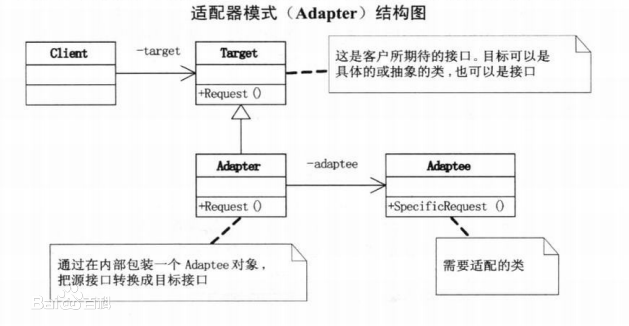
UML
역할
대상 적응 대상: 이 역할은 다른 클래스가 어떤 인터페이스로 변환되는지 정의하며, 이것이 우리가 기대하는 인터페이스입니다.
Adaptee: 조정이 필요한 인터페이스입니다.
어댑터 어댑터: 다른 두 역할은 기존 역할이며 어댑터 역할은 새로 생성해야 합니다. 이는 Adaptee 및 Target 인터페이스를 조정하는 데 사용됩니다.

응용 시나리오
프로그램 데이터베이스가 mysql, mysqli, pdo, sqlite, postgresql 및 기타 작업과 연결되어 있고 데이터베이스를 변경해야 하는 경우 상황에 따라 동작하며, 어댑터 패턴을 이용하여 인터페이스를 통일할 수 있으므로 데이터베이스 구성 외에는 코드에 추가적인 변경이 필요하지 않습니다.
Memcache를 사용하든 Redis를 사용하든 교체 시 매우 편리하고 시간이 절약되는 시나리오도 마찬가지입니다.
참고: 이 모드는 일부 인기 있는 프레임워크에서 볼 수 있습니다. 자세한 내용은 프레임워크 소스 코드를 참조하세요.
코드 구현:
<?php
header('Content-Type:text/html;charset=utf-8');
/**
* 适配器模式演示代码
* Target适配目标: IDataBase接口
* Adaptee被适配者: mysql和mysql_i、postgresql的数据库操作函数
* Adapter适配器 :mysql类和mysql_i、postgresql类
*/
/**
* Interface IDatabase 适配目标,规定的接口将被适配对象实现
* 约定好统一的api行为
*/
interface IDatabase
{
// 定义数据库连接方法
public function connect($host, $username, $password, $database);
// 定义数据库查询方法
public function query($sql);
// 关闭数据库
public function close();
}
/**
* Class Mysql 适配器
*/
class Mysql implements IDatabase
{
protected $connect; // 连接资源
/**
* 实现连接方法
*
* @param $host host
* @param $username 用户名
* @param $password 密码
* @param $database 数据库名
*/
public function connect($host, $username, $password, $database)
{
$connect = mysql_connect($host, $username, $password);
mysql_select_db($database, $connect);
$this->connect = $connect;
//其他操作
}
/**
* 实现查询方法
*
* @param $sql 需要被查询的sql语句
* @return mi
*/
public function query($sql)
{
return mysql_query($sql);
}
// 实现关闭方法
public function close()
{
mysql_close();
}
}
/**
* Class Mysql 适配器
*/
class Mysql_i implements IDatabase
{
protected $connect; // 连接资源
/**
* 实现连接方法
*
* @param $host host
* @param $username 用户名
* @param $password 密码
* @param $database 数据库名
*/
public function connect($host, $username, $password, $database)
{
$connect = mysqli_connect($host, $username, $password, $database);
$this->connect = $connect;
//其他操作
}
/**
* 实现查询方法
*
* @param $sql 需要被查询的sql语句
*/
public function query($sql)
{
return mysqli_query($this->connect, $sql);
}
// 实现关闭
public function close()
{
mysqli_close($this->connect);
}
}
/**
* Class Postgresql 适配器
*/
class Postgresql implements IDatabase
{
protected $connect; // 连接资源
/**
* 实现连接方法
*
* @param $host
* @param $username
* @param $password
* @param $database
*/
public function connect($host, $username, $password, $database)
{
$this->connect = pg_connect("host=$host dbname=$database user=$username password=$password");
//其他操作
}
/**
* 实现查询方法
*
* @param $sql 需要被查询的sql语句
*/
public function query($sql)
{
// 其他操作
}
// 实现关闭方法
public function close()
{
}
}
/**
* 客户端使用演示
* 这里以mysql为例
* 只要模式设计好,不论有多少种数据库,实现和调用方式都是一样的
* 因为都是实现的同一个接口,所以都是可以随意切换的
*/
$host = 'localhost';
$username = 'root';
$password = 'root';
$database = 'mysql';
//$client = new Postgresql();
//$client = new Mysql();
$client = new Mysql_i();
$client->connect($host, $username, $password, $database);
$result = $client->query("select * from db");
while ($rows = mysqli_fetch_array($result)) {
var_dump($rows);
}
$client->close();실행 결과:
array(44) {
  [0]=>
  string(1) "%"
  ["Host"]=>
  string(1) "%"
  [1]=>
  string(4) "test"
  ["Db"]=>
  string(4) "test"
  [2]=>
  string(0) ""
  ["User"]=>
  string(0) ""
  [3]=>
  string(1) "Y"
  ["Select_priv"]=>
  string(1) "Y"
  [4]=>
  string(1) "Y"
  ["Insert_priv"]=>
  string(1) "Y"
  [5]=>
  string(1) "Y"
  ["Update_priv"]=>
  string(1) "Y"
  [6]=>
  string(1) "Y"
  ["Delete_priv"]=>
  string(1) "Y"
  [7]=>
  string(1) "Y"
  ["Create_priv"]=>
  string(1) "Y"
  [8]=>
  string(1) "Y"
  ["Drop_priv"]=>
  string(1) "Y"
  [9]=>
  string(1) "N"
  ["Grant_priv"]=>
  string(1) "N"
  [10]=>
  string(1) "Y"
  ["References_priv"]=>
  string(1) "Y"
  [11]=>
  string(1) "Y"
  ["Index_priv"]=>
  string(1) "Y"
  [12]=>
  string(1) "Y"
  ["Alter_priv"]=>
  string(1) "Y"
  [13]=>
  string(1) "Y"
  ["Create_tmp_table_priv"]=>
  string(1) "Y"
  [14]=>
  string(1) "Y"
  ["Lock_tables_priv"]=>
  string(1) "Y"
  [15]=>
  string(1) "Y"
  ["Create_view_priv"]=>
  string(1) "Y"
  [16]=>
  string(1) "Y"
  ["Show_view_priv"]=>
  string(1) "Y"
  [17]=>
  string(1) "Y"
  ["Create_routine_priv"]=>
  string(1) "Y"
  [18]=>
  string(1) "N"
  ["Alter_routine_priv"]=>
  string(1) "N"
  [19]=>
  string(1) "N"
  ["Execute_priv"]=>
  string(1) "N"
  [20]=>
  string(1) "Y"
  ["Event_priv"]=>
  string(1) "Y"
  [21]=>
  string(1) "Y"
  ["Trigger_priv"]=>
  string(1) "Y"
}
위 결과를 보면 데이터베이스 연결이 되어 있는 것을 알 수 있다. 쿼리문이 성공적으로 실행되었습니다.
성명:
본 글의 내용은 네티즌들의 자발적인 기여로 작성되었으며, 저작권은 원저작자에게 있습니다. 본 사이트는 이에 상응하는 법적 책임을 지지 않습니다. 표절이나 침해가 의심되는 콘텐츠를 발견한 경우 admin@php.cn으로 문의하세요.

