


Mac OS X installs
This section contains notes and hints specific to installing PHP on Mac OS X.
Using Packages
There are a few pre-packaged and pre-compiled versions of PHP for Mac OS X. This can greatly assist in setting up a standard configuration, but if you need to have a different set of features (such as a secure server, or a different database driver), you may need to build PHP and/or your web server yourself. If you are unfamiliar with building and compiling your own software, it's worth investigating whether or not somebody has already built a packaged version of PHP with the features you need. Lightyear Design offers a pre-built version of PHP for OS X, as does Tenon Intersystems.
Compiling for OS X server
There are two slightly different versions of Mac OS X, client and server. The following is for OS X Server.
Example 2-3. Mac OS X server install
1. Get the latest distributions of Apache and PHP
2. Untar them, and run the configure program on Apache like so.
./configure --exec-prefix=/usr
--localstatedir=/var
--mandir=/usr/share/man
--libexecdir=/System/Library/Apache/Modules
--iconsdir=/System/Library/Apache/Icons
--includedir=/System/Library/Frameworks/Apache.framework/Versions/1.3/Headers
--enable-shared=max
--enable-module=most
--target=apache
4. You may also want to add this line:
setenv OPTIM=-O2
If you want the compiler to do some optimization.
5. Next, go to the php4 source directory and configure it.
./configure --prefix=/usr
--sysconfdir=/etc
--localstatedir=/var
--mandir=/usr/share/man
--with-xml
--with-apache=/src/apache_1.3.12
If you have any other addiitons (MySQL, GD, etc.), be sure to add
them here. For the --with-apache string, put in the path to your
apache source directory, for example "/src/apache_1.3.12".
6. make
7. make install
This will add a directory to your Apache source directory under
src/modules/php4.
8. Now, reconfigure Apache to build in PHP4.
./configure --exec-prefix=/usr
--localstatedir=/var
--mandir=/usr/share/man
--libexecdir=/System/Library/Apache/Modules
--iconsdir=/System/Library/Apache/Icons
--includedir=/System/Library/Frameworks/Apache.framework/Versions/1.3/Headers
--enable-shared=max
--enable-module=most
--target=apache
--activate-module=src/modules/php4/libphp4.a
You may get a message telling you that libmodphp4.a is out of date.
If so, go to the src/modules/php4 directory inside your apache
source directory and run this command:
ranlib libmodphp4.a
Then go back to the root of the apache source directory and run the
above configure command again. That'll bring the link table up to
date.
9. make
10. make install
11. copy and rename the php.ini-dist file to your "bin" directory from your
php4 source directory:
cp php.ini-dist /usr/local/bin/php.ini
or (if your don't have a local directory)
cp php.ini-dist /usr/bin/php.ini

 图文详解apache2.4+php8.0的安装配置方法Dec 06, 2022 pm 04:53 PM
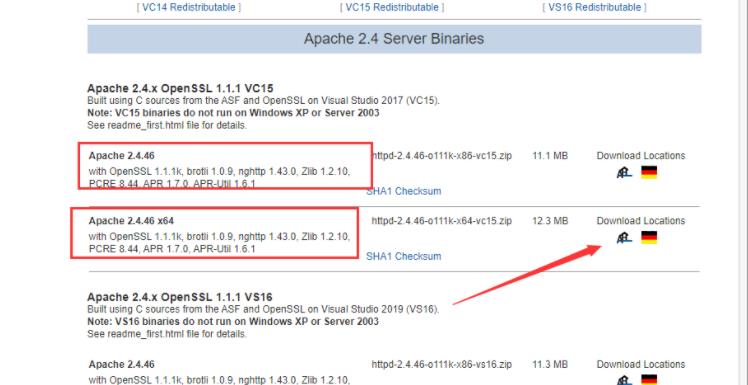
本文给大家介绍如何安装apache2.4,以及如何配置php8.0,文中附有图文详细步骤,下面就带大家一起看看怎么安装配置apache2.4+php8.0吧~
 Linux apache怎么限制并发连接和下载速度May 12, 2023 am 10:49 AM
mod_limitipconn,这个是apache的一个非官方模块,根据同一个来源ip进行并发连接控制,bw_mod,它可以根据来源ip进行带宽限制,它们都是apache的第三方模块。1.下载:wgetwget2.安装#tar-zxvfmod_limitipconn-0.22.tar.gz#cdmod_limitipconn-0.22#vimakefile修改:apxs=“/usr/local/apache2/bin/apxs”#这里是自己apache的apxs路径,加载模块或者#/usr/lo
 apache版本怎么查看?Jun 14, 2019 pm 02:40 PM
查看apache版本的步骤:1、进入cmd命令窗口;2、使用cd命令切换到Apache的bin目录下,语法“cd bin目录路径”;3、执行“httpd -v”命令来查询版本信息,在输出结果中即可查看apache版本号。
 超细!Ubuntu20.04安装Apache+PHP8环境Mar 21, 2023 pm 03:26 PM
本篇文章给大家带来了关于PHP的相关知识,其中主要跟大家分享在Ubuntu20.04 LTS环境下安装Apache的全过程,并且针对其中可能出现的一些坑也会提供解决方案,感兴趣的朋友下面一起来看一下吧,希望对大家有帮助。
 nginx,tomcat,apache的区别是什么May 15, 2023 pm 01:40 PM
1.Nginx和tomcat的区别nginx常用做静态内容服务和代理服务器,直接外来请求转发给后面的应用服务器(tomcat,Django等),tomcat更多用来做一个应用容器,让javawebapp泡在里面的东西。严格意义上来讲,Apache和nginx应该叫做HTTPServer,而tomcat是一个ApplicationServer是一个Servlet/JSO应用的容器。客户端通过HTTPServer访问服务器上存储的资源(HTML文件,图片文件等),HTTPServer是中只是把服务器
 php站用iis乱码而apache没事怎么解决Mar 23, 2023 pm 02:48 PM
在使用 PHP 进行网站开发时,你可能会遇到字符编码问题。特别是在使用不同的 Web 服务器时,会发现 IIS 和 Apache 处理字符编码的方法不同。当你使用 IIS 时,可能会发现在使用 UTF-8 编码时出现了乱码现象;而在使用 Apache 时,一切正常,没有出现任何问题。这种情况应该怎么解决呢?
 如何在 RHEL 9/8 上设置高可用性 Apache(HTTP)集群Jun 09, 2023 pm 06:20 PM
Pacemaker是适用于类Linux操作系统的高可用性集群软件。Pacemaker被称为“集群资源管理器”,它通过在集群节点之间进行资源故障转移来提供集群资源的最大可用性。Pacemaker使用Corosync进行集群组件之间的心跳和内部通信,Corosync还负责集群中的投票选举(Quorum)。先决条件在我们开始之前,请确保你拥有以下内容:两台RHEL9/8服务器RedHat订阅或本地配置的仓库通过SSH访问两台服务器root或sudo权限互联网连接实验室详情:服务器1:node1.exa
 Linux下如何查看nginx、apache、mysql和php的编译参数May 14, 2023 pm 10:22 PM
快速查看服务器软件的编译参数:1、nginx编译参数:your_nginx_dir/sbin/nginx-v2、apache编译参数:catyour_apache_dir/build/config.nice3、php编译参数:your_php_dir/bin/php-i|grepconfigure4、mysql编译参数:catyour_mysql_dir/bin/mysqlbug|grepconfigure以下是完整的实操例子:查看获取nginx的编译参数:[root@www~]#/usr/lo


핫 AI 도구

Undresser.AI Undress
사실적인 누드 사진을 만들기 위한 AI 기반 앱

AI Clothes Remover
사진에서 옷을 제거하는 온라인 AI 도구입니다.

Undress AI Tool
무료로 이미지를 벗다

Clothoff.io
AI 옷 제거제

AI Hentai Generator
AI Hentai를 무료로 생성하십시오.

인기 기사
뜨거운 도구

DVWA
DVWA(Damn Vulnerable Web App)는 매우 취약한 PHP/MySQL 웹 애플리케이션입니다. 주요 목표는 보안 전문가가 법적 환경에서 자신의 기술과 도구를 테스트하고, 웹 개발자가 웹 응용 프로그램 보안 프로세스를 더 잘 이해할 수 있도록 돕고, 교사/학생이 교실 환경 웹 응용 프로그램에서 가르치고 배울 수 있도록 돕는 것입니다. 보안. DVWA의 목표는 다양한 난이도의 간단하고 간단한 인터페이스를 통해 가장 일반적인 웹 취약점 중 일부를 연습하는 것입니다. 이 소프트웨어는

PhpStorm 맥 버전
최신(2018.2.1) 전문 PHP 통합 개발 도구

SublimeText3 Mac 버전
신 수준의 코드 편집 소프트웨어(SublimeText3)

MinGW - Windows용 미니멀리스트 GNU
이 프로젝트는 osdn.net/projects/mingw로 마이그레이션되는 중입니다. 계속해서 그곳에서 우리를 팔로우할 수 있습니다. MinGW: GCC(GNU Compiler Collection)의 기본 Windows 포트로, 기본 Windows 애플리케이션을 구축하기 위한 무료 배포 가능 가져오기 라이브러리 및 헤더 파일로 C99 기능을 지원하는 MSVC 런타임에 대한 확장이 포함되어 있습니다. 모든 MinGW 소프트웨어는 64비트 Windows 플랫폼에서 실행될 수 있습니다.

ZendStudio 13.5.1 맥
강력한 PHP 통합 개발 환경

