Extjs 연구 노트 5: renderTo와 applyTo_extjs의 차이점에 대한 작은 세부 정보
- WBOYWBOYWBOYWBOYWBOYWBOYWBOYWBOYWBOYWBOYWBOYWBOYWB원래의
- 2016-05-16 18:37:071807검색
ExtJS에서 renderTo와 applyTo의 차이점
applyTo와 renderTo에 대한 이해와 생각
개인적으로 이 두 글은 별로 인기가 없는 것 같습니다. 최종적으로 어떤 코드가 생성되는지 간단한 예제를 작성해 보세요.
코드를 복사하세요 코드는 다음과 같습니다.
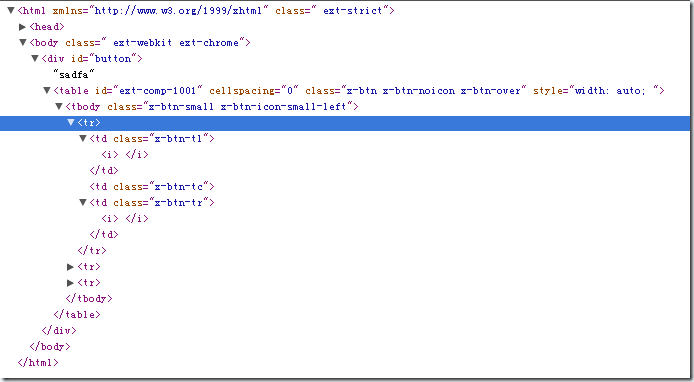
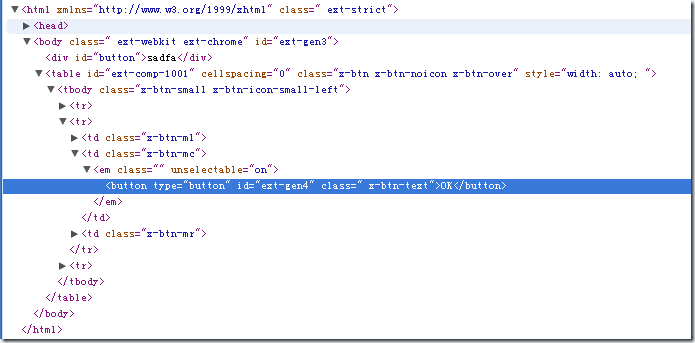
이 코드로 생성된 html은 다음과 같습니다.
applyTo:button인 경우 생성된 코드는 다음과 같습니다.

 간단히 말하면
. 다음으로 extjs 소스 코드의 미스터리에 대해 좀 더 살펴보겠습니다. 이 두 구성 항목이 extjs에서 내부적으로 어떻게 사용되는지 살펴보고, Firebug 플러그인을 사용하여 ext-all-debug.js 파일을 디버깅하세요.
Ext.Component 생성자에 다음과 같은 코드가 있습니다. Ext.Component = function(config){…} (버전 3.1.0은 9270행입니다):
코드 복사 코드는 다음과 같습니다.
if(this.applyTo){ this.applyToMarkup(this.applyTo); >delete this.applyTo ;
}else if(this.renderTo){
this.render(this.renderTo);
delete this.renderTo; >보이는 applyTo 속성은 Component가 applyToMarkup 메소드를 호출하도록 하고, renderTo는 render 메소드를 호출하도록 하며, 둘 다 설정된 경우 applyTo만 유효합니다. 이는 extjs 문서에도 구체적으로 명시되어 있습니다.
appylToMarkup 메소드는 다음과 같습니다(3.1.0 버전은 9560라인),
}else if(this.renderTo){
this.render(this.renderTo);
delete this.renderTo; >보이는 applyTo 속성은 Component가 applyToMarkup 메소드를 호출하도록 하고, renderTo는 render 메소드를 호출하도록 하며, 둘 다 설정된 경우 applyTo만 유효합니다. 이는 extjs 문서에도 구체적으로 명시되어 있습니다.
appylToMarkup 메소드는 다음과 같습니다(3.1.0 버전은 9560라인),
코드 복사
코드는 다음과 같습니다:
applyToMarkup : function(el){ this.allowDomMove = false; this.el = Ext.get(el) this.render(this .el.dom.parentNode); }
또한 최종적으로 render를 호출하는데, render의 위치는 parentNode이며, render 메소드는 다음과 같습니다. (버전 3.1.0은 9370번째 줄입니다.) )
코드 복사
코드는 다음과 같습니다.
render : 함수(컨테이너, 위치){
if(!this.rendered && this.fireEvent('beforerender', this) !== false){
if(!container && this .el){
this.el = Ext.get(this.el);
컨테이너 = this.el.dom.parentNode;
this.allowDomMove = false;
}
this.container = Ext.get(컨테이너);
if(this.ctCls){
this.container.addClass(this.ctCls);
}
this.rendered = true;
if(위치 !== 정의되지 않음){
if(Ext.isNumber(위치)){
position = this.container.dom.childNodes[위치];
}else{
position = Ext.getDom(position);
}
}
this.onRender(this.container, position || null);
if(this.autoShow){
this.el.removeClass(['x-hidden','x-hide-' this.hideMode]);
}
if(this.cls){
this.el.addClass(this.cls);
this.cls를 삭제하세요.
}
if(this.style){
this.el.applyStyles(this.style);
this.style을 삭제하세요.
}
if(this.overCls){
this.el.addClassOnOver(this.overCls);
}
this.fireEvent('render', this);
var contentTarget = this.getContentTarget();
if (this.html){
contentTarget.update(Ext.DomHelper.markup(this.html));
this.html 삭제;
}
if (this.contentEl){
var ce = Ext.getDom(this.contentEl);
Ext.fly(ce).removeClass(['x-hidden', 'x-hide-display']);
contentTarget.appendChild(ce);
}
if (this.tpl) {
if (!this.tpl.compile) {
this.tpl = new Ext.XTemplate(this.tpl);
}
if (this.data) {
this.tpl[this.tplWriteMode](contentTarget, this.data);
이 데이터를 삭제하세요.
}
}
this.afterRender(this.container);
if(this.hidden){
this.doHide();
}
if(this.disabled){
this.disable(true);
}
if(this.stateful !== false){
this.initStateEvents();
}
this.fireEvent('afterrender', this);
}
이것을 반환하세요.
}
render 方法看起来比较复杂,仔细阅读下其实也不是太难,主要就是为一个DOM节点设置class,可见성별, onRender 방법 중 하나를 사용하여 html代码.
에서 applyTo와 renderTo의 논리와 렌더링 中提到的el配置属性, 我查extjs의 文档发现这是一个读属性,虽然有방법覆盖它,不过一般不需要手动设置,下面是Panel的公共属性el的文档原文:
el : Ext.Element
이 구성요소를 캡슐화하는 Ext.Element입니다. 읽기 전용입니다.
이것은 보통
클래스의 onRender 메소드에 의해 생성된 요소이지만
<a href="http://www.extjs.com/output/Ext.Component.html#Ext.Component-autoEl"><font face="NSimsun" color="#0000ff">autoEl<code><a href="http://www.extjs.com/output/Ext.Component.html#Ext.Component-autoEl"><font face="NSimsun" color="#0000ff">autoEl</font></a> 구성참고
: 이 요소는 이 구성 요소가 렌더링될 때까지 사용할 수 없습니다.저희는 extjs를 좋아합니다. el是紧包裹着extjs组件的一个DOM节点, 一般是由extjs自己生成的, 好image细胞膜一样,如果拨开了它,那么这个组件就不完整了,很可能会表现的不正常。父元素,这个컨테이너中可以包括其他的html元素或者extjs组件。
상대방은 적용되지 않으며 렌더링에는 적용되지 않습니다.
성명:
본 글의 내용은 네티즌들의 자발적인 기여로 작성되었으며, 저작권은 원저작자에게 있습니다. 본 사이트는 이에 상응하는 법적 책임을 지지 않습니다. 표절이나 침해가 의심되는 콘텐츠를 발견한 경우 admin@php.cn으로 문의하세요.

