


Here's a comprehensive guide on how to create your own email rules in the new Outlook and the web version of Outlook 365.
If you've become accustomed to using rules in classic Outlook to manage your email flow, you'll be pleased to know that the new Outlook also includes this feature. Despite some differences in the setup process and a slightly reduced set of options, you can still create rules to automate the sorting of your emails and keep a tidy inbox.
- New Outlook rules
- Create rule in new Outlook and web
- Set up rule for specific emails
- Manage rules
- Edit rule
- Disable and enable rule
- Remove rule
- Change order of rules
- Run rule manually
- New Outlook rules not working
- Client-side rules are out
- Rules are specific to each account
- Rules for Gmail and Yahoo accounts are not supported
New Outlook rules
Like the classic Outlook desktop app, the new Outlook lets you set up rules to manage your emails, but with a few less options. To grasp the nuances, you need to understand the difference between the server-side and client-side rules, and what you can and can't do with them.
Server-side rules work directly on the server, so they run whether or not Outlook is open on your computer. These are the kind of rules you'll find in Outlook on the web and the new Outlook app, which is pretty much a web client in disguise (a wrapper over the web client). They're great for organizing your emails - flagging the important ones, sorting them into categories, or moving to folders, all done on the server as soon as your emails come in.
But here's the catch: client-side rules, like printing emails or setting reminders, aren't available in the new Outlook or Outlook 365 online. That's because these rules need the Outlook client running on your computer to work. For example, you can't play a sound or print an email if you've logged into your Outlook account from a different computer that doesn't have a printer or speakers. Even if you could, in theory, set up such a rule, it won't work because there won't be any technical way to execute it.
So, while classic Outlook with an Exchange server has both server-side and client-only rules, in the new Outlook only server-side rules are available.

Examples of new Outlook rules:
- Block emails with certain words in new Outlook - filter spam emails by moving messages with certain words to the Junk folder.
- Set an out-of-office reply in new Outlook - notify senders that you are away with an automatic out-of-office reply.
- Forward or redirect mail - automatically forward or redirect all mail that you receive or specific messages only.
How to create a rule for Inbox in new Outlook and web
In the new Outlook and Outlook on the web (also known as Outlook 365 online), rules are applied to incoming messages that you receive.
To create an email rule for your Inbox, this is what you need to do:
- Click the Settings gear icon in the upper-right corner of the Outlook window. Alternatively, you can click Mail > View tab > View Settings.
- In the Settings menu, choose Mail > Rules.
- If you have multiple accounts, select the one for which you want to create a rule from the dropdown list at the top.
- Click on the plus icon to add a new rule.

- In the rules menu that opens, you need to define three essential components: a rule name, conditions, and actions.
-
Name the rule. Enter a shot descriptive name in the first box, for example "Forward messages".
-
Specify conditions. From the dropdown menu next to number 2, choose a condition. You can add more conditions by clicking the Add another condition link. For example, if you want to forward emails sent by a specific person, choose the "From" condition.
-
Define actions. Use the dropdown menu next to number 3 to select an action to apply to emails that meet your conditions. You can also add multiple actions by selecting Add another action. Actions are grouped into three categories:
- Organize: Move, copy, delete, or pin to the top.
- Mark message: as read, junk, with importance or assign a category.
- Route: forward, forward as attachment, or redirect.
For instance, select "Forward to" as an action, and then specify the email address of the recipient.
-
Add exceptions (optional). Outlook email rules can also include exceptions to conditions. Click Add an exception to specify an exception. For example, you may choose not to forward emails containing the word "confidential" in the subject or body.
- If you don't want to execute any more rules for a message after a certain rule is applied, select the Stop processing more rules checkbox. Find more about how this feature works: Stop processing more rules in Outlook.
- If you want to apply the rule to all existing emails meeting the condition, select the Run this rule checkbox. It's important to note that this option is limited to specific Outlook email rule types, such as move to folder, flag, or categorize, and is unavailable for forwarding rules.
- Finally, press Save to save the newly created rule or Discard to cancel any changes.


Done! You've successfully created a rule in the new Outlook, allowing you to manage your email flow according to your specified criteria.
Tip. In Outlook.com, the process of creating an email rule is essentially the same. While slight differences in the option names may exist, they don't hinder the understanding of overall functionality or the rule creation process.
How to make a rule for specific emails in new Outlook and web
The new Outlook also has a convenient feature to swiftly create a rule directly from an existing email, which is particularly useful for managing all messages from a specific sender. Here's how to do it:
- In your Inbox or any other folder, right-click the email for which you want to set up a rule.
- From the context menu, select Rules > Create rule.
- Choose the folder where you want all messages from that sender to be moved and click OK. If you wish to do something else, click More options.
- If you've chosen to create a rule that moves emails to the designated folder, a confirmation message will appear. To immediately apply the rule to all existing messages in the target folder, put a tick in the Run this rule now checkbox. Then, click OK to close the popup dialog, or click View rules to see the full description of the email rule that Outlook has just created for you.
- If you've opted for more options, you'll be directed to the rules menu where the first two settings - rule name and condition – are preconfigured (you are free to modify these as needed). Your task is to specify the action you wish to apply to messages from that specific sender.
- Optionally, add exceptions, and then save the rule.


With these simple steps, you can promptly organize your inbox by creating rules directly from messages.
How to manage rules in new Outlook and web
To change, remove, or rearrange existing rules in new Outlook and Outlook 365 online, open the rule menu (Settings > Mail > Rules). From there, you can perform various actions:
Change the rule
To edit an existing rule, click the pencil icon next to the rule. This will open the Rules Settings menu where you can modify the rule's conditions and behavior.
Temporarily disable / enable rule
To turn off the rule when you don't need it, toggle the switch box to the left of the rule. When you need the rule again, simply toggle it back on.
Delete the rule
To permanently delete the rule, click the trashcan icon.
Change the rules order
In the new Outlook, email rules are applied to incoming messages based on their order in the rules list.
To adjust the order in which rules are executed, use the Up or Down arrows to move a rule up or down in the list.
Run the rule manually
By default, rules trigger on incoming emails after creation. To apply a rule to the messages that are already in your inbox, click the Run button next to the rule.

Rules are not working in new Outlook and web
Having trouble with rules in the new Outlook and web app? There can be various reasons behind it. Sometimes, rules don't work because they’re set up wrong, conflict with other rules, or they're just turned off. But a couple of big reasons stand out in the new Outlook and web version.
Client-side rules are unavailable
In the transition from classic Outlook to the new Outlook or web platform, you'll find out that client-side rules (such as follow-up or print emails) are not supported, as they rely on the Outlook client running on your computer. Since the new Outlook and web version don't use the client, these rules get disabled and show an error message indicating their incompatibility. Unfortunately, there is no workaround to make client-side rules function in the new Outlook or web app.

Email rules are specific to each account
If you've got more than one account, you need to set up rules for each one separately. You can check which account you're setting rules for in the top right corner of the Settings menu.

Rules cannot be created for Gmail and Yahoo accounts
In the new Outlook, you can't make rules for Gmail or Yahoo accounts because Outlook's rules are designed to work with emails hosted on Microsoft's servers, while external email services like Gmail or Yahoo have a different infrastructure and their own set of rules and filters.

While these are the primary issues affecting rules in the new Outlook and web, there might be other reasons why your rules don't work. For further troubleshooting, please check out Why rules are not working in Outlook: reasons and fixes.
And there you have it – a straightforward guide to setting up and fine-tuning your own rules in both the new Outlook and Outlook 365 Online. Feel free to play around with different criteria and actions to find the perfect combination that works for you. A bit of experimentation and adjustment here and there, and you'll be navigating your inbox like a pro, leaving more time for the things you love instead of sorting emails.
위 내용은 새로운 전망 및 웹에서 이메일 규칙을 만드는 방법의 상세 내용입니다. 자세한 내용은 PHP 중국어 웹사이트의 기타 관련 기사를 참조하세요!

 Excel의 중간 공식 - 실제 예Apr 11, 2025 pm 12:08 PM
이 튜토리얼은 중간 기능을 사용하여 Excel에서 수치 데이터의 중앙값을 계산하는 방법을 설명합니다. 중앙 경향의 주요 척도 인 중앙값은 데이터 세트의 중간 값을 식별하여 Central Tenden의보다 강력한 표현을 제공합니다.
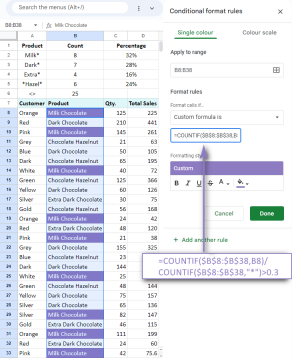 Google 스프레드 시트 Countif 기능은 공식 예제와 함께합니다Apr 11, 2025 pm 12:03 PM
마스터 Google Sheets Countif : 포괄적 인 가이드 이 안내서는 Google 시트의 다목적 카운티프 기능을 탐색하여 간단한 셀 카운팅 이외의 응용 프로그램을 보여줍니다. 우리는 정확하고 부분적인 경기에서 Han에 이르기까지 다양한 시나리오를 다룰 것입니다.
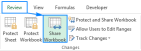 Excel 공유 통합 문서 : 여러 사용자를위한 Excel 파일을 공유하는 방법Apr 11, 2025 am 11:58 AM
이 튜토리얼은 다양한 방법, 액세스 제어 및 갈등 해결을 다루는 Excel 통합 문서 공유에 대한 포괄적 인 안내서를 제공합니다. Modern Excel 버전 (2010, 2013, 2016 및 이후) 협업 편집을 단순화하여 M에 대한 필요성을 제거합니다.
 Excel을 JPG로 변환하는 방법 - 이미지 파일로 .xls 또는 .xlsx를 저장Apr 11, 2025 am 11:31 AM
이 자습서는 .xls 파일을 .jpg 이미지로 변환하는 다양한 방법을 탐색하여 내장 된 Windows 도구와 무료 온라인 변환기를 모두 포함합니다. 프레젠테이션을 만들거나 스프레드 시트 데이터를 단단히 공유하거나 문서를 디자인해야합니까? YO를 변환합니다
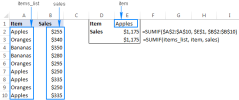 Excel 이름 및 명명 범위 : 공식에서 정의 및 사용 방법Apr 11, 2025 am 11:13 AM
이 튜토리얼은 Excel 이름의 기능을 명확히하고 셀, 범위, 상수 또는 공식의 이름을 정의하는 방법을 보여줍니다. 또한 정의 된 이름을 편집, 필터링 및 삭제하는 것도 다룹니다. Excel 이름은 엄청나게 유용하지만 종종 오버로입니다
 표준 편차 Excel : 기능 및 공식 예제Apr 11, 2025 am 11:01 AM
이 튜토리얼은 표준 편차와 평균의 표준 오차의 차이점을 명확히하여 표준 편차 계산을위한 최적의 Excel 함수를 안내합니다. 설명 통계에서 평균 및 표준 편차는 Intrinsi입니다.
 Excel의 제곱근 : SQRT 기능 및 기타 방법Apr 11, 2025 am 10:34 AM
이 Excel 튜토리얼은 정사각형 뿌리와 Nth 뿌리를 계산하는 방법을 보여줍니다. 제곱근을 찾는 것은 일반적인 수학적 작동이며 Excel은 몇 가지 방법을 제공합니다. Excel에서 사각형 뿌리를 계산하는 방법 : SQRT 기능 사용 : the
 Google Sheets Basics : Google 스프레드 시트에서 작업하는 방법을 배우십시오.Apr 11, 2025 am 10:23 AM
Google Sheets : 초보자 가이드의 힘을 잠금 해제하십시오 이 튜토리얼은 MS Excel에 대한 강력하고 다양한 대안 인 Google Sheets의 기본 사항을 소개합니다. 스프레드 시트를 쉽게 관리하고, 주요 기능을 활용하며, 협업하는 방법에 대해 알아보십시오.


핫 AI 도구

Undresser.AI Undress
사실적인 누드 사진을 만들기 위한 AI 기반 앱

AI Clothes Remover
사진에서 옷을 제거하는 온라인 AI 도구입니다.

Undress AI Tool
무료로 이미지를 벗다

Clothoff.io
AI 옷 제거제

Video Face Swap
완전히 무료인 AI 얼굴 교환 도구를 사용하여 모든 비디오의 얼굴을 쉽게 바꾸세요!

인기 기사
뜨거운 도구

SecList
SecLists는 최고의 보안 테스터의 동반자입니다. 보안 평가 시 자주 사용되는 다양한 유형의 목록을 한 곳에 모아 놓은 것입니다. SecLists는 보안 테스터에게 필요할 수 있는 모든 목록을 편리하게 제공하여 보안 테스트를 더욱 효율적이고 생산적으로 만드는 데 도움이 됩니다. 목록 유형에는 사용자 이름, 비밀번호, URL, 퍼징 페이로드, 민감한 데이터 패턴, 웹 셸 등이 포함됩니다. 테스터는 이 저장소를 새로운 테스트 시스템으로 간단히 가져올 수 있으며 필요한 모든 유형의 목록에 액세스할 수 있습니다.

WebStorm Mac 버전
유용한 JavaScript 개발 도구

SublimeText3 Mac 버전
신 수준의 코드 편집 소프트웨어(SublimeText3)

Dreamweaver Mac版
시각적 웹 개발 도구

Atom Editor Mac 버전 다운로드
가장 인기 있는 오픈 소스 편집기

