


Object detection is pivotal in artificial intelligence, serving as the backbone for numerous cutting-edge applications. From autonomous vehicles and surveillance systems to medical imaging and augmented reality, the ability to identify and locate objects in images and videos is transforming industries worldwide. TensorFlow’s Object Detection API, a powerful and versatile tool, simplifies building robust object detection models. By leveraging this API, developers can train custom models tailored to specific needs, significantly reducing development time and complexity.
In this guide, we will explore the step-by-step process of training an object detection model using TensorFlow,focusing on integrating datasets fromRoboflow Universe,a rich repository of annotated datasets designed to accelerate AI development.
Learning Objectives
- Learn to set up and configure TensorFlow‘s Object Detection API environment for efficient model training.
- Understand how to prepare and preprocess datasets for training, using the TFRecord format.
- Gain expertise in selecting and customizing a pre-trained object detection model for specific needs.
- Learn to adjust pipeline configuration files and fine-tune model parameters to optimize performance.
- Master the training process, including handling checkpoints and evaluating model performance during training.
- Understand how to export the trained model for inference and deployment in real-world applications.
This article was published as a part of theData Science Blogathon.
Table of contents
- Step-By-Step Implementation of Object Detection with TensorFlow
- Step1: Setting Up the Environment
- Step2: Verify Environment and Installations
- Step3: Prepare the Training Data
- Step4: Set Up the Training Configuration
- Step5: Modify the Pipeline Configuration File
- Step6: Train the Model
- Step7: Save the Trained Model
- Conclusion
- Frequently Asked Questions
Step-By-Step Implementation of Object Detection with TensorFlow
In this section, we’ll walk you through a step-by-step implementation of object detection using TensorFlow, guiding you from setup to deployment.
Step1: Setting Up the Environment
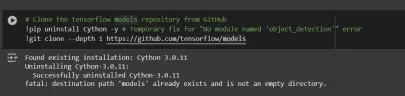
The TensorFlow Object Detection API requires various dependencies. Begin by cloning the TensorFlow models repository:
# Clone the tensorflow models repository from GitHub
!pip uninstall Cython -y # Temporary fix for "No module named 'object_detection'" error
!git clone --depth 1 https://github.com/tensorflow/models
- Uninstall Cython: This step ensures there are no conflicts with the Cython library during setup.
- Clone TensorFlow Models Repository: This repository contains TensorFlow’s official models, including the Object Detection API.
Copy the Setup Files andModify the setup.py File
# Copy setup files into models/research folder
%%bash
cd models/research/
protoc object_detection/protos/*.proto --python_out=.
#cp object_detection/packages/tf2/setup.py .

# Modify setup.py file to install the tf-models-official repository targeted at TF v2.8.0
import re
with open('/content/models/research/object_detection/packages/tf2/setup.py') as f:
    s = f.read()

with open('/content/models/research/setup.py', 'w') as f:
    # Set fine_tune_checkpoint path
    s = re.sub('tf-models-official>=2.5.1',
               'tf-models-official==2.8.0', s)
    f.write(s)
Why is This Necessary?
- Protocol Buffers Compilation: The Object Detection API uses .proto files to define model configurations and data structures. These need to be compiled into Python code to function.
- Dependency Version Compatibility: TensorFlow and its dependencies evolve. Using tf-models-official>=2.5.1 may inadvertently install an incompatible version for TensorFlow v2.8.0.
- Explicitly setting tf-models-official==2.8.0 avoids potential version conflicts and ensures stability.
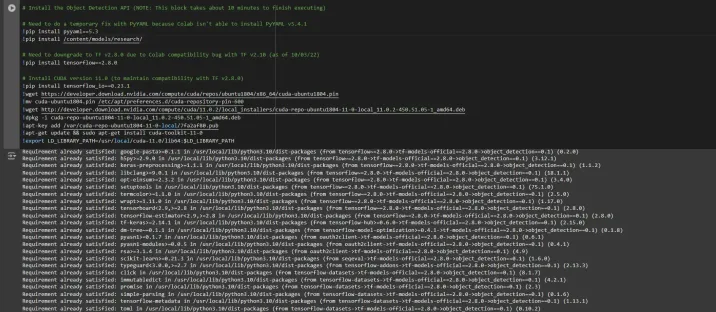
Installing dependency libraries
TensorFlow models often rely on specific library versions. Fixing the TensorFlow version ensures smooth integration.
# Install the Object Detection API

# Need to do a temporary fix with PyYAML because Colab isn't able to install PyYAML v5.4.1
!pip install pyyaml==5.3
!pip install /content/models/research/

# Need to downgrade to TF v2.8.0 due to Colab compatibility bug with TF v2.10 (as of 10/03/22)
!pip install tensorflow==2.8.0

# Install CUDA version 11.0 (to maintain compatibility with TF v2.8.0)
!pip install tensorflow_io==0.23.1
!wget https://developer.download.nvidia.com/compute/cuda/repos/ubuntu1804/x86_64/cuda-ubuntu1804.pin
!mv cuda-ubuntu1804.pin /etc/apt/preferences.d/cuda-repository-pin-600
!wget http://developer.download.nvidia.com/compute/cuda/11.0.2/local_installers/cuda-repo-ubuntu1804-11-0-local_11.0.2-450.51.05-1_amd64.deb
!dpkg -i cuda-repo-ubuntu1804-11-0-local_11.0.2-450.51.05-1_amd64.deb
!apt-key add /var/cuda-repo-ubuntu1804-11-0-local/7fa2af80.pub
!apt-get update && sudo apt-get install cuda-toolkit-11-0
!export LD_LIBRARY_PATH=/usr/local/cuda-11.0/lib64:$LD_LIBRARY_PATH
While running this block you need to restart the sessions again and run this block of code again to successfully install all dependencies. This will install all the dependencies successfully.
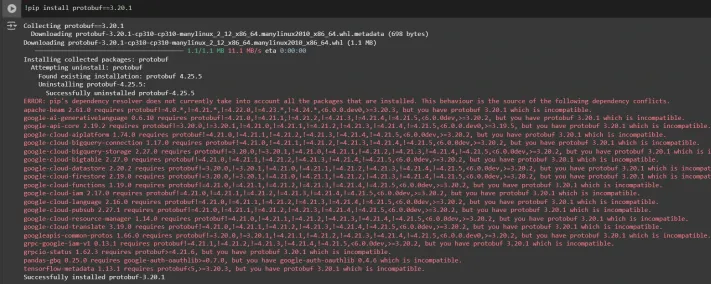
Installing an appropriate version of protobuf library for resolving dependency issues
!pip install protobuf==3.20.1
Step2: Verify Environment and Installations
To confirm the installation works, run the following test:
# Run Model Bulider Test file, just to verify everything's working properly
!python /content/models/research/object_detection/builders/model_builder_tf2_test.py
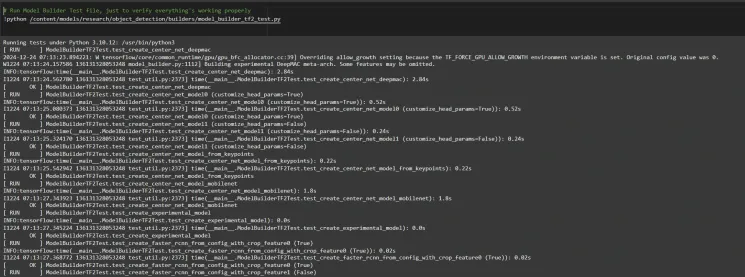
If no errors appear, your setup is complete. So now we have completed the setup successfully.
Step3: Prepare the Training Data
For this tutorial, we’ll use the “People Detection” dataset from Roboflow Universe. Follow these steps to prepare it:
Visit the dataset page:
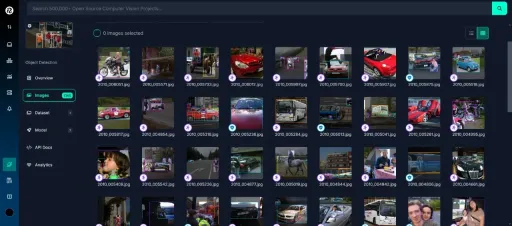
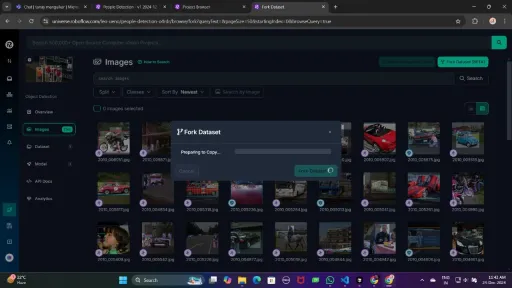
Fork the dataset into your workspace to make it accessible for customization.
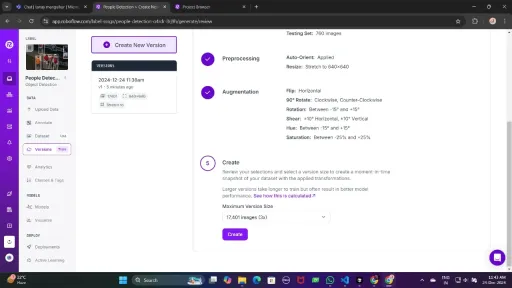
Generate a version of the dataset to finalize its preprocessing configurations such as augmentation and resizing.
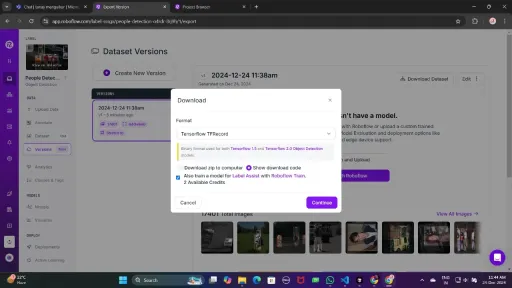
Now , Download it in TFRecord format, which is a binary format optimized for TensorFlow workflows. TFRecord stores data efficiently and allows TensorFlow to read large datasets during training with minimal overhead.
Once downloaded, place the dataset files in your Google Drive mount your code to your drive, and load those files in the code to use it.
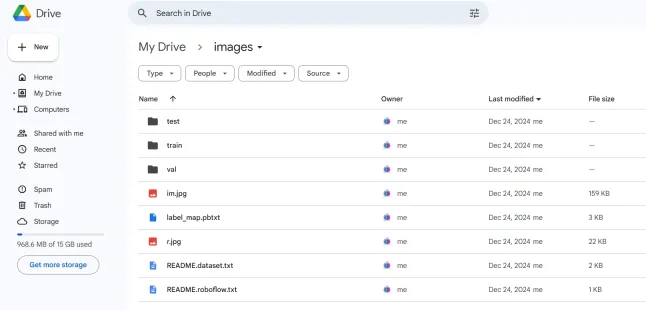
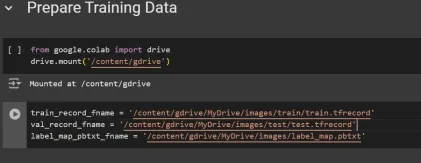
from google.colab import drive
drive.mount('/content/gdrive')


train_record_fname = '/content/gdrive/MyDrive/images/train/train.tfrecord'
val_record_fname = '/content/gdrive/MyDrive/images/test/test.tfrecord'
label_map_pbtxt_fname = '/content/gdrive/MyDrive/images/label_map.pbtxt'
Step4: Set Up the Training Configuration
Now, it’s time to set up the configuration for the object detection model. For this example, we’ll use the efficientdet-d0 model. You can choose from other models like ssd-mobilenet-v2 or ssd-mobilenet-v2-fpnlite-320, but for this guide, we’ll focus on efficientdet-d0.
# Change the chosen_model variable to deploy different models available in the TF2 object detection zoo
chosen_model = 'efficientdet-d0'

MODELS_CONFIG = {
    'ssd-mobilenet-v2': {
        'model_name': 'ssd_mobilenet_v2_320x320_coco17_tpu-8',
        'base_pipeline_file': 'ssd_mobilenet_v2_320x320_coco17_tpu-8.config',
        'pretrained_checkpoint': 'ssd_mobilenet_v2_320x320_coco17_tpu-8.tar.gz',
    },
    'efficientdet-d0': {
        'model_name': 'efficientdet_d0_coco17_tpu-32',
        'base_pipeline_file': 'ssd_efficientdet_d0_512x512_coco17_tpu-8.config',
        'pretrained_checkpoint': 'efficientdet_d0_coco17_tpu-32.tar.gz',
    },
    'ssd-mobilenet-v2-fpnlite-320': {
        'model_name': 'ssd_mobilenet_v2_fpnlite_320x320_coco17_tpu-8',
        'base_pipeline_file': 'ssd_mobilenet_v2_fpnlite_320x320_coco17_tpu-8.config',
        'pretrained_checkpoint': 'ssd_mobilenet_v2_fpnlite_320x320_coco17_tpu-8.tar.gz',
    },
}

model_name = MODELS_CONFIG[chosen_model]['model_name']
pretrained_checkpoint = MODELS_CONFIG[chosen_model]['pretrained_checkpoint']
base_pipeline_file = MODELS_CONFIG[chosen_model]['base_pipeline_file']
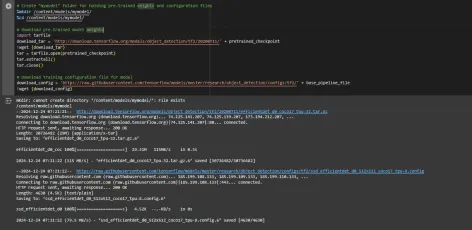
We then download the pre-trained weights and the corresponding configuration file for the chosen model:
# Create "mymodel" folder for holding pre-trained weights and configuration files
%mkdir /content/models/mymodel/
%cd /content/models/mymodel/

# Download pre-trained model weights
import tarfile
download_tar = 'http://download.tensorflow.org/models/object_detection/tf2/20200711/' + pretrained_checkpoint
!wget {download_tar}
tar = tarfile.open(pretrained_checkpoint)
tar.extractall()
tar.close()

# Download training configuration file for model
download_config = 'https://raw.githubusercontent.com/tensorflow/models/master/research/object_detection/configs/tf2/' + base_pipeline_file
!wget {download_config}
After this, we set up the number of steps for training and batch size based on the model selected:
# Set training parameters for the model
num_steps = 4000

if chosen_model == 'efficientdet-d0':
  batch_size = 8
else:
  batch_size = 8

You can increase and decrease num_steps and batch_size according to your requirements.
Step5: Modify the Pipeline Configuration File
We need to customize the pipeline.config file with the paths to our dataset and model parameters. The pipeline.config file contains various configurations such as the batch size, number of classes, and fine-tuning checkpoints. We make these modifications by reading the template and replacing the relevant fields:
# Set file locations and get number of classes for config file
pipeline_fname = '/content/models/mymodel/' + base_pipeline_file
fine_tune_checkpoint = '/content/models/mymodel/' + model_name + '/checkpoint/ckpt-0'

def get_num_classes(pbtxt_fname):
    from object_detection.utils import label_map_util
    label_map = label_map_util.load_labelmap(pbtxt_fname)
    categories = label_map_util.convert_label_map_to_categories(
        label_map, max_num_classes=90, use_display_name=True)
    category_index = label_map_util.create_category_index(categories)
    return len(category_index.keys())
num_classes = get_num_classes(label_map_pbtxt_fname)
print('Total classes:', num_classes)
# Create custom configuration file by writing the dataset, model checkpoint, and training parameters into the base pipeline file
import re
%cd /content/models/mymodel
print('writing custom configuration file')
with open(pipeline_fname) as f:
s = f.read()
with open('pipeline_file.config', 'w') as f:
# Set fine_tune_checkpoint path
s = re.sub('fine_tune_checkpoint: ".*?"',
'fine_tune_checkpoint: "{}"'.format(fine_tune_checkpoint), s)
# Set tfrecord files for train and test datasets
s = re.sub(
'(input_path: ".*?)(PATH_TO_BE_CONFIGURED/train)(.*?")', 'input_path: "{}"'.format(train_record_fname), s)
s = re.sub(
'(input_path: ".*?)(PATH_TO_BE_CONFIGURED/val)(.*?")', 'input_path: "{}"'.format(val_record_fname), s)
# Set label_map_path
s = re.sub(
'label_map_path: ".*?"', 'label_map_path: "{}"'.format(label_map_pbtxt_fname), s)
# Set batch_size
s = re.sub('batch_size: [0-9]+',
'batch_size: {}'.format(batch_size), s)
# Set training steps, num_steps
s = re.sub('num_steps: [0-9]+',
'num_steps: {}'.format(num_steps), s)
# Set number of classes num_classes
s = re.sub('num_classes: [0-9]+',
'num_classes: {}'.format(num_classes), s)
# Change fine-tune checkpoint type from "classification" to "detection"
s = re.sub(
'fine_tune_checkpoint_type: "classification"', 'fine_tune_checkpoint_type: "{}"'.format('detection'), s)
# If using ssd-mobilenet-v2, reduce learning rate (because it's too high in the default config file)
if chosen_model == 'ssd-mobilenet-v2':
s = re.sub('learning_rate_base: .8',
'learning_rate_base: .08', s)
s = re.sub('warmup_learning_rate: 0.13333',
'warmup_learning_rate: .026666', s)
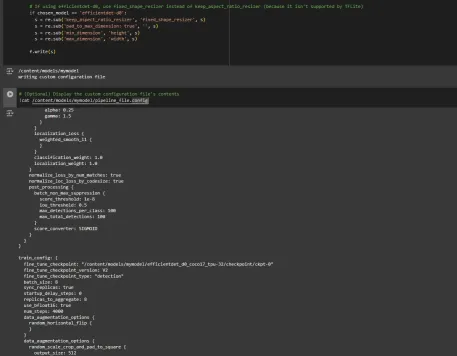
# If using efficientdet-d0, use fixed_shape_resizer instead of keep_aspect_ratio_resizer (because it isn't supported by TFLite)
if chosen_model == 'efficientdet-d0':
s = re.sub('keep_aspect_ratio_resizer', 'fixed_shape_resizer', s)
s = re.sub('pad_to_max_dimension: true', '', s)
s = re.sub('min_dimension', 'height', s)
s = re.sub('max_dimension', 'width', s)
f.write(s)
# (Optional) Display the custom configuration file's contents
!cat /content/models/mymodel/pipeline_file.config
# Set the path to the custom config file and the directory to store training checkpoints in
pipeline_file = '/content/models/mymodel/pipeline_file.config'
model_dir = '/content/training/'
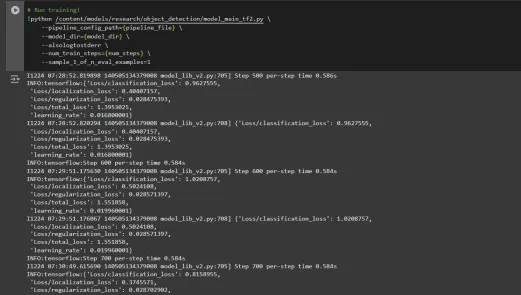
Step6: Train the Model
Now we can train the model using the custom pipeline configuration file. The training script will save checkpoints, which you can use to evaluate the performance of your model:
# Run training!
!python /content/models/research/object_detection/model_main_tf2.py \
    --pipeline_config_path={pipeline_file} \
    --model_dir={model_dir} \
    --alsologtostderr \
    --num_train_steps={num_steps} \
    --sample_1_of_n_eval_examples=1
Step7: Save the Trained Model
After training is complete, we export the trained model so it can be used for inference. We use the exporter_main_v2.py script to export the model:
!python /content/models/research/object_detection/exporter_main_v2.py \
    --input_type image_tensor \
    --pipeline_config_path {pipeline_file} \
    --trained_checkpoint_dir {model_dir} \
    --output_directory /content/exported_model

Finally, we compress the exported model into a zip file for easy downloading and then you can download the zip file containing your trained model:
import shutil
# Path to the exported model folder
exported_model_path = '/content/exported_model'

# Path where the zip file will be saved
zip_file_path = '/content/exported_model.zip'

# Create a zip file of the exported model folder
shutil.make_archive(zip_file_path.replace('.zip', ''), 'zip', exported_model_path)

# Download the zip file using Google Colab's file download utility
from google.colab import files
files.download(zip_file_path)
You can use these downloaded model files for testing it on unseen images or in your applications according to your needs.
You can refer to this:collab notebook for detailed code
Conclusion
In conclusion, this guide equips you with the knowledge and tools necessary to train an object detection model using TensorFlow’s Object Detection API, leveraging datasets from Roboflow Universe for rapid customization. By following the steps outlined, you can effectively prepare your data, configure the training pipeline, select the right model, and fine-tune it to meet your specific needs. Moreover, the ability to export and deploy your trained model opens up vast possibilities for real-world applications, whether in autonomous vehicles, medical imaging, or surveillance systems. This workflow enables you to create powerful, scalable object detection systems with reduced complexity and faster time to deployment.
Key Takeaways
- TensorFlow Object Detection API offers a flexible framework for building custom object detection models with pre-trained options, reducing development time and complexity.
- TFRecord format is essential for efficient data handling, especially with large datasets in TensorFlow, allowing fast training and minimal overhead.
- Pipeline configuration files are crucial for fine-tuning and adjusting the model to work with your specific dataset and desired performance characteristics.
- Pretrained models like efficientdet-d0 and ssd-mobilenet-v2 provide solid starting points for training custom models, with each having specific strengths depending on use case and resource constraints.
- The training process involves managing parameters like batch size, number of steps, and model checkpointing to ensure the model learns optimally.
- Exporting the model is essential for using the trained object detection model in a real-world model that is being packaged and ready for deployment.
Frequently Asked Questions
Q1: What is the TensorFlow Object Detection API?A: The TensorFlow Object Detection API is a flexible and open-source framework for creating, training, and deploying custom object detection models. It provides tools for fine-tuning pre-trained models and building solutions tailored to specific use cases.
Q2: What is the purpose of the TFRecord format in object detection workflows?A: TFRecord is a binary file format optimized for TensorFlow pipelines. It allows efficient data handling, ensuring faster loading, minimal I/O overhead, and smoother training, especially with large datasets.
Q3: What are pipeline configuration files, and why are they critical?A: These files enable seamless model customization by defining parameters like dataset paths, learning rate, model architecture, and training steps to meet specific datasets and performance goals.
Q4: How do I select the best pre-trained model for my use case?A: Select EfficientDet-D0 for a balance of accuracy and efficiency, ideal for edge devices, and SSD-MobileNet-V2 for lightweight, fast real-time applications like mobile apps.
The media shown in this article is not owned by Analytics Vidhya and is used at the Author’s discretion.
위 내용은 텐서 플로우로 물체 감지의 상세 내용입니다. 자세한 내용은 PHP 중국어 웹사이트의 기타 관련 기사를 참조하세요!

![chatgpt를 사용할 수 없습니다! 즉시 테스트 할 수있는 원인과 솔루션 설명 [최신 2025]](https://img.php.cn/upload/article/001/242/473/174717025174979.jpg?x-oss-process=image/resize,p_40) chatgpt를 사용할 수 없습니다! 즉시 테스트 할 수있는 원인과 솔루션 설명 [최신 2025]May 14, 2025 am 05:04 AM
chatgpt를 사용할 수 없습니다! 즉시 테스트 할 수있는 원인과 솔루션 설명 [최신 2025]May 14, 2025 am 05:04 AMchatgpt에 액세스 할 수 없습니까? 이 기사는 다양한 실용적인 솔루션을 제공합니다! 많은 사용자가 매일 chatgpt를 사용할 때 액세스 할 수 없거나 느린 응답과 같은 문제가 발생할 수 있습니다. 이 기사는 다양한 상황에 따라 이러한 문제를 단계별로 해결하도록 안내합니다. Chatgpt의 접근성 및 예비 문제 해결의 원인 먼저 문제가 OpenAI 서버 측 또는 사용자의 네트워크 또는 장치 문제에 있는지 확인해야합니다. 문제 해결을 위해 아래 단계를 따르십시오. 1 단계 : OpenAI의 공식 상태를 확인하십시오 chatgpt 서비스가 정상적으로 실행 중인지 확인하려면 OpenAi 상태 페이지 (status.openai.com)를 방문하십시오. 빨간색 또는 노란색 알람이 표시되면 열린 것을 의미합니다.
 ASI의 위험을 계산하는 것은 인간의 마음으로 시작합니다May 14, 2025 am 05:02 AM
2025 년 5 월 10 일, MIT 물리학 자 Max Tegmark는 AI Labs가 인공 초 지능을 방출하기 전에 Oppenheimer의 삼위 일체 테스트 미적분학을 모방해야한다고 Guardian에게 말했다. “내 평가는 'Compton Constant', 인종이
 Chatgpt에서 가사를 작성하고 작곡하는 방법에 대한 이해하기 쉬운 설명May 14, 2025 am 05:01 AM
AI 음악 제작 기술은 매일 매일 변화하고 있습니다. 이 기사는 Chatgpt와 같은 AI 모델을 예로 사용하여 AI를 사용하여 음악 제작을 지원하고 실제 사례에 대해 설명하는 방법을 자세히 설명합니다. 우리는 Sunoai, Hugging Face의 AI Jukebox 및 Python 's Music21 Library를 통해 음악을 만드는 방법을 소개합니다. 이러한 기술을 통해 모든 사람은 독창적 인 음악을 쉽게 만들 수 있습니다. 그러나 AI 생성 컨텐츠의 저작권 문제는 무시할 수 없으며 사용할 때는 신중해야합니다. 음악 분야에서 AI의 무한한 가능성을 모색 해 봅시다! OpenAi의 최신 AI 에이전트 "OpenAi Deep Research"가 소개됩니다. [chatgpt] ope
 chatgpt-4는 무엇입니까? 당신이 할 수있는 일, 가격 및 GPT-3.5의 차이에 대한 철저한 설명!May 14, 2025 am 05:00 AM
ChatGpt-4의 출현은 AI 응용 프로그램의 가능성을 크게 확장했습니다. GPT-3.5와 비교하여 ChatGpt-4는 상당히 개선되었습니다. 강력한 맥락 이해력이 있으며 이미지를 인식하고 생성 할 수도 있습니다. 그것은 보편적 인 AI 조수입니다. 비즈니스 효율성 향상 및 창출 지원과 같은 많은 분야에서 큰 잠재력을 보여주었습니다. 그러나 동시에, 우리는 또한 사용의 예방 조치에주의를 기울여야합니다. 이 기사에서는 ChatGpt-4의 특성을 자세히 설명하고 다양한 시나리오에 대한 효과적인 사용 방법을 소개합니다. 이 기사에는 최신 AI 기술을 최대한 활용하는 기술이 포함되어 있습니다. OpenAi의 최신 AI 에이전트, "OpenAi Deep Research"에 대한 자세한 내용은 아래 링크를 클릭하십시오.
 chatgpt 앱을 사용하는 방법을 설명하십시오! 일본 지원 및 음성 대화 기능May 14, 2025 am 04:59 AM
chatgpt 앱 : AI 조수와 함께 창의력을 발휘하십시오! 초보자 가이드 Chatgpt 앱은 쓰기, 번역 및 질문 답변을 포함하여 광범위한 작업을 처리하는 혁신적인 AI 어시스턴트입니다. 창의적인 활동과 정보 수집에 유용한 끝없는 가능성이있는 도구입니다. 이 기사에서는 초보자를위한 이해하기 쉬운 방법, ChatGpt 스마트 폰 앱을 설치하는 방법, 음성 입력 기능 및 플러그인과 같은 앱의 고유 한 기능 및 앱을 사용할 때 염두에 두는 포인트에 이르기까지 설명합니다. 또한 플러그인 제한 및 장치 간 구성 동기화를 자세히 살펴 보겠습니다.
 중국어 버전의 Chatgpt를 어떻게 사용합니까? 등록 절차 및 수수료에 대한 설명May 14, 2025 am 04:56 AM
Chatgpt Chinese 버전 : 중국 AI 대화의 새로운 경험 잠금 해제 Chatgpt는 전 세계적으로 인기가 있습니다. 중국어 버전도 제공한다는 것을 알고 있습니까? 이 강력한 AI 도구는 일상적인 대화를 지원할뿐만 아니라 전문적인 콘텐츠를 처리하며 단순화되고 전통적인 중국어와 호환됩니다. 중국의 사용자이든 중국어를 배우는 친구이든 상관없이 혜택을 누릴 수 있습니다. 이 기사는 계정 설정, 중국 신속한 단어 입력, 필터 사용 및 다양한 패키지 선택을 포함하여 ChatGpt 중국어 버전을 사용하는 방법을 자세히 소개하고 잠재적 위험 및 응답 전략을 분석합니다. 또한 ChatGpt 중국어 버전을 다른 중국 AI 도구와 비교하여 장점과 응용 프로그램 시나리오를 더 잘 이해할 수 있도록 도와줍니다. Openai의 최신 AI 인텔리전스
 5 AI 요원 신화 당신은 지금 믿음을 중단해야합니다.May 14, 2025 am 04:54 AM
이것들은 생성 AI 분야의 다음 도약으로 생각 될 수 있으며, 이는 우리에게 Chatgpt 및 기타 대규모 모델 챗봇을 제공했습니다. 단순히 질문에 대답하거나 정보를 생성하는 대신, 우리를 대신하여 조치를 취할 수 있습니다.
 Chatgpt를 사용하여 여러 계정을 만들고 관리하는 불법성에 대한 이해하기 쉬운 설명May 14, 2025 am 04:50 AM
ChatGpt를 사용한 효율적인 다중 계정 관리 기술 | 비즈니스와 사생활 사용 방법에 대한 철저한 설명! Chatgpt는 다양한 상황에서 사용되지만 일부 사람들은 여러 계정 관리에 대해 걱정할 수 있습니다. 이 기사는 ChatGpt에 대한 여러 계정을 만드는 방법, 사용할 때 수행 할 작업 및 안전하고 효율적으로 작동하는 방법을 자세히 설명합니다. 또한 비즈니스와 개인 사용의 차이, OpenAI의 이용 약관을 준수하는 것과 같은 중요한 점을 다루며 여러 계정을 안전하게 활용하는 데 도움이되는 안내서를 제공합니다. Openai


핫 AI 도구

Undresser.AI Undress
사실적인 누드 사진을 만들기 위한 AI 기반 앱

AI Clothes Remover
사진에서 옷을 제거하는 온라인 AI 도구입니다.

Undress AI Tool
무료로 이미지를 벗다

Clothoff.io
AI 옷 제거제

Video Face Swap
완전히 무료인 AI 얼굴 교환 도구를 사용하여 모든 비디오의 얼굴을 쉽게 바꾸세요!

인기 기사
뜨거운 도구

스튜디오 13.0.1 보내기
강력한 PHP 통합 개발 환경

VSCode Windows 64비트 다운로드
Microsoft에서 출시한 강력한 무료 IDE 편집기

PhpStorm 맥 버전
최신(2018.2.1) 전문 PHP 통합 개발 도구

Eclipse용 SAP NetWeaver 서버 어댑터
Eclipse를 SAP NetWeaver 애플리케이션 서버와 통합합니다.

안전한 시험 브라우저
안전한 시험 브라우저는 온라인 시험을 안전하게 치르기 위한 보안 브라우저 환경입니다. 이 소프트웨어는 모든 컴퓨터를 안전한 워크스테이션으로 바꿔줍니다. 이는 모든 유틸리티에 대한 액세스를 제어하고 학생들이 승인되지 않은 리소스를 사용하는 것을 방지합니다.

