AI를 사용한 스팸 이메일 분류기 구축: 기본 애플리케이션
- Patricia Arquette원래의
- 2024-12-31 11:32:11551검색
Node.js를 사용한 스팸 이메일 분류기
이 프로젝트는 Node.js와 Natural 라이브러리를 사용하여 이메일을 스팸 또는 스팸 아님. 이 애플리케이션은 스팸 감지를 위해 텍스트 분류 작업의 일반적인 알고리즘인 Naive Bayes 분류기를 사용합니다.
전제 조건시작하기 전에 다음이 설치되어 있는지 확인하세요.
- Node.js: Node.js 다운로드
- npm(노드 패키지 관리자): npm은 Node.js 설치와 함께 제공됩니다.
1단계: 프로젝트 설정
- 프로젝트 폴더 만들기: 터미널이나 명령 프롬프트를 열고 프로젝트에 대한 새 폴더를 만듭니다.
   mkdir spam-email-classifier
   cd spam-email-classifier
- Node.js 프로젝트 초기화: 폴더 내에서 다음 명령을 실행하여 package.json 파일을 생성합니다.
npm init -y2단계: 종속성 설치
다음 명령을 실행하여 필수 종속성을 설치합니다.
npm install natural
- natural: Naive Bayes를 이용한 분류를 포함한 다양한 NLP(자연어 처리) 도구를 제공하는 라이브러리입니다.
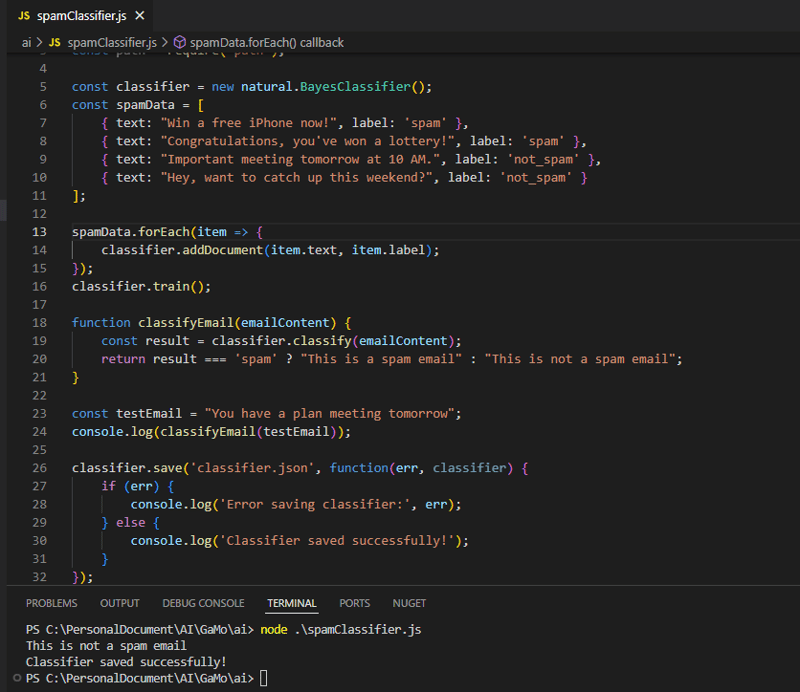
새 JavaScript 파일(예: spamClassifier.js)을 만들고 다음 코드를 추가합니다.
const natural = require('natural');

// Create a new Naive Bayes classifier
const classifier = new natural.BayesClassifier();

// Sample spam and non-spam data
const spamData = [
  { text: "Congratulations, you've won a 00 gift card!", label: 'spam' },
  { text: "You are eligible for a free trial, click here to sign up.", label: 'spam' },
  { text: "Important meeting tomorrow at 10 AM", label: 'not_spam' },
  { text: "Let's grab lunch this weekend!", label: 'not_spam' }
];

// Add documents to the classifier (training data)
spamData.forEach(item => {
  classifier.addDocument(item.text, item.label);
});

// Train the classifier
classifier.train();

// Function to classify an email
function classifyEmail(emailContent) {
  const result = classifier.classify(emailContent);
  return result === 'spam' ? "This is a spam email" : "This is not a spam email";
}

// Example of using the classifier to detect spam
const testEmail = "Congratulations! You have won a 00 gift card.";
console.log(classifyEmail(testEmail)); // Output: "This is a spam email"

// Save the trained model to a file (optional)
classifier.save('spamClassifier.json', function(err, classifier) {
  if (err) {
    console.log('Error saving classifier:', err);
  } else {
    console.log('Classifier saved successfully!');
  }
});
4단계: 분류자 실행
분류자를 실행하려면 터미널을 열고 프로젝트 폴더로 이동하세요. 그런 다음 다음 명령을 실행합니다.
node spamClassifier.js다음과 유사한 출력이 표시됩니다.
This is a spam email
Classifier saved successfully!
5단계: 저장된 분류자 로드(선택 사항)
나중에 분류자 모델을 로드하여 새 이메일을 분류할 수 있습니다. 모델을 로드하고 새 이메일을 분류하는 방법은 다음과 같습니다.
const natural = require('natural');

// Load the saved classifier
natural.BayesClassifier.load('spamClassifier.json', null, function(err, classifier) {
  if (err) {
    console.log('Error loading classifier:', err);
  } else {
    // Classify a new email
    const testEmail = "You have won a free iPhone!";
    console.log(classifier.classify(testEmail)); // Output: 'spam' or 'not_spam'
  }
});
6단계: 모델 개선(선택 사항)
스팸 분류기의 정확성을 높이려면 다음을 수행하세요.
- 더 많은 교육 데이터 추가: 스팸 및 스팸이 아닌 이메일의 샘플을 더 많이 포함합니다.
- 다양한 알고리즘 실험: Naive Bayes가 요구 사항에 충분하지 않은 경우 다른 분류 알고리즘이나 모델을 사용해 보세요.
- 고급 기술 사용: 보다 복잡한 분류 작업을 위해 딥 러닝 또는 신경망을 구현합니다.
앱에서 이메일을 보내거나 받으려면
Nodemailer 라이브러리를 사용하여 이메일을 보낼 수 있습니다.
- Nodemailer 설치:
   mkdir spam-email-classifier
   cd spam-email-classifier
- 이메일 보내기(예):
npm init -y

결론
이 가이드에서는 Node.js 및 Naive Bayes를 사용하여 이메일을 스팸인지 아닌지를 분류하는 AI 앱을 설정하는 과정을 안내했습니다. 이 앱을 다음과 같이 확장할 수 있습니다.
- 정확성을 높이기 위해 더 많은 훈련 데이터를 추가합니다.
- 더 발전된 머신러닝 기술을 사용합니다.
- 분류자를 웹 애플리케이션이나 이메일 시스템에 통합합니다.
위 내용은 AI를 사용한 스팸 이메일 분류기 구축: 기본 애플리케이션의 상세 내용입니다. 자세한 내용은 PHP 중국어 웹사이트의 기타 관련 기사를 참조하세요!
성명:
본 글의 내용은 네티즌들의 자발적인 기여로 작성되었으며, 저작권은 원저작자에게 있습니다. 본 사이트는 이에 상응하는 법적 책임을 지지 않습니다. 표절이나 침해가 의심되는 콘텐츠를 발견한 경우 admin@php.cn으로 문의하세요.

