
나만의 GitHub Copilot 구축: 코드 완성 도구에 대한 단계별 가이드

- DDD원래의
- 2024-09-14 12:15:371308검색
GitHub Copilot과 같은 코드 완성 도구를 구축하는 것이 복잡하다고 생각한 적이 있나요? 의외로 생각보다 어렵지 않아요!
엔지니어로서 저는 항상 코드 완성 도구가 내부적으로 어떻게 작동하는지에 매료되었습니다. 그래서 제가 직접 구축할 수 있는지 알아보기 위해 프로세스를 역설계했습니다.
다음은 제가 직접 만들어 게시한 LLM-Autocompleter입니다.
AI 지원 도구가 소프트웨어 개발의 표준이 되면서, 자신만의 코드 완성 도구를 만드는 것은 LSP(Language Server Protocol), API 및 OpenAI의 GPT와 같은 고급 모델과의 통합에 대해 배울 수 있는 좋은 방법입니다. 게다가 정말 보람찬 프로젝트입니다.
코드 완성 도구는 기본적으로 LSP(Language Server Protocol) 서버를 VS Code와 같은 플랫폼의 인라인 코드 완성 메커니즘과 결합합니다. 이 튜토리얼에서는 VS Code의 인라인 완성 API를 활용하고 자체 LSP 서버를 구축합니다.
자세히 살펴보기 전에 LSP 서버가 무엇인지 알아보겠습니다.
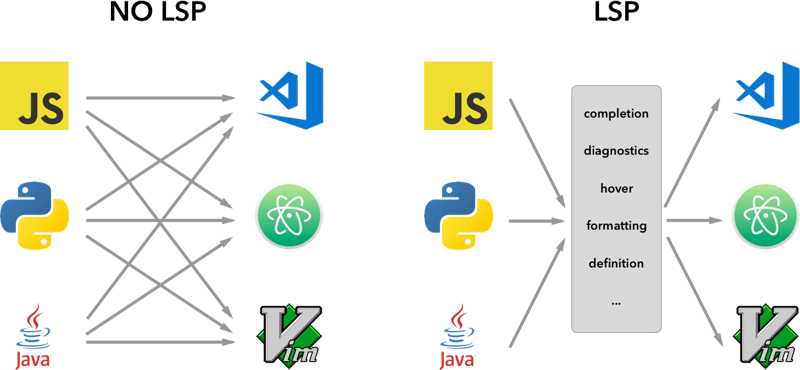
언어 서버 프로토콜(LSP)
LSP 서버는 텍스트 편집기나 IDE(통합 개발 환경)에 언어별 기능을 제공하는 백엔드 서비스입니다. 편집기(클라이언트)와 언어별 도구 사이의 다리 역할을 하며 다음과 같은 기능을 제공합니다.
코드 완성(입력할 때 코드 조각 제안),
정의로 이동(기호가 정의된 코드 부분으로 이동),
오류 검사(구문 오류를 실시간으로 강조 표시).
LSP(Language Server Protocol)의 기본 개념은 이러한 서버와 개발 도구가 통신하는 방식에 대한 프로토콜을 표준화하는 것입니다. 이렇게 하면 단일 언어 서버를 여러 개발 도구에서 재사용할 수 있으며 LSP는 단지 프로토콜일 뿐입니다.
이러한 서버가 LSP를 통해 편집자와 통신하는 방식을 표준화함으로써 개발자는 VS Code, Sublime Text, 심지어 Vim과 같은 다양한 플랫폼에서 원활하게 작동하는 언어별 기능을 만들 수 있습니다.
이제 LSP의 기본 사항을 이해했으므로 단계별로 자체 코드 완성 도구를 구축하는 방법을 살펴보겠습니다.
VS Code에서 제공하는 샘플 인라인 완성 확장을 사용하여 시작하겠습니다. GitHub에서 직접 복제할 수 있습니다.
vscode-샘플-인라인 완성
이제 lsp 서버를 설정해 보겠습니다. 아래 구조를 따르면 됩니다
.
├── client // Language Client
│   ├── src
│   │   ├── test // End to End tests for Language Client / Server
│   │   └── extension.ts // Language Client entry point
├── package.json // The extension manifest.
└── server // Language Server
    └── src
        └── server.ts // Language Server entry point
자세한 내용은 lsp-sample을 참조하세요
암호
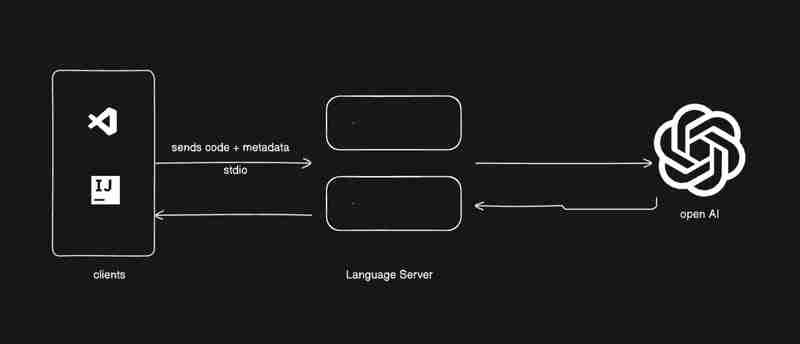
나는 여러분에게 약간의 코드를 제공할 것입니다. 여러분은 여러 가지를 하나로 연결해야 합니다. 여러분이 배웠으면 합니다. 아래 이미지는 우리가 만들려는 것을 보여줍니다.
client/src/extension.ts로 이동하여 활성화 기능에서 모든 항목을 제거합니다
export function activate(context: ExtensionContext) {
}
설정을 시작하겠습니다
- lsp 클라이언트를 생성하고 시작합니다.
- serverModule: 언어 서버의 기본 스크립트 경로를 가리킵니다.
- debugOptions: 디버그 모드에서 서버를 실행하는 데 유용합니다.
extension.ts
export function activate(context: ExtensionContext) {
    const serverModule = context.asAbsolutePath(
        path.join("server", "out", "server.js")
    );

    const debugOptions = { execArgv: ['--nolazy', '--
 inspect=6009'] };

  // communication with the server using Stdio
    const serverOptions: ServerOptions = {
        run: {
            module: serverModule,
            transport: TransportKind.stdio,
        },
        debug: {
            module: serverModule,
            transport: TransportKind.stdio,
            options: debugOptions
        }
    };

        const clientOptions: LanguageClientOptions = {
        documentSelector: [{ scheme: 'file' }],
        initializationOptions: serverConfiguration
    };


     client = new LanguageClient(
        'LSP Server Name',
        serverOptions,
        clientOptions
    );

  client.start();
}
- lsp 서버에서 데이터 수신은 server/src/server.ts로 이동하세요.
몇가지 정보
서버와 클라이언트 간 통신을 위해 따를 수 있는 다양한 유형의 프로토콜이 있습니다.
자세한 내용은 microsoft-lsp-docs를 참조하세요
왜 스튜디오인가요? Stdio는 클라이언트와 서버 간에 가장 널리 지원되는 통신 프로토콜 중 하나입니다. 이를 통해 우리가 구축 중인 LSP 서버가 VS Code뿐만 아니라 Vim 및 Sublime Text와 같은 다른 편집기에서도 작동할 수 있습니다.
server.ts
const methodStore: Record<string, any> = {
  exit,
  initialize,
  shutdown,
};

process.stdin.on("data", async (bufferChuck) => {
    buffer += bufferChuck;

    while (true) {
        try {
            // Check for the Content-Length line
            const lengthMatch = buffer.match(/Content-Length: (\d+)\r\n/);
            if (!lengthMatch) break;

            const contentLength = parseInt(lengthMatch[1], 10);
            const messageStart = buffer.indexOf("\r\n\r\n") + 4;

            // Continue unless the full message is in the buffer
            if (buffer.length < messageStart + contentLength) break;

            const rawMessage = buffer.slice(messageStart, messageStart + contentLength);
            const message = JSON.parse(rawMessage);


            const method = methodStore[message.method];

            if (method) {
                const result = await method(message);

                if (result !== undefined) {
                    respond(message.id, result);
                }
            }
            buffer = buffer.slice(messageStart + contentLength);
        } catch (error: any) {

            const errorMessage = {
                jsonrpc: "2.0",
                method: "window/showMessage",
                params: {
                    type: 1, // Error type
                    message: `Error processing request: ${error.message}`
                }
            };

            const errorNotification = JSON.stringify(errorMessage);
            const errorNotificationLength = Buffer.byteLength(errorNotification, "utf-8");
            const errorHeader = `Content-Length: ${errorNotificationLength}\r\n\r\n`;

            process.stdout.write(errorHeader + errorNotification);
        }
    }
});
initialize.ts
export const initialize = (message: RequestMessage): InitializeResult => {

    return {
        capabilities: {
            completionProvider: {
                resolveProvider: true
            },
            textDocumentSync: TextDocumentSyncKind.Incremental,
            codeActionProvider: {
                resolveProvider: true
            }
        },
        serverInfo: {
            name: "LSP-Server",
            version: "1.0.0",
        },
    };
};
exit.ts
export const exit = () => {
    process.exit(0);
  };
shutdown.ts
export const shutdown = () => {
    return null;
  };
기본 기능이 완료되면 이제 키보드의 F5 키를 사용하거나 디버깅 가이드를 따라 디버깅 모드에서 vscode를 실행할 수 있습니다
이제 인라인 공급자를 추가하고 이에 따라 요청과 응답을 받아보겠습니다.
methodStore에 새로운 메소드를 추가해 보겠습니다
server.ts
const methodStore: Record<string, any> = {
  exit,
  initialize,
  shutdown,
  "textDocument/generation": generation
};
세대.ts
export const generation = async (message: any) => {
    if(!message && message !== undefined) return {};

    const text = message.params.textDocument.text as string;

    if(!text) return {};

        const cursorText = getNewCursorText(text, message.params.position.line, message.params.position.character);

  const response = await getResponseFromOpenAI(cursorText, message.params.fsPath);

 return {
    generatedText: response,
  }

}

function getNewCursorText(text: string, line: number, character: number): string {
    const lines = text.split('\n');
    if (line < 0 || line >= lines.length) return text;

    const targetLine = lines[line];
    if (character < 0 || character > targetLine.length) return text;

    lines[line] = targetLine.slice(0, character) + '<CURSOR>' + targetLine.slice(character);
    return lines.join('\n');
}


const getResponseFromOpenAI = async (text: string, fsPath: stiring): Promise<string> => {
     const message = {
          "role": "user",
          "content": text
    };

   const systemMetaData: Paramaters = {
    max_token: 128,
    max_context: 1024,
    messages: [],
    fsPath: fsPath
   }

   const messages = [systemPrompt(systemMetaData), message]

   const chatCompletion: OpenAI.Chat.ChatCompletion | undefined = await this.open_ai_client?.chat.completions.create({
            messages: messages,
            model: "gpt-3.5-turbo",
            max_tokens: systemMetaData?.max_tokens ?? 128,
        });


        if (!chatCompletion) return "";

        const generatedResponse = chatCompletion.choices[0].message.content;

        if (!generatedResponse) return "";

        return generatedResponse;
}
template.ts
interface Parameters {
    max_tokens: number;
    max_context: number;
    messages: any[];
    fsPath: string;
}

 export const systemPrompt = (paramaters: Parameters | null) => {
    return {
        "role": "system",
        "content": `
        Instructions:
            - You are an AI programming assistant.
            - Given a piece of code with the cursor location marked by <CURSOR>, replace <CURSOR> with the correct code.
            - First, think step-by-step.
            - Describe your plan for what to build in pseudocode, written out in great detail.
            - Then output the code replacing the <CURSOR>.
            - Ensure that your completion fits within the language context of the provided code snippet.
            - Ensure, completion is what ever is needed, dont write beyond 1 or 2 line, unless the <CURSOR> is on start of a function, class or any control statment(if, switch, for, while).

            Rules:
            - Only respond with code.
            - Only replace <CURSOR>; do not include any previously written code.
            - Never include <CURSOR> in your response.
            - Handle ambiguous cases by providing the most contextually appropriate completion.
            - Be consistent with your responses.
            - You should only generate code in the language specified in the META_DATA.
            - Never mix text with code.
            - your code should have appropriate spacing.

            META_DATA:
            ${paramaters?.fsPath}`
    };
};
이제 인라인 공급자를 등록해 보겠습니다
extension.ts
import {languages} from "vscode";


function getConfiguration(configName: string) {
    if(Object.keys(workspace.getConfiguration(EXTENSION_ID).get(configName)).length > 0){
        return workspace.getConfiguration(EXTENSION_ID).get(configName);
    }
    return null;
}

const inLineCompletionConfig = getConfiguration("inlineCompletionConfiguration");

export function activate(context: ExtensionContext) {
 // OTHER CODE

  languages.registerInlineCompletionItemProvider(
        { pattern: "**" },
        {
            provideInlineCompletionItems: (document: TextDocument, position: Position) => {
                const mode = inLineCompletionConfig["mode"] || 'slow';
                return provideInlineCompletionItems(document, position, mode);
            },
        }

    );

}


let lastInlineCompletion = Date.now();
let lastPosition: Position | null = null;
let inlineCompletionRequestCounter = 0;

const provideInlineCompletionItems = async (document: TextDocument, position: Position, mode: 'fast' | 'slow') => {
    const params = {
        textDocument: {
            uri: document.uri.toString(),
            text: document.getText(),
        },
        position: position,
        fsPath: document.uri.fsPath.toString()
    };

    inlineCompletionRequestCounter += 1;
    const localInCompletionRequestCounter = inlineCompletionRequestCounter;
    const timeSinceLastCompletion = (Date.now() - lastInlineCompletion) / 1000;
    const minInterval = mode === 'fast' ? 0 : 1 / inLineCompletionConfig["maxCompletionsPerSecond"];

    if (timeSinceLastCompletion < minInterval) {
        await new Promise(r => setTimeout(r, (minInterval - timeSinceLastCompletion) * 1000));
    }

    if (inlineCompletionRequestCounter === localInCompletionRequestCounter) {
        lastInlineCompletion = Date.now();

        let cancelRequest = CancellationToken.None;
        if (lastPosition && position.isAfter(lastPosition)) {
            cancelRequest = CancellationToken.Cancelled;
        }
        lastPosition = position;

        try {
            const result = await client.sendRequest("textDocument/generation", params, cancelRequest);


            const snippetCode = new SnippetString(result["generatedText"]);
            return [new InlineCompletionItem(snippetCode)];
        } catch (error) {
            console.error("Error during inline completion request", error);
            client.sendNotification("window/showMessage", {
                type: 1, // Error type
                message: "An error occurred during inline completion: " + error.message
            });
            return [];
        }
    } else {
        return [];
    }
};
이 블로그는 자신만의 코드 완성 도구를 구축하는 데 필요한 기반을 제공하지만 여정은 여기서 끝나지 않습니다. LSP와 AI의 다양한 기능을 탐색하여 필요에 맞게 도구를 맞춤화하면서 이 코드를 실험하고 연구하고 개선해 보시기 바랍니다.
이 기능을 구현하려는 사람이 누구든 배우고, 연구하고, 함께 연결하길 바랍니다.
당신이 배운 것
LSP 서버 이해: LSP 서버가 무엇인지, LSP 서버가 언어별 도구를 어떻게 지원하는지, 크로스 에디터 지원에 중요한 이유를 배웠습니다.
VS Code 확장 빌드: API를 사용하여 VS Code에 코드 완성 기능을 통합하는 방법을 살펴보았습니다.
AI 기반 코드 완성: OpenAI의 GPT 모델에 연결하면 머신러닝이 지능적인 제안을 통해 어떻게 개발자 생산성을 향상시킬 수 있는지 확인하실 수 있습니다.
여기까지 오시면 무엇을 배웠는지 알고 싶습니다.
오늘 제 블로그에서 새로운 내용을 얻으셨다면 좋아요를 눌러주세요.
나와 연결-linked-In
위 내용은 나만의 GitHub Copilot 구축: 코드 완성 도구에 대한 단계별 가이드의 상세 내용입니다. 자세한 내용은 PHP 중국어 웹사이트의 기타 관련 기사를 참조하세요!