


우리는 현재 dev.to 프런트엔드 챌린지를 3D 시각화를 위한 기본 정적 파일 웹 앱을 신속하게 구성하는 방법을 탐색하는 수단으로 사용할 것입니다. 우리는 THREE.js(내가 가장 좋아하는 라이브러리 중 하나)를 사용하여 챌린지의 마크업 입력을 표시하는 데 사용할 수 있는 기본 태양계 도구를 구성할 것입니다.
비전
이 프로젝트에 영감을 준 현재 dev.to 챌린지는 다음과 같습니다.
https://dev.to/challenges/frontend-2024-09-04
이러한 라인에 따라 얼마나 빨리 조합할 수 있는지 봅시다!
시작하기
새로운 Github 프로젝트에서 Vite를 사용하여 매우 빠른 반복을 위해 즉시 사용 가능한 핫 모듈 교체(또는 HMR)를 통해 프로젝트를 시작하고 실행할 것입니다.
git clone [url]
cd [folder]
yarn create vite --template vanilla .
이렇게 하면 즉시 작동하는 프레임워크 없는 Vite 프로젝트가 생성됩니다. 종속성을 설치하고 3개를 추가한 후 "라이브" 개발 프로젝트를 실행하기만 하면 됩니다.
yarn install
yarn add three
yarn run dev
이를 통해 거의 실시간으로 개발하고 디버깅할 수 있는 "라이브" 버전이 제공됩니다. 이제 들어가서 물건을 뜯어낼 준비가 되었습니다!
엔진 구조
THREE를 한번도 사용해본 적이 없다면 알아둘 만한 몇 가지 사항이 있습니다.
엔진 설계에는 일반적으로 특정 시간에 세 가지 활동 또는 루프가 진행됩니다. 세 가지가 모두 순차적으로 수행된다면 이는 핵심 "게임 루프"에 세 가지 활동의 순서가 있음을 의미합니다.
일종의 사용자 입력 폴링이나 처리해야 하는 이벤트가 있습니다
렌더링 호출 자체가 있습니다
일종의 내부 논리/업데이트 동작이 있습니다
네트워킹과 같은 것(예: 업데이트 패킷 수신)은 (사용자 작업과 같이) 애플리케이션 상태의 일부 업데이트로 전파되어야 하는 이벤트를 트리거하므로 여기서 입력으로 처리될 수 있습니다.

물론 그 밑에는 상태 자체에 대한 표현이 있습니다. ECS를 사용하는 경우 이는 구성요소 테이블 세트일 수 있습니다. 우리의 경우 이는 주로 3개 객체(예: Scene 인스턴스)의 인스턴스화로 시작됩니다.
이를 염두에 두고 앱의 기본 자리 표시자를 작성해 보겠습니다.
물건을 벗기다
최상위 index.html을 리팩토링하는 것부터 시작하겠습니다.
정적 파일 참조는 필요하지 않습니다
자바스크립트 후크는 필요하지 않습니다
우리는 전역 범위의 스타일시트를 원합니다
ES6 모듈을 HTML의 최상위 진입점으로 연결하려고 합니다
최상위 index.html 파일은 다음과 같습니다.
  <meta charset="UTF-8">
  <meta name="viewport" content="width=device-width, initial-scale=1.0">
  <title>Vite App</title>
  <link rel="stylesheet" href="index.css" type="text/css">
  <script type="module" src="index.mjs"></script>
전역 범위 스타일시트에서는 본문이 패딩, 여백 또는 오버플로 없이 전체 화면을 차지하도록 지정합니다.
body {
    width: 100vw;
    height: 100vh;
    overflow: hidden;
    margin: 0;
    padding: 0;
}
이제 나머지를 정리하는 동안 앱이 작동하는지 확인하기 위한 기본 자리 표시자 콘텐츠와 함께 ES6 모듈을 추가할 준비가 되었습니다.
/**
 * index.mjs
 */

function onWindowLoad(event) {
    console.log("Window loaded", event);
}

window.addEventListener("load", onWindowLoad);
이제 꺼내기 시작할 수 있습니다! 다음 항목을 삭제합니다:
main.js
javascript.svg
counter.js
공개/
style.css
물론, 브라우저에서 '라이브' 보기를 보면 비어 있을 것입니다. 하지만 괜찮아요! 이제 3D로 전환할 준비가 되었습니다.
3개의 헬로 월드
3개의 고전적인 "hello world" 회전 큐브를 설명하는 것부터 시작하겠습니다. 나머지 로직은 이전 단계에서 생성한 ES6 모듈 내에 있습니다. 먼저 다음 3개를 가져와야 합니다.
import * as THREE from "three";
그런데 이제 어쩌지?
THREE에는 간단하면서도 강력한 특정 그래픽 파이프라인이 있습니다. 고려해야 할 몇 가지 요소가 있습니다:
한 장면
카메라
자체 렌더링 대상(제공되지 않은 경우)과 장면과 카메라를 매개변수로 사용하는 render() 메서드가 있는 렌더러
장면은 단지 최상위 장면 그래프 노드입니다. 해당 노드는 세 가지 흥미로운 속성의 조합입니다.
변환(상위 노드에서) 및 하위 배열
정점 버퍼 내용과 구조(그리고 인덱스 버퍼, 기본적으로 메시를 정의하는 수치 데이터)를 정의하는 지오메트리
GPU가 기하학 데이터를 처리하고 렌더링하는 방법을 정의하는 자료
따라서 시작하려면 이러한 각 항목을 정의해야 합니다. 창 크기를 알면 도움이 되는 카메라부터 시작해 보겠습니다.
const width = window.innerWidth;
const height = window.innerHeight;
const camera = new THREE.PerspectiveCamera(70, width/height, 0.01, 10);
camera.position.z = 1;
이제 "상자" 형상과 "메시 법선" 재질이 포함된 기본 큐브를 추가할 장면을 정의할 수 있습니다.
const scene = new THREE.Scene();
const geometry = new THREE.BoxGeometry(0.2, 0.2, 0.2);
const material = new THREE.MeshNormalMaterial();
const mesh = new THREE.Mesh(geometry, material);
scene.add(mesh);
Lastly, we'll instantiate the renderer. (Note that, since we don't provide a rendering target, it will create its own canvas, which we will then need to attach to our document body.) We're using a WebGL renderer here; there are some interesting developments in the THREE world towards supporting a WebGPU renderer, too, which are worth checking out.
const renderer = new THREE.WebGLRenderer({
    "antialias": true
});
renderer.setSize(width, height);
renderer.setAnimationLoop(animate);
document.body.appendChild(renderer.domElement);
We have one more step to add. We pointed the renderer to an animation loop function, which will be responsible for invoking the render function. We'll also use this opportunity to update the state of our scene.
function animate(time) {
    mesh.rotation.x = time / 2000;
    mesh.rotation.y = time / 1000;
    renderer.render(scene, camera);
}
But this won't quite work yet. The singleton context for a web application is the window; we need to define and attach our application state to this context so various methods (like our animate() function) can access the relevant references. (You could embed the functions in our onWindowLoad(), but this doesn't scale very well when you need to start organizing complex logic across multiple modules and other scopes!)
So, we'll add a window-scoped app object that combines the state of our application into a specific object.
window.app = {
    "renderer": null,
    "scene": null,
    "camera": null
};
Now we can update the animate() and onWindowLoad() functions to reference these properties instead. And once you've done that you will see a Vite-driven spinning cube!

Lastly, let's add some camera controls now. There is an "orbit controls" tool built into the THREE release (but not the default export). This is instantiated with the camera and DOM element, and updated each loop. This will give us some basic pan/rotate/zoom ability in our app; we'll add this to our global context (window.app).
import { OrbitControls } from "three/addons/controls/OrbitControls.js";
// ...in animate():
window.app.controls.update();
// ...in onWindowLoad():
window.app.controls = new OrbitControls(window.app.camera, window.app.renderer.domElement);
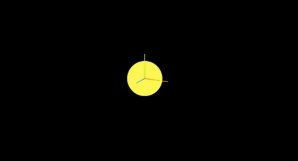
We'll also add an "axes helper" to visualize coordinate frame verification and debugging inspections.
// ...in onWindowLoad():
app.scene.add(new THREE.AxesHelper(3));
Not bad. We're ready to move on.
Turning This Into a Solar System
Let's pull up what the solar system should look like. In particular, we need to worry about things like coordinates. The farthest object out will be Pluto (or the Kuiper Belt--but we'll use Pluto as a reference). This is 7.3 BILLION kilometers out--which brings up an interesting problem. Surely we can't use near/far coordinates that big in our camera properties!
These are just floating point values, though. The GPU doesn't care if the exponent is 1 or 100. What matters is, that there is sufficient precision between the near and far values to represent and deconflict pixels in the depth buffer when multiple objects overlap. So, we can move the "far" value out to 8e9 (we'll use kilometers for units here) so long as we also bump up the "near" value, which we'll increase to 8e3. This will give our depth buffer plenty of precision to deconflict large-scale objects like planets and moons.
Next we're going to replace our box geometry and mesh normal material with a sphere geometry and a mesh basic material. We'll use a radius of 7e5 (or 700,000 kilometers) for this sphere. We'll also back out our initial camera position to keep up with the new scale of our scene.
// in onWindowLoad():
app.camera.position.x = 1e7;
// ...
const geometry = new THREE.SPhereGEometry(7e5, 32, 32);
const material = new THERE.MeshBasicMaterial({"color": 0xff7700});
You should now see something that looks like the sun floating in the middle of our solar system!
Planets
Let's add another sphere to represent our first planet, Mercury. We'll do it by hand for now, but it will become quickly obvious how we want to reusably-implement some sort of shared planet model once we've done it once or twice.
We'll start by doing something similar as we did with the sun--defining a spherical geometry and a single-color material. Then, we'll set some position (based on the orbital radius, or semi-major axis, of Mercury's orbit). Finally, we'll add the planet to the scene. We'll also want (though we don't use it yet) to consider what the angular velocity of that planet's orbit is, once we start animating it. We'll consolidate these behaviors, given this interface, within a factory function that returns a new THREE.Mesh instance.
function buildPlanet(radius, initialPosition, angularVelocity, color) {
    const geometry = new THREE.SphereGeometry(radius, 32, 32);
    const material = new THREE.MeshBasicMaterial({"color": color});
    const mesh = new THREE.Mesh(geometry, material);
    mesh.position.set(initialPosition.x, initialPosition.y, initialPosition.z);
    return mesh;
}
Back in onWindowLoad(), we'll add the planet by calling this function and adding the result to our scene. We'll pass the parameters for Mercury, using a dullish grey for the color. To resolve the angular velocity, which will need to be in radius per second, we'll pass the orbital period (which Wikipedia provides in planet data cards) through a unit conversion:

The resulting call looks something like this:
// ...in onWindowLoad():
window.app.scene.add(buildPlanet(2.4e3, new THREE.Vector3(57.91e6, 0, 0), 2 * Math.PI / 86400 / 87.9691, 0x333333));
(We can also remove the sun rotation calls from the update function at this point.)
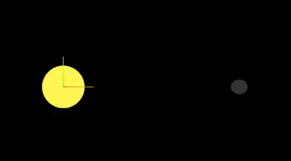
If you look at the scene at this point, the sun will look pretty lonely! This is where the realistic scale of the solar system starts becoming an issue. Mercury is small, and compared to the radius of the sun it's still a long way away. So, we'll add a global scaling factor to the radius (to increase it) and the position (to decrease it). This scaling factor will be constant so the relative position of the planets will still be realistic. We'll tweak this value until we are comfortable with how visible our objects are within the scene.
const planetRadiusScale = 1e2;
const planetOrbitScale = 1e-1;
// ...in buildPlanet():
const geometry = new THREE.SphereGeometry(planetRadiusScale * radius, 32, 32);
// ...
mesh.position.set(
    planetOrbitScale * initialPosition.x,
    planetOrbitScale * initialPosition.y,
    planetOrbitScale * initialPosition.z
);
You should now be able to appreciate our Mercury much better!
MOAR PLANETZ
We now have a reasonably-reusable planetary factory. Let's copy and paste spam a few times to finish fleshing out the "inner" solar system. We'll pull our key values from a combination of Wikipedia and our eyeballs' best guess of some approximate color.
// ...in onWindowLoad():
window.app.scene.add(buildPlanet(2.4e3, new THREE.Vector3(57.91e6, 0, 0), 2 * Math.PI / 86400 / 87.9691, 0x666666));
window.app.scene.add(buildPlanet(6.051e3, new THREE.Vector3(108.21e6, 0, 0), 2 * Math.PI / 86400 / 224.701, 0xaaaa77));
window.app.scene.add(buildPlanet(6.3781e3, new THREE.Vector3(1.49898023e8, 0, 0), 2 * Math.PI / 86400 / 365.256, 0x33bb33));
window.app.scene.add(buildPlanet(3.389e3, new THREE.Vector3(2.27939366e8, 0, 0), 2 * Math.PI / 86400 / 686.980, 0xbb3333));
Hey! Not bad. It's worth putting a little effort into reusable code, isn't it?

But this is still something of a mess. We will have a need to reuse this data, so we shouldn't copy-paste "magic values" like these. Let's pretend the planet data is instead coming from a database somewhere. We'll mock this up by creating a global array of objects that are procedurally parsed to extract our planet models. We'll add some annotations for units while we're at it, as well as a "name" field that we can use later to correlate planets, objects, data, and markup entries.
At the top of the module, then, we'll place the following:
const planets = [
    {
        "name": "Mercury",
        "radius_km": 2.4e3,
        "semiMajorAxis_km": 57.91e6,
        "orbitalPeriod_days": 87.9691,
        "approximateColor_hex": 0x666666
    }, {
        "name": "Venus",
        "radius_km": 6.051e3,
        "semiMajorAxis_km": 108.21e6,
        "orbitalPeriod_days": 224.701,
        "approximateColor_hex": 0xaaaa77
    }, {
        "name": "Earth",
        "radius_km": 6.3781e3,
        "semiMajorAxis_km": 1.49898023e8,
        "orbitalPeriod_days": 365.256,
        "approximateColor_hex":  0x33bb33
    }, {
        "name": "Mars",
        "radius_km": 3.389e3,
        "semiMajorAxis_km": 2.27939366e8,
        "orbitalPeriod_days": 686.980,
        "approximateColor_hex":  0xbb3333
    }
];
Now we're ready to iterate through these data items when populating our scene:
// ...in onWindowLoad():
planets.forEach(p => {
    window.app.scene.add(buildPlanet(p.radius_km, new THREE.Vector3(p.semiMajorAxis_km, 0, 0), 2 * Math.PI / 86400 / p.orbitalPeriod_days, p.approximateColor_hex));
});
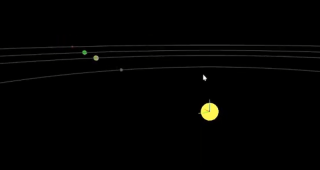
Adding Some Tracability
Next we'll add some "orbit traces" that illustrate the path each planet will take during one revolution about the sun. Since (for the time being, until we take into account the specific elliptical orbits of each planet) this is just a circle with a known radius. We'll sample that orbit about one revolution in order to construct a series of points, which we'll use to instantiate a line that is then added to the scene.
This involves the creation of a new factory function, but it can reuse the same iteration and planet models as our planet factory. First, let's define the factory function, which only has one parameter for now:
function buildOrbitTrace(radius) {
    const points = [];
    const n = 1e2;
    for (var i = 0; i


<p>Now we'll modify the iteration in our onWindowLoad() function to instantiate orbit traces for each planet:<br>
</p>

<pre class="brush:php;toolbar:false">// ...in onWindowLoad():
planets.forEach(p => {
    window.app.scene.add(buildPlanet(p.radius_km, new THREE.Vector3(p.semiMajorAxis_km, 0, 0), 2 * Math.PI / 86400 / p.orbitalPeriod_days, p.approximateColor_hex));
    window.app.scene.add(buildOrbitTrace(p.semiMajoxAxis_km));
});
Now that we have a more three-dimensional scene, we'll also notice that our axis references are inconsistent. The OrbitControls model assumes y is up, because it looks this up from the default camera frame (LUR, or "look-up-right"). We'll want to adjust this after we initially instantiate the original camera:
// ...in onWindowLoad():
app.camera.position.z = 1e7;
app.camera.up.set(0, 0, 1);
Now if you rotate about the center of our solar system with your mouse, you will notice a much more natural motion that stays fixed relative to the orbital plane. And of course you'll see our orbit traces!
Clicky-Clicky
Now it's time to think about how we want to fold in the markup for the challenge. Let's take a step back and consider the design for a moment. Let's say there will be a dialog that comes up when you click on a planet. That dialog will present the relevant section of markup, associated via the name attribute of the object that has been clicked.

But that means we need to detect and compute clicks. This will be done with a technique known as "raycasting". Imagine a "ray" that is cast out of your eyeball, into the direction of the mouse cursor. This isn't a natural part of the graphics pipeline, where the transforms are largely coded into the GPU and result exclusively in colored pixels.
In order to back out those positions relative to mouse coordinates, we'll need some tools that handle those transforms for us within the application layer, on the CPU. This "raycaster" will take the current camera state (position, orientation, and frustrum properties) and the current mouse position. It will look through the scene graph and compare (sometimes against a specific collision distance) the distance of those node positions from the mathematical ray that this represents.
Within THREE, fortunately, there are some great built-in tools for doing this. We'll need to add two things to our state: the raycaster itself, and some representation (a 2d vector) of the mouse state.
window.app = {
    // ... previous content
    "raycaster": null,
    "mouse_pos": new THREE.Vector2(0, 0)
};
We'll need to subscribe to movement events within the window to update this mouse position. We'll create a new function, onMouseMove(), and use it to add an event listener in our onWindowLoad() initialization after we create the raycaster:
// ...in onWindowLoad():
window.app.raycaster = new THREE.Raycaster();
window.addEventListener("pointermove", onPointerMove);
Now let's create the listener itself. This simply transforms the [0,1] window coordinates into [-1,1] coordinates used by the camera frame. This is a fairly straightforward pair of equations:
function onPointerMove(event) {
    window.app.mouse_pos.x = (event.clientX / window.innerWidth) * 2 - 1;
    window.app.mouse_pos.y = (event.clientY / window.innerHeight) * 2 - 1;
}
Finally, we'll add the raycasting calculation to our rendering pass. Technically (if you recall our "three parts of the game loop" model) this is an internal update that is purely a function of game state. But we'll combine the rendering pass and the update calculation for the time being.
// ...in animate():
window.app.raycaster.setFromCamera(window.app.mouse_pos, window.app.camera):
const intersections = window.app.raycaster.intersectObjects(window.app.scene.children);
if (intersections.length > 0) { console.log(intersections); }
Give it a quick try! That's a pretty neat point to take a break.
What's Next?
What have we accomplished here:
We have a representation of the sun and inner solar system
We have reusable factories for both planets and orbit traces
We have basic raycasting for detecting mouse collisions in real time
We have realistic dimensions (with some scaling) in our solar system frame
But we're not done yet! We still need to present the markup in response to those events, and there's a lot more we can add! So, don't be surprised if there's a Part Two that shows up at some point.
위 내용은 [ 무작위 소프트웨어 프로젝트: dev.to Frontend Challenge의 상세 내용입니다. 자세한 내용은 PHP 중국어 웹사이트의 기타 관련 기사를 참조하세요!

 JavaScript 엔진 : 구현 비교Apr 13, 2025 am 12:05 AM
각각의 엔진의 구현 원리 및 최적화 전략이 다르기 때문에 JavaScript 엔진은 JavaScript 코드를 구문 분석하고 실행할 때 다른 영향을 미칩니다. 1. 어휘 분석 : 소스 코드를 어휘 단위로 변환합니다. 2. 문법 분석 : 추상 구문 트리를 생성합니다. 3. 최적화 및 컴파일 : JIT 컴파일러를 통해 기계 코드를 생성합니다. 4. 실행 : 기계 코드를 실행하십시오. V8 엔진은 즉각적인 컴파일 및 숨겨진 클래스를 통해 최적화하여 Spidermonkey는 유형 추론 시스템을 사용하여 동일한 코드에서 성능이 다른 성능을 제공합니다.
 브라우저 너머 : 실제 세계의 JavaScriptApr 12, 2025 am 12:06 AM
실제 세계에서 JavaScript의 응용 프로그램에는 서버 측 프로그래밍, 모바일 애플리케이션 개발 및 사물 인터넷 제어가 포함됩니다. 1. 서버 측 프로그래밍은 Node.js를 통해 실현되며 동시 요청 처리에 적합합니다. 2. 모바일 애플리케이션 개발은 재교육을 통해 수행되며 크로스 플랫폼 배포를 지원합니다. 3. Johnny-Five 라이브러리를 통한 IoT 장치 제어에 사용되며 하드웨어 상호 작용에 적합합니다.
 Next.js (백엔드 통합)로 멀티 테넌트 SAAS 애플리케이션 구축Apr 11, 2025 am 08:23 AM
일상적인 기술 도구를 사용하여 기능적 다중 테넌트 SaaS 응용 프로그램 (Edtech 앱)을 구축했으며 동일한 작업을 수행 할 수 있습니다. 먼저, 다중 테넌트 SaaS 응용 프로그램은 무엇입니까? 멀티 테넌트 SAAS 응용 프로그램은 노래에서 여러 고객에게 서비스를 제공 할 수 있습니다.
 Next.js (Frontend Integration)를 사용하여 멀티 테넌트 SaaS 응용 프로그램을 구축하는 방법Apr 11, 2025 am 08:22 AM
이 기사에서는 Contrim에 의해 확보 된 백엔드와의 프론트 엔드 통합을 보여 주며 Next.js를 사용하여 기능적인 Edtech SaaS 응용 프로그램을 구축합니다. Frontend는 UI 가시성을 제어하기 위해 사용자 권한을 가져오고 API가 역할 기반을 준수하도록합니다.
 JavaScript : 웹 언어의 다양성 탐색Apr 11, 2025 am 12:01 AM
JavaScript는 현대 웹 개발의 핵심 언어이며 다양성과 유연성에 널리 사용됩니다. 1) 프론트 엔드 개발 : DOM 운영 및 최신 프레임 워크 (예 : React, Vue.js, Angular)를 통해 동적 웹 페이지 및 단일 페이지 응용 프로그램을 구축합니다. 2) 서버 측 개발 : Node.js는 비 차단 I/O 모델을 사용하여 높은 동시성 및 실시간 응용 프로그램을 처리합니다. 3) 모바일 및 데스크탑 애플리케이션 개발 : 크로스 플랫폼 개발은 개발 효율을 향상시키기 위해 반응 및 전자를 통해 실현됩니다.
 JavaScript의 진화 : 현재 동향과 미래 전망Apr 10, 2025 am 09:33 AM
JavaScript의 최신 트렌드에는 Typescript의 Rise, 현대 프레임 워크 및 라이브러리의 인기 및 WebAssembly의 적용이 포함됩니다. 향후 전망은보다 강력한 유형 시스템, 서버 측 JavaScript 개발, 인공 지능 및 기계 학습의 확장, IoT 및 Edge 컴퓨팅의 잠재력을 포함합니다.
 Demystifying JavaScript : 그것이하는 일과 중요한 이유Apr 09, 2025 am 12:07 AM
JavaScript는 현대 웹 개발의 초석이며 주요 기능에는 이벤트 중심 프로그래밍, 동적 컨텐츠 생성 및 비동기 프로그래밍이 포함됩니다. 1) 이벤트 중심 프로그래밍을 사용하면 사용자 작업에 따라 웹 페이지가 동적으로 변경 될 수 있습니다. 2) 동적 컨텐츠 생성을 사용하면 조건에 따라 페이지 컨텐츠를 조정할 수 있습니다. 3) 비동기 프로그래밍은 사용자 인터페이스가 차단되지 않도록합니다. JavaScript는 웹 상호 작용, 단일 페이지 응용 프로그램 및 서버 측 개발에 널리 사용되며 사용자 경험 및 크로스 플랫폼 개발의 유연성을 크게 향상시킵니다.
 Python 또는 JavaScript가 더 좋습니까?Apr 06, 2025 am 12:14 AM
Python은 데이터 과학 및 기계 학습에 더 적합한 반면 JavaScript는 프론트 엔드 및 풀 스택 개발에 더 적합합니다. 1. Python은 간결한 구문 및 풍부한 라이브러리 생태계로 유명하며 데이터 분석 및 웹 개발에 적합합니다. 2. JavaScript는 프론트 엔드 개발의 핵심입니다. Node.js는 서버 측 프로그래밍을 지원하며 풀 스택 개발에 적합합니다.


핫 AI 도구

Undresser.AI Undress
사실적인 누드 사진을 만들기 위한 AI 기반 앱

AI Clothes Remover
사진에서 옷을 제거하는 온라인 AI 도구입니다.

Undress AI Tool
무료로 이미지를 벗다

Clothoff.io
AI 옷 제거제

AI Hentai Generator
AI Hentai를 무료로 생성하십시오.

인기 기사
뜨거운 도구

mPDF
mPDF는 UTF-8로 인코딩된 HTML에서 PDF 파일을 생성할 수 있는 PHP 라이브러리입니다. 원저자인 Ian Back은 자신의 웹 사이트에서 "즉시" PDF 파일을 출력하고 다양한 언어를 처리하기 위해 mPDF를 작성했습니다. HTML2FPDF와 같은 원본 스크립트보다 유니코드 글꼴을 사용할 때 속도가 느리고 더 큰 파일을 생성하지만 CSS 스타일 등을 지원하고 많은 개선 사항이 있습니다. RTL(아랍어, 히브리어), CJK(중국어, 일본어, 한국어)를 포함한 거의 모든 언어를 지원합니다. 중첩된 블록 수준 요소(예: P, DIV)를 지원합니다.

SecList
SecLists는 최고의 보안 테스터의 동반자입니다. 보안 평가 시 자주 사용되는 다양한 유형의 목록을 한 곳에 모아 놓은 것입니다. SecLists는 보안 테스터에게 필요할 수 있는 모든 목록을 편리하게 제공하여 보안 테스트를 더욱 효율적이고 생산적으로 만드는 데 도움이 됩니다. 목록 유형에는 사용자 이름, 비밀번호, URL, 퍼징 페이로드, 민감한 데이터 패턴, 웹 셸 등이 포함됩니다. 테스터는 이 저장소를 새로운 테스트 시스템으로 간단히 가져올 수 있으며 필요한 모든 유형의 목록에 액세스할 수 있습니다.

에디트플러스 중국어 크랙 버전
작은 크기, 구문 강조, 코드 프롬프트 기능을 지원하지 않음

SublimeText3 Linux 새 버전
SublimeText3 Linux 최신 버전

Dreamweaver Mac版
시각적 웹 개발 도구

