HTML 이벤트 속성

- WBOYWBOYWBOYWBOYWBOYWBOYWBOYWBOYWBOYWBOYWBOYWBOYWB원래의
- 2024-09-04 16:17:27726검색
이 글에서는 HTML 이벤트 속성에 대해 자세히 설명하겠습니다. 이벤트는 사용자 작업의 결과로 수행되는 작업입니다. 예를 들어, 사용자가 데이터를 읽기 위해 키보드를 누르는 것을 키보드 이벤트라고 합니다. 이러한 활동은 사용자가 웹사이트를 살펴보고 버튼을 클릭할 때 또는 브라우저가 페이지를 조작하는 새로 고침 버튼을 눌러 페이지가 로드될 때 수행됩니다. 이 모든 행동을 하나의 사건이라고 합니다. 여기에서는 이벤트에 대한 기본적인 이해와 이벤트가 브라우저에서 사용자 작업에 따라 어떻게 작동하는지 살펴보겠습니다. 다음 섹션에서 설명하는 전체 브라우저 창에서 발생하는 다양한 유형의 이벤트가 있습니다.
5가지 HTML 이벤트 속성
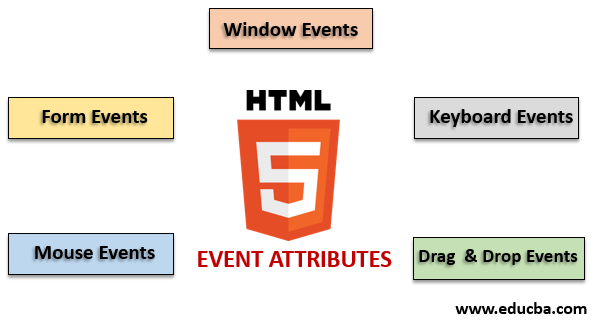
HTML에서 사용할 수 있는 다양한 이벤트 변형이 있습니다. 그리고 이러한 모든 이벤트에는 이벤트 작업이 수행될 때 실행되는 이벤트 핸들러라는 이름의 작은 코드 블록이 있습니다. 이는 HTML 요소에 첨부됩니다. 이벤트 핸들러 또는 이벤트 리스너는 HTML 이벤트 속성에서 중요한 역할을 합니다. 전역적으로 선언되고 HTML 요소에 적용되는 다양한 유형의 이벤트 속성과 해당 작업을 자세히 살펴보겠습니다. 4가지 기본 이벤트 속성이 주로 사용됩니다. 그들은:
- 창문 이벤트
- 양식 이벤트
- 마우스 이벤트
- 키보드 이벤트
- 드래그 앤 드롭 이벤트
예를 들어 이러한 모든 속성을 하나씩 설명하겠습니다. 먼저 같이 가겠습니다.
1. 윈도우 이벤트
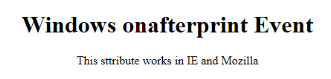
- onafterprintEvent: 이 속성은 모든 Html 태그에서 지원되며 페이지 인쇄가 시작되고 단일 값 스크립트가 있을 때 작동합니다. 다음은 HTML 코드의 예입니다. 이 예는 버튼을 눌렀을 때를 보여줍니다. 대화 메시지에 인쇄되는 메시지를 인쇄합니다.
코드:
<!DOCTYPE html>
<html>
<head>
<title>
Windows onafterprint Event
</title>
</head>
<body onafterprint="myfun()">
<h1>Windows onafterprint Event </h1>
<p>This attribute works in IE and Mozilla</p>
<body style = "text-align:center">
<script>
function myfun() {
alert("Document is being printed");
}
</script>
</body>
</html>
출력:
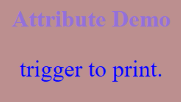
- onbeforeprint: 인쇄 전에 작동합니다. 인쇄 프로세스 후에 이벤트가 시작됩니다. 아래는 예시코드입니다.
코드:
<!DOCTYPE html>
<html>
<head>
<style>
body {
color: #9370DB;
background-color: #BC8F8F;
text-align: center;
padding: 20px;
}
p {
font-size: 2rem;
}
</style>
</head>
<body onbeforeprint="get()">
<h1> Attribute Demo</h1>
<p style="color:#0000FF;">trigger to print.</p>
<div class="show"></div>
<script>
function get() {
document.body.style.background = "#00BFFF";
}
</script>
</body>
</html>
출력:
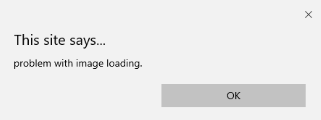
- onerror: 이 함수는 요소가 존재하지 않는 동안 오류가 발생하면 트리거됩니다.
코드:
<!DOCTYPE html>
<html>
<body>
<img src="p.jpg" onerror="myFun()">
<p>hello world.</p>
<script>
function myFun() {
alert("problem with image loading.");
}
</script>
</body>
</html>
출력:
- onload: 이 기능은 개체를 로드하는 데 도움이 되며 웹페이지가 올바르게 로드되었는지 확인하는 데 유용합니다.
코드:
<!DOCTYPE html>
<html>
<head>
<title>onload event demo</title>
</head>
<body>
<img src="pic.jpg" onload="ldImg()" width="50" height="92">
<script>
function ldImg() {
alert("image loaded without error");
}
</script>
</body>
</html>
출력:
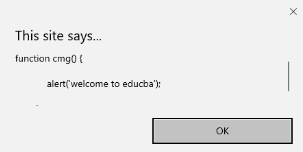
- onresize: 이 이벤트는 브라우저 창의 크기가 조정될 때 트리거되며 resize 속성 아래에서 모든 요소가 트리거될 수 있습니다.
코드:
<!DOCTYPE html>
<head>
<title>onresize event</title>
</head>
<body>
<script type="text/javascript">
function cmg() {
alert('welcome to educba');
}
window.onresize = cmg;
</script>
</head>
<body>
<input type="button"  value="Click the button"
onclick="alert(window.onresize);">
</body>
</html>
출력:
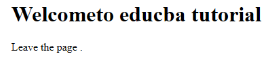
- onunload: 이 이벤트는 웹페이지 창이 닫히거나 사용자가 웹페이지를 떠날 때 트리거됩니다. 아래 코드는 사용자가 떠날 때 페이지를 언로드하고 검색해 주셔서 감사하다는 경고를 표시합니다. 이 이벤트는 때때로 모든 브라우저에서 작동합니다.
코드:
<!DOCTYPE html>
<html>
<body onunload="onfunc()"><h1>Welcometo educba tutorial</h1>
<p>Leave the page .</p>
<script>
function onfunc() {
alert("Thank you for searching!");
}
</script>
</body>
</html>
출력:
2. 양식 이벤트
양식 컨트롤과 함께 작동합니다. 다음은 사용자가 브라우저와 상호작용할 때 발생하는 속성입니다.
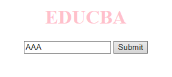
- onblur: 이 이벤트는 사용자의 주의가 양식 창에서 벗어날 때 발생합니다. 다음 예시는 소문자로 입력을 받아 제출 버튼을 클릭하면 출력이 대문자로 바뀌는 예시입니다.
코드:
<!DOCTYPE html>
<html>
<head>
<title> Form onblur </title>
<style>
body {
text-align:center;
}
h1 {
color:pink;
}
</style>
</head>
<body>
<h1>EDUCBA</h1>
<input type="text" name="fname" id="aaa"
onblur="myfunc()">
<button type="button">Submit</button>
<script>
function myfunc() {
var a = document.getElementById("aaa");
a.value = a.value.toUpperCase();
}
</script>
</body>
</html>
출력:
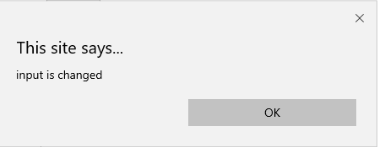

- onchange: 이 이벤트는 사용자가 양식의 기존 요소를 변경할 때 발생합니다. 요소가 포커스를 잃을 때 발생합니다.
코드:
<!DOCTYPE html>
<html lang="en">
<head>
<meta charset="utf-8">
<title>HTML onchange</title>
</head>
<body>
<form name="example" action="">  <input type="text" name="rahul" onchange="alert('input is changed')"><br>
<label>select the dress color</label>
<select onchange="alert('You have changed the selection!');">
<option>pink</option>
<option>Yellow</option>
<option>White</option>
</select>
<p><strong>Note:</strong> Select any option </p>
<label>Describe yourself in short : </label>   <br/><textarea cols="15" rows="7" name="details" onchange="alert('description has changed')">   </textarea><br>
<button type="button" name="submit">Submit</button>
</form>
</body>
</html>
출력:
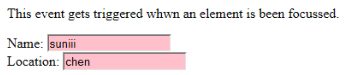
- onfocus: 이 속성은 사용자가 웹페이지의 요소에 주의를 기울이거나 입력에 포커스가 있을 때 활성화됩니다. 아래 예는 필드에 입력을 입력할 때 강조 표시됩니다.
코드:
<!DOCTYPE html>
<html>
<body>
<p>This event gets triggered whwn an element is been focussed.</p>
Name: <input type="text" id="name" onfocus="onfoc(this.id)"><br>
Location: <input type="text" id="loc" onfocus="onfoc(this.id)">
<script>
function onfoc(a) {
document.getElementById(a).style.background = "pink";
}
</script>
</body>
</html>
출력:
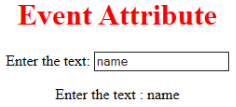
- oninput: This event triggers when the input is entered in the input field. It has been activated when the value in the text field is changed. It reflects once the value of the element is changed.
<!DOCTYPE html>
<html>
<head>
<title> HTML oninput </title>
</head>
<style>
body {
text-align:center;
}
h1 {
color:red;
}
</style>
<body>
<h1> Event Attribute </h1>
Enter the text:
<input type="text" id="EDUCBA"  oninput="myon()">
<p id= "sid"></p>
<script>
function myon()
{
var x = document.getElementById("EDUCBA").value;
document.getElementById("sid").innerHTML = "Enter the text : " +x;
}
</script>
</body>
</html>
Output:
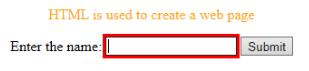

- oninvalid: This attribute calls the events when the text entered in the input type is invalid or remains empty. This event attribute must fill the input element.
Code:
<!DOCTYPE html>
<html>
<head>
<title> example oninvalid Event </title>
<style>
p {
color:orange;
}
body {
text-align:center;
}
</style>     </head>
<body>
<p> HTML is used to create a web page</p>
<form  method="get">
Enter the name:
<input type="text" oninvalid="alert('Fill the text form!');" required>
<input type="submit" value="Submit">
</form>  </body>
</html>
Output:

- onreset: It is fired when a form is a rest. The following example says when you submit the button, a form is processed, and again when you click to reset, the form is being reset.
Code:
<!DOCTYPE html>
<html>
<style>
body {font-family:calibri;}
label {font-variant:small-caps;}
ol {background-color:#610000; margin-top:35px;}
li {margin-top:3px; padding:3px; background-color:rose; font-size:15px;}
div {position:absolute;top:250px;left:70px; font-size:1.5em;
}
</style>
<body>
<ol>
<li>Form with input to reset and submit</li>
</ol>
<form action="" method="get" onreset="onRes()" onsubmit="onSub()">
<label>Enter input:<br /><input type="text" id="iv" oninvalid="onInva()" oninput="onInp()"></label><br /><br />
<input type="submit" value="press"> <input type="reset">
</form>
<div id="a_box"></div>
<script>
function onInva() {
alert("Input field cannot be empty!");
}
function onInp() {
var input_value = document.getElementById("iv").value;
document.getElementById("a_box").innerHTML = "Input value: <br />" + iv;
}
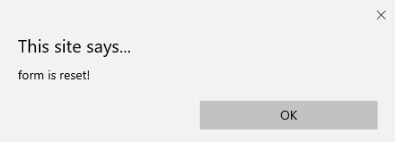
function onRes() {
alert("form is reset!");
}
function onSubmitEvent() {
alert("Form is loading");
location.reload();
}
</script>
</body>
</html>
Output:
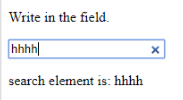
- onsearch: It works when a user presses an enter button.
Code:
<!DOCTYPE html>
<html>
<body>
<p>Write in the field.</p>
<input type="search" id="value1" onsearch="myF()">
<p id="sample"></p>
<script>
function myF() {
var k = document.getElementById("value1");
document.getElementById("sample").innerHTML = "search element is: " + k.value;
}
</script>
</body>
</html>
Output:
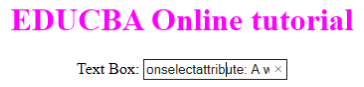
- onselect: It is triggered when a text has been selected in an input box. It throws a dialog box printing an alert message.
Code:
<!DOCTYPE html>
<html>
<head>
<title>onselect demo</title>
<style>
h1 {
color:magenta;
}
body {
text-align:center;
}
</style>
<script>
function eduhtml() {
alert("text highlighted!");
}
</script>
</head>
<body>
<h1>EDUCBA Online tutorial</h1>
Text Box: <input type="text" value="onselectattribute: A well defined portal" onselect="eduhtml()">
</body>
</html>
</html>
Output:
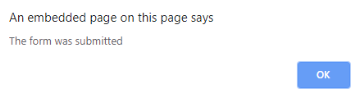
- onsubmit: The purpose of this event is to execute the action performed while pressing the submit button.
Code:
<!DOCTYPE html>
<html>
<body>
<head>
<title> Onsubmit Example</title>
</head>
<form action="demo_form.asp" onsubmit="myF()">
Enter name: <input type="text" name="fname">
<label>Email :</label>
<input id="email" name="email" type="text">
<input type="submit" value="Submit">
</form>
<script>
function myF() {
alert("The form was submitted");
}
</script>
</body>
</html>
Output:
3. Key Board Attributes
- OnKeyDown: It is triggered when a user presses a down Arrow key.
Code:
<!DOCTYPE html>
<html>
<body>
<p>Example for Onkeydown.</p>
<input type="text" onkeydown="mykedwn()">
<script>
function mykedwn() {
alert("key press is activated");
}
</script>
</body>
</html>
Output:

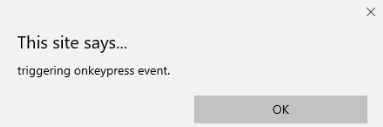
- OnKeyPress: This event gets triggered when the user presses any key on the keyboard. Note: some browser doesn’t support pressing any key.
Code:
<!DOCTYPE html>
<html>
<body>
<p> This example shows when a user type in the text area it triggers an event </p>
<form>
<textarea onkeypress="alert('triggering onkeypress event.')" placeholder="Place the cursor inside the textarea and press a key."  " cols="30" rows="4" style="background-color:pink;">> </textarea> </form>
</body>
</html>
Output:
- OnKeyUp: This attribute gets triggered when a user releases a cursor from the text field. Below comes the demonstration.
Code:
<!DOCTYPE html>
<html>
<body>
<p> This example transforms the character to lower case.</p>
Fill the name: <input type="text" id="jjj" onkeyup="mykey()">
<script>
function mykey() {
var g = document.getElementById("jjj");
g.value = g.value.toLowerCase();
}
</script>
</body>
</html>
Output:

4. Mouse Event Attributes
This action triggers a mouse event when a mouse is pressed either from a computer or any external devices like a smartphone or tablet. Some of the mouse events are given below:
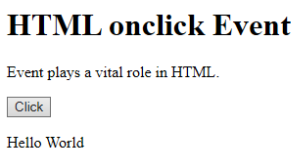
- onclick: It is triggered when a user presses the button over the mouse. An input example is given below to show the event while clicking the mouse.
Code:
<!DOCTYPE html>
<html>
<body>
<h1>HTML onclick Event</h1>
<p> Event plays a vital role in HTML.</p>
<button onclick="oncf()">Click </button>
<p id="sample"></p>
<script>
function oncf() {
document.getElementById("sample").innerHTML = "Hello World";
}
</script>
</body>
</html>
Output:
- onmousemove: It is fired when a mouse is moved over an image in any direction.
Code:
<!doctype html>
<html>
<head><title> Event onmousemove demo</title>
</head>
<body>
<p>This event is activated when the pointer drags its direction.</p>
<body style="width:200px;height:80px;border:2px solid;" onmousemove="javascript:alert('mouse action');">Sample text</body>
</body>
</html>
Output:

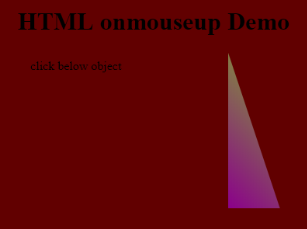
- Onmouseup: This event gives a notification when a user releases a button on an output.
Code:
<!DOCTYPE html>
<html>
<head>
<style>
body {
color:  "#ff0000";
height: 120vh;
background-color: #610000;
text-align: center;
}
.polygon {
float: right;
shape-inside: polygon(0 0, 0 200px, 100px 200px);
clip-path: polygon(0 0, 0 250px, 100px 300px);
height: 200px;
width: 200px;
background: linear-gradient(to bottom left, #7CFC00, #8B008B);
}
p {
margin: 30px auto;
}
</style>
</head>
<body>
<h1>HTML onmouseup Demo</h1>
<div class="polygon" onmouseup="mupfn()"></div>
<p> click below object</p>
<script>
function mupFn() {
document.querySelector('.polygon').style.transform = 'scale(2.2)';
}
</script>
</body>
</html>
Output:
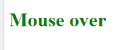
- Onmouseover: Execute a JavaScript when moving the mouse pointer over an image
Code:
<!DOCTYPE html>
<html>
<body>
<title>Example demonstrating Onmouseover.</title>
<h1 id="sample" onmouseover="A()" onmouseout="B()">Mouse over </h1>
<script>
function A() {
document.getElementById("sample").style.color = "yellow";}
function B() {
document.getElementById("sample").style.color = "green";
}
</script>
</body>
</html>
Output:
5. Drag Event Attributes
This application helps in the HTML window when the user drags the input element. Below are the different event listeners used in HTML to store dragged data.
- Ondrag: This is used when an element is being dragged from the web page.
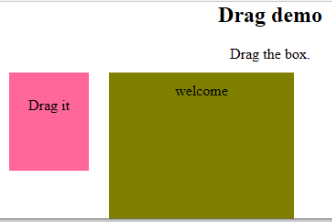
- Ondragstart: This fires when the user begins to drag from the input field. The below example demonstrates about dragging the two-target area.
Code:
<!DOCTYPE HTML>
<html>
<head>
<style type = "text/css">
#b1, #b2 {
float:left;padding:11px;margin:11px; -moz-user-select:none;
}
#b1 { background-color: #FF6699; width:65px; height:85px;  }
#b2 { background-color: #808000; width:180px; height:180px; }
</style>
<script type = "text/javascript">
function dStart(e) {
e.dataTransfer.effectAllowed = 'move';
e.dataTransfer.setData("Text", e.target.getAttribute('id'));
e.dataTransfer.setDragImage(e.target,0,0);
return true;
}
</script>
</head>
<body>
<center>
<h2>Drag demo</h2>
<div> Drag the box.</div>
<div id = "b1" draggable = "true"
ondragstart = "return dStart(e)">
<p>Drag it</p>
</div>
<div id = "b2">welcome</div>
</center>
</body>
</html>
Output:
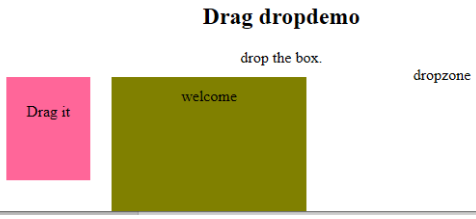
-
ondrop: Execute this attribute when a draggable element is dropped in element.
Code:
<!DOCTYPE HTML>
<html>
<head>
<style type = "text/css">
#b1, #b2 {
float:left;padding:11px;margin:11px; -moz-user-select:none;
}
#b1 { background-color: #FF6699; width:65px; height:85px;  }
#b2 { background-color: #808000; width:180px; height:180px; }
</style>
<script type = "text/javascript">
function dStart(e) {
e.dataTransfer.effectAllowed = 'move';
e.dataTransfer.setData("Text", e.target.getAttribute('id'));
e.dataTransfer.setDragImage(e.target,0,0);
return true;
}
</script>
</head>
<body>
<center>
<h2>Drag  dropdemo</h2>
<div> drop the box.</div>
<div id = "b1" draggable = "true"
ondragstart = "return dStart(e)">
<p>Drag it</p>
</div>
<div class="droptarget"
ondrop="drop(event)"
ondragover="allowDrop(event)">
</div>
<div id = "b2">welcome</div>
<span> dropzone </span>
</center>
</body>
</html>
Output:

Conclusion
This event attribute helps to make a web application very easier and attractive. The different occurrence of actions generates various events. Even though this approach is generally avoided, the programmer likes to learn the function assigned for the HTML attributes events. These event handlers are still executed to beautify the web pages.
Recommended Article
This is a guide to the HTML Event Attributes. Here we discuss the Introduction to HTML Event Attributes along with Code implementation and Output. you can also go through our suggested articles to learn more –
- HTML Frames
- HTML Style Attribute
- Applications of HTML
- HTML vs HTML5
위 내용은 HTML 이벤트 속성의 상세 내용입니다. 자세한 내용은 PHP 중국어 웹사이트의 기타 관련 기사를 참조하세요!
JavaScript html5 html Object if for while Error Attribute Event pointer function this alert input windows성명:본 글의 내용은 네티즌들의 자발적인 기여로 작성되었으며, 저작권은 원저작자에게 있습니다. 본 사이트는 이에 상응하는 법적 책임을 지지 않습니다. 표절이나 침해가 의심되는 콘텐츠를 발견한 경우 admin@php.cn으로 문의하세요.