Smart-Doc을 사용하여 Java WebSocket API 문서를 생성하는 방법
- 王林원래의
- 2024-08-27 20:00:33705검색
소개
Smart-Doc은 개발자가 Java 프로젝트에 대한 명확하고 상세한 API 문서를 쉽게 작성할 수 있도록 도와주는 강력한 문서 생성 도구입니다. WebSocket 기술의 인기가 높아짐에 따라 Smart-Doc은 버전 3.0.7부터 WebSocket 인터페이스에 대한 지원을 추가했습니다. 이 문서에서는 Smart-Doc을 사용하여 Java WebSocket 인터페이스 문서를 생성하는 방법을 자세히 설명하고 WebSocket 서버의 전체 예를 제공합니다.
WebSocket 기술 개요
먼저 WebSocket 기술에 대해 간단히 알아보겠습니다. WebSocket 프로토콜은 전이중 통신 채널을 제공하여 클라이언트와 서버 간의 데이터 교환을 더욱 간단하고 효율적으로 만듭니다. Java에서 개발자는 JSR 356: WebSocket용 Java API를 사용하여 WebSocket 서버 및 클라이언트를 쉽게 구현할 수 있습니다.
WebSocket 주석 개요
Java WebSocket에서 @ServerEndpoint 주석은 POJO 클래스를 WebSocket 서버 엔드포인트로 정의하는 데 사용됩니다. 이 주석이 표시된 메서드는 WebSocket 이벤트(예: 연결 설정, 메시지 수신 등)가 발생할 때 자동으로 호출될 수 있습니다. @ServerEndpoint 외에도 몇 가지 다른 WebSocket 관련 주석이 있습니다.
@OnOpen: 이 메소드는 클라이언트가 서버와 WebSocket 연결을 설정할 때 트리거됩니다. 일반적으로 리소스를 초기화하거나 환영 메시지를 보내는 데 사용됩니다.
@OnMessage: 이 메소드는 서버가 클라이언트로부터 메시지를 수신할 때 트리거됩니다. 수신된 메시지를 처리하고 해당 작업을 수행하는 역할을 담당합니다.
@OnClose: 이 메서드는 클라이언트가 WebSocket 연결을 닫을 때 트리거됩니다. 주로 리소스를 해제하거나 정리 작업을 수행하는 데 사용됩니다.
@OnError: WebSocket 통신 중 오류가 발생하면 이 메소드가 트리거됩니다. 로깅이나 사용자에게 알림 등 오류 상황을 처리합니다.
스마트닥 소개
Smart-Doc은 Java 기반의 경량 API 문서 생성 도구입니다. 소스 코드 및 주석에서 인터페이스 정보 추출을 지원하고 Markdown 형식으로 문서를 자동 생성합니다. WebSocket 프로젝트의 경우 이는 지루한 문서 설명을 수동으로 작성하지 않고도 ServerEndpoint 클래스에서 직접 문서를 추출할 수 있음을 의미합니다.
https://github.com/TongchengOpenSource/smart-doc
WebSocket 인터페이스 문서를 생성하도록 Smart-Doc 구성
환경 준비
개발 환경에 다음 구성 요소가 설치되어 있는지 확인하세요.
- 자바 17 이상
- 빌드 도구로서의 Maven 또는 Gradle
- Smart-Doc 플러그인 최신 버전
- javax.websocket과 같은 WebSocket 서버 구현 라이브러리(일반적으로 Java SE에 포함됨)
WebSocket 서버 생성
플러그인 종속성 추가
pom.xml 파일에 Smart-Doc 종속성을 추가합니다.
<plugins>
    <plugin>
        <groupId>com.ly.smart-doc</groupId>
        <artifactId>smart-doc-maven-plugin</artifactId>
        <version>[Latest version]</version>
        <configuration>
            <!--smart-doc-->
            <configFile>./src/main/resources/smart-doc.json</configFile>
        </configuration>
    </plugin>
</plugins>
WebSocket 서버 엔드포인트 생성
클라이언트로부터 받은 메시지를 나타내는 간단한 POJO인 메시지 유형(Message)을 정의합니다.
public class Message {
    private String content;

    // getter and setter methods
}
클라이언트에게 다시 보낼 응답 메시지를 나타내는 간단한 POJO인 응답 유형(SampleResponse)을 정의합니다.
public class SampleResponse {
    private String responseContent;
    // getter and setter methods
}
클라이언트가 보낸 메시지를 JSON 형식에서 메시지 객체로 변환하는 메시지 디코더(MessageDecoder)를 구현합니다.
public class MessageDecoder implements Decoder.Text<Message> {

    private static final ObjectMapper objectMapper = new ObjectMapper();
    @Override
    public Message decode(String s) throws DecodeException {
        try {
            return objectMapper.readValue(s, Message.class);
        } catch (Exception e) {
            throw new DecodeException(s, "Unable to decode text to Message", e);
        }
    }
    @Override
    public boolean willDecode(String s) {
        return (s != null);
    }

    @Override
    public void init(EndpointConfig endpointConfig) {
    }
    @Override
    public void destroy() {
    }
}
응답 인코더(MessageResponseEncoder)를 구현합니다.
public class MessageResponseEncoder implements Encoder.Text<SampleResponse> {

    private static final ObjectMapper objectMapper = new ObjectMapper();

    @Override
    public String encode(SampleResponse response) {
        try {
            return objectMapper.writeValueAsString(response);
        } catch (Exception e) {
            throw new RuntimeException("Unable to encode SampleResponse", e);
        }
    }

    @Override
    public void init(EndpointConfig endpointConfig) {
    }

    @Override
    public void destroy() {
    }
}
ServerEndpoint 주석을 사용하여 간단한 WebSocket 서버를 생성하세요.
/**
 * WebSocket server endpoint example.
 */
@Component
@ServerEndpoint(value = "/ws/chat/{userId}",
        decoders = {MessageDecoder.class},
        encoders = {MessageResponseEncoder.class})
public class ChatEndpoint {

    /**
     * Called when a new connection is established.
     *
     * @param session the client session
     * @param userId  the user ID
     */
    @OnOpen
    public void onOpen(Session session, @PathParam("userId") String userId) {
        System.out.println("Connected: " + session.getId() + ", User ID: " + userId);
    }

    /**
     * Called when a message is received from the client.
     *
     * @param message the message sent by the client
     * @param session the client session
     * @return the response message
     */
    @OnMessage
    public SampleResponse receiveMessage(Message message, Session session) {
        System.out.println("Received message: " + message);
        return new SampleResponse(message.getContent());
    }

    /**
     * Called when the connection is closed.
     *
     * @param session the client session
     */
    @OnClose
    public void onClose(Session session) {
        System.out.println("Disconnected: " + session.getId());
    }

    /**
     * Called when an error occurs.
     *
     * @param session   the client session
     * @param throwable the error
     */
    @OnError
    public void onError(Session session, Throwable throwable) {
        throwable.printStackTrace();
    }
}
Smart-Doc 구성
Smart-Doc이 문서 생성 방법을 알 수 있도록 smart-doc.json 구성 파일을 만듭니다.
{
  "serverUrl": "http://smart-doc-demo:8080", // Set the server address, not required
  "outPath": "src/main/resources/static/doc" // Specify the output path of the document
}
문서 생성
문서를 생성하려면 명령줄에서 다음 명령을 실행하세요.
mvn smart-doc:websocket-html
문서 보기
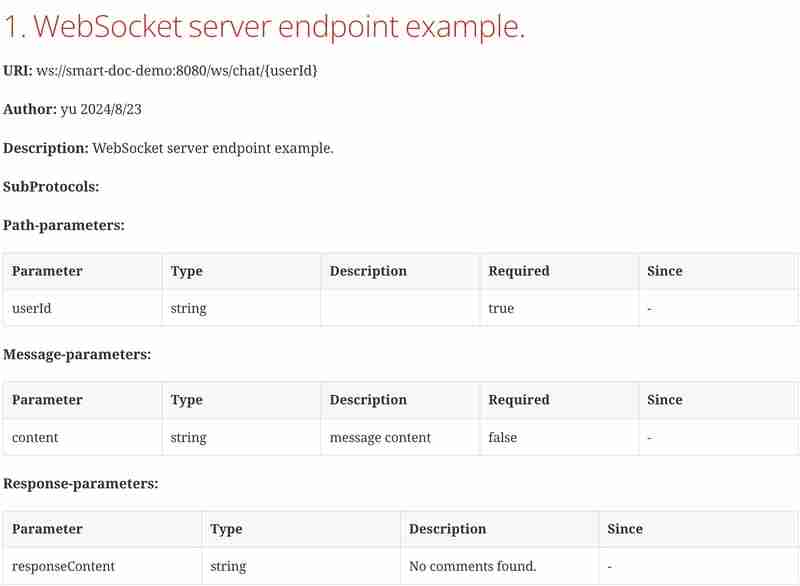
문서가 생성된 후 src/main/resources/static/doc/websocket 디렉터리에서 찾을 수 있습니다. WebSocket API 설명서를 보려면 브라우저에서 websocket-index.html 파일을 엽니다.

결론
Smart-Doc을 사용하여 Java WebSocket 인터페이스 문서를 자동으로 생성하면 수동 문서 작성 시간이 많이 절약될 뿐만 아니라 문서의 정확성과 적시 업데이트가 보장됩니다. 좋은 문서 관리 전략이 개발 효율성과 코드 품질을 크게 향상시킬 수 있다는 것이 입증되었습니다. Smart-Doc과 같은 도구를 사용하면 문서 유지 관리 문제에 대한 걱정 없이 WebSocket 애플리케이션 개발에 더 집중할 수 있습니다.
위 내용은 Smart-Doc을 사용하여 Java WebSocket API 문서를 생성하는 방법의 상세 내용입니다. 자세한 내용은 PHP 중국어 웹사이트의 기타 관련 기사를 참조하세요!

