
Oats~i를 사용하여 웹 앱 구축 – 강의 조각, 라우팅 및 기본 경로

- PHPz원래의
- 2024-08-21 06:40:321182검색
오늘은 이론이나 시작 프로젝트에 대해 이야기하지 않습니다. 우리는 튜토리얼을 통해 최초의 Oats~i 웹 앱을 구축하고 있습니다.
이 글을 처음 읽으신다면 "Build a Web with Oats~i" 시리즈의 시작 부분을 간략하게 확인하여 Oats~i가 무엇인지, 어떻게 작동하고 설정하는지에 대해 알아보세요. 프런트엔드 개발 환경에 적용하세요.
이 튜토리얼에서 우리는 두 페이지로 구성된 Oats~i 웹 앱을 구축할 것입니다. 하나는 임의의 고양이 사진을 표시하고 다른 하나는 제목에 따라 영화를 검색하고 표시합니다. 모두 공개적으로 사용 가능한 API를 사용합니다.
하지만 배울 것이 너무 많기 때문에 한 번에 한 단계씩 진행해 나갈 것입니다. 따라서 레슨 1의 목표는 라우팅과 프래그먼트를 설정하고 기본 경로를 설정하는 방법을 보여주는 것입니다.
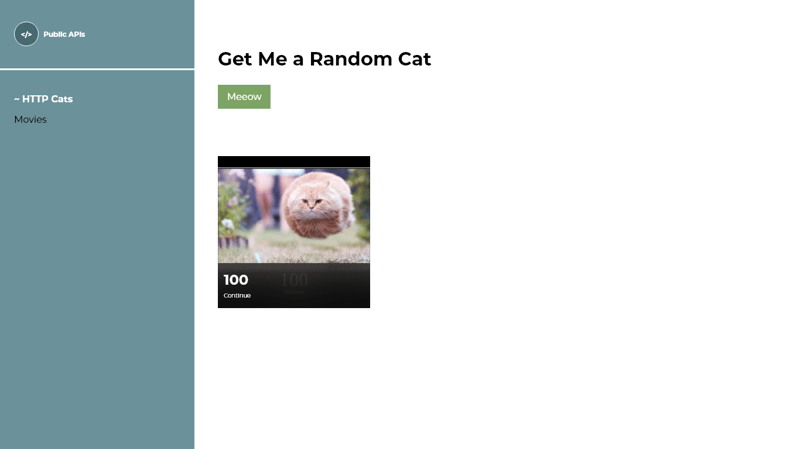
오늘 수업의 마지막 프로젝트는 다음과 같습니다.
참고:
시작하기 전에 최종 코드를 실행하고 싶거나 직접 따라하고 싶다면 여기에서 소스 코드를 찾으세요: https://github.com/Ian-Cornelius/Oats-i-Lesson-1-- -조각 경로 및 기본 경로
저장소를 복제하고 프로젝트의 루트 폴더로 이동한 후 터미널을 열고 실행하세요
npm install
설치가 완료될 때까지 기다린 후 실행하세요
npm run dev
터미널에 제공된 URL을 브라우저에서 열고 탐색한 후 따라가세요.
또한 이 전체 시리즈에서는 Oats~i 웹 앱을 만들 때 중요한 코드 부분만 다룰 수 있도록 여러분이 HTML과 CSS에 일반적으로 익숙하다고 가정합니다. Oats~i를 시작하는 데 필요한 고급 HTML 또는 CSS 지식은 없습니다. 기본만.
또한 node와 npm이 이미 설치되어 있다고 가정합니다.
자, 본격적으로 살펴보겠습니다!
설정
Oats~i CLI를 사용하여 프로젝트를 빠르게 설정하겠습니다. Oats~i를 실행할 새 폴더를 만들고 해당 폴더로 이동한 후 터미널을 열고 실행하세요
npx oats-i-cli
안내에 따라 설치가 완료될 때까지 기다립니다.
완전한 Oats~i 개발 환경을 설정했습니다. 이제 시작 프로젝트에서 필요하지 않은 파일을 삭제하고 편집해 보겠습니다.
파일 삭제
먼저 src ->로 이동합니다. 앱 -> 인덱스 -> 자산을 삭제하고 해당 폴더 아래의 모든 파일을 삭제하세요.
그런 다음 src ->로 이동합니다. 앱 -> 조각을 제거하고 about 및 home 폴더를 삭제하세요.
고양이와 영화 조각 만들기
Oats~i는 주로 프래그먼트 시스템을 통해 뷰나 페이지를 렌더링합니다. 프래그먼트는 기본적으로 시각적 세부 사항이나 데이터를 표시하는 데 필요한 구성 요소 또는 요소로 구성된 뷰 단위입니다.
튜토리얼 프로젝트의 경우를 살펴보겠습니다.
사용자가 버튼을 클릭하면 http-cat API를 사용하여 무작위로 선택된 http 코드를 기반으로 무작위 고양이 이미지가 표시되는 페이지가 있습니다. 홈페이지 또는 "/" 경로가 됩니다.
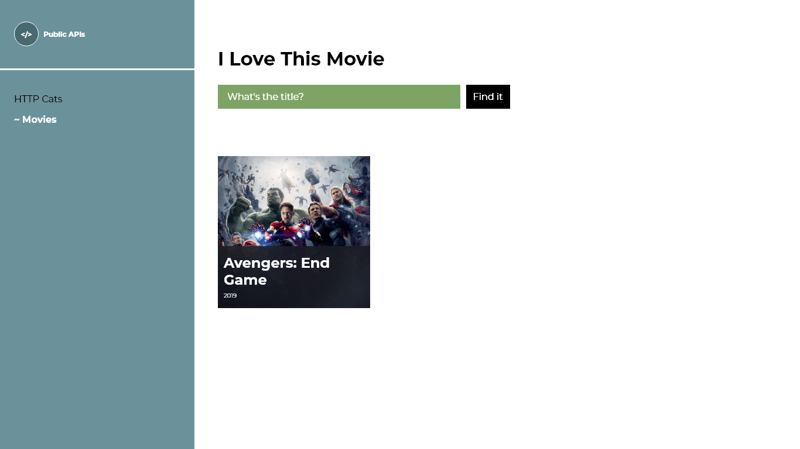
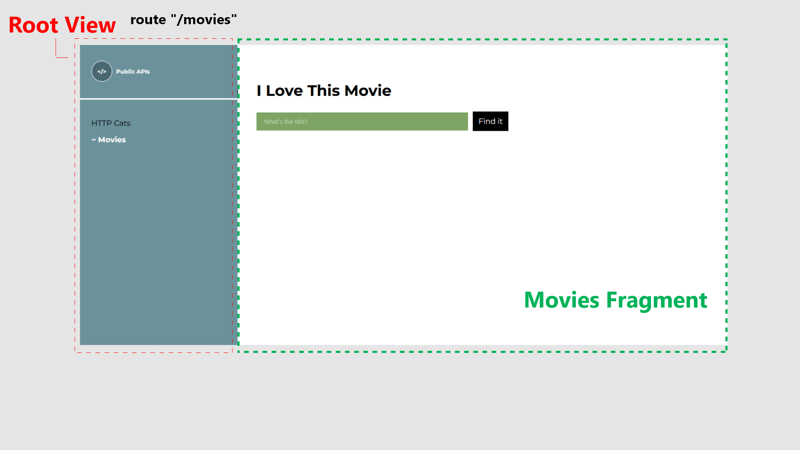
다른 페이지에는 사용자가 영화 제목을 입력하고 영화 API를 사용하여 검색할 수 있는 검색창과 버튼이 있습니다. 영화 페이지 또는 '/movies' 경로입니다.
우리는 사용자가 홈 페이지 또는 "/" 경로와 영화 페이지 또는 "/movies" 경로에 각각 올바른 보기가 표시되면서 이 두 페이지 사이를 탐색할 수 있기를 원합니다.
이 뷰는 우리의 조각입니다. 다음은 이 개념을 더 명확하게 하는 데 도움이 되는 시각화입니다.
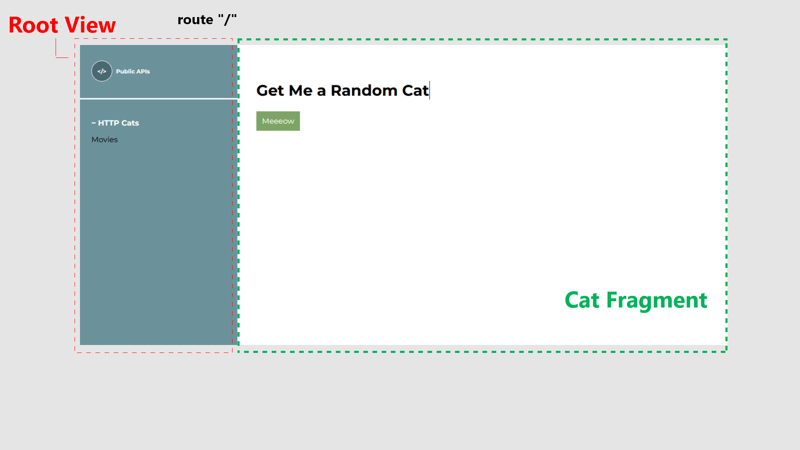
이 논리에 따르면 이 프로젝트의 Oats~i 웹 앱에는 두 개의 조각이 있습니다. 각각의 전체 코드가 포함된 자체 폴더를 갖는 두 가지를 만들어 보겠습니다.
고양이 조각 폴더
src로 이동 -> 앱 -> 그런 다음 "http-cats"라는 새 폴더를 만듭니다. 이 폴더에는 사용자가
“/” 경로.
Inside the “http-cats” folder, create new folders named views, styles, assets, and scripts.
The views folder will hold the view templates for our http-cats fragment. The styles folder will hold the css files, the assets folder will hold the asset files (images, etc), and the scripts folder will hold our javascript files.
Note: These folder structures are not a strict enforcement by Oats~i but rather a logical project structure that I find to work best for most cases.
Now, let’s write the JavaScript source file that will actually render our http-cats fragment.
Write the Http-Cats Fragment Source File
Inside the scripts folder, create a new file named http_cats_main_fragment.js. Paste the following code inside it:
//@ts-check
//import styles
import "../styles/http_cats.css";

import AppFragmentBuilder from "oats-i/fragments/builder/AppFragmentBuilder";
import AppMainFragment from "oats-i/fragments/AppMainFragment"

class HTTPCatsMainFragment extends AppMainFragment{

    async initializeView(cb){

        //@ts-expect-error cannot find module (for view)
        const uiTemplate = require("../views/http_cats_fragment.hbs")();
        this.onViewInitSuccess(uiTemplate, cb);
    }
}

const httpCatsMainFragmentBuilder = new AppFragmentBuilder(HTTPCatsMainFragment, {

    localRoutingInfos: null,
    viewID: "http-cats-main-fragment",
});
export default httpCatsMainFragmentBuilder;
Now, let’s break it down.
Importing CSS Files (Styling)
The first line imports our css file, used to style our http-cats fragment view. Webpack handles loading this file into our final HTML file using the css loader, style loader, and html webpack plugin we’d configured before.
AppMainFragment, AppFragmentBuilder (and AppChildFragment Classes - Fragment Classes)
The next lines import the AppMainFragment class and the AppFragmentBuilder class.
When building Oats~i fragments, you’ll be extending from either of two fragment classes. These are the main fragment or child fragment class.
The main fragment is the parent fragment view of your page or route. Its content is encapsulated within a div element, given the id passed in as the viewID when instantiating the AppFragmentBuilder class. This content is then placed inside the tag which you put inside the tag.
There can only be one main fragment per route or page. Any other view that will be rendered by a fragment afterwards must be from a child fragment. You can picture it this way using a HTML markup tree.
<app-root>
    <main-fragment>
        <div id=”{viewID}”
            <!-- main fragment content -->
            <child-fragment id=”{childFragmentID}”>
                <div id=”{viewID (childfragment)}”>
                </div>
            </child-fragment>
        </div>
    </main-fragment>
</app-root>
That’s why, as you’ll observe later when looking at setting up routes, we define a target which builds a main fragment, then supply nested child fragments which build child fragments in order of their rendering in the HTML tree, from the main-fragment.
This way, Oats~i can sequentially render your fragments and therefore views, without conflict, and swap them easily based on their position in the tree.
We’ll add a child fragment to this project later. For now, let’s just grasp the base concept of a fragment.
Implementing the AppMainFragment Class
What you’ll learn here and in more tutorials involving fragments will be exactly how you’ll implement any fragment class, regardless of whether it’s inherited from a main or child fragment class.
In our example, we’re only interested in overriding one method:
async initializeView(cb)
This method is called by Oats~i when it’s building a fragment to retrieve its view template as a html string. In our case, we require our view template file for the http-cats fragment using the line:
const uiTemplate = require("../views/http_cats_fragment.hbs")();
The view file is a handlebars template. We’ll create and implement it shortly.
After templating our view into a html string, we now pass it to the internal method
this.onViewInitSuccess(uiTemplate, cb);
Calling this method informs the fragment that we’ve completed templating our view and it can proceed to the next build phase.
And for our purposes in this tutorial, that’s just about it. Our fragment now has a view to attach, and we don’t have any buttons or listeners to bind yet. We’ll handle that in our next tutorial. But for now, this fragment is set to go.
Except for one tiny step.
AppFragmentBuilder
Oats~i builds fragments by first instantiating them when they’re needed for a specific route. It does this through the AppFragmentBuilder class.
We instantiate this class with the class definition of our fragment and it’s constructor arguments that will be passed to it on instantiation.
Therefore, in our project, we create an instance of AppFragmentBuilder, passing in the HttpCatsMainFragment class, and constructor arguments including localRoutingInfos and viewID.
const httpCatsMainFragmentBuilder = new AppFragmentBuilder(HTTPCatsMainFragment, {

    localRoutingInfos: null,
    viewID: "http-cats-main-fragment",
});
The constructor argument you should pay attention to for now is the viewID.
As mentioned before, the view you render from initializeView() is wrapped inside a parent div element, which is assigned this viewID as its id. Doing this makes it easier for Oats~i to track whether your fragment’s view has been loaded, and remove it from the DOM when the fragment is being destroyed.
Finally, we export this builder, as that is what will be passed as the target, and in the case of a child fragment, one of the nested child fragments when providing the app’s routing info.
export default httpCatsMainFragmentBuilder;
Implement the View Template for Http-Cats Fragment
Now, let’s implement the view template file we imported as the view for our http-cats fragment. Oats~i uses handlebars by default for templating view files. However, since Oats~i only cares about the view being provided as a html string, you can modify the templating engine to whichever suits you and your project, as long as it can be used with webpack.
In the http-cats folder, open the views folder and create a new file named http_cats_fragment.hbs.
Open the file and paste the following code:
<section class="section">
    <h1 class="frag-header mont-txt"><span>Get Me a Random Cat</span></h1>
    <button class="b-cta mont-txt" id="get-cat">Meeeow</button>
</section>
Implement the Styling for Http-Cats Fragment’s View
Now lets implement the styling for the http-cats fragment’s view we’ve just templated.
Inside the http-cats folder, navigate to styles and create a file named http_cats.css. Paste the following code inside it:
.section {

    padding: 0 40px;
}

.frag-header {

    font-size: 32px !important;
    font-weight: 700 !important;
    display: flex;
    flex-direction: column;
    justify-content: end;
    min-height: 120px;
}

.b-cta {

    padding: 11px 12px;
    background-color: #7da464;
    border: none;
    cursor: pointer;
    color: white !important;
}

#get-cat {

    margin-top: 25px;
}
With these files set up, our imported files in the http-cats main fragment, specifically the styling and views, have now been implemented.
You might be probably itching to see how the web app looks like already. So, instead of implementing our second fragment, let’s just put everything together and see what our current web app looks like.
Implement Our Root View
From our previous part of this series, where we talked about starting an Oats~i app, I mentioned that Oats~i expects that you give it a template for the app root view or have it already implemented in your main html file before it can start rendering your route and fragments.
This app root view is basically the primary view of your entire web app, encapsulating bits of it that will never change.
In our case, we’ll write this in our main html file, that is the home.sv.hbs file that is always served by the server whenever the web app is initially loaded.
Navigate to src -> server -> home and open the home.sv.hbs file. Delete its content and replace it with the following code:
<!DOCTYPE html>
<html lang="en">
<head>
<meta charset="UTF-8">
<meta name="viewport" content="width=device-width, initial-scale=1.0">
<title>Build a Web App with Oats~i: Lesson 1</title>
</head>
<body>
<app-root id="my-app">
<div id="nav">
<div id="logo"><p class="mont-txt"><span></></span>Public APIs</p></div>
<div id="links">
<a href="/" class="nav-link mont-txt http-cats-link">HTTP Cats</a>
<a href="/movies" class="nav-link mont-txt movies-link">Movies</a>
</div>
</div>
<main-fragment>
</main-fragment>
</app-root>
</body>
</html>
Most of this code looks like your typical html markup. However, pay close attention to the start and end of the tag.
Oats~i app root view begins with the app-root tag. Within it, you can markup bits of your view that will never change. In our instance, this is the navigation that will be rendered at the left of the screen. Then, we finally include a single tag and leave it as is.
This is where Oats~i will start loading our fragments, starting with the main fragment then its children.
Now, navigate to src -> app -> index -> styles -> index.css and let’s code the styling for our app root view.
Before doing that, delete the adjacent index_responsive.css file. That was for the starter project that comes in default with Oats~i, so we don’t need it.
Now, for our index.css file, I’ve put the styling in that folder because it more represents the base or “index” styling of the app. You can always place this file wherever it suits you best as long as the import is right.
Open the index.css file, delete its content, and replace it with the following:
@import url('https://fonts.googleapis.com/css2?family=Archivo+Black&family=Montserrat:ital,wght@0,100..900;1,100..900&family=Mulish:ital@0;1&family=Open+Sans:ital,wght@0,300..800;1,300..800&display=swap');

/* Crucial styling to allow specially structured A links to still have clicks intercepted by router. */
/* Carry over to your project */
a *:not([click-override=true]){

    pointer-events: none
}

body {

    margin: 0;
    background-color: white;
    box-sizing: border-box;
    overflow-x: hidden;
    --body-padding: 24px;
    --color-primary: #6b929a;
}

.mont-txt {

    font-family: "Montserrat", sans-serif;
    font-weight: 400;
    font-style: normal;
    color: black;
    margin: 0;
    font-size: 16px;
}

#my-app {

    position: relative;
    display: grid;
    grid-template-columns: auto 1fr;
}

#nav {

    box-sizing: border-box;
    height: 100lvh;
    background: var(--color-primary);
    min-width: 332px;
    width: max-content;
}

#logo {

    padding-left: var(--body-padding);
    min-height: 120px;
    width: 100%;
    position: relative;
    display: flex;
    flex-direction: row;
    align-items: center;
}

#logo::before {

    content: "";
    position: absolute;
    bottom: 0;
    left: 0;
    width: 100%;
    height: 3px;
    background-color: white;
}

#logo > p {

    color: white;
    font-weight: 700;
    font-size: 12px;
    display: flex;
    flex-direction: row;
    align-items: center;
    gap: 8px;
}

#logo > p > span {

    display: inline-block;
    width: 42px;
    height: 42px;
    border: 1px white solid;
    background-color: #486970;
    border-radius: 500px;
    display: flex;
    flex-direction: row;
    align-items: center;
    justify-content: center;
}

#links {

    margin: 40px var(--body-padding);
    display: flex;
    flex-direction: column;
    gap: 16px;
}

.nav-link {

    text-decoration: none;
    color: black;
    font-weight: 400;
}

.nav-link[navigation-state=active] {

    font-weight: 700;
    color: white;
}

.nav-link[navigation-state=active]::before {

    content: "~ ";
}
Most of this code is just project-specific, so unrelated to how Oats~i works. Except for a few directives.
a *:not([click-override=true]){

    pointer-events: none
}
As mentioned in the previous part of this series, this directive ensures you can write unique markup inside your A tags and have Oats~i still intercept its clicks correctly. This is just a quirk with how events bubble in js.
Also, another directive that I want you to pay attention to is this:
.nav-link[navigation-state=active] {

    font-weight: 700;
    color: white;
}
The above directive, and its counterpart that immediately follows for the pseudoelement ::before, allows us to change the look of our links or navigation buttons when Oats~i has detected we’ve clicked on it and the requested routing has been initiated.
As mentioned in the previous part of the series, Oats~i uses an array of navigation info to know which elements are the main navigational buttons or links in your app, automatically attach listeners to them, and tell you when each is active.
Therefore, in this case, our work is to only apply unique styling to our navigational links when they’re active, using the attribute navigation-state=”active”, which adds a tilde, increases the font weight, and changes the color to white for our specific link.
The only thing left to ensure Oats~i updates this attribute is to just supply the right main navigation info, which we’ll do shortly.
Now, let’s implement the index.js file where we start our Oats~i app, create our routing info, and main navigation info.
Implement Index.js
Our Oats~i app starts at the index.js file. If you’re familiar with webpack configuration, you’ll notice that this is our entry point for our configuration and the chunk we inject into the home.sv.hbs file when emitting it as a hbs file using html webpack plugin.
Navigate to src -> app -> index -> scripts, and open the index.js file. Delete all content and replace it with this:
//@ts-check
import AppStateManager from "oats-i/base-history/app_state_manager";
import appRoot from "oats-i/bin/app_root"
import AppRoutingInfo from "./routing-info/app_routing_info";
import MainRouter from "oats-i/router/main_router";
import AppMainNavInfo from "./routing-info/app_main_nav_info";

//import styles
import "../styles/index.css";

function initApp(){

    const appStateManager = new AppStateManager(AppRoutingInfo);
    appRoot.initApp(appStateManager, new MainRouter(AppRoutingInfo, appStateManager, (args) => {}, "", async (url) => {

        return {

            canAccess: true,
            fallbackRoute: "/"
        }
    }), { template: null, mainNavInfos: AppMainNavInfo }, "");
}

initApp();
Most of what’s happening here was explained in the previous part of this series, so I once again encourage you to read it if you haven’t. The only important line of code here is the style import:
import "../styles/index.css";
Again, we’re just simply importing our styling file for index or more specifically, our app root view, and our css loaders and html webpack plugin will take care of packaging it in our final view template (home.hbs).
The other crucial bits of this code are the AppRoutingInfo and AppMainNavInfo imports. From the previous part of the series, I explained that these two provide the routing information for the web app and the main navigation info.
Let’s implement them specifically for our project.
Implement AppRoutingInfo
Navigate to src -> app -> index -> scripts -> routing-info and open the app_routing_info.js file. Delete its content and paste the following code:
//@ts-check
import RoutingInfoUtils from "oats-i/router/utils/routing-info/routing_info_utils";
import AppMainNavInfo from "./app_main_nav_info";
import httpCatsMainFragmentBuilder from "../../../fragments/http-cats/scripts/http_cats_main_fragment";

const AppRoutingInfo = RoutingInfoUtils.buildMainRoutingInfo([

    {
        route: "/",
        target: httpCatsMainFragmentBuilder,
        nestedChildFragments: null
    }

], AppMainNavInfo);

export default AppRoutingInfo;
Most of what you see here was previously explained in the previous part of this series. What I’ll touch on are the specific routing info we provide.
In this case, we only have one routing info provided as:
{
        route: "/",
        target: httpCatsMainFragmentBuilder,
        nestedChildFragments: null
    }
This directs Oats~i that for the route “/” or our home page, we start building from the target or main fragment provided by httpCatsMainFragmentBuilder. Our nestedChildFragments is null, meaning Oats~i will not render any child fragments inside the main fragment because they’re not provided.
So, when the user navigates to “/”, or the page loads from “/”, Oats~i will match this routing info, emit an instance of the HttpCatsMainFragment from its builder, the httpCatsMainFragmentBuilder, and render it by invoking its rendering functions, initializeView() being one of them.
We’ll add routing info for our movies fragment later on. For now, let’s implement the AppMainNavInfo.
Implement AppMainNavInfo
Inside the routing-info folder, open the app_main_nav_info.js file. Delete the content and paste the following code:
//@ts-check
import MainNavigationInfoBuilder from "oats-i/router/utils/nav-info/main_nav_info_builder";

const AppMainNavInfo = MainNavigationInfoBuilder.buildMainNavigationInfo([

    {
        selector: "http-cats-link",
        defaultRoute: "/",
        baseActiveRoute: "/",
    }
]);

export default AppMainNavInfo;
Most of this code had been explained in the previous part of the series. What’s of importance here is the nav info we provide for our app at this stage.
{
        selector: "http-cats-link",
        defaultRoute: "/",
        baseActiveRoute: "/",
    }
Oats~i interprets this as our navigation button or link is identified by the dot selector http-cats-link (therefore has the class attribute of the same) and it should navigate to the defaultRoute “/” and it will be labelled as active for the base route “/” and any that starts with it, as long as it’s the best match/fit.
We’d already templated our nav link with this selector and route in the app root view.
<a href="/" class="nav-link mont-txt http-cats-link">HTTP Cats</a>
That’s just about it.
Let’s test what our app looks like now.
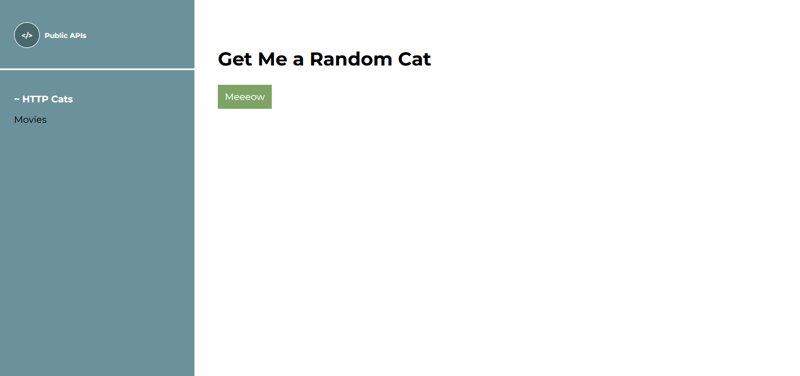
Running the Project for The First Time
Open the terminal, ensure you are at the project’s root folder, and run:
npm run dev
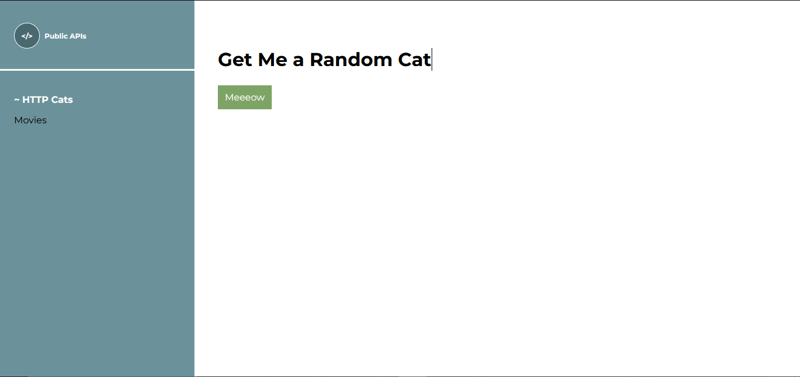
Open the address shown in the terminal in your browser (often is localhost:8080) and look at your first Oats~i web app in action. You should have a view like this:
Now, to experience routing and fragments switching in action, let’s quickly implement the movies fragment. This should be faster because you now understand what’s happening.
Implement the Movies Fragment
Navigate to src -> app -> fragments and create a new folder named movies. Inside the movies folder, create new folders named exactly as in the http-cats folder, that is assets, scripts, styles, and views.
Open the scripts folder, and create a file named movies_main_fragment.js. Paste the following code inside it:
//@ts-check
//import styles
import "../styles/movies.css";

import AppFragmentBuilder from "oats-i/fragments/builder/AppFragmentBuilder";
import AppMainFragment from "oats-i/fragments/AppMainFragment"

class MoviesMainFragment extends AppMainFragment{

    async initializeView(cb){

        //@ts-expect-error cannot find module (for view)
        const uiTemplate = require("../views/movies_fragment.hbs")();
        this.onViewInitSuccess(uiTemplate, cb);
    }
}

const moviesMainFragmentBuilder = new AppFragmentBuilder(MoviesMainFragment, {

    localRoutingInfos: null,
    viewID: "movies-main-fragment",
});

export default moviesMainFragmentBuilder;
Navigate back to the movies folder, open the views folder, create a file named movies_fragment.hbs and paste the following code:
<section class="section logo-section">
    <h1 class="frag-header mont-txt"><span>I Love This Movie</span></h1>
    <form class="mont-txt" id="movie-form">
        <input type="text" id="movie-search" placeholder="What's the title?">
        <button class="b-cta mont-txt" id="find-movie">Find it</button>
    </form>
</section>
Finally, navigate back to the movies folder, open the styles folder and create a movies.css file. Paste the following code:
#movie-form {

    display: flex;
    flex-direction: row;
    align-items: center;
    gap: 10px;
    margin-top: 25px;
}

#movie-search {

    padding: 11px 16px;
    background-color: #7da464;
    width: 414px;
    color: white !important;
    border: none;
}

#find-movie {

    background-color: black;
}
Our movies fragment is done. We have the JavaScript source file, our view template, and its styling, all of which have been imported in our source file. Now, we just have to add a new routing info and main nav info for these, rerun the app, and see our complete project.
Update AppRoutingInfo
Open the app_routing_info.js file and add the following bits of code.
At the top of the file, just under the current imports, import our exported builder for the movies main fragment.
import moviesMainFragmentBuilder from "../../../fragments/movies/scripts/movies_main_fragment";
Finally, inside the array of routing infos, add the info for our movies fragment. It will be for the route “/movies”, matching the link we’ve used in our navigational link that initiates the routing.
{
        route: "/movies",
        target: moviesMainFragmentBuilder,
        nestedChildFragments: null
    }
PS: Don’t forget the comma separating the two ?
Now, let’s finalize by updating our AppMainNavInfo, so that our navigational link for movies is styled correctly when we’re in that route.
Update AppMainNavInfo
Open the app_main_nav_info.js file and add the following nav info inside the array:
{
        selector: "movies-link",
        defaultRoute: "/movies",
        baseActiveRoute: "/movies",
    }
PS: Remember that comma. Saving you some hairs ?
Remember, our navigation link matches this selector and default route, as we described it inside our home.sv.hbs file.
<a href="/movies" class="nav-link mont-txt movies-link">Movies</a>
And that’s it. If you’d stopped the app, just run npm run dev again.
If not, webpack would have automatically picked up the changes and refreshed the browser. So just give the web app a look.
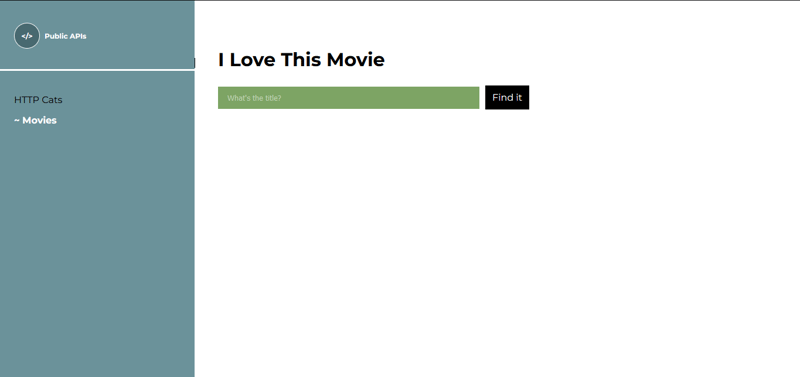
You should now be able to navigate between the http-cat route “/” and the movies route “/movies” with our nav links updating based on which one is currently active.
Bonus – Default Routes
Here’s a bonus that might help you curate your Oats~i web app experiences in your future projects.
In the previous part of the series, I talked about how Oats~i allows you to define a default route that the app should launch in in case the initial route is not a validly defined option in the routing info.
For our project as is, the home route “/”, which is the base route our app will load in first, is already defined in our routing info. But what if we wanted to start at the route “/http-cats”, which will now define the build for the http-cats main fragment?
We can change the routing info entry for http-cats to have the route as “/http-cats” then in the startup script, provide that route as the default route.
Your updated routing info should look like:
{
        route: "/http-cats",
        target: httpCatsMainFragmentBuilder,
        nestedChildFragments: null
    }
And the startup script should be updated to look as follows:
appRoot.initApp(appStateManager, new MainRouter(AppRoutingInfo, appStateManager, (args) => {}, "", async (url) => {

        return {

            canAccess: true,
            fallbackRoute: "/"
        }
    }), { template: null, mainNavInfos: AppMainNavInfo }, "/http-cats"); //note the change from “” to “/http-cats”
Now, if you run the app and load it from the home route “/”, Oats~i will attempt to find a matching route info for the route, which it will fail, then fallback to the default, and update the address to our defined default, which is “/http-cats”.
So, our web app will now default to /http-cats whenever its loaded from home or a url that is not explicitly defined in the web app’s routing info. (So, not just home “/” but even “/someRandomUrl”)
Sign Up and Follow for the Next Tutorial
That’s it for lesson 1. Quite some concepts to learn and grasp but I hope it was exciting nonetheless. In the next lesson and part of this series, we’ll actually implement these APIs and add data management and reactivity to our Oats~i app.
If you have any questions, feel free to comment them below. Also, consider supporting with a like, follow, or donation.
See you in the next one.
Support Oats~i
You can support the development of Oats~i through Patreon*** or buy me a coffee.
위 내용은 Oats~i를 사용하여 웹 앱 구축 – 강의 조각, 라우팅 및 기본 경로의 상세 내용입니다. 자세한 내용은 PHP 중국어 웹사이트의 기타 관련 기사를 참조하세요!