
SST 및 Docker를 사용하여 Hetzner VPS에 Next.js 앱을 배포하는 방법

- WBOY원래의
- 2024-08-13 14:35:331009검색
내 원래 블로그 게시물: https://www.prudkohliad.com/articles/deploy-next-js-to-vps-using-sst-2024-08-11
SST는 자체 인프라에서 최신 풀 스택 애플리케이션을 쉽게 구축할 수 있게 해주는 프레임워크입니다. SST v3은 Pulumi와 Terraform을 사용합니다
– SST 문서
이 가이드에서는 SST와 Docker를 사용하여 Hetzner VPS에 Next.js 앱을 배포합니다. 이 가이드는 이전 게시물의 후속편입니다. 여기에서 이해되지 않는 내용을 찾으면 Docker 및 GitHub Actions를 사용하여 Hetzner의 VPS에 Next.js 앱을 배포하는 방법에서 답을 찾을 가능성이 높습니다.
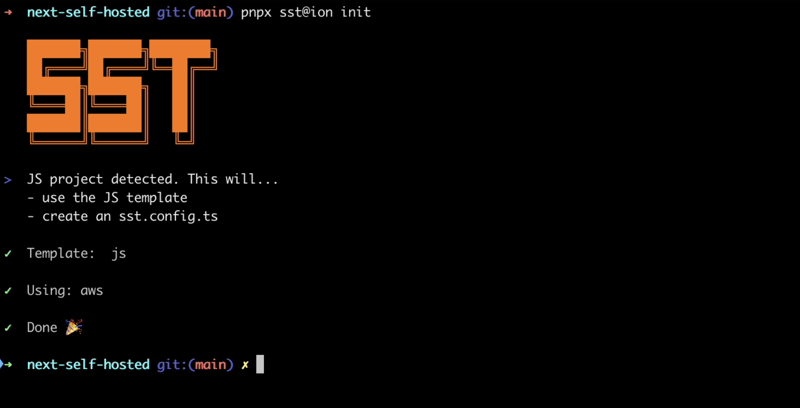
프로젝트에 SST 추가
프로젝트에 SST를 추가하려면 다음 명령을 실행하세요.
pnpx sst@ion init
대화형 프롬프트가 표시됩니다. "예"를 선택한 다음 "aws"를 선택합니다.
필요한 패키지가 모두 설치되어 있는지 확인하세요.
pnpm install
이렇게 하면 모든 구성을 추가할 sst.config.ts 파일이 생성됩니다.
또한 일부 다른 파일/디렉토리가 생성됩니다. .dockerignore에 추가해 보겠습니다. Docker 이미지가 되는 것을 원하지 않습니다.
# sst
.sst
sst.config.ts
tsconfig.json
현재 sst 구성 파일의 모습은 다음과 같습니다.
/// <reference path="./.sst/platform/config.d.ts" />

export default $config({
  app(input) {
    return {
      name: "next-self-hosted",
      removal: input?.stage === "production" ? "retain" : "remove",
      home: "aws",
    };
  },
  async run() {},
});
AWS를 사용하지 않을 것이므로 home 매개변수를 "local"로 설정하겠습니다.
/// <reference path="./.sst/platform/config.d.ts" />

export default $config({
  app(input) {
    return {
      name: "next-self-hosted",
      removal: input?.stage === "production" ? "retain" : "remove",
      home: "local",
    };
  },
  async run() {},
});
이제 run() 함수에 항목을 추가할 수 있습니다.
Hetzner에서 API 토큰 생성
SST를 사용하여 Hetzner에서 VPS를 생성하려면 Hetzner API 토큰이 필요합니다. 새로운 것을 생성해 보겠습니다.
Hetzner 콘솔에서 프로젝트를 열고 "보안" 탭으로 이동하세요:
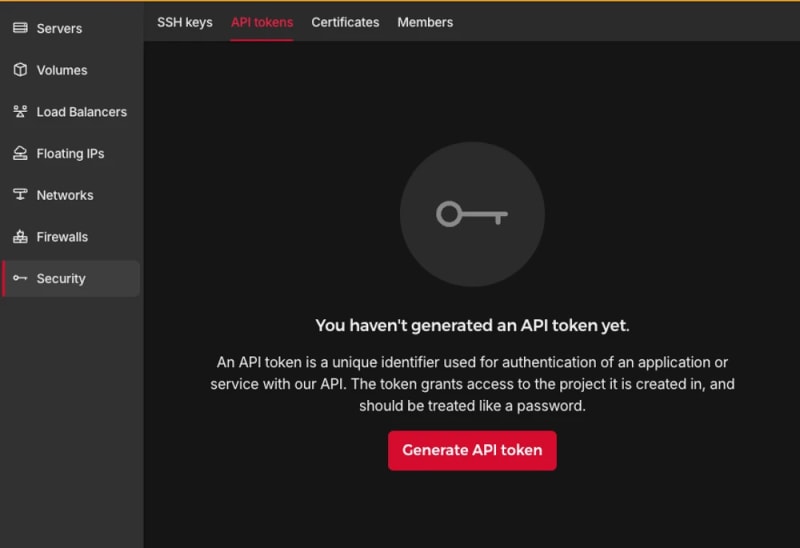
API 토큰 생성:

새 토큰이 프로젝트에 추가됩니다:

토큰은 한 번만 표시되므로 잃어버리지 않도록 주의하세요.
TLS 및 Hetzner 공급자 추가:
pnpm sst add tls
pnpm sst add hcloud
pnpm install
SSH 키 생성
Hetzner VPS를 생성한 후 추가 명령을 실행하려면 생성 중에 SSH 키가 추가되었는지 확인해야 합니다. 이를 위해 로컬에서 SSH 토큰을 생성한 다음 공개 부분을 Hetzner에 추가하겠습니다. 실행 함수에 다음 코드를 추가합니다.
// In the run() function:

// Generate an SSH key
const sshKeyLocal = new tls.PrivateKey("SSH Key - Local", {
  algorithm: "ED25519",
});

// Add the SSH key to Hetzner
const sshKeyHetzner = new hcloud.SshKey("SSH Key - Hetzner", {
  publicKey: sshKeyLocal.publicKeyOpenssh,
});
앱 배포:
pnpm sst deploy

SST ❍ ion 0.1.90  ready!

➜  App:        next-self-hosted
   Stage:      antonprudkohliad

~  Deploy

|  Created     SSH Key - Local tls:index:PrivateKey
|  Created     SSH Key - Hetzner hcloud:index:SshKey

✓  Complete
Hetzner에 새로운 SSH 키가 추가된 것을 볼 수 있습니다:

이제 VPS 생성을 진행할 수 있습니다.
서버 생성
다음 명령을 사용하면 프로젝트에 새 VPS가 생성됩니다.
// In the run() function:

// Create a Server on Hetzner
const server = new hcloud.Server("Server", {
  image: "docker-ce",
  serverType: "cx22",
  location: "nbg1",
  sshKeys: [sshKeyHetzner.id],
});
여기서는 Docker가 이미 설치되어 있으므로 docker-ce 이미지를 사용하고 있습니다. Hetzner Cloud API를 사용하면 사용 가능한 모든 이미지, 서버 유형 및 데이터 센터를 나열할 수 있습니다.
서버가 올바르게 생성되었는지 확인하세요.
pnpm sst deploy
SST ❍ ion 0.1.90  ready!

➜  App:        next-self-hosted
   Stage:      antonprudkohliad

~  Deploy

|  Created     Server hcloud:index:Server (34.5s)

✓  Complete
콘솔에서 새로 생성된 서버를 볼 수도 있습니다.

VPS에서 Docker 서버에 연결
VPS에 앱 Docker 이미지를 구축하고 네트워크, 볼륨, 컨테이너를 생성하려면 로컬 시스템과 VPS의 Docker 서버 사이에 브리지를 만들어야 합니다. 그러기 위해서는 Docker 공급자가 필요합니다.
pnpm sst add docker
pnpm install
SSH 클라이언트가 액세스할 수 있도록 개인 SSH 키를 디스크에 저장하세요. VPS에서 Docker 서버에 대한 연결을 생성하십시오:
// At the top of the file:
import { resolve as pathResolve } from "node:path";
import { writeFileSync as fsWriteFileSync } from "node:fs";

// In the run() function:

// Store the private SSH Key on disk to be able to pass it to the Docker
// Provider
const sshKeyLocalPath = sshKeyLocal.privateKeyOpenssh.apply((k) => {
  const path = "id_ed25519_hetzner";
  fsWriteFileSync(path, k, { mode: 0o600 });
  return pathResolve(path);
});

// Connect to the Docker Server on the Hetzner Server
const dockerServerHetzner = new docker.Provider("Docker Server - Hetzner", {
  host: $interpolate`ssh://root@${server.ipv4Address}`,
  sshOpts: ["-i", sshKeyLocalPath, "-o", "StrictHostKeyChecking=no"],
});
또한 GitHub 저장소와 Docker 이미지에 포함되지 않도록 개인 SSH 키 id_ed25519_hetzner를 .gitignore 및 .dockerignore에 추가해야 합니다.
배포를 트리거하여 변경 사항을 확인합니다.
pnpm sst deploy
SST ❍ ion 0.1.90  ready!

➜  App:        next-self-hosted
   Stage:      antonprudkohliad

~  Deploy

|  Created     Docker Server - Hetzner pulumi:providers:docker

✓  Complete
Build the Docker image
Now we can build the Docker image on the remove Docker server:
// In the run() function:

// Build the Docker image
const dockerImageHetzner = new docker.Image(
  "Docker Image - App - Hetzner",
  {
    imageName: "next-self-hosted/next-self-hosted:latest",
    build: {
      context: pathResolve("./"),
      dockerfile: pathResolve("./Dockerfile"),
      target: "production",
      platform: "linux/amd64",
    },
    skipPush: true,
  },
  {
    provider: dockerServerHetzner,
    dependsOn: [server],
  }
);
Let’s trigger the deployment to see if everything works:
pnpm sst deploy
SST ❍ ion 0.1.90  ready!

➜  App:        next-self-hosted
   Stage:      antonprudkohliad

~  Deploy

|  Log         Starting Docker build
< ... A PRETTY LONG BUILD LOG HERE ... >
|  Log         Image built successfully, local id "sha256:629a6cdfc298c74599a3056278e31c64197a87f6d11aab09573bc9171d2f3362"
|  Created     Docker Image - App - Hetzner docker:index:Image (36.0s)

✓  Complete
Now, let’s check that Docker image made it to the server:
ssh root@116.203.183.180 -i ./id_ed25519_hetzner -o StrictHostKeyChecking=no -C "docker image ls"
REPOSITORY                          TAG       IMAGE ID       CREATED              SIZE
next-self-hosted/next-self-hosted   latest    629a6cdfc298   About a minute ago   712MB
Awesome!
Docker networks
We will create two networks: Public and Internal. The Public network is for services to which NGINX is connected, i.e. for services that have to be exposed to the outside (e.g. the Next.js application or an API server). The Internal network is for services that are not meant to be exposed to the outside e.g. Postgres database, Redis cache:
// In the run() function:

// Setup Docker Networks
const dockerNetworkPublic = new docker.Network(
  "Docker Network - Public",
  { name: "app_network_public" },
  { provider: dockerServerHetzner, dependsOn: [server] }
);
const dockerNetworkInternal = new docker.Network(
  "Docker Network - Internal",
  { name: "app_network_internal" },
  { provider: dockerServerHetzner, dependsOn: [server] }
);
Trigger the deployment:
pnpm sst deploy
SST ❍ ion 0.1.90  ready!

➜  App:        next-self-hosted
   Stage:      antonprudkohliad

~  Deploy

|  Created     Docker Network - Public docker:index:Network (2.3s)
|  Created     Docker Network - Internal docker:index:Network (3.1s)

✓  Complete
Check that networks app_network_internal and app_network_public are present on the remote:
ssh root@116.203.183.180 -i ./id_ed25519_hetzner -o StrictHostKeyChecking=no -C "docker network ls"
NETWORK ID     NAME                   DRIVER    SCOPE
0590360bd4ae   app_network_internal   bridge    local
e3bd8be72506   app_network_public     bridge    local
827fa5ca5de2   bridge                 bridge    local
dc8880514199   host                   host      local
f1481867db18   none                   null      local
Docker volumes
We will create a volume to store the application build files (the .next folder):
// In the run() function:

// Setup Docker Volumes
const dockerVolumeAppBuild = new docker.Volume(
  "Docker Volume - App Build",
  { name: "app_volume_build" },
  { provider: dockerServerHetzner, dependsOn: [server] }
);
Deploy and verify that the docker volume app_volume_build is present on the VPS:
pnpm sst deploy
SST ❍ ion 0.1.90  ready!

➜  App:        next-self-hosted
   Stage:      antonprudkohliad

~  Deploy

|  Created     Docker Volume - App Build docker:index:Volume

✓  Complete

ssh root@116.203.183.180 -i ./id_ed25519_hetzner -o StrictHostKeyChecking=no -C "docker volume ls"
DRIVER    VOLUME NAME
local     app_volume_build
The Build container
We are going to run a one-off container (a.k.a. Init Container) to build the Next.js application and store the result in the .next folder, that will be shared with the main application container through the volume that we have created above:
// In the run() function:

// Run a one-off container to build the app
const dockerAppBuildContainer = new docker.Container(
  "Docker Container - App Build",
  {
    name: "app_container_build",
    image: dockerImageHetzner.imageName,
    volumes: [
      {
        volumeName: dockerVolumeAppBuild.name,
        containerPath: "/app/.next",
      },
    ],
    command: ["pnpm", "build"],
    mustRun: true,
  },
  {
    provider: dockerServerHetzner,
  }
);
Deploy and verify via logs that the build has been successful:
pnpm sst deploy
SST ❍ ion 0.1.90  ready!

➜  App:        next-self-hosted
   Stage:      antonprudkohliad

~  Deploy

|  Created     Docker Container - App Build docker:index:Container (1.1s)

✓  Complete

ssh root@116.203.183.180 -i ./id_ed25519_hetzner -o StrictHostKeyChecking=no -C "docker logs -f app_container_build"

> next-self-hosted@ build /app
> next build

  ▲ Next.js 14.2.5

   Creating an optimized production build ...
 ✓ Compiled successfully
   Linting and checking validity of types ...
   Collecting page data ...
   Generating static pages (0/4) ...
   Generating static pages (1/4)
   Generating static pages (2/4)
   Generating static pages (3/4)
 ✓ Generating static pages (4/4)
   Finalizing page optimization ...
   Collecting build traces ...

Route (app)                              Size     First Load JS
┌ ○ /                                    142 B          87.2 kB
└ ○ /_not-found                          871 B          87.9 kB
+ First Load JS shared by all            87 kB
  ├ chunks/52d5e6ad-40eff88d15e66edb.js  53.6 kB
  ├ chunks/539-e1fa9689ed3badf0.js       31.5 kB
  └ other shared chunks (total)          1.84 kB

○  (Static)  prerendered as static content
The App container
Now we will add a “runner” container, that will use the build output from the Build container, and run next start:
// In the run() function:

const dockerAppContainer = new docker.Container(
  "Docker Container - App",
  {
    name: "app",
    image: dockerImageHetzner.imageName,
    volumes: [
      {
        volumeName: dockerVolumeAppBuild.name,
        containerPath: "/app/.next",
      },
    ],
    networksAdvanced: [
      { name: dockerNetworkPublic.id },
      { name: dockerNetworkInternal.id },
    ],
    command: ["pnpm", "start"],
    restart: "always",
  },
  { provider: dockerServerHetzner, dependsOn: [dockerAppBuildContainer] }
);
Deploy and verify that the app has started successfully:
pnpm sst deploy
SST ❍ ion 0.1.90  ready!

➜  App:        next-self-hosted
   Stage:      antonprudkohliad

~  Deploy

|  Created     Docker Container - App docker:index:Container (1.1s)

✓  Complete

ssh root@116.203.183.180 -i ./id_ed25519_hetzner -o StrictHostKeyChecking=no -C "docker logs -f app"

> next-self-hosted@ start /app
> next start

  ▲ Next.js 14.2.5
  - Local:        http://localhost:3000

 ✓ Starting...
 ✓ Ready in 497ms
The app container might fail, because the build container has not finished building yet, but it will soon recover and function normally.
Add Cloudflare certificates
In order to upload files to the VPS, we need to install the Command provider and the Polumi package:
pnpm sst add @pulumi/command
pnpm add -D @pulumi/pulumi
pnpm install
Make sure that the /root/app and /root/app/certs directories exist on the VPS and upload Cloudflare Origin Server certificates:
// At the top of the file
import { asset as pulumiAsset } from "@pulumi/pulumi";

// In the run() function:

// Make sure that app directory exists
new command.remote.Command("Command - Ensure app directory", {
  create: "mkdir -p /root/app",
  connection: {
    host: server.ipv4Address,
    user: "root",
    privateKey: sshKeyLocal.privateKeyOpenssh,
  },
});

// Make sure that app/certs directory exists
new command.remote.Command("Command - Ensure app/certs directory", {
  create: "mkdir -p /root/app/certs",
  connection: {
    host: server.ipv4Address,
    user: "root",
    privateKey: sshKeyLocal.privateKeyOpenssh,
  },
});

// Copy Certificates to the VPS
new command.remote.CopyToRemote(
  "Copy - Certificates - Key",
  {
    source: new pulumiAsset.FileAsset(
      pathResolve("./certs/cloudflare.key.pem")
    ),
    remotePath: "/root/app/certs/cloudflare.key.pem",
    connection: {
      host: server.ipv4Address,
      user: "root",
      privateKey: sshKeyLocal.privateKeyOpenssh,
    },
  }
);
new command.remote.CopyToRemote(
  "Copy - Certificates - Cert",
  {
    source: new pulumiAsset.FileAsset(
      pathResolve("./certs/cloudflare.cert.pem")
    ),
    remotePath: "/root/app/certs/cloudflare.cert.pem",
    connection: {
      host: server.ipv4Address,
      user: "root",
      privateKey: sshKeyLocal.privateKeyOpenssh,
    },
  }
);
new command.remote.CopyToRemote(
  "Copy - Certificates - Authenticated Origin Pull",
  {
    source: new pulumiAsset.FileAsset(
      pathResolve("./certs/authenticated_origin_pull_ca.pem")
    ),
    remotePath: "/root/app/certs/authenticated_origin_pull_ca.pem",
    connection: {
      host: server.ipv4Address,
      user: "root",
      privateKey: sshKeyLocal.privateKeyOpenssh,
    },
  }
);
Start Nginx
Copy Nginx configuration file to the VPS and start the Nginx container:
// In the run() function:

// Copy Nginx config to the VPS
const commandCopyNginxConfig = new command.remote.CopyToRemote(
  "Copy - Nginx Config",
  {
    source: new pulumiAsset.FileAsset(
      pathResolve("./nginx/production.conf")
    ),
    remotePath: "/root/app/nginx.conf",
    connection: {
      host: server.ipv4Address,
      user: "root",
      privateKey: sshKeyLocal.privateKeyOpenssh,
    },
  }
);

// Run the Nginx container
const dockerNginxContainer = new docker.Container(
  "Docker Container - Nginx",
  {
    name: "app_container_nginx",
    image: "nginx:1.27.0-bookworm",
    volumes: [
      {
        hostPath: "/root/app/nginx.conf",
        containerPath: "/etc/nginx/nginx.conf",
      },
      {
        hostPath: "/root/app/certs",
        containerPath: "/certs",
      },
    ],
    command: ["nginx", "-g", "daemon off;"],
    networksAdvanced: [{ name: dockerNetworkPublic.id }],
    restart: "always",
    ports: [
      {
        external: 443,
        internal: 443,
      },
    ],
    healthcheck: {
      tests: ["CMD", "service", "nginx", "status"],
      interval: "30s",
      timeout: "5s",
      retries: 5,
      startPeriod: "10s",
    },
  },
  { provider: dockerServerHetzner, dependsOn: [dockerAppContainer] }
);

return { ip: server.ipv4Address };
Deploy and verify that the Nginx container is running:
pnpm sst deploy
SST ❍ ion 0.1.90  ready!

➜  App:        next-self-hosted
   Stage:      antonprudkohliad

~  Deploy

|  Deleted     Docker Container - App Build docker:index:Container
|  Created     Command - Ensure app/certs directory command:remote:Command
|  Created     Command - Ensure app directory command:remote:Command
|  Created     Docker Container - App Build docker:index:Container
|  Created     Copy - Certificates - Cert command:remote:CopyToRemote (1.2s)
|  Created     Copy - Nginx Config command:remote:CopyToRemote (1.2s)
|  Created     Copy - Certificates - Key command:remote:CopyToRemote (1.2s)
|  Created     Copy - Certificates - Authenticated Origin Pull command:remote:CopyToRemote (1.2s)
|  Deleted     Docker Container - App docker:index:Container
|  Created     Docker Container - App docker:index:Container (1.2s)
|  Created     Docker Container - Nginx docker:index:Container (7.1s)

✓  Complete
   ip: 116.203.183.180

ssh root@116.203.183.180 -i ./id_ed25519_hetzner -o StrictHostKeyChecking=no -C "docker ps -a"

CONTAINER ID   IMAGE                                      COMMAND                  CREATED         STATUS                     PORTS                          NAMES
9c2cb18db304   nginx:1.27.0-bookworm                      "/docker-entrypoint.…"   3 minutes ago   Up 3 minutes (healthy)     80/tcp, 0.0.0.0:443->443/tcp   app_container_nginx
32e6a4cee8bc   next-self-hosted/next-self-hosted:latest   "docker-entrypoint.s…"   4 minutes ago   Up 3 minutes               3000/tcp                       app
f0c50aa32493   next-self-hosted/next-self-hosted:latest   "docker-entrypoint.s…"   4 minutes ago   Exited (0) 3 minutes ago                                  app_container_build
As you can see, Nginx and the application are running smoothly.
The final check
It’s time to make sure that the DNS record is pointing to the right IP address (yes, it is possible to add this to the SST config too, via the Cloudflare provider):

Then, we can open the application and verify that it works:

Congratulations! We have now completed out SST dive and can enjoy the freshly deployed application ?
Cleaning up
SST makes it very easy to clean up – just run pnpm sst remove and the whole setup will go away:
pnpm sst remove
SST ❍ ion 0.1.90  ready!

➜  App:        next-self-hosted
   Stage:      antonprudkohliad

~  Remove

|  Deleted     Docker Container - Nginx docker:index:Container (1.9s)
|  Deleted     Docker Container - App docker:index:Container
|  Deleted     Docker Container - App Build docker:index:Container
|  Deleted     Docker Image - App - Hetzner docker:index:Image
|  Deleted     Docker Volume - App Build docker:index:Volume (2.1s)
|  Deleted     Docker Network - Public docker:index:Network (3.1s)
|  Deleted     Docker Network - Internal docker:index:Network (3.2s)
|  Deleted     Copy - Nginx Config command:remote:CopyToRemote
|  Deleted     Docker Server - Hetzner pulumi:providers:docker
|  Deleted     Copy - Certificates - Authenticated Origin Pull command:remote:CopyToRemote
|  Deleted     Command - Ensure app/certs directory command:remote:Command
|  Deleted     Copy - Certificates - Key command:remote:CopyToRemote
|  Deleted     Command - Ensure app directory command:remote:Command
|  Deleted     Copy - Certificates - Cert command:remote:CopyToRemote
|  Deleted     Server hcloud:index:Server (16.8s)
|  Deleted     SSH Key - Hetzner hcloud:index:SshKey
|  Deleted     SSH Key - Local tls:index:PrivateKey

✓  Removed
위 내용은 SST 및 Docker를 사용하여 Hetzner VPS에 Next.js 앱을 배포하는 방법의 상세 내용입니다. 자세한 내용은 PHP 중국어 웹사이트의 기타 관련 기사를 참조하세요!