Django 앱 배포: 외부 Celery가 포함된 EC 앱 실행기
- 王林원래의
- 2024-08-08 22:54:121389검색
잠깐만...

우리 모두는 프로덕션을 진행하느라 바쁜 상황에 직면했지만 배포 플랫폼을 선택하는 데에는 많은 요인이 고려됩니다. 음 네, 우리는 AWS를 선택하겠습니다. 일반적으로 플랫폼을 고수한 후에는 아키텍처, 비용, 안정성, 확장성, 가용성 및 타당성과 같은 몇 가지 요소에 의존할 수 있습니다. 맞춰보세요 !!! 이는 신뢰성, 확장성, 가용성 및 타당성에 관한 것이 아닙니다. AWS는 이 모든 면에서 신뢰할 수 있기 때문입니다. 이 튜토리얼에서는 Django 앱의 일부 아키텍처의 장점과 단점을 식별합니다.
진행하기 전에 무슨 일이 일어나고 있는지 완벽하게 이해하기 위한 몇 가지 전제 조건을 알아보겠습니다.
:) 이 튜토리얼에 포함된 모든 코드는 오픈소스로 제공됩니다. 마음껏 발자국을 남겨보세요.
전제 조건
계속 진행하기 전에 다음을 수행해야 합니다.
- AWS 계정 보유
- Django에 대한 지식을 가지세요
- 대기열, 작업, 브로커가 무엇인지 이해하세요
캐싱이란 무엇이며 캐시하는 이유
캐싱은 자주 액세스하는 데이터를 빠른 액세스 위치에 임시로 저장하여 이 데이터를 검색하는 데 걸리는 시간을 줄이는 데 사용되는 기술입니다. AWS에서 캐싱은 기본 데이터베이스 및 API의 로드를 최소화하여 최종 사용자의 응답 시간을 단축함으로써 애플리케이션 성능과 확장성을 향상시킵니다.
효율성을 향상하고 대기 시간을 줄이며 비용을 절감하기 위해 캐시를 사용합니다. 캐싱은 데이터를 애플리케이션에 더 가깝게 저장함으로써 데이터베이스 쿼리, 네트워크 트래픽 및 계산 부하의 빈도를 줄입니다. 이를 통해 더 빠른 데이터 검색, 향상된 사용자 경험, 최적화된 리소스 사용이 가능하며 이는 트래픽이 많은 애플리케이션에 매우 중요합니다.
몸을 따뜻하게 하자

EC2:
Elastic Compute Engine의 완전한 의미에서 EC2는 AWS 데이터 센터에 있는 웹 서버입니다. 즉, EC2는 AWS에서 얻을 수 있는 가상입니다. 모든 기능을 사용할 수 있는 "종량제 플랜"에 따라 매우 저렴한 월별 요금으로 구입할 수 있습니다.AWS App Runner:
이는 웹 애플리케이션과 API의 실행과 확장을 단순화하는 완전 관리형 서비스로, 개발자가 인프라 관리 없이 코드 저장소나 컨테이너 이미지에서 빠르게 배포할 수 있도록 해줍니다.셀러리와 장고 셀러리:
Celery는 Python의 실시간 처리를 위한 오픈 소스 분산 작업 대기열입니다. Django Celery는 Celery를 Django 프레임워크와 통합하여 Django 애플리케이션 내에서 비동기 작업 실행, 주기적 작업 및 백그라운드 작업 관리를 지원합니다. 이 기술의 사용 사례는 다양합니다. 통신 서비스(SMS, 이메일), 예약된 작업(Crons) 및 백그라운드 데이터 처리 작업(예: 데이터 집계, 기계 학습 모델 교육, 파일 처리)이 될 수 있습니다.Amazon RDS(관계형 데이터베이스 서비스):
클라우드에서 관계형 데이터베이스의 설정, 운영 및 확장을 단순화하는 관리형 데이터베이스 서비스입니다. MySQL, PostgreSQL, Oracle 및 SQL Server와 같은 다양한 데이터베이스 엔진을 지원하여 자동화된 백업, 패치 및 고가용성을 제공하여 사용자가 데이터베이스 관리 작업에서 해방되도록 합니다.
이 맥락에서 EC2와 App Runner 비교
아키텍처
앱이 어떻게 구성되어 있고 배포 설정이 어떻게 작동하는지 살펴보겠습니다.
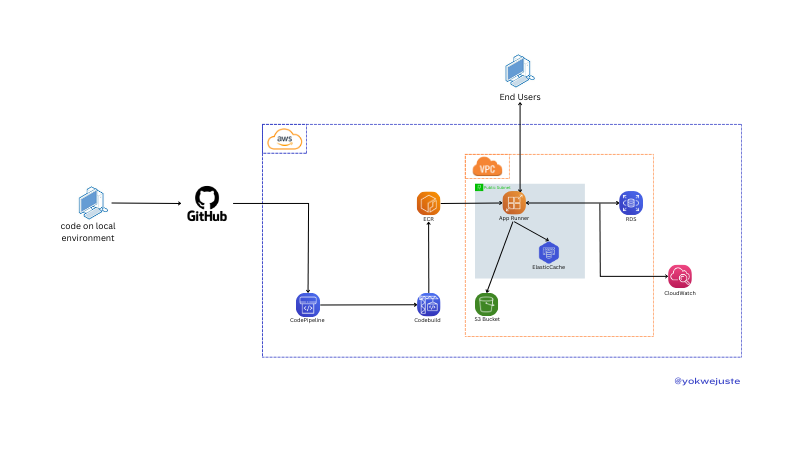
AWS App Runner(ECR)를 사용한 배포 설정

코드를 GitHub에 푸시하여 CodePipeline 워크플로를 트리거합니다. CodePipeline은 CodeBuild를 사용하여 릴리스 버전 관리를 위해 ECR(Elastic Container Registry)에 저장된 Docker 이미지를 생성합니다. 이 튜토리얼에서는 Virtual Private Cloud(VPC) 구성을 건너뜁니다. CloudWatch를 사용하여 로그를 지속적으로 모니터링하여 애플리케이션 상태를 보장합니다. 그리고 보너스는 정적 파일에 대해 AWS RDS 및 S3에서 제공하는 Postgres를 사용하도록 프로젝트를 빠르게 구성하는 것입니다.AWS EC2 인스턴스로 배포

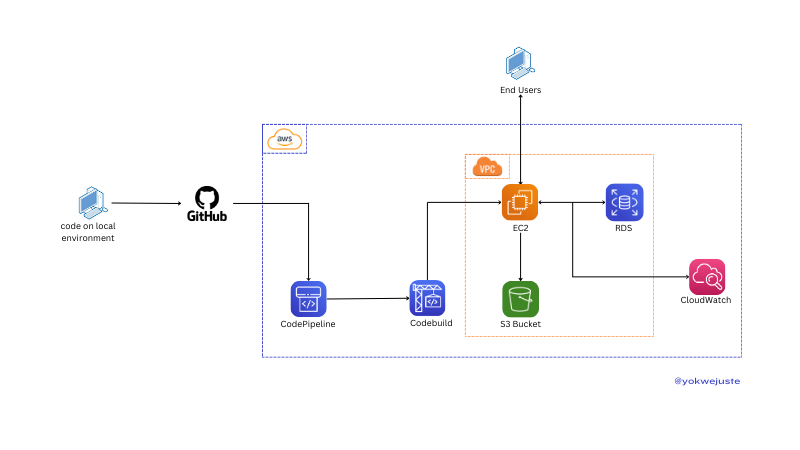
버전 관리 및 ECR을 생략하고 유사한 프로세스를 사용하여 코드를 GitHub에 푸시하고 CodeBuild를 사용하여 버전 관리를 위해 ECR에 저장된 Docker 이미지를 생성하는 CodePipeline을 트리거합니다. EC2 인스턴스는 이러한 이미지를 가져와 VPC 내에 애플리케이션을 배포하므로 최종 사용자가 애플리케이션에 액세스할 수 있습니다. 애플리케이션은 CloudWatch에서 모니터링하는 데이터 스토리지용 RDS 및 정적 파일용 S3와 상호 작용합니다. 선택적으로 certbot과 같은 옵션을 사용하여 이 인스턴스에 SSL 구성을 추가할 수 있습니다.
가격 비교표
다음은 일반적인 사용 시나리오를 기반으로 EC2와 App Runner 간의 가상 가격 비교입니다.
| Service | Component | Cost Breakdown | Example Monthly Cost (Estimate) |
|---|---|---|---|
| EC2 | Instance Usage | t2.micro (1 vCPU, 1 GB RAM) | .50 |
| Storage | 30 GB General Purpose SSD | .00 | |
| Data Transfer | 100 GB Data Transfer | .00 | |
| Total | .50 | ||
| App Runner | Requests | 1 million requests | .00 |
| Compute | 1 vCPU, 2 GB RAM, 30 hours/month | .00 | |
| Data Transfer | 100 GB Data Transfer | .00 | |
| Total | .00 |
관리 용이성
이 두 리소스를 어떻게 관리하는지 간략하게 요약해 보겠습니다.
| Factor | EC2 | App Runner |
|---|---|---|
| Setup | Manual setup required | Fully managed service |
| Management Overhead | High - requires OS updates, security patches, etc. | Low - abstracts infrastructure management |
| Configuration | Extensive control over instance configuration | Limited control, focuses on simplicity |
확장성
| Factor | EC2 | App Runner |
|---|---|---|
| Scaling Setup | Manual setup of Auto Scaling groups | Automatic scaling based on traffic |
| Scaling Management | Requires configuration and monitoring | Managed by AWS, seamless scaling |
| Flexibility | High - granular control over scaling policies | Simplified, less flexible |
배포 속도
| Factor | EC2 | App Runner |
|---|---|---|
| Deployment Time | Slower - instance provisioning and configuration | Faster - managed deployment |
| Update Process | May require downtime or rolling updates | Seamless updates |
| Automation | Requires setup of deployment pipelines | Simplified, integrated deployment |
맞춤화 및 제어
| Factor | EC2 | App Runner |
|---|---|---|
| Customization | Extensive - full control over environment | Limited - managed environment |
| Control | High - choose specific instance types, storage, etc. | Lower - focus on ease of use |
| Flexibility | High - suitable for specialized configurations | Simplified for standard web applications |
보안
| Factor | EC2 | App Runner |
|---|---|---|
| Security Control | High - detailed control over security configurations | Simplified security management |
| Management | Requires manual configuration of security groups, IAM | Managed by AWS, less granular control |
| Compliance | Extensive options for compliance configurations | Simplified compliance management |
프로젝트 설정
우리 프로젝트의 비교가 프로젝트 설정 자체에 의존하지 않는다는 점을 감안할 때. AWS의 셀러리 구성을 갖춘 기본 Django 애플리케이션을 갖게 됩니다.
Django를 활용한 기본 프로젝트를 진행하겠습니다.
종속성 설치 및 프로젝트 생성:
명령어는 아래 순서대로 실행해야 합니다.
# Project directory creation
mkdir MySchedular && cd MySchedular

# Creating an isolated space for the project dependencies
python -m venv venv && source venv/bin/activate

# Dependencies installation
pip install django celery redis python_dotenv

# Creating project and app
django-admin startproject my_schedular . && python manage.py startapp crons

# Let's add a few files to the project skeleton
touch my_schedular/celery.py crons/urls.py crons/tasks.py
이 시점에서 다음을 통해 프로젝트 뼈대를 확인할 수 있습니다.
tree -I "venv|__pycache__" .
그리고 지금 이 순간엔 이게 있어야 해
    .
    ├── crons
    │   ├── __init__.py
    │   ├── admin.py
    │   ├── apps.py
    │   ├── migrations
    │   │   └── __init__.py
    │   ├── models.py
+   │   ├── tasks.py
    │   ├── tests.py
+   │   ├── urls.py
    │   └── views.py
    ├── manage.py
    └── my_schedular
        ├── __init__.py
        ├── asgi.py
+       ├── celery.py
        ├── settings.py
        ├── urls.py
        └── wsgi.py

    3 directories, 16 files
코드와 논리
이제 앱의 로직에 몇 줄을 추가하고 이 프로젝트의 또 다른 마일스톤을 다루는 것으로 진행할 수 있습니다.
1- 셀러리 설정
# my_schedular/celery.py

from __future__ import absolute_import, unicode_literals
import os
from celery import Celery

os.environ.setdefault('DJANGO_SETTINGS_MODULE', 'myproject.settings')

app = Celery('myproject')

app.config_from_object('django.conf:settings', namespace='CELERY')

app.autodiscover_tasks()

@app.task(bind=True)
def debug_task(self):
    print(f'Request: {self.request!r}')
2- 브로커를 설정하기 위해 셀러리 변수를 덮어씁니다
# my_schedular/settings.py

CELERY_BROKER_URL = os.getenv('CELERY_BROKER_URL ')
CELERY_RESULT_BACKEND = os.getenv('CELERY_RESULT_BACKEND')
3- Django가 시작될 때 앱이 로드되도록 init.py를 업데이트하세요.
# my_schedular/__init__.py
from __future__ import absolute_import, unicode_literals

from .celery import app as celery_app

__all__ = ('celery_app',)
4- 작업을 만듭니다
# crons/tasks.py
from celery import shared_task
import time

@shared_task
def add(x, y):
    time.sleep(10)
    return x + y
5- 이제 간단한 Json 응답이 포함된 간단한 뷰를 추가해 보겠습니다.
# crons/views.py
from django.http import JsonResponse
from crons.tasks import add

def index(request):
    return JsonResponse({"message": "Hello world, your Django App is Running"})

def add_view(request):
    result = add.delay(4, 6)
    return JsonResponse({'task_id': result.id})
6- 액세스를 가능하게 하는 엔드포인트가 없으면 뷰를 가질 수 없습니다
# crons/urls.py
from django.urls import path

from crons.views import add_view, index

urlpatterns = [
    path('', index, name='index'),
    path('add/', add_view, name='add'),
]
7- 전체 프로젝트의 일반 urls.py에 앱 URL을 추가합니다.
# my_schedular/urls.py
from django.contrib import admin
from django.urls import include, path

urlpatterns = [
    path('admin/', admin.site.urls),
    path('/', include('crons.urls')),
]
환경 변수 추가:
# .env
SECRET_KEY=
DEBUG=
CELERY_BROKER_URL=
CELERY_RESULT_BACKEND=
이러한 모든 단계를 적절하게 수행한 후에는 다음과 같은 결과가 나옵니다.

AWS 환경 설정
AWS로 배송 중이므로 몇 가지 리소스를 구성해야 합니다.
새 VPC(Virtual Private Cloud) 생성
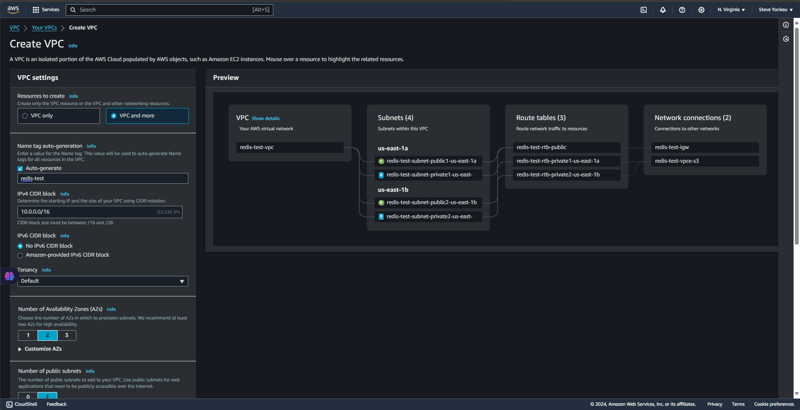
우리는 리소스 간의 안전한 액세스와 통신을 위해 격리된 환경과 네트워크를 만듭니다.
보안 그룹 생성
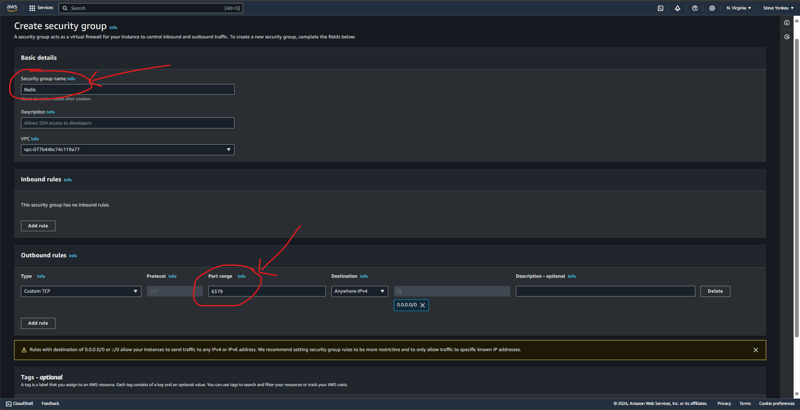
이전에 만든 VPC 아래에 보안 그룹을 생성하고 TCP 포트 6379(Redis 포트)에 인바운드 및 아웃바운드 규칙을 함께 추가합니다.
ElasticCache에서 RedisOSS 생성
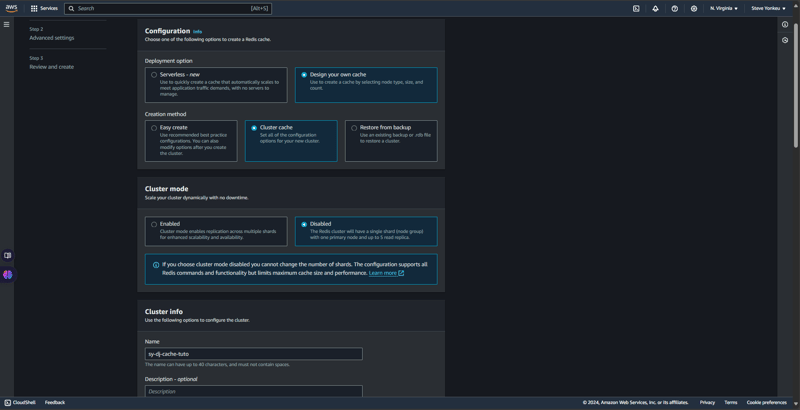
기본적으로 AWS Elastic Cache는 캐싱과 관련하여 RedisOSS와 memCache라는 두 가지 종류를 제공합니다. RedisOSS는 고급 데이터 구조와 지속성 기능을 제공하는 반면 Memcached는 더 간단하며 키-값 쌍의 고속 캐싱에 중점을 둡니다. Redis는 Memcached와 달리 복제 및 클러스터링도 지원합니다. 다시 비즈니스로 돌아가서 Redis로 돌아가세요.
탄력적 컨테이너 레지스트리(ECR) 설정
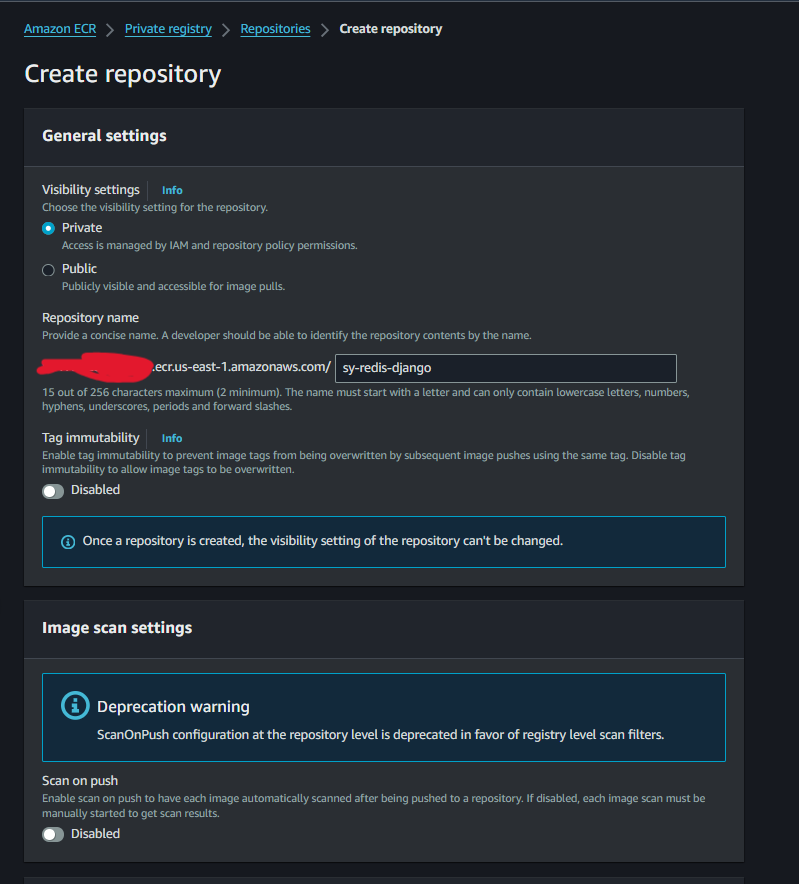
ECR 이미지 생성은 매우 간단하고 간단합니다.
1: App Runner 배포 업데이트
아래 단계에 따라 앱 실행기를 실행하세요.
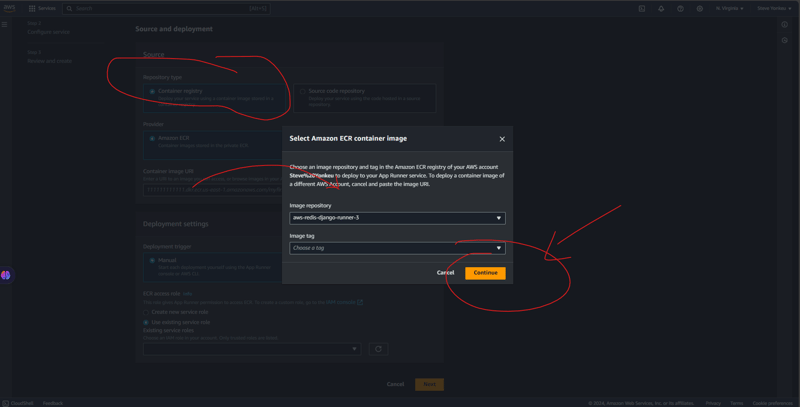
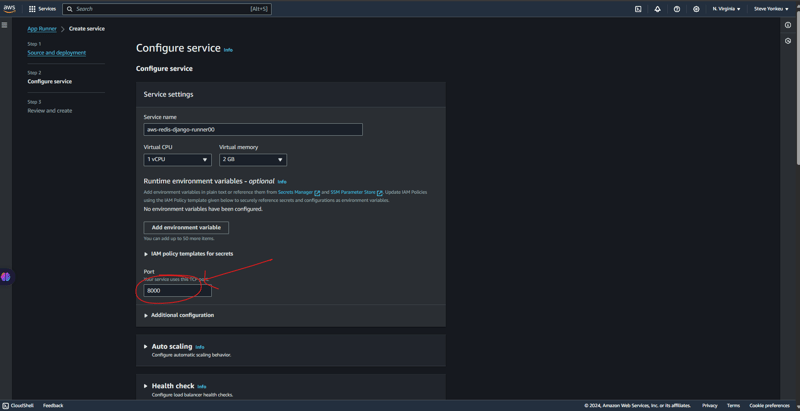
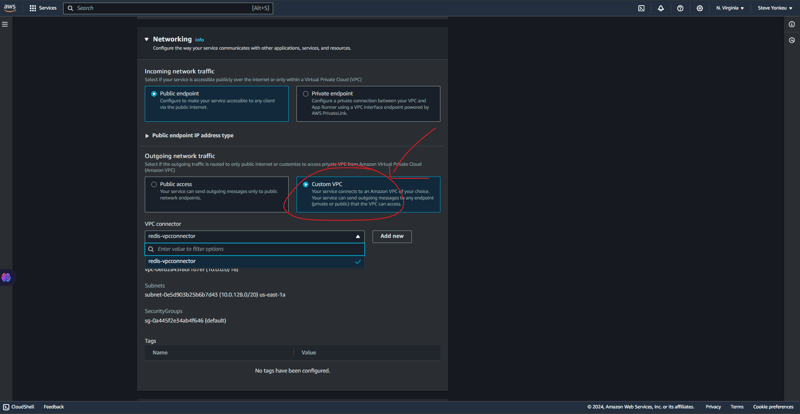
여기서 우리는 매우 기술적이어야 합니다. VPC는 대부분의 리소스가 있는 보안 네트워크입니다. App Runner가 VPC에서 발견되지 않으므로 해당 리소스 간의 통신을 위한 보안 수단을 제공해야 합니다.
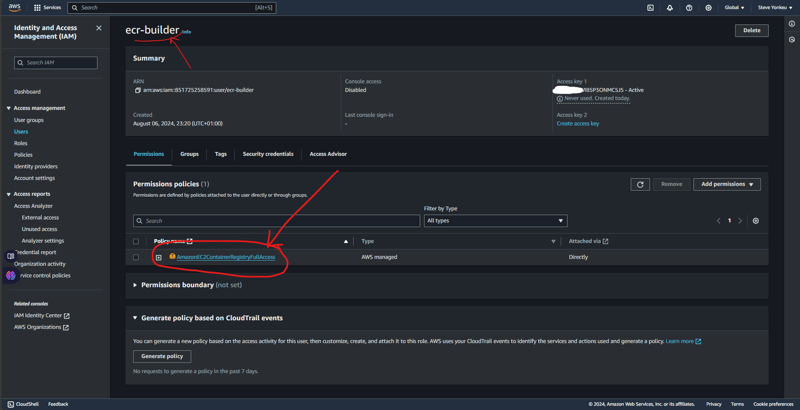
자격 증명 사용자 자격 증명
이 튜토리얼에서는 워크플로를 ECR에 연결하기 위한 승인이 필요합니다. 그런 다음 이미지를 AWS ECR에 푸시할 수 있도록 AmazonEC2ContainerRegistryFullAccess 권한 정책을 추가합니다.
결과
모든 작업이 완료되면 다음과 같은 트리 구조가 됩니다.
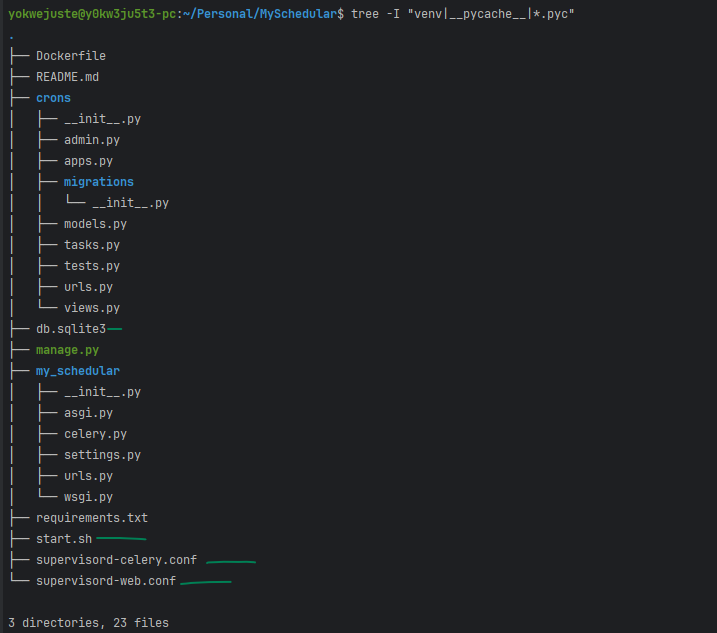

My GitHub에서 이 튜토리얼의 전체 코드 베이스를 볼 수 있습니다.
TWO: Deploying to an EC2
We will go with one the easiest EC2 to setup and the one having a free tier, an ubuntu EC2 instance. And The same code base that was used above is the same we are using here.
Creating an EC2
![EC2 1]https://dev-to-uploads.s3.amazonaws.com/uploads/articles/rk8waijxkthu1ule91fn.png)
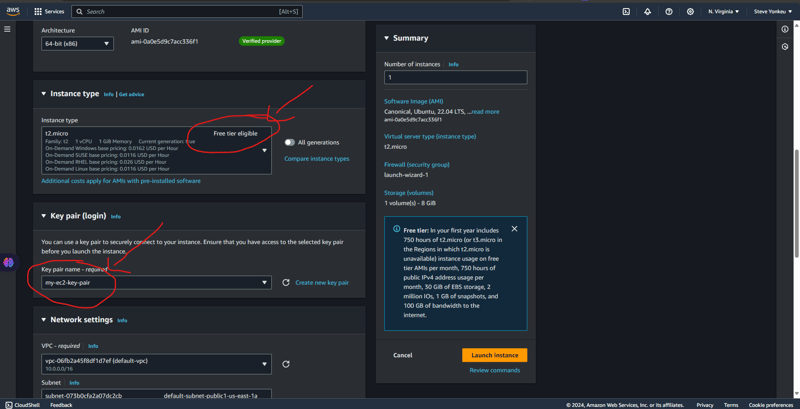
Alternatively, we can setup the security group separately.
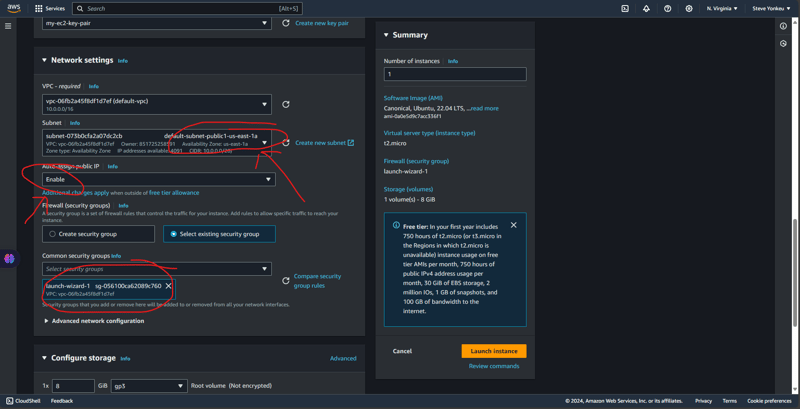
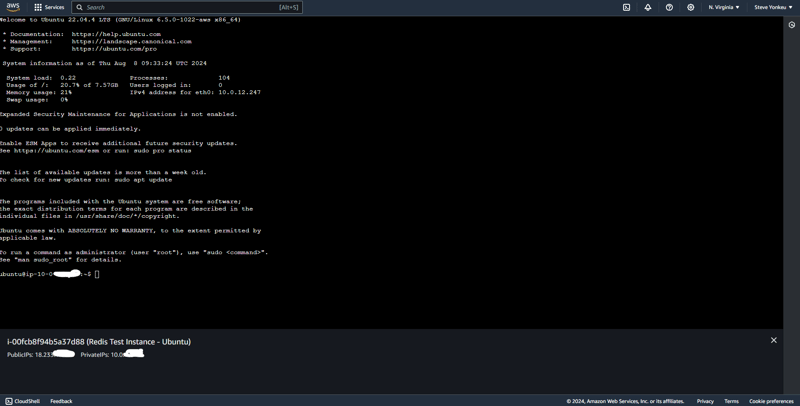


Setting up the EC2
Run this script to install necessary dependencies
#!/bin/bash

# Update the package list and upgrade existing packages
sudo apt-get update
sudo apt-get upgrade -y

# Install Python3, pip, and other essentials
sudo apt-get install -y python3-pip python3-dev libpq-dev nginx curl

# Install Redis
sudo apt-get install -y redis-server

# Start and enable Redis
sudo systemctl start redis.service
sudo systemctl enable redis.service

# Install Supervisor
sudo apt-get install -y supervisor

# Install virtualenv
sudo pip3 install virtualenv

# Setup your Django project directory (adjust the path as needed)
cd ~/aws-django-redis

# Create a virtual environment
virtualenv venv

# Activate the virtual environment
source venv/bin/activate

# Install Gunicorn and other requirements
pip install gunicorn
pip install -r requirements.txt

# Create directories for logs if they don't already exist
sudo mkdir -p /var/log/aws-django-redis
sudo chown -R ubuntu:ubuntu /var/log/aws-django-redis

# Supervisor Configuration for Gunicorn
echo "[program:aws-django-redis]
command=$(pwd)/venv/bin/gunicorn --workers 3 --bind 0.0.0.0:8000 my_schedular.wsgi:application
directory=$(pwd)
autostart=true
autorestart=true
stderr_logfile=/var/log/aws-django-redis/gunicorn.err.log
stdout_logfile=/var/log/aws-django-redis/gunicorn.out.log
user=ubuntu
" | sudo tee /etc/supervisor/conf.d/aws-django-redis.conf

# Supervisor Configuration for Celery
echo "[program:celery]
command=$(pwd)/venv/bin/celery -A my_schedular worker --loglevel=info
directory=$(pwd)
autostart=true
autorestart=true
stderr_logfile=/var/log/aws-django-redis/celery.err.log
stdout_logfile=/var/log/aws-django-redis/celery.out.log
user=ubuntu
" | sudo tee /etc/supervisor/conf.d/celery.conf

# Reread and update Supervisor
sudo supervisorctl reread
sudo supervisorctl update
sudo supervisorctl restart all

# Set up Nginx to proxy to Gunicorn
echo "server {
    listen 80;
    server_name <your_vm_ip>;

    location / {
        proxy_pass http://127.0.01:8000;
        proxy_set_header Host \$host;
        proxy_set_header X-Real-IP \$remote_addr;
        proxy_set_header X-Forwarded-For \$proxy_add_x_forwarded_for;
        proxy_set_header X-Forwarded-Proto \$scheme;
    }

    error_log  /var/log/nginx/aws-django-redis_error.log;
    access_log /var/log/nginx/aws-django-redis_access.log;
}" | sudo tee /etc/nginx/sites-available/aws-django-redis

# Enable the Nginx site configuration
sudo ln -s /etc/nginx/sites-available/aws-django-redis /etc/nginx/sites-enabled/
sudo rm /etc/nginx/sites-enabled/default

# Test Nginx configuration and restart Nginx
sudo nginx -t
sudo systemctl restart nginx
Results
This setup is available on GitHub on the dev branch, have a look and open a PR.
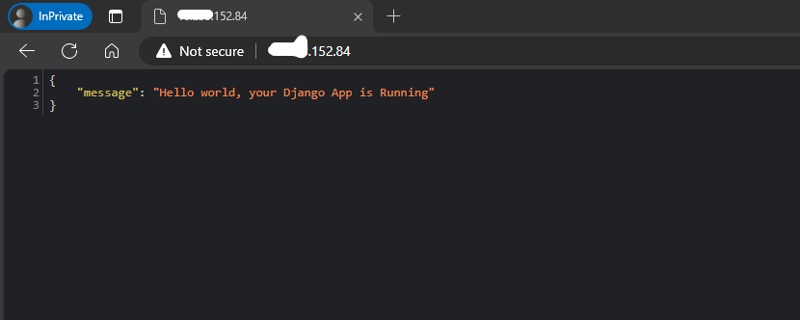
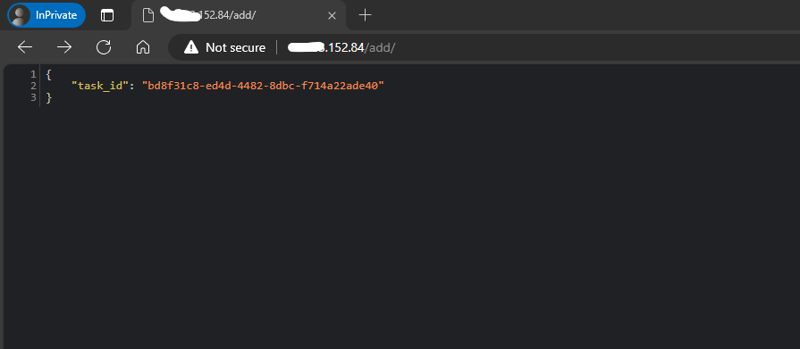
Pricing and Setup Comparison Table
| Feature / Service | Self-Managed on EC2 (Free Tier) | Fully Managed AWS Services |
|---|---|---|
| EC2 Instance | t2.micro - Free for 750 hrs/mo | Not applicable |
| Application Hosting | Self-managed Django & Gunicorn | AWS App Runner (automatic scaling) |
| Database | Self-managed PostgreSQL | Amazon RDS (managed relational DB) |
| In-Memory Cache | Redis on the same EC2 | Amazon ElastiCache (Redis) |
| Task Queue | Celery with Redis | AWS managed queues (e.g., SQS) |
| Load Balancer | Nginx (self-setup) | AWS Load Balancer (integrated) |
| Static Files Storage | Serve via Nginx | Amazon S3 (highly scalable storage) |
| Log Management | Manual setup (Supervisor, Nginx, Redis) | AWS CloudWatch (logs and monitoring) |
| Security | Manual configurations | AWS Security Groups, IAM roles |
| Scaling | Manual scaling | Automatic scaling |
| Maintenance | Manual updates and patches | Managed by AWS |
| Pricing | Minimal (mostly within free tier) | Higher due to managed services |
비용 요약
- AWS 프리 티어를 사용한 설정: 무료 티어 한도 내에서는 주로 무료입니다. 사용량이 무료 등급 허용량을 초과하는 경우 잠재적인 비용이 발생할 수 있습니다.
- 모든 유료 AWS 서비스를 사용한 설정: 데이터 전송 및 저장에 대한 추가 비용과 함께 EC2, Elasticache 및 RDS용 t2.micro 인스턴스 1개를 지속적으로 운영한다는 가정 하에 월 약 $41.34로 예상됩니다.
참고: 가격은 대략적인 것이며 지역 및 특정 AWS 가격 변동에 따라 달라질 수 있습니다. 특정 요구 사항에 대한 가장 정확한 비용 견적을 얻으려면 항상 현재 AWS 가격 페이지를 확인하세요.
분석
- EC2에서 자체 관리: 이 접근 방식은 특히 AWS 무료 등급을 사용할 때 비용 효율적입니다. 더 많은 설정과 수동 유지 관리가 필요하지만 환경에 대한 완전한 제어 기능을 제공합니다. 소규모 또는 저예산 프로젝트에 적합합니다.
- 완전 관리형 AWS 서비스: 운영 비용은 증가하지만 인프라 관리, 확장 및 유지 관리와 관련된 워크로드는 줄어듭니다. 대규모 애플리케이션에 적합하거나 운영 단순성과 확장이 우선시되는 경우에 적합합니다.
요약
아아아아아아아!!! 아쉽게도 이에 대한 요약은 없습니다. 예, 더 나은 이해를 위해 다시 돌아가세요.
결론
배움의 길은 길고 어려워 보일 수 있지만, 한 번에 하나의 리소스씩 지속적으로 지식을 추가하면 목표와 목표를 달성할 수 있습니다.
위 내용은 Django 앱 배포: 외부 Celery가 포함된 EC 앱 실행기의 상세 내용입니다. 자세한 내용은 PHP 중국어 웹사이트의 기타 관련 기사를 참조하세요!


