전자상거래 상점을 위해 Nuxt.js에서 제품 가져오기 및 표시
- PHPz원래의
- 2024-07-24 11:01:531101검색

이 게시물은 내 웹노트에서 확인해보세요!
마지막으로 흥미로운 점은 UI를 마친 후 주요 기능 구현으로 이동할 수 있다는 것입니다. 따라서 이 기사에서는 서버에서 데이터를 가져와 Pinia 저장소에 저장하는 방법에 대해 설명하고 상점 목록과 제품 페이지를 동적으로 렌더링할 것입니다. 평소와 같이 수행해야 할 작업 계획을 정의하는 것부터 시작하겠습니다.
- 간단한 Axios 모듈 구성
- 제품 목록 가져오기 및 렌더링
- Nuxt.js를 사용하여 제품 동적 페이지 설정
이제 명확한 계획이 세워졌으니 이제 소매를 걷어붙이고 일을 시작할 시간입니다. 서버에서 데이터를 가져오기 위한 백본 역할을 하는 Axios 모듈을 구성하는 것부터 시작하겠습니다.
1. 간단한 Axios 모듈 구성
이전 게시물 중 하나인 "Nuxt.js로 전자상거래 스토어 구축: 프로젝트 설정을 위한 단계별 가이드"에서 이미 axios를 설치했으므로 이제 이를 구성하고 사용 준비를 할 수 있습니다.
루트 디렉터리 안에 "http" 폴더를 만들고, http 폴더 안에 http-client.js 파일을 만듭니다. 필요한 경우 기본 Axios 설정 및 인터셉터를 위한 파일이 될 것이지만 지금은 기본 URL로만 Axios를 등록하겠습니다.
import axios from "axios";

export const HTTP = axios.create({
    baseURL: "http://localhost:3005",
});
"http" 폴더 안에 별도의 앱 기능을 위해 axios 서비스를 저장할 "services" 폴더를 생성합니다. "services" 디렉토리 내부에 첫 번째 서비스 products.service.js를 생성하면 제품에 대한 REST API 서비스가 저장됩니다.
Axios를 사용하여 처음 두 개의 get 함수를 추가할 수 있습니다. 이를 위해서는 HTTP를 가져오고 요청에서 데이터를 반환하는 화살표 함수를 생성하기만 하면 됩니다.
import { HTTP } from '../http-client';

export const getAllProducts = () =>
    HTTP.get('/products').then(({data}) => data )

export const getProductById = (id) =>
    HTTP.get(`/products/${id}`).then(({data}) => data )
백엔드 서버를 모방하기 위해 "json-server"도 설치하고 제품 배열로 미리 채웠던 것을 기억하시는 것처럼 제품 데이터를 업데이트하고 다음과 같은 더 많은 제품을 생성할 수 있습니다.
{
    "id": "1",
    "name": "Product 1",
    "instagram": "https://instagram.com",
    "pinterest": "https://pinterest.com",
    "image": "https://images.pexels.com/photos/2081332/pexels-photo-2081332.jpeg?auto=compress&cs=tinysrgb&w=600",
    "description": "Lorem ipsum dolor sit amet, consectetur adipiscing elit, sed do eiusmod tempor incididunt ut labore et dolore magna aliqua. Ut enim ad minim veniam, quis nostrud exercitation ullamco laboris nisi ut aliquip ex ea commodo consequat. Duis aute irure dolor in reprehenderit in voluptate velit esse cillum dolore eu fugiat nulla pariatur. Excepteur sint occaecat cupidatat non proident, sunt in culpa qui officia deserunt mollit anim id est laborum.",
    "price": 100
},
이제 제품 데이터와 해당 서버 API를 호출하는 기능을 갖춘 즉시 사용 가능한 개발 서버가 생겼습니다. 다음 단계는 이 데이터를 제품 페이지로 가져오는 것을 구현하는 것입니다.
2. 제품 목록 가져오기 및 렌더링
새 products.js 스토어를 만들고 서버에서 받은 제품 목록을 저장할 "productsList" 변수와 제품 페이지에 대해 별도의 제품을 저장할 "product" 변수를 추가합니다. 그런 다음 Axios 서비스를 사용하여 서버에서 데이터를 가져와 상태로 설정하는 두 가지 작업을 추가합니다. 그리고 getter를 추가하는 것을 잊지 마세요.
import { defineStore } from 'pinia';
import {
    getAllProducts,
    getProductById
} from '@/http/services/products.services';

export const useProductsStore = defineStore({
    id: 'products',
    state: () => ({
        productsList: [],
        product: null
    }),
    actions: {
        async aGetAllProducts() {
            await getAllProducts()
            .then((data) => {
                this.productsList = data;
            })
            .catch((error) => {
                console.log(error);
            })
        },
        async aGetProductById(id) {
            await getProductById(id)
            .then((data) => {
                this.product = JSON.parse(JSON.stringify(data));
            })
            .catch((error) => {
                console.log(error);
            })
        }
    },
    getters: {
        gProductsList: (state) => state.productsList,
        gProduct: (state) => state.product
    }
})
멋지네요. 컴포넌트 내부에서 이 저장소를 사용할 수 있습니다.
쇼핑 페이지를 열고 제품 스토어를 가져온 다음 생성된 수명 주기 후크 내에서(전체 페이지를 렌더링하기 전에 데이터를 가져옵니다) "aGetAllProducts" 작업을 호출합니다.
created() {
    const productsStore = useProductsStore();
    productsStore.aGetAllProducts();
}
그런 다음 getter를 사용하여 제품 목록을 가져오고 렌더링할 수 있습니다. 제품 목록 데이터를 제품 카드 목록으로 보내야 합니다.
<div class="products__content">
    <ProductCard v-for="product in productsStore.gProductsList" :key="product.name" :product="product" />
</div>
이제 "json-server --watch db/db.json --port 3005" 명령을 사용하여 json-server를 시작해야 합니다. 그리고 "npm run dev" 명령을 사용하여 별도의 PowerShell에서 Nuxt 개발 서버를 시작합니다.
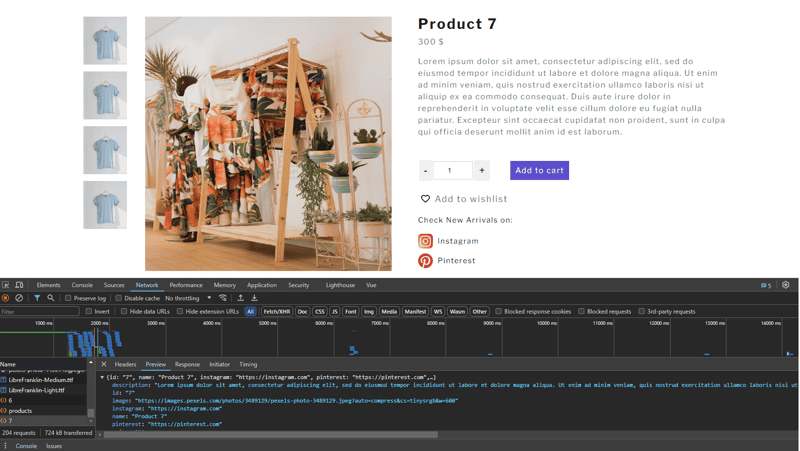
이제 쇼핑 페이지를 방문하거나 새로 고친 후 json 서버에 제품 데이터에 대한 요청을 보내고 해당 데이터를 페이지에 렌더링합니다.

멋지네요. 하지만 문제는 제품 카드를 클릭하면 정적 데이터가 있는 제품 페이지로 리디렉션된다는 것입니다. 각 페이지에는 동일한 정보와 이미지가 표시됩니다. 이 문제를 해결하려면 다음 단계로 넘어가세요.
3. Nuxt.js를 사용하여 제품 동적 페이지 설정
제품 페이지를 구축할 때 해당 페이지를 동적으로 만들기 위해 폴더 이름을 대괄호로 지정했습니다. 이제 제품 카드를 클릭하면 URL에 제품 ID가 있는 쇼핑 페이지로 리디렉션됩니다. 이는 Nuxt가 폴더 이름 내부의 "product"를 해당 ID로 대체하지만 페이지는 여전히 정적이기 때문입니다. 이를 변경하려면 URL에서 제품 ID를 가져온 다음 해당 ID를 사용하여 서버에서 제품 데이터를 가져와야 합니다.
서버에서 데이터를 가져오는 기능을 이미 만들었으므로 이제 제품 페이지를 업데이트해야 합니다. 이를 위해 [product] 폴더 내에서 index.vue 파일을 열고 제품 스토어를 가져온 다음, 라우터 매개변수를 가져오고 "aGetProductById" 작업에 다른 매개변수로 보낼 구성요소 내에 생성된 후크를 추가하세요.
created() {
    const productId = this.$route.params.product;
    this.productsStore.aGetProductById(productId);
}
또한 서버에서 받은 데이터를 렌더링하려면 템플릿(제목, 가격, 설명, 이미지 ...)을 업데이트해야 합니다.
이미지:
<div class="product-info__image--main">
    <img :src="productsStore.gProduct?.image" alt="product image">
</div>
Product Description:
<h1 class="product-info__content--title">{{ productsStore.gProduct?.name }}</h1>
<p class="product-info__content--price">{{ productsStore.gProduct?.price }} $</p>
<p class="product-info__content--description">{{ productsStore.gProduct?.description }}</p>
Now, let's restart the Nuxt dev server and check the result by clicking on different product cards. We should see another product each time.

In this article, we explored the process of fetching and presenting products in a Nuxt.js e-commerce application. We started by configuring the Axios module, which served as the backbone for making API requests to our server.
Keep in mind that these code examples are only the top of the iceberg. Feel free to experiment with advanced approaches, add new features, and optimize your codebase as you improve your e-commerce application to better suit the demands of your customers and company.
If you would need a source code for this tutorial you can get it here.
위 내용은 전자상거래 상점을 위해 Nuxt.js에서 제품 가져오기 및 표시의 상세 내용입니다. 자세한 내용은 PHP 중국어 웹사이트의 기타 관련 기사를 참조하세요!

