


显示有限的接口到外部
当发布python第三方package时,并不希望代码中所有的函数或者class可以被外部import,在__init__.py中添加__all__属性,该list中填写可以import的类或者函数名, 可以起到限制的import的作用, 防止外部import其他函数或者类。
#!/usr/bin/env python
# -*- coding: utf-8 -*-
from base import APIBase
from client import Client
from decorator import interface, export, stream
from server import Server
from storage import Storage
from util import (LogFormatter, disable_logging_to_stderr,
            enable_logging_to_kids, info)
__all__ = ['APIBase', 'Client', 'LogFormatter', 'Server',
      'Storage', 'disable_logging_to_stderr', 'enable_logging_to_kids',
      'export', 'info', 'interface', 'stream']
with的魔力
with语句需要支持上下文管理协议的对象, 上下文管理协议包含__enter__和__exit__两个方法。 with语句建立运行时上下文需要通过这两个方法执行进入和退出操作。
其中上下文表达式是跟在with之后的表达式, 该表达式返回一个上下文管理对象。
# 常见with使用场景
with open("test.txt", "r") as my_file: # 注意, 是__enter__()方法的返回值赋值给了my_file,
  for line in my_file:
    print line
知道具体原理,我们可以自定义支持上下文管理协议的类,类中实现__enter__和__exit__方法。
#!/usr/bin/env python
# -*- coding: utf-8 -*-
class MyWith(object):
  def __init__(self):
    print "__init__ method"
  def __enter__(self):
    print "__enter__ method"
    return self # 返回对象给as后的变量
  def __exit__(self, exc_type, exc_value, exc_traceback):
    print "__exit__ method"
    if exc_traceback is None:
      print "Exited without Exception"
      return True
    else:
      print "Exited with Exception"
      return False
def test_with():
  with MyWith() as my_with:
    print "running my_with"
  print "------分割线-----"
  with MyWith() as my_with:
    print "running before Exception"
    raise Exception
    print "running after Exception"
if __name__ == '__main__':
  test_with()
执行结果如下:
__init__ method
__enter__ method
running my_with
__exit__ method
Exited without Exception
------分割线-----
__init__ method
__enter__ method
running before Exception
__exit__ method
Exited with Exception
Traceback (most recent call last):
 File "bin/python", line 34, in <module>
  exec(compile(__file__f.read(), __file__, "exec"))
 File "test_with.py", line 33, in <module>
  test_with()
 File "test_with.py", line 28, in test_with
  raise Exception
Exception
证明了会先执行__enter__方法, 然后调用with内的逻辑, 最后执行__exit__做退出处理, 并且, 即使出现异常也能正常退出
filter的用法
相对filter而言, map和reduce使用的会更频繁一些, filter正如其名字, 按照某种规则过滤掉一些元素。
#!/usr/bin/env python
# -*- coding: utf-8 -*-
lst = [1, 2, 3, 4, 5, 6]
# 所有奇数都会返回True, 偶数会返回False被过滤掉
print filter(lambda x: x % 2 != 0, lst)
#输出结果
[1, 3, 5]
一行作判断
当条件满足时, 返回的为等号后面的变量, 否则返回else后语句。
lst = [1, 2, 3]
new_lst = lst[0] if lst is not None else None
print new_lst
# 打印结果
1
装饰器之单例
使用装饰器实现简单的单例模式
# 单例装饰器
def singleton(cls):
  instances = dict() # 初始为空
  def _singleton(*args, **kwargs):
    if cls not in instances: #如果不存在, 则创建并放入字典
      instances[cls] = cls(*args, **kwargs)
    return instances[cls]
  return _singleton
@singleton
class Test(object):
  pass
if __name__ == '__main__':
  t1 = Test()
  t2 = Test()
  # 两者具有相同的地址
  print t1, t2
staticmethod装饰器
类中两种常用的装饰, 首先区分一下他们:
普通成员函数, 其中第一个隐式参数为对象
- classmethod装饰器, 类方法(给人感觉非常类似于OC中的类方法), 其中第一个隐式参数为类
- staticmethod装饰器, 没有任何隐式参数. python中的静态方法类似与C++中的静态方法
#!/usr/bin/env python

# -*- coding: utf-8 -*-
class A(object):
  # 普通成员函数
  def foo(self, x):
    print "executing foo(%s, %s)" % (self, x)
  @classmethod  # 使用classmethod进行装饰
  def class_foo(cls, x):
    print "executing class_foo(%s, %s)" % (cls, x)
  @staticmethod # 使用staticmethod进行装饰
  def static_foo(x):
    print "executing static_foo(%s)" % x
def test_three_method():
  obj = A()
  # 直接调用噗通的成员方法
  obj.foo("para") # 此处obj对象作为成员函数的隐式参数, 就是self
  obj.class_foo("para") # 此处类作为隐式参数被传入, 就是cls
  A.class_foo("para") #更直接的类方法调用
  obj.static_foo("para") # 静态方法并没有任何隐式参数, 但是要通过对象或者类进行调用
  A.static_foo("para")
if __name__ == '__main__':
  test_three_method()

# 函数输出
executing foo(<__main__.A object at 0x100ba4e10>, para)
executing class_foo(<class '__main__.A'>, para)
executing class_foo(<class '__main__.A'>, para)
executing static_foo(para)
executing static_foo(para)
property装饰器
定义私有类属性
将property与装饰器结合实现属性私有化(更简单安全的实现get和set方法)。
#python内建函数
property(fget=None, fset=None, fdel=None, doc=None)
fget是获取属性的值的函数,fset是设置属性值的函数,fdel是删除属性的函数,doc是一个字符串(像注释一样)。从实现来看,这些参数都是可选的。
property有三个方法getter(), setter()和delete() 来指定fget, fset和fdel。 这表示以下这行:
class Student(object):
  @property #相当于property.getter(score) 或者property(score)
  def score(self):
    return self._score
  @score.setter #相当于score = property.setter(score)
  def score(self, value):
    if not isinstance(value, int):
      raise ValueError('score must be an integer!')
    if value < 0 or value > 100:
      raise ValueError('score must between 0 ~ 100!')
    self._score = value
iter魔法
通过yield和__iter__的结合,我们可以把一个对象变成可迭代的
通过__str__的重写, 可以直接通过想要的形式打印对象
#!/usr/bin/env python
# -*- coding: utf-8 -*-
class TestIter(object):
  def __init__(self):
    self.lst = [1, 2, 3, 4, 5]
  def read(self):
    for ele in xrange(len(self.lst)):
      yield ele
  def __iter__(self):
    return self.read()
  def __str__(self):
    return ','.join(map(str, self.lst))

  __repr__ = __str__
def test_iter():
  obj = TestIter()
  for num in obj:
    print num
  print obj
if __name__ == '__main__':
  test_iter()
神奇partial
partial使用上很像C++中仿函数(函数对象)。
在stackoverflow给出了类似与partial的运行方式:
def partial(func, *part_args):
  def wrapper(*extra_args):
    args = list(part_args)
    args.extend(extra_args)
    return func(*args)
  return wrapper
利用用闭包的特性绑定预先绑定一些函数参数,返回一个可调用的变量, 直到真正的调用执行:
#!/usr/bin/env python
# -*- coding: utf-8 -*-
from functools import partial
def sum(a, b):
  return a + b
def test_partial():
  fun = partial(sum, 2)  # 事先绑定一个参数, fun成为一个只需要一个参数的可调用变量
  print fun(3) # 实现执行的即是sum(2, 3)
if __name__ == '__main__':
  test_partial()

# 执行结果
5
神秘eval
eval我理解为一种内嵌的python解释器(这种解释可能会有偏差), 会解释字符串为对应的代码并执行, 并且将执行结果返回。
看一下下面这个例子:
#!/usr/bin/env python
# -*- coding: utf-8 -*-
def test_first():
  return 3
def test_second(num):
  return num
action = { # 可以看做是一个sandbox
    "para": 5,
    "test_first" : test_first,
    "test_second": test_second
    }
def test_eavl():
  condition = "para == 5 and test_second(test_first) > 5"
  res = eval(condition, action) # 解释condition并根据action对应的动作执行
  print res
if __name__ == '_
exec
exec在Python中会忽略返回值, 总是返回None, eval会返回执行代码或语句的返回值
exec和eval在执行代码时, 除了返回值其他行为都相同
在传入字符串时, 会使用compile(source, '
#!/usr/bin/env python
# -*- coding: utf-8 -*-
def test_first():
  print "hello"
def test_second():
  test_first()
  print "second"
def test_third():
  print "third"
action = {
    "test_second": test_second,
    "test_third": test_third
    }
def test_exec():
  exec "test_second" in action
if __name__ == '__main__':
  test_exec() # 无法看到执行结果
getattr
getattr(object, name[, default])返回对象的命名属性,属性名必须是字符串。如果字符串是对象的属性名之一,结果就是该属性的值。例如, getattr(x, ‘foobar') 等价于 x.foobar。 如果属性名不存在,如果有默认值则返回默认值,否则触发 AttributeError 。
# 使用范例
class TestGetAttr(object):
  test = "test attribute"
  def say(self):
    print "test method"
def test_getattr():
  my_test = TestGetAttr()
  try:
    print getattr(my_test, "test")
  except AttributeError:
    print "Attribute Error!"
  try:
    getattr(my_test, "say")()
  except AttributeError: # 没有该属性, 且没有指定返回值的情况下
    print "Method Error!"
if __name__ == '__main__':
  test_getattr()

# 输出结果
test attribute
test method
命令行处理
def process_command_line(argv):
  """
  Return a 2-tuple: (settings object, args list).
  `argv` is a list of arguments, or `None` for ``sys.argv[1:]``.
  """
  if argv is None:
    argv = sys.argv[1:]
  # initialize the parser object:
  parser = optparse.OptionParser(
    formatter=optparse.TitledHelpFormatter(width=78),
    add_help_option=None)
  # define options here:
  parser.add_option(   # customized description; put --help last
    '-h', '--help', action='help',
    help='Show this help message and exit.')
  settings, args = parser.parse_args(argv)
  # check number of arguments, verify values, etc.:
  if args:
    parser.error('program takes no command-line arguments; '
           '"%s" ignored.' % (args,))
  # further process settings & args if necessary
  return settings, args
def main(argv=None):
  settings, args = process_command_line(argv)
  # application code here, like:
  # run(settings, args)
  return 0    # success
if __name__ == '__main__':
  status = main()
  sys.exit(status)
读写csv文件
# 从csv中读取文件, 基本和传统文件读取类似
import csv
with open('data.csv', 'rb') as f:
  reader = csv.reader(f)
  for row in reader:
    print row
# 向csv文件写入
import csv
with open( 'data.csv', 'wb') as f:
  writer = csv.writer(f)
  writer.writerow(['name', 'address', 'age']) # 单行写入
  data = [
      ( 'xiaoming ','china','10'),
      ( 'Lily', 'USA', '12')]
  writer.writerows(data) # 多行写入
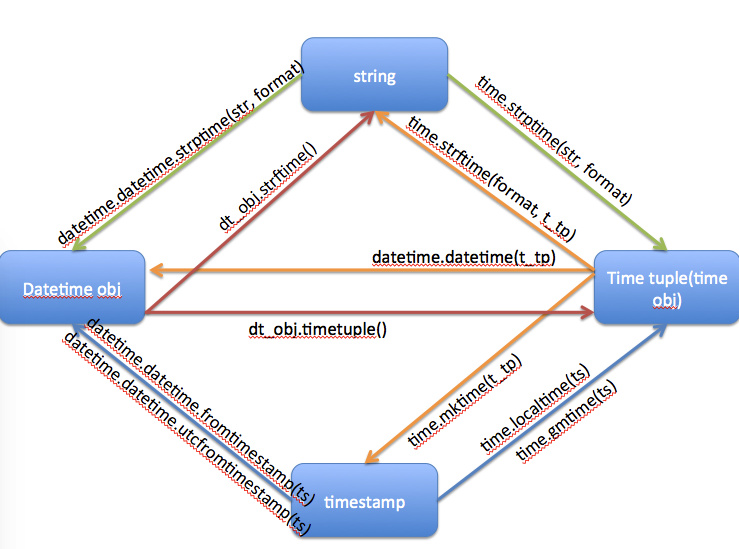
只发一张网上的图, 然后查文档就好了, 这个是记不住的
字符串格式化
一个非常好用, 很多人又不知道的功能:
>>> name = "andrew"
>>> "my name is {name}".format(name=name)
'my name is andrew'

 파이썬 : 게임, Guis 등Apr 13, 2025 am 12:14 AM
Python은 게임 및 GUI 개발에서 탁월합니다. 1) 게임 개발은 Pygame을 사용하여 드로잉, 오디오 및 기타 기능을 제공하며 2D 게임을 만드는 데 적합합니다. 2) GUI 개발은 Tkinter 또는 PYQT를 선택할 수 있습니다. Tkinter는 간단하고 사용하기 쉽고 PYQT는 풍부한 기능을 가지고 있으며 전문 개발에 적합합니다.
 Python vs. C : 응용 및 사용 사례가 비교되었습니다Apr 12, 2025 am 12:01 AM
Python은 데이터 과학, 웹 개발 및 자동화 작업에 적합한 반면 C는 시스템 프로그래밍, 게임 개발 및 임베디드 시스템에 적합합니다. Python은 단순성과 강력한 생태계로 유명하며 C는 고성능 및 기본 제어 기능으로 유명합니다.
 2 시간의 파이썬 계획 : 현실적인 접근Apr 11, 2025 am 12:04 AM
2 시간 이내에 Python의 기본 프로그래밍 개념과 기술을 배울 수 있습니다. 1. 변수 및 데이터 유형을 배우기, 2. 마스터 제어 흐름 (조건부 명세서 및 루프), 3. 기능의 정의 및 사용을 이해하십시오. 4. 간단한 예제 및 코드 스 니펫을 통해 Python 프로그래밍을 신속하게 시작하십시오.
 파이썬 : 기본 응용 프로그램 탐색Apr 10, 2025 am 09:41 AM
Python은 웹 개발, 데이터 과학, 기계 학습, 자동화 및 스크립팅 분야에서 널리 사용됩니다. 1) 웹 개발에서 Django 및 Flask 프레임 워크는 개발 프로세스를 단순화합니다. 2) 데이터 과학 및 기계 학습 분야에서 Numpy, Pandas, Scikit-Learn 및 Tensorflow 라이브러리는 강력한 지원을 제공합니다. 3) 자동화 및 스크립팅 측면에서 Python은 자동화 된 테스트 및 시스템 관리와 같은 작업에 적합합니다.
 2 시간 안에 얼마나 많은 파이썬을 배울 수 있습니까?Apr 09, 2025 pm 04:33 PM
2 시간 이내에 파이썬의 기본 사항을 배울 수 있습니다. 1. 변수 및 데이터 유형을 배우십시오. 이를 통해 간단한 파이썬 프로그램 작성을 시작하는 데 도움이됩니다.
 10 시간 이내에 프로젝트 및 문제 중심 방법에서 컴퓨터 초보자 프로그래밍 기본 사항을 가르치는 방법?Apr 02, 2025 am 07:18 AM
10 시간 이내에 컴퓨터 초보자 프로그래밍 기본 사항을 가르치는 방법은 무엇입니까? 컴퓨터 초보자에게 프로그래밍 지식을 가르치는 데 10 시간 밖에 걸리지 않는다면 무엇을 가르치기로 선택 하시겠습니까?
 중간 독서를 위해 Fiddler를 사용할 때 브라우저에서 감지되는 것을 피하는 방법은 무엇입니까?Apr 02, 2025 am 07:15 AM
Fiddlerevery Where를 사용할 때 Man-in-the-Middle Reading에 Fiddlereverywhere를 사용할 때 감지되는 방법 ...
 Python 3.6에 피클 파일을로드 할 때 '__builtin__'모듈을 찾을 수없는 경우 어떻게해야합니까?Apr 02, 2025 am 07:12 AM
Python 3.6에 피클 파일로드 3.6 환경 보고서 오류 : modulenotfounderror : nomodulename ...


핫 AI 도구

Undresser.AI Undress
사실적인 누드 사진을 만들기 위한 AI 기반 앱

AI Clothes Remover
사진에서 옷을 제거하는 온라인 AI 도구입니다.

Undress AI Tool
무료로 이미지를 벗다

Clothoff.io
AI 옷 제거제

AI Hentai Generator
AI Hentai를 무료로 생성하십시오.

인기 기사
뜨거운 도구

스튜디오 13.0.1 보내기
강력한 PHP 통합 개발 환경

Dreamweaver Mac版
시각적 웹 개발 도구

WebStorm Mac 버전
유용한 JavaScript 개발 도구

SublimeText3 Mac 버전
신 수준의 코드 편집 소프트웨어(SublimeText3)

mPDF
mPDF는 UTF-8로 인코딩된 HTML에서 PDF 파일을 생성할 수 있는 PHP 라이브러리입니다. 원저자인 Ian Back은 자신의 웹 사이트에서 "즉시" PDF 파일을 출력하고 다양한 언어를 처리하기 위해 mPDF를 작성했습니다. HTML2FPDF와 같은 원본 스크립트보다 유니코드 글꼴을 사용할 때 속도가 느리고 더 큰 파일을 생성하지만 CSS 스타일 등을 지원하고 많은 개선 사항이 있습니다. RTL(아랍어, 히브리어), CJK(중국어, 일본어, 한국어)를 포함한 거의 모든 언어를 지원합니다. 중첩된 블록 수준 요소(예: P, DIV)를 지원합니다.

