방문자 모드
Visitor Pattern에서는 요소 클래스의 실행 알고리즘을 변경하는 Visitor 클래스를 사용합니다. 이러한 방식으로 방문자가 변경됨에 따라 요소의 실행 알고리즘이 변경될 수 있습니다. 이러한 유형의 디자인 패턴은 행동 패턴입니다. 스키마에 따르면 방문자 개체가 요소 개체에 대한 작업을 처리할 수 있도록 요소 개체가 방문자 개체를 수락했습니다.
소개
의도: 주로 데이터 구조와 데이터 작업을 분리합니다.
주로 해결되는 문제: 안정적인 데이터 구조 및 불안정한 연산 결합 문제.
사용 시기: 객체 구조의 객체에 대해 서로 다른 다양한 작업을 수행해야 하며 이러한 작업이 이러한 객체의 클래스를 "오염"시키는 것을 방지해야 합니다. 방문자 패턴을 사용하여 이를 캡슐화합니다. 수업.
해결 방법: 방문한 수업에서 방문자를 받을 수 있도록 외부 인터페이스를 추가합니다.
키 코드: 데이터베이스 클래스에는 방문자를 수락하고 자체 참조를 방문자에게 전달하는 메서드가 있습니다.
적용 예: 당신은 친구 집에 손님이고, 당신은 방문자이며, 친구가 당신의 방문을 수락하고, 친구의 설명을 전달한 다음, 친구의 설명을 판단하는 것이 방문자 모드입니다.
장점: 1. 단일 책임 원칙을 준수합니다. 2. 확장성이 뛰어납니다. 3. 유연성.
단점: 1. 특정 요소는 방문자에게 세부 정보를 공개하므로 Dimit 원칙을 위반합니다. 2. 특정 요소를 변경하는 것은 어렵습니다. 3. 종속성 반전 원칙을 위반하고 추상화 대신 구체적인 클래스에 의존합니다.
사용 시나리오: 1. 객체 구조의 객체에 해당하는 클래스는 거의 변경되지 않지만 이 객체 구조에 대한 새로운 작업을 정의해야 하는 경우가 많습니다. 2. 객체 구조의 객체에 대해 다양하고 관련되지 않은 작업을 수행해야 하며 이러한 작업이 이러한 객체의 클래스를 "오염"시키는 것을 방지해야 하며 새 작업을 추가할 때 이러한 클래스를 수정하고 싶지 않습니다.
참고: 방문자는 기능을 통합하고 보고서, UI, 인터셉터 및 필터를 만들 수 있습니다.
Implementation
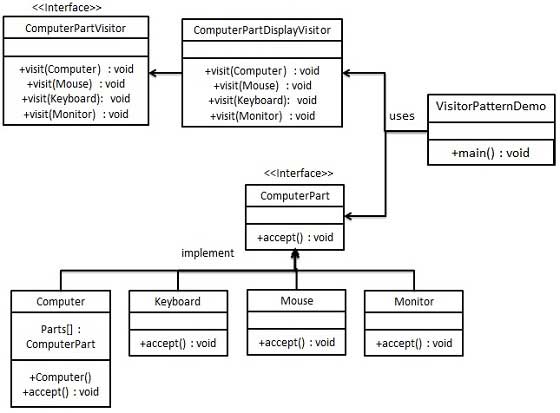
허용된 작업을 정의하는 ComputerPart 인터페이스를 만듭니다. Keyboard, Mouse, Monitor 및 Computer는 ComputerPart 인터페이스를 구현하는 엔터티 클래스입니다. 방문자 클래스의 작업을 정의하는 또 다른 인터페이스 ComputerPartVisitor를 정의하겠습니다. 컴퓨터 엔터티 방문자를 사용하여 해당 작업을 수행합니다.
VisitorPatternDemo, 데모 클래스에서는 Computer, ComputerPartVisitor 클래스를 사용하여 방문자 패턴의 사용법을 보여줍니다.

1단계
요소를 나타내는 인터페이스를 정의합니다.
ComputerPart.java
public interface class ComputerPart {
   public void accept(ComputerPartVisitor computerPartVisitor);
}
2단계
위 클래스를 확장하는 엔터티 클래스를 만듭니다.
keyboard.java
public class Keyboard  implements ComputerPart {

   @Override
   public void accept(ComputerPartVisitor computerPartVisitor) {
      computerPartVisitor.visit(this);
   }
}
monitor.java
public class Monitor  implements ComputerPart {

   @Override
   public void accept(ComputerPartVisitor computerPartVisitor) {
      computerPartVisitor.visit(this);
   }
}
mouse.java
public class Mouse  implements ComputerPart {

   @Override
   public void accept(ComputerPartVisitor computerPartVisitor) {
      computerPartVisitor.visit(this);
   }
}
computer.java
public class Computer implements ComputerPart {

   ComputerPart[] parts;

   public Computer(){
      parts = new ComputerPart[] {new Mouse(), new Keyboard(), new Monitor()};
   }


   @Override
   public void accept(ComputerPartVisitor computerPartVisitor) {
      for (int i = 0; i < parts.length; i++) {
         parts[i].accept(computerPartVisitor);
      }
      computerPartVisitor.visit(this);
   }
}
step 3
방문자를 나타내는 인터페이스를 정의합니다.
ComputerPartVisitor.java
public interface ComputerPartVisitor {
	public void visit(Computer computer);
	public void visit(Mouse mouse);
	public void visit(Keyboard keyboard);
	public void visit(Monitor monitor);
}
4단계
위 클래스를 구현하는 엔터티 방문자를 만듭니다.
ComputerPartDisplayVisitor.java
public class ComputerPartDisplayVisitor implements ComputerPartVisitor {

   @Override
   public void visit(Computer computer) {
      System.out.println("Displaying Computer.");
   }

   @Override
   public void visit(Mouse mouse) {
      System.out.println("Displaying Mouse.");
   }

   @Override
   public void visit(Keyboard keyboard) {
      System.out.println("Displaying Keyboard.");
   }

   @Override
   public void visit(Monitor monitor) {
      System.out.println("Displaying Monitor.");
   }
}
5단계
ComputerPartDisplayVisitor를 사용하여 Computer의 구성 요소를 표시합니다.
VisitorPatternDemo.java
public class VisitorPatternDemo {
   public static void main(String[] args) {

      ComputerPart computer = new Computer();
      computer.accept(new ComputerPartDisplayVisitor());
   }
}
6단계
출력을 확인합니다.
rreee


