jEasyUI extension row display details
jQuery EasyUI Data Grid - Extended row display details
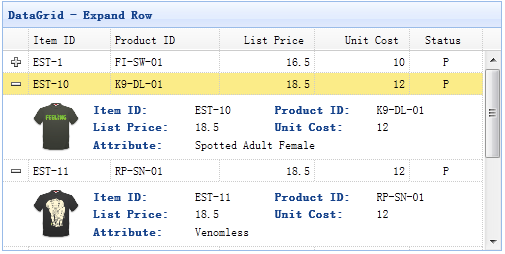
The data grid (datagrid) can change its view (view) to display different effects. Using detailed view, the datagrid can display expand buttons ("+" or "-") to the left of the data rows. Users can expand rows to display additional details.

Step 1: Create the data grid (DataGrid)
	<table id="dg" style="width:500px;height:250px"
			url="datagrid8_getdata.php"
			pagination="true" sortName="itemid" sortOrder="desc"
			title="DataGrid - Expand Row"
			singleSelect="true" fitColumns="true">
		<thead>
			<tr>
				<th field="itemid" width="60">Item ID</th>
				<th field="productid" width="80">Product ID</th>
				<th field="listprice" align="right" width="70">List Price</th>
				<th field="unitcost" align="right" width="70">Unit Cost</th>
				<th field="status" width="50" align="center">Status</th>
			</tr>
		</thead>
	</table>
Step 2: Set the detailed view for the data grid (DataGrid)
In order to use the detailed view, Please remember to quote the view script file at the head of the page.
<script type="text/javascript" src="http://www.w3cschool.cc/try/jeasyui/datagrid-detailview.js"></script>
$('#dg').datagrid({
	view: detailview,
	detailFormatter:function(index,row){
		return '<div class="ddv" style="padding:5px 0"></div>';
	},
	onExpandRow: function(index,row){
		var ddv = $(this).datagrid('getRowDetail',index).find('div.ddv');
		ddv.panel({
			border:false,
			cache:false,
			href:'datagrid21_getdetail.php?itemid='+row.itemid,
			onLoad:function(){
				$('#dg').datagrid('fixDetailRowHeight',index);
			}
		});
		$('#dg').datagrid('fixDetailRowHeight',index);
	}
});
We define the 'detailFormatter' function to tell the datagrid how to render the detailed view. In this case, we return a simple '<div>' element that will act as a container for the detailed content. Note that the details are empty. When the user clicks on the expand button ('+'), the onExpandRow event will be fired. So we can write some code to load ajax details. Finally we call the 'fixDetailRowHeight' method to fix the row height when the details are loaded.
Step 3: Server-side code
<?php
	include_once 'conn.php';

	$itemid = mysql_real_escape_string($_REQUEST['itemid']);

	$rs = mysql_query("select * from item where itemid='$itemid'");
	$item = mysql_fetch_array($rs);
?>

<table class="dv-table" border="0" style="width:100%;">
	<tr>
		<td rowspan="3" style="width:60px">
			<?php
				$aa = explode('-',$itemid);
				$serno = $aa[1];
				$img = "images/shirt$serno.gif";
				echo "<img src=\"$img\" style=\"width:60px;margin-right:20px\" />";
			?>
		</td>
		<td class="dv-label">Item ID: </td>
		<td><?php echo $item['itemid'];?></td>
		<td class="dv-label">Product ID:</td>
		<td><?php echo $item['productid'];?></td>
	</tr>
	<tr>
		<td class="dv-label">List Price: </td>
		<td><?php echo $item['listprice'];?></td>
		<td class="dv-label">Unit Cost:</td>
		<td><?php echo $item['unitcost'];?></td>
	</tr>
	<tr>
		<td class="dv-label">Attribute: </td>
		<td colspan="3"><?php echo $item['attr1'];?></td>
	</tr>
</table>
Download jQuery EasyUI instance
jeasyui-datagrid-datagrid21.zip


