jEasyUI custom paging
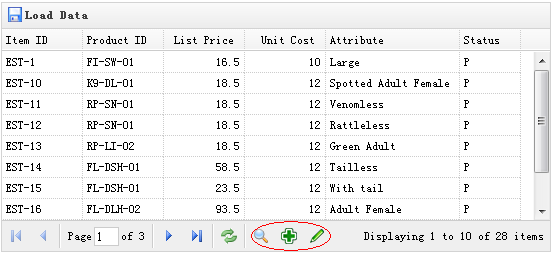
The data grid (datagrid) has a built-in paging function with very good features, and it is also quite simple to customize. In this tutorial, we will create a datagrid and add some custom buttons on the paging toolbar.

Create DataGrid
	<table id="tt" title="Load Data" class="easyui-datagrid" style="width:550px;height:250px"
			url="data/datagrid_data.json"
			iconCls="icon-save" pagination="true">
		<thead>
			<tr>
				<th field="itemid" width="80">Item ID</th>
				<th field="productid" width="80">Product ID</th>
				<th field="listprice" width="80" align="right">List Price</th>
				<th field="unitcost" width="80" align="right">Unit Cost</th>
				<th field="attr1" width="100">Attribute</th>
				<th field="status" width="60" align="center">Stauts</th>
			</tr>
		</thead>
	</table>
Please remember to set the 'pagination' property to true so that the paging toolbar will be generated.
Custom paging toolbar
	var pager = $('#tt').datagrid('getPager');    // get the pager of datagrid
	pager.pagination({
		showPageList:false,
		buttons:[{
			iconCls:'icon-search',
			handler:function(){
				alert('search');
			}
		},{
			iconCls:'icon-add',
			handler:function(){
				alert('add');
			}
		},{
			iconCls:'icon-edit',
			handler:function(){
				alert('edit');
			}
		}],
		onBeforeRefresh:function(){
			alert('before refresh');
			return true;
		}
	});
As you can see, we first get the pager object of the data grid (datagrid), and then recreate the paging (pagination). We hide the page list and add three new buttons.
Download jQuery EasyUI instance
jeasyui-datagrid-datagrid11.zip


