インテントの基本的な使い方
このセクションの紹介:
前のセクションの終了後、Android の 4 つの主要コンポーネントの学習が終了したことを意味します~。このセクションで学びたいのは、4 つの主要コンポーネント間の関係です。 ハブ - インテント (インテント)、Android 通信のブリッジ。たとえば、次の方法でアクティビティを開始できます:
- startActivity(Intent)/startActivityForResult(Intent): アクティビティを開始するには
- startService (Intent)/ bindingService(Intent): Service を開始するには
- sendBroadcast: 指定された BroadcastReceiver にブロードキャストを送信します
- また、登録時に大量の Intent-Filter を作成したことを忘れないでください。 4 つの主要コンポーネント~
さて、早速、このセクションを始めましょう!なお、Intentについては既に使ったことがあるので概念的な話は割愛します~ 古いルール、公式 API: Intent
1. 明示的 Intent と暗黙的 Intent の違い
- Explicit Intent: startActivity(new Intent(A など) のように、コンポーネント名を通じて開始するターゲット コンポーネントを指定します。 .これ、B.クラス)); 毎回開始されるコンポーネントは 1 つだけです~
- 暗黙的明示的インテント: コンポーネント名を指定せず、コンポーネントを開始するときに、インテントのアクション、データ、またはカテゴリを指定します。 AndroidManifest.xml 内の該当コンポーネントの Intent-filter を照合し、属性を満たすコンポーネントが複数ある場合は 1 つずつ照合します。 どれを開始するかを選択するためのダイアログ ボックスが表示されます~
2. インテントの 7 つのプロパティ:
1) ComponentName (コンポーネント名)

2) Action (アクション)

3) カテゴリ

4) データ、タイプ (MIME タイプ)
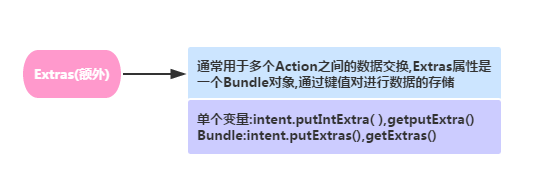
5) 追加
6) )

3明示的インテントの使用例:
これはよく使用されるので、そのまま例に進みます:
例 1: ボタンをクリックしてホーム インターフェイスに戻ります: レンダリングの実行:
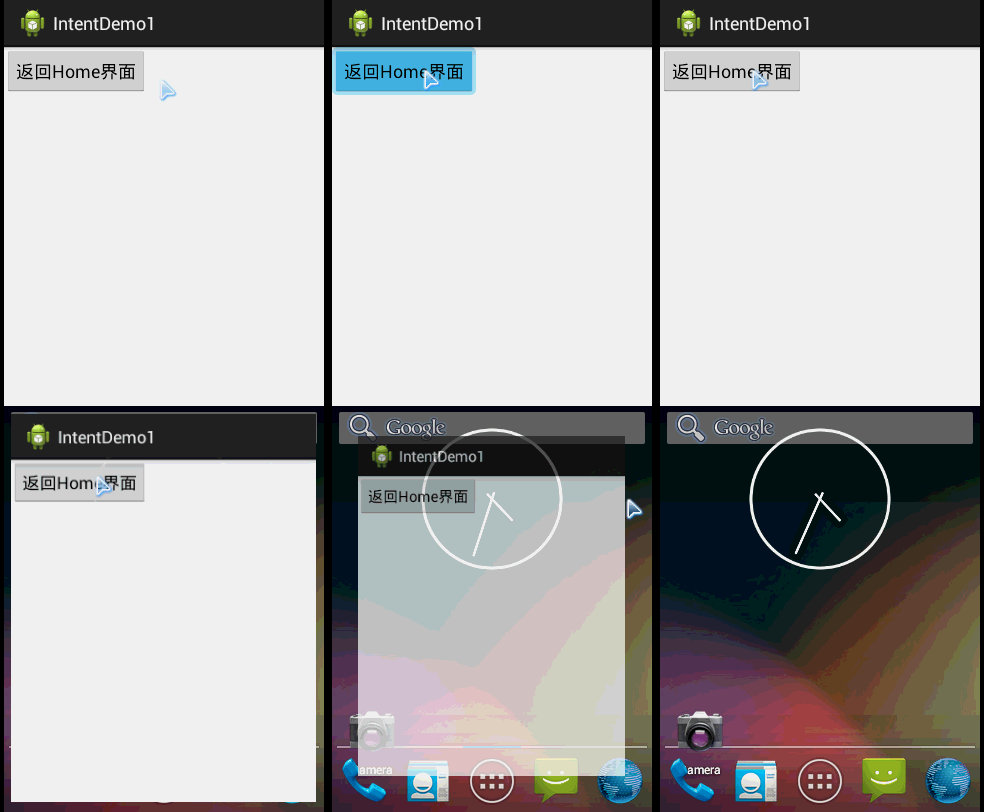
コアコード:
it.setAction(Intent.ACTION_MAIN);
it.addCategory(Intent.CATEGORY_HOME);
startActivity(it);
例 2: ボタンをクリックしてBaidu ページ: 実行中のレンダリング:
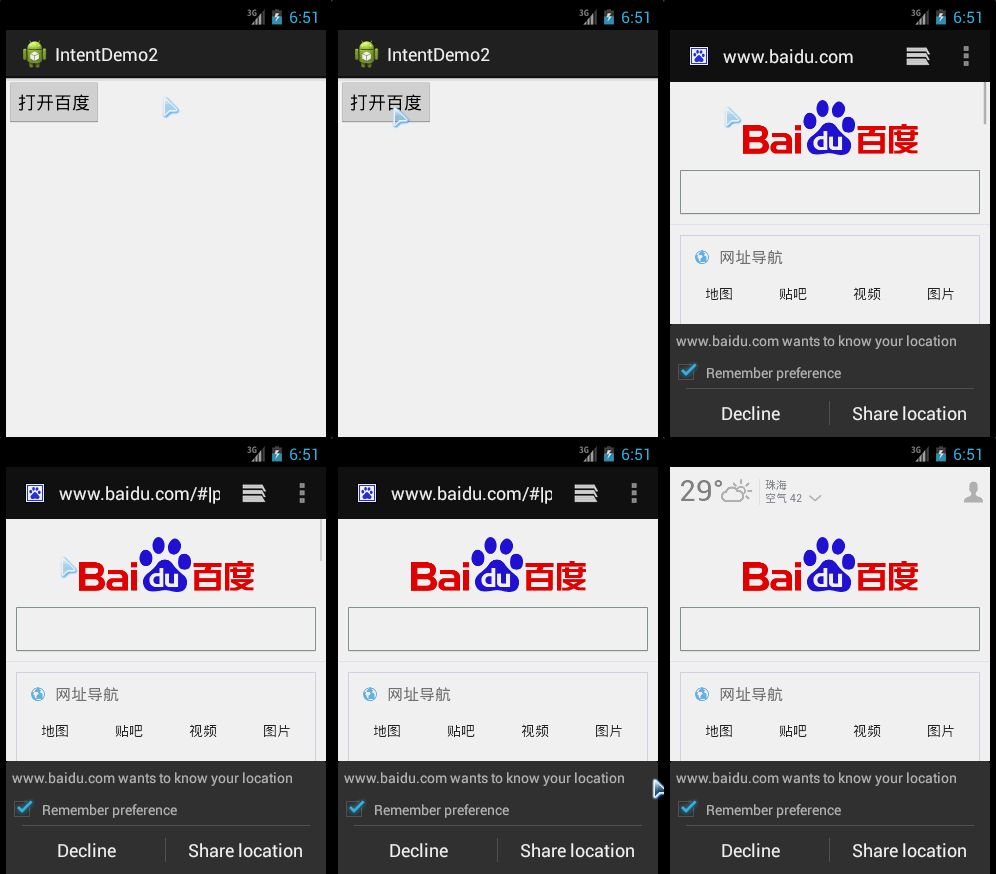
コアコード:
it.setAction(Intent.ACTION_VIEW);
it.setData(Uri.parse( "http://www.baidu.com"));
startActivity(it);
4. 暗黙的インテントの詳細な説明
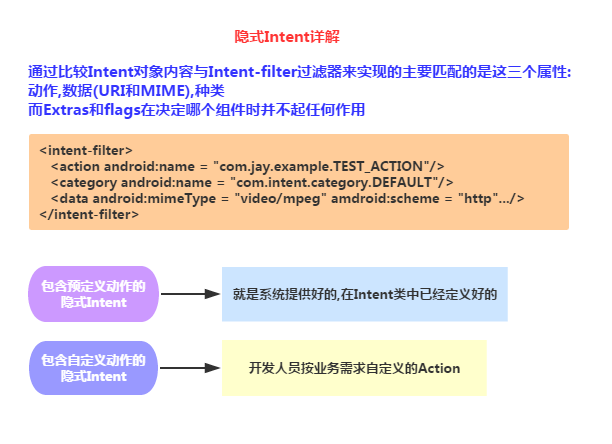
1) 事前定義されたアクションの暗黙的インテントの例:
コード例:ボタンをクリックすると、アクションが VIEW であるすべてのアクティビティがフィルタリングされ、ユーザーによってさらに選択されます:
コア コード:
ボタン内に、対応するアクティビティを含む 2 番目のアクティビティのレイアウトを作成します最初のアクティビティの click イベントに次のコードを追加します。
startActivity(it); 最後に、次のコードを追加します。 2 番目のアクティビティのインテント:
android:label="Second Activity">
<intent-filter>」
コード例: カスタムアクションとカテゴリを使用して、別のアクティビティをアクティブ化します
コアコード: 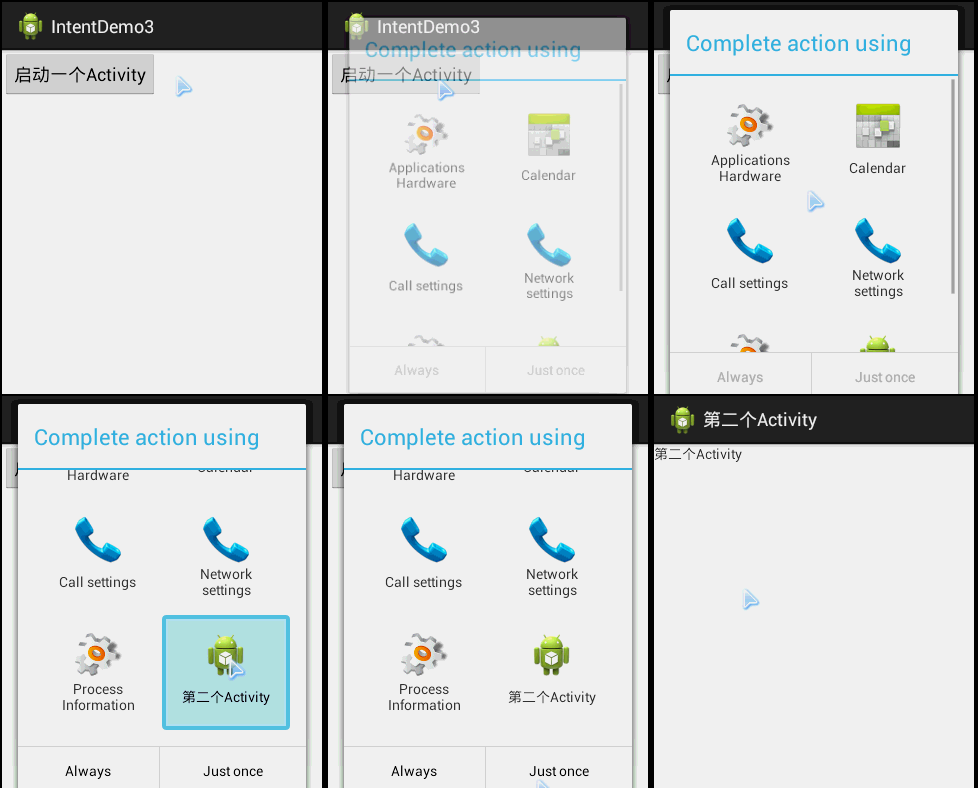 2 番目のアクティビティのレイアウトを確立します。対応するアクティビティで、最初のアクティビティのボタン クリック イベントに次のコードを追加します:
Intent it = new Intent();
it.setAction("my_action");
it .addCategory("my_category");startActivity(it);
2番目のアクティビティの意図に次のコードを追加します。 lt;/activity & gt;
& lt; category android: name = "Android.intent.カテゴリ.DEFAULT"/>
5. よく使われるシステムインテントのコレクション
上記にリストされていないものがあれば、提案してください~
。//1. 電話をかける
// モバイル カスタマー サービス 10086 に電話する
Uri uri = Uri.parse("tel:10086");
インテントtent = new Intent(Intent.ACTION_DIAL, uri);
startActivity(intent);
//========================== == ===================================
///2. テキストメッセージを送信します
//コンテンツを 10086 に送信する 「Hello」のテキスト メッセージ
Uri uri = Uri.parse("smsto:10086");
Intenttent = new Intent(Intent.ACTION_SENDTO, uri);
intent.putExtra("sms_body", " Hello");
startActivity(intent);
//3. MMS の送信 (添付ファイル付きのテキスト メッセージの送信と同等)
Intenttent = new Intent(Intent.ACTION_SEND);
intent.putExtra("sms_body", "Hello ");
Uri uri = Uri.parse("content://media/external/images/media/23");
intent.putExtra(Intent.EXTRA_STREAM, uri);
intent.setType("image/png" );
startActivity(意図);
//====================================== ======== ====================
//4. ブラウザを開きます:
// Baidu ホームページを開きます
Uri uri = ウリ。 parse("http://www .baidu.com");
インテントの意図 = new Intent(Intent.ACTION_VIEW, uri);
startActivity(intent);
//=========== ========= ======================================== ===
//5. メールを送信します: (Google サービスを骨抜きにする方法はありません!!!)
// メールをsomeone@domain.comに送信します
Uri uri = Uri.parse("mailto:someone@domain. com");
Intenttent = new Intent(Intent.ACTION_SENDTO, uri);
startActivity(intent);
//「Hello」という内容の電子メールをsomeone@domain.comに送信します
Intenttent = new Intent(Intent .ACTION_SEND);
intent.putExtra(Intent.EXTRA_EMAIL, "someone@domain.com");
intent.putExtra(Intent.EXTRA_SUBJECT, "件名");
intent.putExtra(Intent.EXTRA_TEXT, "Hello");
intent.setType("text /plain");
startActivity(intent);
//複数の人にメールを送信する
Intenttent=new Intent(Intent.ACTION_SEND);
String[] tos = {"1@abc. com", "2@abc .com"}; // 受信者
String[] ccs = {"3@abc.com", "4@abc.com"}; // Cc
String[] bccs = {" 5@abc.com", "6@abc.com"}; // BCC
intent.putExtra(Intent.EXTRA_EMAIL, tos);
intent.putExtra(Intent.EXTRA_CC, ccs);
intent.putExtra(Intent. EXTRA_BCC, bccs );
intent.putExtra(Intent.EXTRA_SUBJECT, "件名");
intent.putExtra(Intent.EXTRA_TEXT, "Hello");
tent.setType("message/rfc822");
startActivity(intent);
//============================ = =================================
//6. 地図を表示:
// Google マップを開きます。中国北京の場所 (北緯 39.9 度、東経 116.3 度)
Uri uri = Uri.parse("geo:39.9,116.3");
Intent 意図 = new Intent(Intent.ACTION_VIEW, uri);
startActivity(intent);
// ============================================= === =============
//7. 経路計画
// 経路計画: 北京のどこか (北緯 39.9 度、東経 116.3 度) から上海のどこか (北緯 31.2 度)緯度、東経 121.4)
Uri uri = Uri.parse("http://maps.google.com/maps?f=d&saddr=39.9 116.3&daddr=31.2 121.4");
Intent 意図 = new Intent(Intent.ACTION_VIEW 、uri);
startActivity(tent);
//==================================== ========== ====================
//8. マルチメディア再生:
インテント インテント = 新しいインテント(Intent.ACTION_VIEW) ;
Uri uri = Uri.parse(" file:///sdcard/foo.mp3");
intent.setDataAndType(uri, "audio/mp3");
startActivity(intent);
//すべてのSD カード内のオーディオ ファイルを選択し、最初のファイルを再生します =-=
Uri uri = Uri.withAppendedPath(MediaStore.Audio.Media.INTERNAL_CONTENT_URI, "1");
Intenttent = new Intent(Intent.ACTION_VIEW, uri) ;
startActivity(intent);
//== ===================================== ============= ===========
//9. カメラを開いて写真を撮ります:
// カメラ プログラムを開きます
インテント インテント = 新しいインテント(MediaStore.ACTION_IMAGE_CAPTURE);
startActivityForResult(intent, 0);
// 写真データを取得します
Bundle extras =tent.getExtras();
Bitmap bitmap = (Bitmap) extras.get("data");
/ /別の方法:
//システム カメラ アプリケーションを呼び出して保存する
Intenttent = new Intent(MediaStore.ACTION_IMAGE_CAPTURE)
time = Calendar.getInstance().getTimeInMillis();
intent.putExtra(MediaStore.EXTRA_OUTPUT, Uri) .fromFile(new File(Environment
.getExternalStorageDirectory().getAbsolutePath()+"/tucue", time + ".jpg")));
startActivityForResult(intent, ACTIVITY_GET_CAMERA_IMAGE);
//====== ============== =================================== ========
//10. 画像を取得して切り取る
// 画像を取得して切り取る
Intenttent = new Intent(Intent.ACTION_GET_CONTENT);
intent.setType("image/*") ;
intent.putExtra("crop", "true") ; // シャーリングをオンにする
intent.putExtra("aspectX", 1) // シャーリングのアスペクト比は 1:2 です
intent.putExtra("aspectY "、2);
mental.putExtra("outputX", 20); // 画像の幅と高さを保存します
intent.putExtra("outputY", 40); /mnt /sdcard/temp"))); // 保存パス
intent.putExtra("outputFormat", "JPEG"); // 戻り形式
startActivityForResult(intent, 0);
// 特定の画像を切り取る
Intent インテント= 新しい Intent("com.android.camera.action.CROP");
intent.setClassName("com.android.camera", "com.android.camera.CropImage"); new File("/mnt/sdcard/temp")));
intent.putExtra("outputX", 1) // カットのアスペクト比は 1:2 です
intent.putExtra("outputY", 2); ;
intent.putExtra("aspectX", 20); // 画像の幅と高さを保存します
intent.putExtra("aspectY", 40);
intent.putExtra("scale", true);
intent. putExtra(" noFaceDetection", true);
intent.putExtra("output", Uri.parse("file:///mnt/sdcard/temp"));
startActivityForResult(intent, 0); === ============================================== === =========
//11. Google マーケットを開く
// Google マーケットを開き、プログラムの詳細ページに直接入ります
Uri uri = Uri.parse("market://details ?id=" + "com.demo.app");
インテントtent = new Intent(Intent.ACTION_VIEW, uri);
startActivity(intent);
//============ ===== ============================================ =
// 12. 携帯電話の設定インターフェースに入ります:
//ワイヤレスネットワーク設定インターフェースに入ります (他の人が推論を行うことができます)
Intenttent = new Intent(android.provider.Settings.ACTION_WIRELESS_SETTINGS);
startActivityForResult(intent, 0);
//== ======================================== ========= ===========
//13. apk をインストールします:
Uri installUri = Uri.fromParts("package", "xxx", null); = 新しいインテント(Intent.ACTION_PACKAGE_ADDED, installUri );
//================================== =========== ===================
//14. apk:
Uri uri = Uri.fromParts("package") をアンインストールします。 , strPackageName, null);
Intent it = new Intent(Intent.ACTION_DELETE, uri);
//============= ============ ================================
//15.添付ファイルを送信:
Intent it = new Intent(Intent.ACTION_SEND);
it.putExtra(Intent.EXTRA_SUBJECT, "メールの件名テキスト");
it.putExtra(Intent.EXTRA_STREAM, "file:///sdcard/eoe.mp3");
sendIntent.setType("audio/mp3") ;
startActivity(Intent.createChooser(it, "電子メール クライアントの選択"));
//========================== == ==================================
//16. 連絡先ページを入力します。インテント = 新しい Intent();
intent.setAction(Intent.ACTION_VIEW);
intent.setData(People.CONTENT_URI);
startActivity(intent);
//============= === ============================================== =
//17. 指定された連絡先を表示します:
Uri personUri = ContentUris.withAppendedId(People.CONTENT_URI, info.id);//info.id 連絡先 ID
Intenttent = new Intent(); (インテント .ACTION_VIEW);
intent.setData(personUri);
startActivity(intent);
//========================== == ==================================
//18. システム エディターを呼び出して連絡先を追加します。 (上位バージョンの SDK が有効):
Intent it = newIntent(Intent.ACTION_INSERT_OR_EDIT)
it.setType("vnd.android.cursor.item/contact");
it .putExtra( "名前","私の名前");
it.putExtra(android.provider.Contacts.Intents.Insert.COMPANY, "組織"); ,"メール ");
it.putExtra(android.provider.Contacts.Intents.Intents.Insert.SECONDARY_PHONE,"mobilePhone");
it.putExtra(android.provider.Contacts.Intents.Insert.TERTIARY_PHONE,"workPhone");
startActivity(it);
/ /============================================= ==== ==============
//19. システム エディターを呼び出して連絡先を追加します (すべて有効):
Intenttent = newIntent(Intent.ACTION_INSERT_OR_EDIT); setType(People.CONTENT_ITEM_TYPE );
intent.putExtra(Contacts.Intents.Insert.NAME, "私の名前");
intent.putExtra(Contacts.Intents.Insert.PHONE, "+1234567890");電話列.TYPE_MOBILE);tent.putExtra(Contacts.Intents.Insert.EMAIL, "com@com.com");
intent.putExtra(Contacts.Intents.Insert.EMAIL_TYPE, Contacts.ContactMethodsColumns.TYPE_WORK);
startActivity(intent); /================================================ = ==============
//20. 別のプログラムを開きます
Intent i = new Intent();
ComponentName cn = new ComponentName("com.example.jay.test",
"com.example.jay.test.MainActivity");
i.setComponent(cn);
startActivityForResult(i, RESULT_OK); ================================================= =============
//21. レコーダーを開きます
Intent mi = new Intent(Media.RECORD_SOUND_ACTION);
startActivity(mi);
//====== = ================================================ = ======
//22. Google からのコンテンツの検索
Intenttent = new Intent();
intent.putExtra(SearchManager.QUERY,"searchString"); startActivity (インテント);
//========================================= === =====================
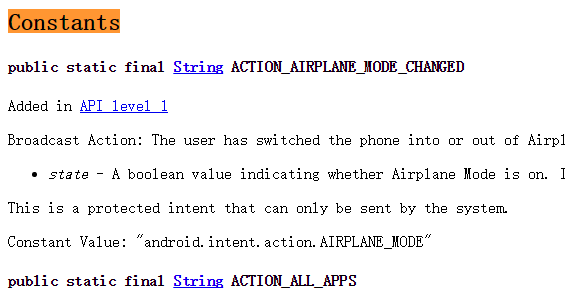
6. アクションはどこで確認できますか?
本当は以前に集めたインテントアクションを直接投稿したかったのですが、よく考えて、誰かに釣り方を教えるよりも釣り方を教える方が良いと判断しました。 Android ドキュメントをダウンロードした場合は、次のパスで見つけることができます:
おもちゃ、そしてここから始めましょう 定数:
知らない人に出会ったら、ここに来て確認してください~
このセクションの概要: