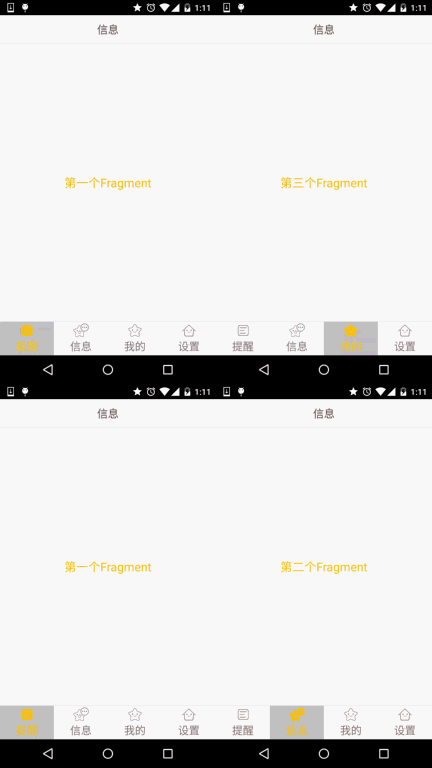
フラグメントの例 - 下部ナビゲーション バーの実装 (方法 2)
このセクションの概要:
前のセクションでは、下部のナビゲーション バーの効果を実現するために LinearLayout + TextView を使用しました。クリックするたびにリセットする必要があります。 すべての TextView のステータスを確認し、クリックされた TextView を選択するのは少し面倒ですよね。次に、別の方法を使用します。 RadioGroup + RadioButton を使用して、前のセクションの効果を実現します。
1. いくつかのランダムな考え
このセクションでは、RadioButton を使用して単一選択効果を実現します。ラジオボタンに慣れていない場合、またはこれまで使用したことがない場合は、次のページに進んでください。 RadioGroup には、前と同じ比率 1:1:1:1 で分割された 4 つの RadioButton が含まれています。 さらに、どの RadioButton がクリックされたかを知るには、RadioGroup の onCheckedChange を書き換えて checkid を判断するだけです。
よし、積み上げを始めよう!
PS:
ここでのマテリアルは、前のセクションのマテリアルから直接使用されています。さらに、Drawableクラスのリソースがすべて選択されています ステータスがチェック済みに変わりました!
ステップ 1: 下部のオプションのリソース ファイルをいくつか作成しますPicture Drawable リソース:
tab_menu_channel.xml<?xml version="1.0"coding="utf-8"?>
< ; item android:drawable="@mipmap/tab_channel_normal" />
</selector>
テキストリソース:
tab_menu_text.xml<?xml version="1.0"coding="utf-8"?>
<item android:color="@color/text_gray" />
</セレクター>
背景资源:tab_menu_bg.xml
<selector xmlns:android="http://schemas.android.com/ apk/res/android">
<item android:state_selected="true">
<shape>
<solid android:color="#FFC4C4C4" />
</shape&g t;
< /item>
<item>
<shape>
<solid android:color="@color/transparent" />
</shape>
</item>
</セレクター>
ステップ 2: アクティビティ レイアウトを作成する
TextView を使用して下部ナビゲーション バーを実装したときに、各 TextView のプロパティがほぼ同じであるという問題が見つかりました。 提案では、同じ属性を抽出してスタイルに書き込むように全員に依頼しました。もしかしたら、怠け者か知らない友人もいるかもしれません。 それを描画して使用する方法をここで示します。
まず、Radiogram ラベルの 1 つを取り出します:
Android: id = "@+ID/rb_channel"
Android:layout_width = " 0dp "
Android:layout_height =" match_parent "
Android:layout_weight = 1 "
Android:background =" ../ style/images/tab_bg " OID: Button = "@NULL"
Android:drawabletop = "@drawable /tab_menu_Channel "
Android: Gravity =" Center"
Android: paddingtop =" 3dp "
Android: text ="@string/tab_amert "
Android: TextColor = "@DRAWABLE/TAB_MENU_TEXT"
Android: TextSize = "18SP"// >
我们可以可每RadioButton都同一的属性抽出,style.xml文件中:
<item name="android:layout_width"> 0dp</item>
<item name="android:layout_weight">1</item>
<item name="android:layout_height">match_parent</item>
<item name="android:背景">@drawable/tab_menu_bg</item>
<item name="android:button">@null</item>
<item name="android:gravity">center</item>
<item name="android:paddingTop">3dp</item>
<item name="android:textColor">@drawable/tab_menu_text</item>
<item name="android:textSize"> ;18sp</item>
</style>
これにより、毎回 activity_main.xml に RadioButton 用に同じコードを記述する必要がなくなります。 RadioButton の style="@style/tab_menu_item" を作成するだけで完了です。
activity_main.xml:
xmlns:tools="http://schemas.android.com/tools"
android:layout_width=" match_parent"
android:layout_height="match_parent"
android:background="../style/images/bg_gray"
tools:context=".MainActivity">
<RelativeLayout
android:id="@+ id/ly_top_bar"
android:layout_width="match_parent"
android:layout_height="48dp"
android:background="../style/images/bg_topbar">
<TextView
android:id="@+ id/txt_topbar"
android:layout_width="match_parent"
android:layout_height="match_parent"
android:layout_centerInParent="true"
android:gravity="center"
android:text="情報"
android:textColor=" @color/text_topbar"
android:textSize="18sp" />
<View
android:layout_width="match_parent"
android:layout_height="2px"
android:layout_alignParentBottom="true"
android:background= "../style/images/div_white" />
</RelativeLayout>
<RadioGroup
android:id="@+id/rg_tab_bar"
android:layout_width="match_parent"
android:layout_height= 「56dp」
android:layout_alignParentBottom="true"
android:background="../style/images/bg_white"
android:orientation="horizontal">
<RadioButton
android:id="@+id/rb _チャンネル」
style="@style/tab_menu_item"
android:drawableTop="@drawable/tab_menu_channel"
android:text="@string/tab_menu_alert" />
<RadioButton
android:id="@+id/rb_message"
style="@style/tab_menu_item"
android:drawableTop="@drawable/tab_menu_message"
android:text="@string/tab_menu_profile" />
<Radi oButton
android:id="@+id/rb_better "
style="@style/tab_menu_item"
android:drawableTop="@drawable/tab_menu_better"
android:text="@string/tab_menu_pay" />
<Radi oButton
android:id="@+id/ rb_setting"
style="@style/tab_menu_item"
android:drawableTop="@drawable/tab_menu_setting"
android:text="@string/tab_menu_setting"/>
</RadioGグループ>
<表示
android :id="@+id/div_tab_bar"
android:layout_width="match_parent"
Android:layout_height = "2px"
Android:layout_above = "@ID/RG_TAB_BAR"
Android: 背景 = "../style/images/div_white"/& gt; Android: ID = "@+ ID /ly_content"
' ' ' s ' s s lt;/FrameLayout>
</RelativeLa yout>
ステップ 3: 上部のナビゲーション バーを非表示にする
android:theme="@style/Theme.AppCompat.NoActionBar"
ステップ 4: 単純なレイアウトとフラグメントのクラスを作成します:
fg_content.xml : <?xml version="1.0" encoding="utf-8"? >
<LinearLayout xmlns:android="http://schemas.android.com/apk/res/android" android:orientation="vertical" android:layout_width="match_parent" android:layout_height="match_parent"
android:background="../style/images/bg_white">android:id=" @+id/txt_content "
android:layout_width =" match_parent "
MyFragment.java:
* 2015/8/29 0028 に Coder-pig によって作成されました。
*/
public class MyFragment extends Fragment {
private String content;
public MyFragment(String content) {
this.content =コンテンツ;
}
@Override
public View onCreateView(LayoutInflater inflater, ViewGroup container, Bundle savedInstanceState) {
View view = inflater.inflate(R.layout.fg_content,container,false);
TextView txt_content = (TextView) view.findViewById(R.id .txt_content);
txt_content.setText(content);
return view;
}
}
ステップ 5: MainActivity.java を作成する
これは TextView の実装よりもはるかに簡単なので、詳細は説明しません。非常に簡単です。コードに移動するだけです:
MainActivity.java
* 2015/8/29 0028 に Coder-pig によって作成されました。
*/
public class MainActivity extends AppCompatActivity implements RadioGroup.OnCheckedChangeListener{
private RadioGroup rg_tab_bar;
private RadioButton rb_channel;
//Fragment Object
プライベート MyFragment fg1,fg2,fg3,fg4;
private FragmentManager fManager;
@Override
protected void onCreate(Bundle savedInstanceState) {
super.onCreate(savedInstanceState);
setContentView(R.layout.activity_main);
fManager = getFragmentManager();
rg_tab_bar = (RadioGroup) findViewById( R.id.rg_tab_bar);
rg_tab_bar.setOnCheckedChangeListener(this);
//获取第一个单选按钮,并设置是选中状態态
rb_channel = (RadioButton) findViewById(R.id.rb_channel);
rb_channel。 setChecked(true);
}
@Override
public onCheckedChanged(RadioGroup group, int checkedId) {
FragmentTransaction fTransaction = fManager.beginTransaction();
HideAllFragment(fTransaction);
switch (checkedId){
case R. id.rb_channel:
if(fg1 == null){
fg1 = new MyFragment("第一个フラグメント");
fTransaction.add(R.id. ly_content,fg1);
}else{
fTransaction.show( fg1);
}
break;
case R.id.rb_message:
if(fg2 == null){
fg2 = new MyFragment("第二フラグメント");
fTransaction.add(R.id.ly_content,fg2);
}else{
fTransaction.show(fg2);
}
break;
case R.id.rb_better:
if(fg3 == null){
fg3 = new MyFragment("第三个フラグメント");
fTransaction。 add(R.id.ly_content,fg3);
else{
fTransaction.show(fg3);
break;
case R.id.rb_setting:
if(fg4 == null){
fg4 = new MyFragment ("第四个フラグメント");
fTransaction.add(R.id.ly_content,fg4);
}else{
fTransaction.show (fg4); private void HideAllFragment(FragmentTransaction flagmentTransaction){
if(fg1 != null)fragmentTransaction.hide (fg1);
if(fg2 != null)fragmentTransaction.hide(fg2);
if(fg3 ! = null) flagmentTransaction.hide(fg3);
if(fg4 != null)fragmentTransaction.hide(fg4);
}
}
PS:
前のセクションで何か言及するのを忘れていました。 FragmentManager は使用するたびに呼び出す必要があります。 beginTransaction() メソッドは FragmentTransaction トランザクション オブジェクトを取得します。図 3. レンダリングの実行 実際、前のセクションの効果は同じです:
FragmentDemo2.zip
:FragmentDemo2.zip ダウンロードこのセクションの説明:


