Android ファイルのダウンロード (1)
このセクションの紹介:
また深い落とし穴があるので、初心者は注意して入ってください... このセクションは、通常のシングルスレッドのダウンロード -> 通常のマルチスレッドのダウンロード -> からダウンロードされます。 -> 非常に実用的な例: Android の DownloadManager を使用して APK を更新する そして、インストール実装コードを上書きしてください。さて、このセクションは非常に興味深いようです。このセクションを始めましょう。 PS: 完全なマルチスレッド ブレークポイントの再開送信全体を次のセクションに記載します。
1. 通常のシングルスレッドファイルのダウンロード:
URLConnection.openStream() を直接使用してネットワーク入力ストリームを開き、ストリームをファイルに書き込みます。
コアメソッド:
public static void downLoad(String path,Context context)throws Exception
{
  URL url = new URL(path);
  InputStream is = url.openStream();
  //截取最后的文件名
  String end = path.substring(path.lastIndexOf("."));
  //打开手机对应的输出流,输出到文件中
  OutputStream os = context.openFileOutput("Cache_"+System.currentTimeMillis()+end, Context.MODE_PRIVATE);
  byte[] buffer = new byte[1024];
  int len = 0;
  //从输入六中读取数据,读到缓冲区中
  while((len = is.read(buffer)) > 0)
  {
    os.write(buffer,0,len);
  }
  //关闭输入输出流
  is.close();
  os.close();
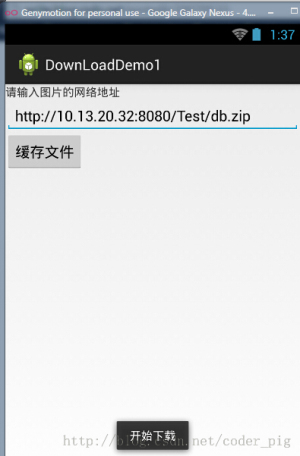
}実行結果:


2. 通常のマルチスレッドダウンロード:
マルチスレッドのダウンロードファイルを使用すると、ファイルのダウンロードより高速ですが、なぜですか?
答え: サーバーが最大 100 人のユーザーにサービスを提供できると仮定すると、多くのサーバー リソースがプリエンプトされるため、サーバー内の 1 つのスレッド 1 人のユーザーに対応して、CPU は 100 個のスレッドをタイム スライスに分割して順番に実行します。 ファイルをダウンロードすると、99 個のユーザー リソースを占有するのと同じになり、当然ダウンロード速度が速くなります
追記: もちろん、有効なスレッドが多すぎる場合、アプリは維持および同期する必要があります。各スレッドのオーバーヘッド。 これらのオーバーヘッドはダウンロード速度の低下につながり、ネットワーク速度にも関係します。
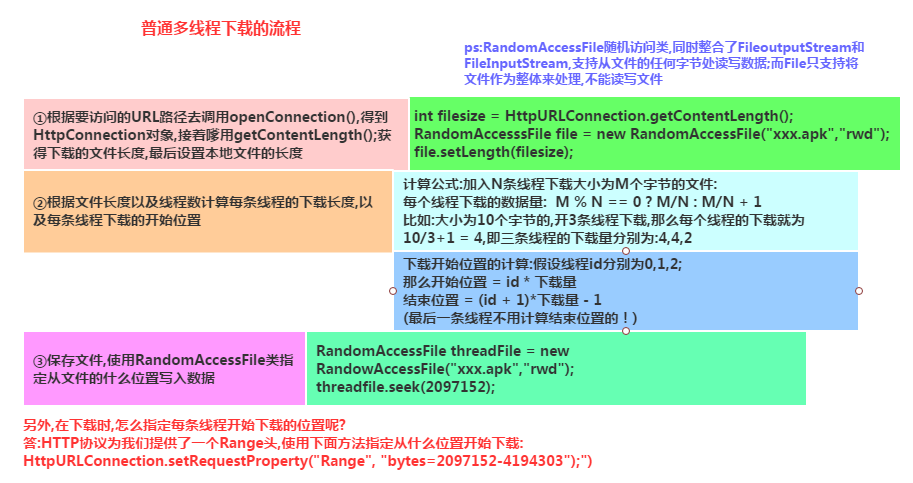
マルチスレッドのダウンロード プロセス:
コア コードは次のとおりですネットワーク接続を取得します同じサイズの空のファイルを作成します。ローカルディスクそれぞれを計算します スレッドはファイルのどの部分からダウンロードを開始して終了を順番に作成する必要があり、ネットワークリソースの指定された部分をダウンロードするために複数のスレッドを開始する必要があります
PS : ここで Java プロジェクトを直接作成し、JUnit で実行します。メソッドを指定するだけです。
:
public class Downloader {
  //添加@Test标记是表示该方法是Junit测试的方法,就可以直接运行该方法了
    @Test
    public void download() throws Exception
    {
      //设置URL的地址和下载后的文件名
      String filename = "meitu.exe";
      String path = "http://10.13.20.32:8080/Test/XiuXiu_Green.exe";
      URL url = new URL(path);
      HttpURLConnection conn = (HttpURLConnection) url.openConnection();
      conn.setConnectTimeout(5000);
      conn.setRequestMethod("GET");
      //获得需要下载的文件的长度(大小)
      int filelength = conn.getContentLength();
      System.out.println("要下载的文件长度"+filelength);
      //生成一个大小相同的本地文件
      RandomAccessFile file = new RandomAccessFile(filename, "rwd");
      file.setLength(filelength);
      file.close();
      conn.disconnect();
      //设置有多少条线程下载
      int threadsize = 3;
      //计算每个线程下载的量
      int threadlength = filelength % 3 == 0 ? filelength/3:filelength+1;
      for(int i = 0;i < threadsize;i++)
      {
        //设置每条线程从哪个位置开始下载
        int startposition = i * threadlength;
        //从文件的什么位置开始写入数据
        RandomAccessFile threadfile = new RandomAccessFile(filename, "rwd");
        threadfile.seek(startposition);
        //启动三条线程分别从startposition位置开始下载文件
        new DownLoadThread(i,startposition,threadfile,threadlength,path).start();
      }
      int quit = System.in.read();
      while('q' != quit)
      {
        Thread.sleep(2000);
      }
    }


  private class DownLoadThread extends Thread {
    private int threadid;
    private int startposition;
    private RandomAccessFile threadfile;
    private int threadlength;
    private String path;
    public DownLoadThread(int threadid, int startposition,
        RandomAccessFile threadfile, int threadlength, String path) {
      this.threadid = threadid;
      this.startposition = startposition;
      this.threadfile = threadfile;
      this.threadlength = threadlength;
      this.path = path;
    }
    public DownLoadThread() {}
    @Override
    public void run() {
      try
      {
        URL url = new URL(path);
        HttpURLConnection conn = (HttpURLConnection) url.openConnection();
        conn.setConnectTimeout(5000);
        conn.setRequestMethod("GET");
        //指定从什么位置开始下载
        conn.setRequestProperty("Range", "bytes="+startposition+"-");
        //System.out.println(conn.getResponseCode());
        if(conn.getResponseCode() == 206)
        {
          InputStream is = conn.getInputStream();
          byte[] buffer = new byte[1024];
          int len = -1;
          int length = 0;
          while(length < threadlength && (len = is.read(buffer)) != -1)
          {
            threadfile.write(buffer,0,len);
            //计算累计下载的长度
            length += len;
          }
          threadfile.close();
          is.close();
          System.out.println("线程"+(threadid+1) + "已下载完成");
        }
      }catch(Exception ex){System.out.println("线程"+(threadid+1) + "下载出错"+ ex);}
    }

  }
}
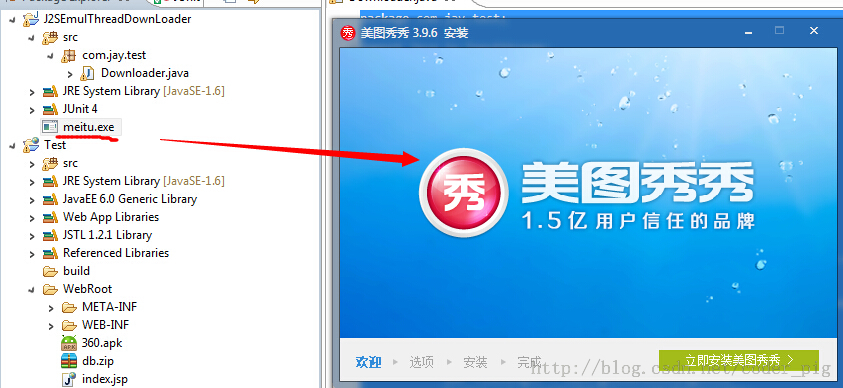
実行中のスクリーンショット: 図に示すように、ファイルはマルチスレッドを使用して完成しました! exe ファイルをダブルクリックして実行すると、ファイルが破損していないことがわかります!

注:
- int filelength = conn.getContentLength(); //ダウンロードしたファイルの長さ(サイズ)を取得
- RandomAccessFile file = new RandomAccessFile(filename, "rwd"); //このクラスは、マルチスレッド ダウンロードの核となるファイルの読み取りと書き込みを行うために実行されます
- nt threadlength = filelength % 3 == 0 filelength/3:filelength+1; //各スレッドのダウンロード量を計算
- conn.setRequestProperty("Range", "bytes="+startposition+"-"); //どの位置から読み書きを開始するかを指定します。これは が提供するメソッドです。 URLConnection
- / /System.out.println(conn.getResponseCode()); //このコメント化されたコードは、conn の戻りコードを表示するために使用されます。以前は 200 を使用していました。 マルチスレッドの場合、通常は 206 です。必要に応じて、このメソッドを呼び出して戻りコードを確認できます。
- int quit = System.in.read();while('q' != quit){Thread.sleep(2000);} //このコードは遅延操作用です。ローカル ダウンロードを使用しているため、おそらくメソッドの実行が終了しており、 スレッドはまだ開始されていないため、例外が発生します。ここで、ユーザーに文字を入力させ、それが「q」の場合は終了します
3. DownloadManager を使用してアプリケーションを更新し、インストールを上書きします。
次のコードは直接使用できます。プロジェクトに参加した後、この内部ブロードキャスト用のフィルターを忘れずに登録してください:
AndroidManifest.xml
:import android.app.DownloadManager;
import android.content.BroadcastReceiver;
import android.content.Context;
import android.content.Intent;
import android.content.pm.ApplicationInfo;
import android.content.pm.PackageManager;
import android.database.Cursor;
import android.net.Uri;
import android.os.Bundle;
import android.os.Environment;
import android.support.v7.app.AppCompatActivity;
/**
* Created by Jay on 2015/9/9 0009.
*/
public class UpdateAct extends AppCompatActivity {
//这个更新的APK的版本部分,我们是这样命名的:xxx_v1.0.0_xxxxxxxxx.apk
//这里我们用的是git提交版本的前九位作为表示
private static final String FILE_NAME = "ABCDEFGHI";
@Override
public void onCreate(Bundle savedInstanceState) {
super.onCreate(savedInstanceState);
String endpoint = "";
try {
//这部分是获取AndroidManifest.xml里的配置信息的,包名,以及Meta_data里保存的东西
ApplicationInfo info = getPackageManager().getApplicationInfo(
getPackageName(), PackageManager.GET_META_DATA);
//我们在meta_data保存了xxx.xxx这样一个数据,是https开头的一个链接,这里替换成http
endpoint = info.metaData.getString("xxxx.xxxx").replace("https",
"http");
} catch (PackageManager.NameNotFoundException e) {
e.printStackTrace();
}
//下面的都是拼接apk更新下载url的,path是保存的文件夹路径
final String _Path = this.getIntent().getStringExtra("path");
final String _Url = endpoint + _Path;
final DownloadManager _DownloadManager = (DownloadManager) getSystemService(DOWNLOAD_SERVICE);
DownloadManager.Request _Request = new DownloadManager.Request(
Uri.parse(_Url));
_Request.setDestinationInExternalPublicDir(
Environment.DIRECTORY_DOWNLOADS, FILE_NAME + ".apk");
_Request.setTitle(this.getString(R.string.app_name));
//是否显示下载对话框
_Request.setShowRunningNotification(true);
_Request.setMimeType("application/com.trinea.download.file");
//将下载请求放入队列
_DownloadManager.enqueue(_Request);
this.finish();
}
//注册一个广播接收器,当下载完毕后会收到一个android.intent.action.DOWNLOAD_COMPLETE
//的广播,在这里取出队列里下载任务,进行安装
public static class Receiver extends BroadcastReceiver {
public void onReceive(Context context, Intent intent) {
final DownloadManager _DownloadManager = (DownloadManager) context
.getSystemService(Context.DOWNLOAD_SERVICE);
final long _DownloadId = intent.getLongExtra(
DownloadManager.EXTRA_DOWNLOAD_ID, 0);
final DownloadManager.Query _Query = new DownloadManager.Query();
_Query.setFilterById(_DownloadId);
final Cursor _Cursor = _DownloadManager.query(_Query);
if (_Cursor.moveToFirst()) {
final int _Status = _Cursor.getInt(_Cursor
.getColumnIndexOrThrow(DownloadManager.COLUMN_STATUS));
final String _Name = _Cursor.getString(_Cursor
.getColumnIndexOrThrow("local_filename"));
if (_Status == DownloadManager.STATUS_SUCCESSFUL
&& _Name.indexOf(FILE_NAME) != 0) {
Intent _Intent = new Intent(Intent.ACTION_VIEW);
_Intent.setDataAndType(
Uri.parse(_Cursor.getString(_Cursor
.getColumnIndexOrThrow(DownloadManager.COLUMN_LOCAL_URI))),
"application/vnd.android.package-archive");
_Intent.addFlags(Intent.FLAG_ACTIVITY_NEW_TASK);
context.startActivity(_Intent);
}
}
_Cursor.close();
}
}
}4. 参照コードのダウンロード:
通常のシングルスレッド ダウンロード ファイル: DownLoadDemo1.zip 通常のマルチスレッド ダウンロード ファイル: J2SEMulDownLoader.zip
このセクションの概要:
さて、このセクションでは、通常のシングルスレッドおよびマルチスレッド ファイルのダウンロードと、Android 独自の DownManager の使用方法を紹介します。 。 アップデート APK をダウンロードして、実装を上書きしてください。皆さんの実際の開発に便利になると思います。はい、ありがとうございます〜


