jEasyUI カスタム ページング
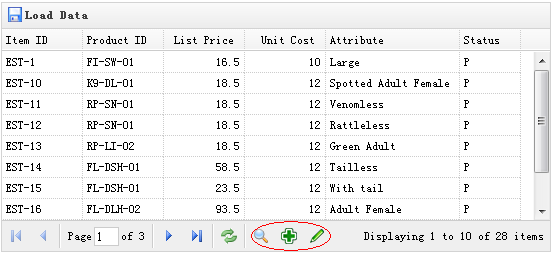
データ グリッド (datagrid) には、非常に優れた機能を備えたページング機能が組み込まれており、カスタマイズも非常に簡単です。このチュートリアルでは、データグリッドを作成し、ページング ツールバーにいくつかのカスタム ボタンを追加します。

DataGrid を作成します
	<table id="tt" title="Load Data" class="easyui-datagrid" style="width:550px;height:250px"
			url="data/datagrid_data.json"
			iconCls="icon-save" pagination="true">
		<thead>
			<tr>
				<th field="itemid" width="80">Item ID</th>
				<th field="productid" width="80">Product ID</th>
				<th field="listprice" width="80" align="right">List Price</th>
				<th field="unitcost" width="80" align="right">Unit Cost</th>
				<th field="attr1" width="100">Attribute</th>
				<th field="status" width="60" align="center">Stauts</th>
			</tr>
		</thead>
	</table>
ページング ツールバーが生成されるように、'pagination' プロパティを true に設定することを忘れないでください。
カスタム ページネーション ツールバー
	var pager = $('#tt').datagrid('getPager');    // get the pager of datagrid
	pager.pagination({
		showPageList:false,
		buttons:[{
			iconCls:'icon-search',
			handler:function(){
				alert('search');
			}
		},{
			iconCls:'icon-add',
			handler:function(){
				alert('add');
			}
		},{
			iconCls:'icon-edit',
			handler:function(){
				alert('edit');
			}
		}],
		onBeforeRefresh:function(){
			alert('before refresh');
			return true;
		}
	});
ご覧のとおり、最初にデータグリッドのページャー オブジェクトを取得し、次にページネーションを再作成します。ページリストを非表示にし、3 つの新しいボタンを追加します。
jQuery EasyUI サンプルをダウンロード
jeasyui-datagrid-datagrid11.zip


