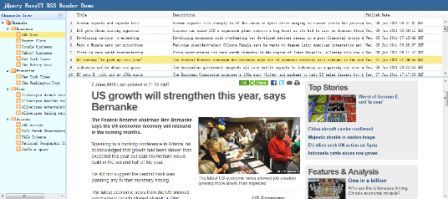
jEasyUI は RSS リーダーを作成します
このチュートリアルでは、jQuery EasyUI フレームワークを通じて RSS リーダーを作成します。

次のプラグインを使用します:
layout: アプリのユーザーインターフェイスを作成します。
datagrid: RSSフィードリストを表示します。
ツリー: フィードチャンネルを表示します。
ステップ 1: レイアウトを作成する
<body class="easyui-layout">
	<div region="north" border="false" class="rtitle">
		jQuery EasyUI RSS Reader Demo
	</div>
	<div region="west" title="Channels Tree" split="true" border="false" style="width:200px;background:#EAFDFF;">
		<ul id="t-channels" url="data/channels.json"></ul>
	</div>
	<div region="center" border="false">
		<div class="easyui-layout" fit="true">
			<div region="north" split="true" border="false" style="height:200px">
				<table id="dg"
						url="get_feed.php" border="false" rownumbers="true"
						fit="true" fitColumns="true" singleSelect="true">
					<thead>
						<tr>
							<th field="title" width="100">Title</th>
							<th field="description" width="200">Description</th>
							<th field="pubdate" width="80">Publish Date</th>
						</tr>
					</thead>
				</table>
			</div>
			<div region="center" border="false" style="overflow:hidden">
				<iframe id="cc" scrolling="auto" frameborder="0" style="width:100%;height:100%"></iframe>
			</div>
		</div>
	</div>
</body>
ステップ 2: DataGrid がイベントを処理する
ここでは、ユーザーによってトリガーされたいくつかのイベントを処理する必要があります。
$('#dg').datagrid({
	onSelect: function(index,row){
		$('#cc').attr('src', row.link);
	},
	onLoadSuccess:function(){
		var rows = $(this).datagrid('getRows');
		if (rows.length){
			$(this).datagrid('selectRow',0);
		}
	}
});
この例では、「onSelect」イベントを使用してフィードのコンテンツを表示し、「onLoadSuccess」イベントを使用して最初の行を選択します。
ステップ 3: ツリー メニュー (ツリー) がイベントを処理する
ツリー メニュー (ツリー) データがロードされたら、最初のリーフ ノードを選択し、「select」メソッドを呼び出してノードを選択する必要があります。 「onSelect」イベントを使用して選択されたノードを取得し、対応する「url」値を取得できるようにします。 最後に、DataGrid の「load」メソッドを呼び出して、フィード リスト データを更新します。
$('#t-channels').tree({
	onSelect: function(node){
		var url = node.attributes.url;
		$('#dg').datagrid('load',{
			url: url
		});
	},
	onLoadSuccess:function(node,data){
		if (data.length){
			var id = data[0].children[0].children[0].id;
			var n = $(this).tree('find', id);
			$(this).tree('select', n.target);
		}
	}
});


