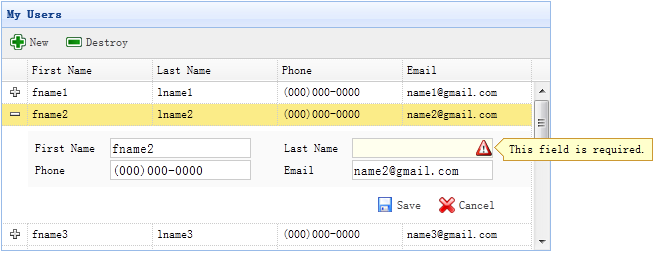
jEasyUI フォーム用の CRUD アプリケーション
データグリッド ビューを「detailview」に切り替えると、ユーザーは行を展開して、その行の下に行の詳細を表示できます。この機能を使用すると、詳細パネルの編集フォームに適切なレイアウトを提供できます。このチュートリアルでは、データグリッド コンポーネントを使用して、編集フォームが占有するスペースを削減します。

ステップ1: HTMLタグでデータグリッド(DataGrid)を定義する
<table id="dg" title="My Users" style="width:550px;height:250px"
		url="get_users.php"
		toolbar="#toolbar"
		fitColumns="true" singleSelect="true">
	<thead>
		<tr>
			<th field="firstname" width="50">First Name</th>
			<th field="lastname" width="50">Last Name</th>
			<th field="phone" width="50">Phone</th>
			<th field="email" width="50">Email</th>
		</tr>
	</thead>
</table>
<div id="toolbar">
	<a href="#" class="easyui-linkbutton" iconCls="icon-add" plain="true" onclick="newItem()">New</a>
	<a href="#" class="easyui-linkbutton" iconCls="icon-remove" plain="true" onclick="destroyItem()">Destroy</a>
</div>
ステップ2: データグリッド(DataGrid)に詳細ビューを適用する
$('#dg').datagrid({
	view: detailview,
	detailFormatter:function(index,row){
		return '<div class="ddv"></div>';
	},
	onExpandRow: function(index,row){
		var ddv = $(this).datagrid('getRowDetail',index).find('div.ddv');
		ddv.panel({
			border:false,
			cache:true,
			href:'show_form.php?index='+index,
			onLoad:function(){
				$('#dg').datagrid('fixDetailRowHeight',index);
				$('#dg').datagrid('selectRow',index);
				$('#dg').datagrid('getRowDetail',index).find('form').form('load',row);
			}
		});
		$('#dg').datagrid('fixDetailRowHeight',index);
	}
});
データグリッドに詳細ビューを適用するには(DataGrid)、「datagrid-detailview.js」ファイルを HTML ページの先頭に導入します。
「detailFormatter」関数を使用して行の詳細を生成します。 この場合、編集フォームを保持する空の <div> を返します。 ユーザーが行展開ボタン (「+」) をクリックすると、「onExpandRow」イベントがトリガーされ、ajax 経由で編集フォーム (フォーム) を読み込みます。 「getRowDetail」メソッドを呼び出して行詳細コンテナを取得すると、行詳細パネルを見つけることができます。 行詳細にパネルを作成し、「show_form.php」から返された編集フォームをロードします。
ステップ 3: 編集フォーム (Form) を作成する
編集フォーム (Form) がサーバーから読み込まれます。
<form method="post">
	<table class="dv-table" style="width:100%;background:#fafafa;padding:5px;margin-top:5px;">
		<tr>
			<td>First Name</td>
			<td><input name="firstname" class="easyui-validatebox" required="true"></input></td>
			<td>Last Name</td>
			<td><input name="lastname" class="easyui-validatebox" required="true"></input></td>
		</tr>
		<tr>
			<td>Phone</td>
			<td><input name="phone"></input></td>
			<td>Email</td>
			<td><input name="email" class="easyui-validatebox" validType="email"></input></td>
		</tr>
	</table>
	<div style="padding:5px 0;text-align:right;padding-right:30px">
		<a href="#" class="easyui-linkbutton" iconCls="icon-save" plain="true" onclick="saveItem(<?php echo $_REQUEST['index'];?>)">Save</a>
		<a href="#" class="easyui-linkbutton" iconCls="icon-cancel" plain="true" onclick="cancelItem(<?php echo $_REQUEST['index'];?>)">Cancel</a>
	</div>
</form>
ステップ 4: 編集を保存またはキャンセルする
「saveItem」関数を呼び出してユーザーを保存するか、「cancelItem」関数を呼び出して編集をキャンセルします。
function saveItem(index){
	var row = $('#dg').datagrid('getRows')[index];
	var url = row.isNewRecord ? 'save_user.php' : 'update_user.php?id='+row.id;
	$('#dg').datagrid('getRowDetail',index).find('form').form('submit',{
		url: url,
		onSubmit: function(){
			return $(this).form('validate');
		},
		success: function(data){
			data = eval('('+data+')');
			data.isNewRecord = false;
			$('#dg').datagrid('collapseRow',index);
			$('#dg').datagrid('updateRow',{
				index: index,
				row: data
			});
		}
	});
}
ポストバックする URL を決定し、フォーム オブジェクトを探して、「submit」メソッドを呼び出してフォーム データを送信します。データが正常に保存されると、行データが折りたたまれて更新されます。
function cancelItem(index){
	var row = $('#dg').datagrid('getRows')[index];
	if (row.isNewRecord){
		$('#dg').datagrid('deleteRow',index);
	} else {
		$('#dg').datagrid('collapseRow',index);
	}
}
編集操作をキャンセルするとき、その行が新しい行で保存されていない場合はその行を直接削除し、それ以外の場合はその行を折りたたんでください。


