Gopher が知っておくべきコード自動化検査
- Go语言进阶学习転載
- 2023-07-25 15:20:291726ブラウズ
この記事では、golangci-lint と pre-commit という 2 つの主要なフレームワークを通じて、git フック を使用して Go を実装する方法について説明します。 言語の git コミットの自動コードレビュー。
静的コード検査
。 go vet<span style="font-size: 15px;letter-spacing: 1px;"> に加えて、多くの Gopher は、パッケージを自動的にインポートするための </span>goimports も知っているかもしれません。 <span style="font-size: 15px;letter-spacing: 1px;"> ツール、コードのフォーマット用の </span>gofmt<span style="font-size: 15px;letter-spacing: 1px;">、およびコード コマンド エラーなどをチェックするための更新を停止した </span>## golint<span style="font-size: 15px;letter-spacing: 1px;"></span> ツール。 <span style="font-size: 15px;letter-spacing: 1px;"></span>上記のツールは <span style="font-size: 15px;letter-spacing: 1px;"></span>
<span style="font-size: 15px;letter-spacing: 1px;"></span> と呼ばれます。ここでは、まず lint とは何かを知る必要があります。 Wikipedia では、lint は次のように定義されています: <span style="font-size: 15px;letter-spacing: 1px;"><p style="font-size: inherit;color: inherit;line-height: inherit;margin-top: 1.5em;margin-bottom: 1.5em;"><span style="font-size: 15px;letter-spacing: 1px;"><em style="font-size: inherit;color: inherit;line-height: inherit;">コンピュータ サイエンスでは、<strong style="font-size: inherit;color: inherit;line-height: inherit;">lint</strong> はツール プログラムの名前で、ソース コードの段落内に不審で構造化されていない (バグを引き起こす可能性がある) 箇所をマークするために使用されます。これは、最初に C 言語に適合し、UNIX プラットフォーム上で開発された静的プログラム解析ツールです。これは後に、ソース コード内の疑わしい箇所をマークするためにコンピューター プログラミング言語で使用されるツールを表す一般的な用語になりました。 </em></span></p>
<p style="font-size: inherit;color: inherit;line-height: inherit;margin-top: 1.5em;margin-bottom: 1.5em;text-align: left;"><span style="font-size: 15px;letter-spacing: 1px;">Go 言語の分野では、golangci-lint は包括的なリンター フレームワークです。上記のいくつかを含む多くのリンターが統合されており、これを適切に使用すると、Go コードをより包括的に分析および検査するのに役立ちます。 golangci-lint でサポートされているリンター項目は、</span><span style="font-size: 15px;letter-spacing: 1px;color: rgb(120, 172, 254);">https://golangci-lint.run/usage/linters/#golint</span></p>
<section style="box-sizing: border-box;"><section powered-by="xiumi.us" style="margin: 10px 0%;box-sizing: border-box;"># ページで確認できます。 <section style="display: inline-block;width: 100%;vertical-align: top;background-image: linear-gradient(to right, rgb(12, 14, 19) 0%, rgb(93, 88, 96) 100%);box-sizing: border-box;"> <section powered-by="xiumi.us" style="margin-right: 0%;margin-bottom: 10px;margin-left: 0%;box-sizing: border-box;"><section style="display: inline-block;width: 100%;vertical-align: top;background-image: linear-gradient(to right, rgba(255, 255, 255, 0) 0%, rgba(255, 255, 255, 0.35) 100%);box-sizing: border-box;"><section powered-by="xiumi.us" style="text-align: center;justify-content: center;margin: 10px 0% -11px;box-sizing: border-box;"><section style="display: inline-block;width: auto;vertical-align: top;border-left: 3px solid rgb(206, 51, 51);border-bottom-left-radius: 0px;border-right: 3px solid rgb(206, 51, 51);border-top-right-radius: 0px;min-width: 10%;max-width: 100%;height: auto;box-sizing: border-box;"><section powered-by="xiumi.us" style="color: rgb(255, 255, 255);padding-right: 10px;padding-left: 10px;line-height: 1;letter-spacing: 1px;box-sizing: border-box;"><p style="box-sizing: border-box;font-size: 20px;">#golangci-lint を使用する<strong></strong></p></section></section></section></section></section> </section></section></section><h2 style="font-size: 1.4em;color: inherit;line-height: inherit;margin-top: 1.5em;margin-bottom: 1.5em;font-weight: bold;"></h2>##ダウンロード<h5 style="font-size: 1em;color: inherit;line-height: inherit;margin-top: 1.5em;margin-bottom: 1.5em;font-weight: bold;"><span style="color: inherit;line-height: inherit;font-size: 17px;"><pre class="brush:php;toolbar:false;">1go get github.com/golangci/golangci-lint/cmd/golangci-lint@latest</pre></span></h5>インストールの成功を確認<h5 style="font-size: 1em;color: inherit;line-height: inherit;margin-top: 1.5em;margin-bottom: 1.5em;font-weight: bold;"><span style="color: inherit;line-height: inherit;font-size: 17px;"><pre class="brush:php;toolbar:false;">1$ golangci-lint version
2golangci-lint has version v1.41.1 built from (unknown, mod sum: "h1:KH28pTSqRu6DTXIAANl1sPXNCmqg4VEH21z6G9Wj4SM=") on (unknown)</pre></span></h5>ヘルプ ドキュメントを表示<h5 style="font-size: 1em;color: inherit;line-height: inherit;margin-top: 1.5em;margin-bottom: 1.5em;font-weight: bold;"><span style="color: inherit;line-height: inherit;font-size: 17px;"><pre class="brush:php;toolbar:false;">1$ golangci-lint help linters</pre></span></h5>
<ul class="list-paddingleft-2" style="font-size: inherit;color: inherit;line-height: inherit;padding-left: 32px;"><li style="font-size: 15px;color: inherit;line-height: inherit;margin-bottom: 0.5em;font-weight: bold;">
<p>#デフォルトのリンター<span style="font-size: 15px;"><strong><span style="color: inherit;line-height: inherit;"></span></strong></span></p> </li></ul>
<p style="font-size: 16px;text-align: center;"><img src="/static/imghwm/default1.png" data-src="https://img.php.cn/upload/article/001/272/559/528f044bae703bd0e8ea5292f1b5ead9-0.png" class="lazy" alt="Gopher が知っておくべきコード自動化検査" ></p>
<figure style="font-size: inherit;color: inherit;line-height: inherit;"><figcaption style="line-height: inherit;margin-top: 10px;text-align: center;color: rgb(153, 153, 153);font-size: 0.7em;"><br></figcaption></figure><ul class="list-paddingleft-2" style="font-size: inherit;color: inherit;line-height: inherit;padding-left: 32px;">#リンターはデフォルトでは有効ではありません<li style="font-size: 15px;color: inherit;line-height: inherit;margin-bottom: 0.5em;font-weight: bold;"><p><span style="font-size: 15px;"> <strong><span style="color: inherit;line-height: inherit;"></span></strong></span></p></li>
<figcaption style="line-height: inherit;margin-top: 10px;text-align: center;color: rgb(153, 153, 153);font-size: 0.7em;"><br></figcaption><ul class="list-paddingleft-2" style="font-size: inherit;color: inherit;line-height: inherit;padding-left: 32px;"><li style="font-size: 15px;color: inherit;line-height: inherit;margin-bottom: 0.5em;font-weight: bold;"><p><span style="font-size: 15px;"><strong><span style="color: inherit;line-height: inherit;">linters 的分类</span></strong></span></p></li></ul>
<p style="font-size: 16px;text-align: center;"><img src="/static/imghwm/default1.png" data-src="https://img.php.cn/upload/article/001/272/559/0dcec1bcc56c321051d6a124d7bddf83-2.png" class="lazy" alt="Gopher が知っておくべきコード自動化検査" ></p>
<p style="font-size: inherit;color: inherit;line-height: inherit;margin-top: 1.5em;margin-bottom: 1.5em;"><span style="font-size: 15px;letter-spacing: 1px;">可以看出,golangci-lint 框架支持的 linter 非常全面,它包括了 bugs、error、format、unused、module 等常见类别的分析 linter。</span></p>
<h5 style="font-size: 1em;color: inherit;line-height: inherit;margin-top: 1.5em;margin-bottom: 1.5em;font-weight: bold;"><span style="color: inherit;line-height: inherit;font-size: 17px;">实例</span></h5>
<p style="font-size: inherit;color: inherit;line-height: inherit;margin-top: 1.5em;margin-bottom: 1.5em;"><span style="font-size: 15px;letter-spacing: 1px;">下面来展示使用示例,现有以下项目结构代码</span></p><pre class="brush:php;toolbar:false;">1.
2├── go.mod
3├── main.go
4└── typecheck
5 └── typecheckDemo.go</pre><p style="font-size: inherit;color: inherit;line-height: inherit;margin-top: 1.5em;margin-bottom: 1.5em;"><span style="font-size: 15px;letter-spacing: 1px;">其中 </span><code style="font-size: inherit;line-height: inherit;overflow-wrap: break-word;padding: 2px 4px;border-radius: 4px;margin-right: 2px;margin-left: 2px;color: rgb(233, 105, 0);background: rgb(248, 248, 248);"><span style="font-size: 15px;letter-spacing: 1px;">main.go</span> 中的代码如下
 1package main
 2
 3import (
 4    "fmt"
 5)
 6
 7func main() {
 8    s1 := "this is a string"
 9    fmt.Printf("inappropriate formate %s\n", &s1)
10
11    i := 1
12    fmt.Println(i != 0 || i != 1)
13
14    arr := []int{1, 2, 3}
15    for _, i := range arr {
16        go func() {
17            fmt.Println(i)
18        }()
19    }
20}
<span style="font-size: 15px;letter-spacing: 1px;">typecheckDemo.go</span> 中的代码
 1package typecheck
 2
 3import "fmt"
 4
 5func check() {
 6    t := unexistType{}
 7    fmt.Println(t)
 8}
 9
10func unused() {
11    i := 1
12}
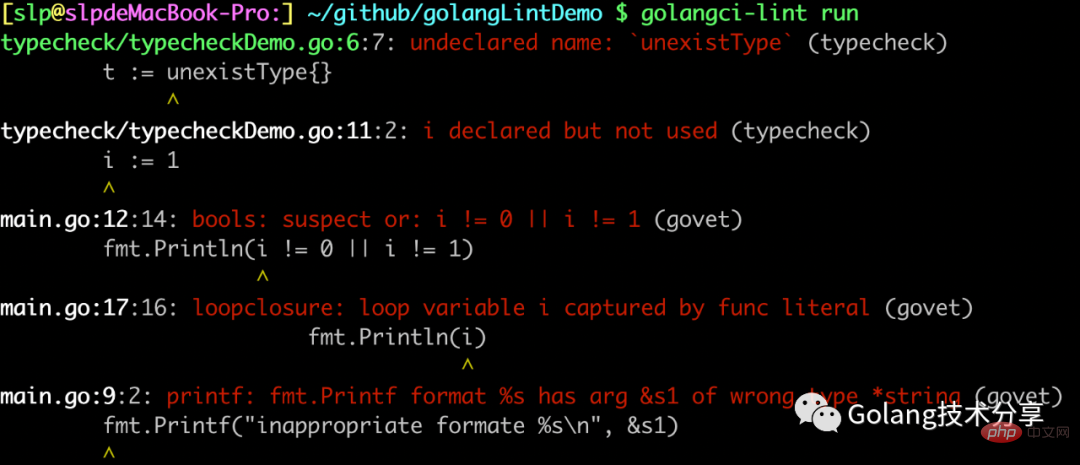
这两个源码文件中的代码都是存在一些问题的。此时,我们通过 golangci-lint 工具来对源码文件进行检查

可以看到,我们在程序根目录中执行 <span style="font-size: 15px;letter-spacing: 1px;">golangci-lint run</span> 命令,它等效于 <span style="font-size: 15px;letter-spacing: 1px;">golangci-lint run ./...</span> 。此时,它将 <span style="font-size: 15px;letter-spacing: 1px;">main.go</span> 和 <span style="font-size: 15px;letter-spacing: 1px;">typecheckDemo.go</span> 中存在的潜在问题都检测到了,并标记了是何种 linter 检测(这里是 typecheck 和 govet 两种)到的。
当然,也可以通过命令 <span style="font-size: 15px;letter-spacing: 1px;">golangci-lint run dir1 dir2/... dir3/file1.go</span> 对某特定的文件或文件夹进行分析。
灵活运用命令选项
golangci-lint 可以通过
<span style="font-size: 15px;">-E/--enable</span>去开启指定 linter,或者<span style="font-size: 15px;">-D/--disable</span>禁止指定 linter。
1golangci-lint run --disable-all -E errcheck
如上命令代表的就是除了 <span style="font-size: 15px;letter-spacing: 1px;">errcheck</span> 的 linter,禁止其他所有的 linter 生效。
golangci-lint 还可以通过
<span style="font-size: 15px;">-p/--preset</span>指定一系列 linter 开启。
1golangci-lint run -p bugs -p error
如上命令代表的就是所有属于 <span style="font-size: 15px;letter-spacing: 1px;">bugs</span> 和 <span style="font-size: 15px;letter-spacing: 1px;">error</span> 分类的 linter 生效。
更多命令选项,可以通过
<span style="font-size: 15px;">golangci-lint run -h</span>查看
配置文件
当然,如果我们要为项目配置 golangci-lint,最好的方式还是配置文件。golangci-lint 在当前工作目录按如下顺序搜索配置文件。
.golangci.yml.golangci.yaml.golangci.toml.golangci.json
在 golangci-lint 官方文档 https://golangci-lint.run/usage/configuration/#config-file 中,提供了一个示例配置文件,非常地详细,在这其中包含了所有支持的选项、描述和默认值。
在这里给出一个比较不错的配置示例文档
 1linters-settings:
 2  errcheck:
 3    check-type-assertions: true
 4  goconst:
 5    min-len: 2
 6    min-occurrences: 3
 7  gocritic:
 8    enabled-tags:
 9      - diagnostic
10      - experimental
11      - opinionated
12      - performance
13      - style
14  govet:
15    check-shadowing: true
16  nolintlint:
17    require-explanation: true
18    require-specific: true
19
20linters:
21  disable-all: true
22  enable:
23    - bodyclose
24    - deadcode
25    - depguard
26    - dogsled
27    - dupl
28    - errcheck
29    - exportloopref
30    - exhaustive
31    - goconst
32    - gocritic
33    - gofmt
34    - goimports
35    - gomnd
36    - gocyclo
37    - gosec
38    - gosimple
39    - govet
40    - ineffassign
41    - misspell
42    - nolintlint
43    - nakedret
44    - prealloc
45    - predeclared
46    - revive
47    - staticcheck
48    - structcheck
49    - stylecheck
50    - thelper
51    - tparallel
52    - typecheck
53    - unconvert
54    - unparam
55    - varcheck
56    - whitespace
57    - wsl
58
59run:
60  issues-exit-code: 1
<br/>
使用 pre-commit hook
在项目开发中,我们都会使用到 git,因此我们可以将代码静态检查放在一个 git 触发点上,而不用每次写完代码手动去执行 <span style="font-size: 15px;letter-spacing: 1px;">golangci-lint run</span> 命令。这里,我们就需要用到 git hooks。
git フック
Git フックは、ユーザーが Git 操作のさまざまな段階でカスタマイズされたロジックを実行できるようにする git のフック メカニズムです。 Git フックは、プロジェクト ルート ディレクトリの <span style="font-size: 15px;letter-spacing: 1px;">.git/hooks</span> に設定されており、設定ファイルの名前は固定されており、本質的にはシェル スクリプトです。 git の実行本体に従って、フックはクライアント フックとサーバー フックの 2 つのカテゴリに分類されます。
クライアントフックには次のものが含まれます: <span style="font-size: 15px;letter-spacing: 1px;">pre-commit</span>、<span style="font-size: 15px;letter-spacing: 1px;">prepare-commit -msg</span>、<span style="font-size: 15px;letter-spacing: 1px;">commit-msg</span>、<span style="font-size: 15px;letter-spacing: 1px;">post-commit</span> などは主にクライアント git の送信ワークフローを制御するために使用されます。サーバー側フック: <span style="font-size: 15px;letter-spacing: 1px;">pre-receive</span>、<span style="font-size: 15px;letter-spacing: 1px;">post-receive</span>、<span style="font-size: 15px;letter-spacing: 1px;">update</span>、主にサーバーが送信されたオブジェクトを受信したとき、サーバーにプッシュする前に呼び出されます。
.sample で終わるファイル名は公式のサンプルであることに注意してください。これらのサンプル スクリプトは実行されず、名前を変更した後 (.sample サフィックスを削除した後) にのみ有効になります。

而 pre-commit 正如其名一样,它在 <span style="font-size: 15px;letter-spacing: 1px;">git add</span> 提交之后,运行 <span style="font-size: 15px;letter-spacing: 1px;">git commit</span> 时执行,脚本执行没报错就继续提交,反之就驳回提交的操作。
pre-commit
试想,如果我们同时开发多个项目,也许项目的所采用的的编程语言并不一样,那么它们所需要的 git hooks 将不一致,此时我们是否要手动给每个项目都配置一个单独的 pre-commit 脚本呢,或者我们是否要去手动下载每一个钩子脚本呢。
实际上,并不需要这么麻烦。这里就引出了 pre-commit 框架,它是一个与语言无关的用于管理 git hooks 钩子脚本的工具(虽然采用 Python 开发,但不止于 Python )。
安装
1$ pip install pre-commit
2或者
3$ curl https://pre-commit.com/install-local.py | python -
4或者
5$ brew install pre-commit
安装成功
1$ pre-commit --version
2pre-commit 1.20.0
编写配置文件
首先我们在项目根目录下新建一个 <span style="font-size: 15px;letter-spacing: 1px;">.pre-commit-config.yaml</span> 文件,这个文件我们可以通过 <span style="font-size: 15px;letter-spacing: 1px;">pre-commit sample-config</span> 得到最基本的配置模板,通过 pre-commit 支持的 hooks 列表 https://pre-commit.com/hooks.html 中,我们找到了 golangci-lint。

因此,使用 golangci-lint 的 <span style="font-size: 15px;letter-spacing: 1px;">.pre-commit-config.yaml</span> 配置内容如下
1repos:
2-   repo: https://github.com/golangci/golangci-lint
3    rev: v1.41.1 # the current latest version
4    hooks:
5    -   id: golangci-lint
安装 git hook 脚本
运行 <span style="font-size: 15px;letter-spacing: 1px;">pre-commit install</span> 命令根据配置文件安装
1$ pre-commit install
2pre-commit installed at .git/hooks/pre-commit
此时,生成了新的 Python 语言编写的 <span style="font-size: 15px;letter-spacing: 1px;">.git/hooks/pre-commit</span> 钩子文件。
git commit 触发 golangci-lint 检查

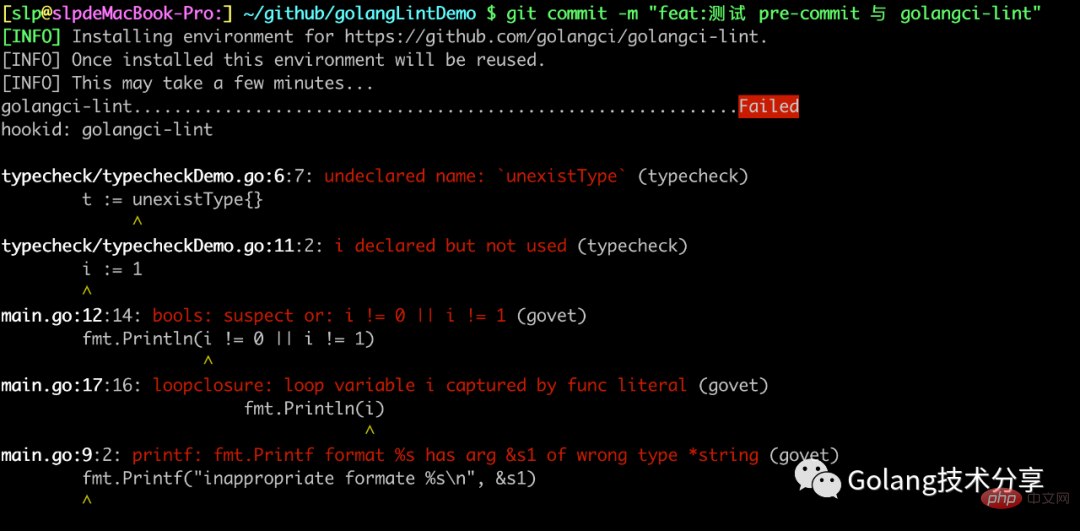
首次运行时,由于 pre-commit 没有 golangci-lint 的环境,会初始化下载安装相关依赖。在下一次 git-commit 的时候,就不会有前三行信息了。
如上图所示,报错内容和我们手动执行 <span style="font-size: 15px;letter-spacing: 1px;">golangci-lint run</span> 命令输出的一样,只有当我们将代码更改正确,才能顺利通过检查,从而 commit 成功。
总结
コードの品質は、すべての開発者が注意を払う必要がある問題です。リンター プラグインは、Gopher が潜在的なバグをタイムリーに発見して解決するのに大いに役立ちます。同時に golangci-lint はプロジェクトチーム内でのコードスタイルの標準化やコードレビューの精神的負担の軽減にも効果的ですので、Gophers の皆様にはぜひ有効活用していただければと思います。
git-commit ツールは、設定ファイルを通じて git フックに必要な <span style="font-size: 15px;letter-spacing: 1px;">pre-commit</span> フック スクリプトを生成します。 golangci-lint を使用して、静的コード検査作業を手動操作から自動化されたプロセスに変換できます。上記の git-commit の紹介は比較的簡単です。さらに詳しく知りたい場合は、公式 Web サイト https://pre-commit.com/index.html## に直接アクセスしてください。 # 学ぶために。実際、この自動化プロセスをより広範囲に拡張できます。たとえば、golangci-lint ルールを使用して、プロジェクトから非標準コードをローカル コード ベースに取り込むのを防ぐことができます。これを継続的統合 CI プロセスに追加して、次のことを実現できます。自動化です。スペースの都合上、CI 部分の利用方法は読者がご自身で検討していただくことに委ねられています。 <span style="font-size: 15px;letter-spacing: 1px;"></span>
以上がGopher が知っておくべきコード自動化検査の詳細内容です。詳細については、PHP 中国語 Web サイトの他の関連記事を参照してください。

