
負荷分散にnginxを使用する方法

- WBOYWBOYWBOYWBOYWBOYWBOYWBOYWBOYWBOYWBOYWBOYWBOYWB転載
- 2023-06-03 08:19:122081ブラウズ
4 層ロード バランシングと 7 層ロード バランシングの比較
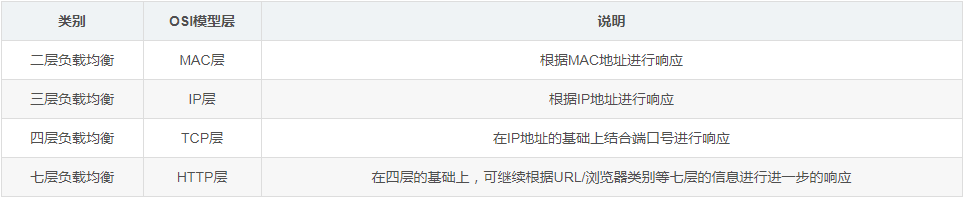
7 層ロード バランシングまたは 4 層ロード バランシングは、実際には次の名前に基づいているとよく言われます。 ISO OSI ネットワーク モデルの層 最終的な決定は、nginx が http プロトコルを使用してアプリケーション層で負荷分散操作を実行するため、nginx が 7 層負荷分散と呼ばれることです。たとえば、tcp 層で負荷分散操作を実行する lvs は、層 4 負荷分散と呼ばれます。一般的に、負荷分散には次の分類があります。
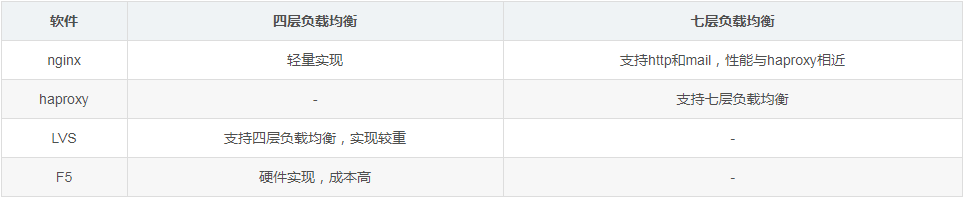
#共通ソフトウェア サポート
##一般的な負荷分散アルゴリズム
一般的な負荷分散アルゴリズムは次のとおりです。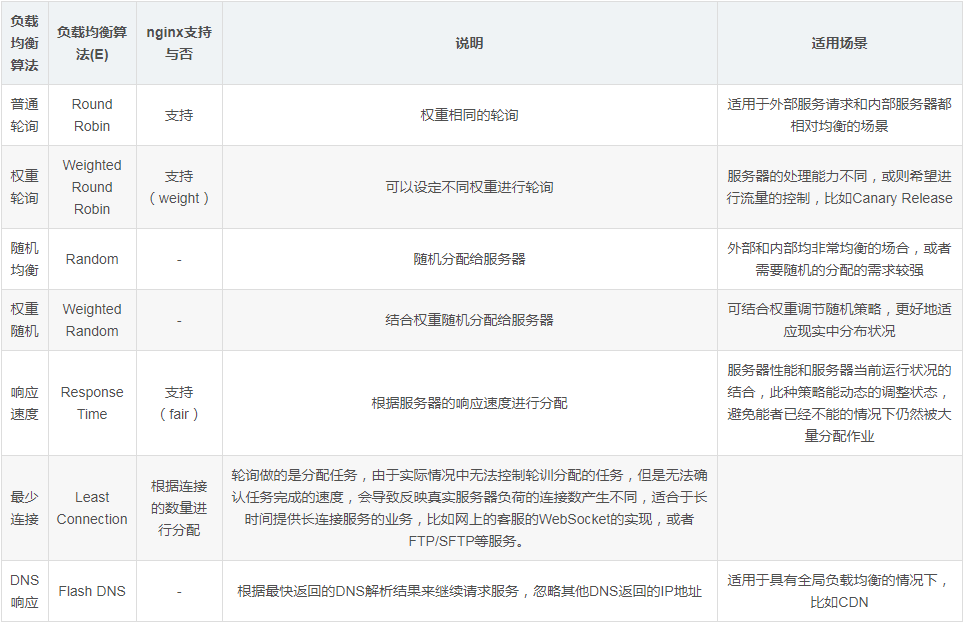
負荷分散のデモ例: 通常のポーリング#次に nginx を使用して、通常のポーリングを実行する方法を示します。

事前に、2 つのポート 7001/7002 で 2 つのサービスを起動して、異なる情報を表示します。デモンストレーションの便宜上、tornado を使用してミラーを作成しました。Docker コンテナーの起動時に渡されるパラメーターは異なり、サービスの表示に使用されます。
[root@kong ~]# docker run -d -p 7001:8080 liumiaocn/tornado:latest python /usr/local/bin/daemon.py "user service 1: 7001"
ddba0abd24524d270a782c3fab907f6a35c0ce514eec3159357bded09022ee57
[root@kong ~]# docker run -d -p 7002:8080 liumiaocn/tornado:latest python /usr/local/bin/daemon.py "user service 1: 7002"
95deadd795e19f675891bfcd44e5ea622c95615a95655d1fd346351eca707951
[root@kong ~]#
[root@kong ~]# curl http://192.168.163.117:7001
hello, service :user service 1: 7001
[root@kong ~]#
[root@kong ~]# curl http://192.168.163.117:7002
hello, service :user service 1: 7002
[root@kong ~]#
Start nginx
[root@kong ~]# docker run -p 9080:80 --name nginx-lb -d nginx
9d53c7e9a45ef93e7848eb3f4e51c2652a49681e83bda6337c89a3cf2f379c74
[root@kong ~]# docker ps |grep nginx-lb
9d53c7e9a45e    nginx           "nginx -g 'daemon ..."  11 seconds ago   up 10 seconds    0.0.0.0:9080->80/tcp                         nginx-lb
[root@kong ~]#
次の nginx コード スニペットを準備し、nginx/etc に追加します。
http {
upstream nginx_lb {
  server 192.168.163.117:7001;
  server 192.168.163.117:7002;
}
server {
  listen    80;
  server_name www.liumiao.cn 192.168.163.117;
  location / {
    proxy_pass http://nginx_lb;
  }
}
/nginx/conf.d/default.conf のdefault.conf を変更する方法コンテナに vim をインストールすることで効果を得ることができます。ローカルで変更して docker cp 経由で渡すことも、sed で直接変更することもできます。 vim をコンテナにインストールする場合は、次の方法を使用します。
[root@kong ~]# docker exec -it nginx-lb sh
# apt-get update
...省略
# apt-get install vim
...省略
変更前
# cat default.conf
server {
  listen    80;
  server_name localhost;
  #charset koi8-r;
  #access_log /var/log/nginx/host.access.log main;
  location / {
    root  /usr/share/nginx/html;
    index index.html index.htm;
  }
  #error_page 404       /404.html;
  # redirect server error pages to the static page /50x.html
  #
  error_page  500 502 503 504 /50x.html;
  location = /50x.html {
    root  /usr/share/nginx/html;
  }
  # proxy the php scripts to apache listening on 127.0.0.1:80
  #
  #location ~ \.php$ {
  #  proxy_pass  http://127.0.0.1;
  #}
  # pass the php scripts to fastcgi server listening on 127.0.0.1:9000
  #
  #location ~ \.php$ {
  #  root      html;
  #  fastcgi_pass  127.0.0.1:9000;
  #  fastcgi_index index.php;
  #  fastcgi_param script_filename /scripts$fastcgi_script_name;
  #  include    fastcgi_params;
  #}
  # deny access to .htaccess files, if apache's document root
  # concurs with nginx's one
  #
  #location ~ /\.ht {
  #  deny all;
  #}
}
#
# cat default.conf
upstream nginx_lb {
  server 192.168.163.117:7001;
  server 192.168.163.117:7002;
}
server {
  listen    80;
  server_name www.liumiao.cn 192.168.163.117;
  #charset koi8-r;
  #access_log /var/log/nginx/host.access.log main;
  location / {
    #root  /usr/share/nginx/html;
    #index index.html index.htm;
    proxy_pass http://nginx_lb;
  }
  #error_page 404       /404.html;
  # redirect server error pages to the static page /50x.html
  #
  error_page  500 502 503 504 /50x.html;
  location = /50x.html {
    root  /usr/share/nginx/html;
  }
  # proxy the php scripts to apache listening on 127.0.0.1:80
  #
  #location ~ \.php$ {
  #  proxy_pass  http://127.0.0.1;
  #}
  # pass the php scripts to fastcgi server listening on 127.0.0.1:9000
  #
  #location ~ \.php$ {
  #  root      html;
  #  fastcgi_pass  127.0.0.1:9000;
  #  fastcgi_index index.php;
  #  fastcgi_param script_filename /scripts$fastcgi_script_name;
  #  include    fastcgi_params;
  #}
  # deny access to .htaccess files, if apache's document root
  # concurs with nginx's one
  #
  #location ~ /\.ht {
  #  deny all;
  #}
}
#
[root@kong ~]# docker restart nginx-lb
nginx-lb
[root@kong ~]#
ポーリングが次の順序で実行されていることがはっきりとわかります:
[root@kong ~]#curlhello、サービス :ユーザー サービス 1: 7001[root@kong ~]#curl
##ロード バランシングのデモンストレーション例: ウェイト ポーリング
hello、サービス :ユーザー サービス 1: 7002
[root@kong ~]#カール
こんにちは、サービス:ユーザーサービス1:7001
[root@kong ~]#カール
こんにちは、サービス:ユーザーサービス1:7002
[root@kong ~]
#これに基づいて、ウェイト ポーリングを実行するにはウェイトを追加するだけで済みます
#default.conf を変更します #default.conf を次のように変更します
# cp default.conf default.conf.org
# vi default.conf
# diff default.conf default.conf.org
2,3c2,3
<   server 192.168.163.117:7001 weight=100;
<   server 192.168.163.117:7002 weight=200;
---
>   server 192.168.163.117:7001;
>   server 192.168.163.117:7002;
#
nginx コンテナを再起動します
[root@kong ~]# docker restart nginx-lb
nginx-lb
[root@kong ~]#
結果の確認
1/3 と 2/3 の比率で投票結果が行われていることがわかります:
[root @kong ~]#curlhello、サービス :ユーザー サービス 1: 7001
[root@kong ~]#curlhello、サービス :ユーザー サービス 1: 7002
[root@kong ~] #カールこんにちは、サービス:ユーザーサービス1: 7002[root@kong ~]
#
以上が負荷分散にnginxを使用する方法の詳細内容です。詳細については、PHP 中国語 Web サイトの他の関連記事を参照してください。