


事前情報
1. デシジョンツリー
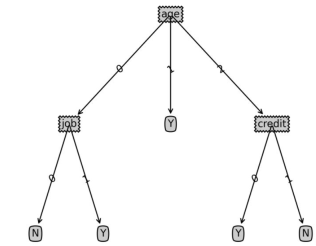
書き換えられた文: 教師あり学習では、一般的に使用される分類アルゴリズムは決定木です。これはサンプルのバッチに基づいており、各サンプルには一連の属性と対応する分類結果が含まれています。これらのサンプルを学習に使用すると、アルゴリズムは新しいデータを正しく分類できるデシジョン ツリーを生成できます
2. サンプル データ
14 人の既存ユーザーとその個人属性があると仮定します。特定の商品を購入するかどうかは次のとおりです。
| 年齢 | 収入範囲 | 職種 | 信用格付け | 購入決定 | |||||||||||
|---|---|---|---|---|---|---|---|---|---|---|---|---|---|---|---|
| 高い | 不安定 | 悪い | No | ||||||||||||
| ##高 | 不安定 | 良好 | なし | ||||||||||||
| 30-40 | 高い | 不安定 | 悪い | は | |||||||||||
| >40 | 中 | 不安定 | 悪い | はい | #05 | ||||||||||
| 低 | 安定 | 悪い | はい | 06 | |||||||||||
| 低 | 安定 | 良好 | なし | 07 | |||||||||||
| 低 | 安定 | 良い | はい | 08 | |||||||||||
| 不安定 | 悪い | No | 09 | ||||||||||||
| 安定 | 悪い | は | 10 | ||||||||||||
| 中 | 安定 | 悪い | はい | ##11 | 中 | 安定 | 良い | はい | ##12 | 30-40 | |||||
| 不安定 | 良い | はい | 13 | 30-40 | |||||||||||
| 安定 | 悪い | #は | 14 | >40 | |||||||||||
| 不安定 | 良い | いいえ | ## |
| 仕事の内容 | 信用格付け | ## | |
|---|---|---|---|
| # | 高 | 不安定 | |
def classify(inputtree,featlabels,testvec):
    firststr = list(inputtree.keys())[0]
    seconddict = inputtree[firststr]
    featindex = featlabels.index(firststr)
    for key in seconddict.keys():
        if testvec[featindex]==key:
            if type(seconddict[key]).__name__=='dict':
                classlabel=classify(seconddict[key],featlabels,testvec)
            else:
                classlabel=seconddict[key]
    return classlabel
labels=['age','income','job','credit'] tsvec=[0,0,1,1] print('result:',classify(Tree,labels,tsvec)) tsvec1=[0,2,0,1] print('result1:',classify(Tree,labels,tsvec1)) |
result: Y | result1: N
import matplotlib.pyplot as plt

decisionNode = dict(box, fc="0.8")
leafNode = dict(box, fc="0.8")
arrow_args = dict(arrow)

#获取叶节点的数目
def getNumLeafs(myTree):
    numLeafs = 0
    firstStr = list(myTree.keys())[0]
    secondDict = myTree[firstStr]
    for key in secondDict.keys():
        if type(secondDict[key]).__name__=='dict':#测试节点的数据是否为字典,以此判断是否为叶节点
            numLeafs += getNumLeafs(secondDict[key])
        else:   numLeafs +=1
    return numLeafs

#获取树的层数
def getTreeDepth(myTree):
    maxDepth = 0
    firstStr = list(myTree.keys())[0]
    secondDict = myTree[firstStr]
    for key in secondDict.keys():
        if type(secondDict[key]).__name__=='dict':#测试节点的数据是否为字典,以此判断是否为叶节点
            thisDepth = 1 + getTreeDepth(secondDict[key])
        else:   thisDepth = 1
        if thisDepth > maxDepth: maxDepth = thisDepth
    return maxDepth

#绘制节点
def plotNode(nodeTxt, centerPt, parentPt, nodeType):
    createPlot.ax1.annotate(nodeTxt, xy=parentPt,  xycoords='axes fraction',
             xytext=centerPt, textcoords='axes fraction',
             va="center", ha="center", bbox=nodeType, arrowprops=arrow_args )

#绘制连接线
def plotMidText(cntrPt, parentPt, txtString):
    xMid = (parentPt[0]-cntrPt[0])/2.0 + cntrPt[0]
    yMid = (parentPt[1]-cntrPt[1])/2.0 + cntrPt[1]
    createPlot.ax1.text(xMid, yMid, txtString, va="center", ha="center", rotation=30)

#绘制树结构
def plotTree(myTree, parentPt, nodeTxt):#if the first key tells you what feat was split on
    numLeafs = getNumLeafs(myTree)  #this determines the x width of this tree
    depth = getTreeDepth(myTree)
    firstStr = list(myTree.keys())[0]     #the text label for this node should be this
    cntrPt = (plotTree.xOff + (1.0 + float(numLeafs))/2.0/plotTree.totalW, plotTree.yOff)
    plotMidText(cntrPt, parentPt, nodeTxt)
    plotNode(firstStr, cntrPt, parentPt, decisionNode)
    secondDict = myTree[firstStr]
    plotTree.yOff = plotTree.yOff - 1.0/plotTree.totalD
    for key in secondDict.keys():
        if type(secondDict[key]).__name__=='dict':#test to see if the nodes are dictonaires, if not they are leaf nodes
            plotTree(secondDict[key],cntrPt,str(key))        #recursion
        else:   #it's a leaf node print the leaf node
            plotTree.xOff = plotTree.xOff + 1.0/plotTree.totalW
            plotNode(secondDict[key], (plotTree.xOff, plotTree.yOff), cntrPt, leafNode)
            plotMidText((plotTree.xOff, plotTree.yOff), cntrPt, str(key))
    plotTree.yOff = plotTree.yOff + 1.0/plotTree.totalD

#创建决策树图形
def createPlot(inTree):
    fig = plt.figure(1, facecolor='white')
    fig.clf()
    axprops = dict(xticks=[], yticks=[])
    createPlot.ax1 = plt.subplot(111, frameon=False, **axprops)    #no ticks
    #createPlot.ax1 = plt.subplot(111, frameon=False) #ticks for demo puropses
    plotTree.totalW = float(getNumLeafs(inTree))
    plotTree.totalD = float(getTreeDepth(inTree))
    plotTree.xOff = -0.5/plotTree.totalW; plotTree.yOff = 1.0;
    plotTree(inTree, (0.5,1.0), '')
    plt.savefig('决策树.png',dpi=300,bbox_inches='tight')
    plt.show()
以上がPythonでデシジョンツリー分類アルゴリズムを実装する方法の詳細内容です。詳細については、PHP 中国語 Web サイトの他の関連記事を参照してください。

 Pythonリストをどのようにスライスしますか?May 02, 2025 am 12:14 AM
slicingapythonlistisdoneusingtheyntaxlist [start:stop:step] .hore'showitworks:1)startisthe indexofthefirstelementtoinclude.2)spotisthe indexofthefirmenttoeexclude.3)staptistheincrementbetbetinelements
 Numpyアレイで実行できる一般的な操作は何ですか?May 02, 2025 am 12:09 AM
numpyallows forvariousoperationsonarrays:1)basicarithmeticlikeaddition、減算、乗算、および分割; 2)AdvancedperationssuchasmatrixMultiplication;
 Pythonを使用したデータ分析では、配列はどのように使用されていますか?May 02, 2025 am 12:09 AM
Arraysinpython、特にnumpyandpandas、aresentialfordataanalysis、offeringspeedandeficiency.1)numpyarraysenable numpyarraysenable handling forlaredatasents andcomplexoperationslikemoverages.2)Pandasextendsnumpy'scapabivitieswithdataframesfortruc
 リストのメモリフットプリントは、Pythonの配列のメモリフットプリントとどのように比較されますか?May 02, 2025 am 12:08 AM
listsandnumpyarraysinpythonhavedifferentmemoryfootprints:listsaremoreflexiblellessmemory-efficient、whileenumpyarraysaraysareoptimizedfornumericaldata.1)listsstorereferencesto objects、with whowedaround64byteson64-bitedatigu
 実行可能なPythonスクリプトを展開するとき、環境固有の構成をどのように処理しますか?May 02, 2025 am 12:07 AM
toensurepythonscriptsbehaveCorrectlyAcrossDevelosment、staging、and Production、usetheseStrategies:1)環境variablesforsimplestetings、2)configurationfilesforcomplexsetups、and3)dynamicloadingforadaptability.eachtododododododofersuniquebentandrequiresca
 Pythonアレイをどのようにスライスしますか?May 01, 2025 am 12:18 AM
Pythonリストスライスの基本的な構文はリストです[start:stop:step]。 1.STARTは最初の要素インデックス、2。ストップは除外された最初の要素インデックスであり、3.ステップは要素間のステップサイズを決定します。スライスは、データを抽出するためだけでなく、リストを変更および反転させるためにも使用されます。
 どのような状況で、リストは配列よりもパフォーマンスが向上しますか?May 01, 2025 am 12:06 AM
ListSoutPerformArraysIn:1)ダイナミシジョンアンドフレーケンティオン/削除、2)ストーリングヘテロゼンダタ、および3)メモリ効率の装飾、ButmayhaveslightPerformancostsinceNASOPERATIONS。
 PythonアレイをPythonリストに変換するにはどうすればよいですか?May 01, 2025 am 12:05 AM
toconvertapythonarraytoalist、usetheList()constructororageneratorexpression.1)importhearraymoduleandcreateanarray.2)useList(arr)または[xforxinarr] toconvertoalistは、largedatatessを変えることを伴うものです。


ホットAIツール

Undresser.AI Undress
リアルなヌード写真を作成する AI 搭載アプリ

AI Clothes Remover
写真から衣服を削除するオンライン AI ツール。

Undress AI Tool
脱衣画像を無料で

Clothoff.io
AI衣類リムーバー

Video Face Swap
完全無料の AI 顔交換ツールを使用して、あらゆるビデオの顔を簡単に交換できます。

人気の記事
ホットツール

メモ帳++7.3.1
使いやすく無料のコードエディター

SublimeText3 Mac版
神レベルのコード編集ソフト(SublimeText3)

SecLists
SecLists は、セキュリティ テスターの究極の相棒です。これは、セキュリティ評価中に頻繁に使用されるさまざまな種類のリストを 1 か所にまとめたものです。 SecLists は、セキュリティ テスターが必要とする可能性のあるすべてのリストを便利に提供することで、セキュリティ テストをより効率的かつ生産的にするのに役立ちます。リストの種類には、ユーザー名、パスワード、URL、ファジング ペイロード、機密データ パターン、Web シェルなどが含まれます。テスターはこのリポジトリを新しいテスト マシンにプルするだけで、必要なあらゆる種類のリストにアクセスできるようになります。

SublimeText3 中国語版
中国語版、とても使いやすい

Dreamweaver Mac版
ビジュアル Web 開発ツール
ホットトピック
 7889
7889 15165014141152130225124829