
Ubuntu で Nginx サービスを構築および構成する方法

- 王林転載
- 2023-05-19 17:47:112739ブラウズ
1. Nginx
Nginx (「エンジン x」) は、ロシアのプログラマー Igor Sysoev によって開発された高性能 Web およびリバース プロキシ サーバーであり、IMAP/POP3/SMTP プロキシ サーバーでもあります。
3 つの主要な WEB サーバーの 1 つ: apache、Nginx、lighttpd。 Nginx は優れた代替手段であり、大量の同時接続を処理する必要がある場合には Apache サーバーよりも適しています。
nginx アプリケーション シナリオ
静的サーバー。 (画像、ビデオサービス) もう 1 つは lighttpd です。 html、js、css、flv、jpg、gif などの数万の同時ファイル。
動的サービス、PHP、jspを実行するためのnginx-fastcgiモード。 (PHP の同時実行数は 500 ~ 1500、MySQL の同時実行数は 300 ~ 1500)。
リバース プロキシ、負荷分散。 1 日の pv が 2000W 未満の場合は、nginx をプロキシとして直接使用できます。
キャッシング サービス。 SQUID、VARNISHに似ています。
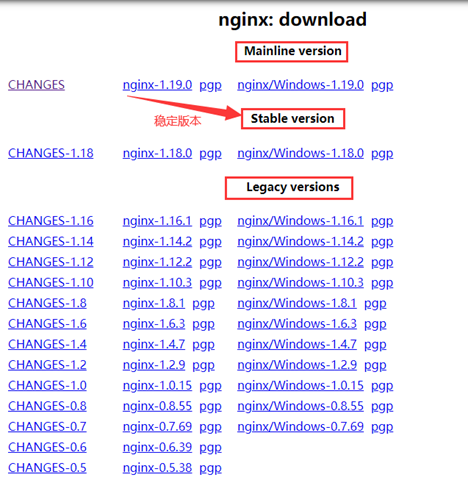
公式 Web サイトでは 3 種類のバージョンが提供されています。
Nginx 公式 Web サイトでは 3 種類のバージョンが提供されています。
メインライン バージョン: メインラインは、Nginx が現在開発中のバージョンです。開発バージョンと言われます
安定バージョン: 最新の安定バージョン、運用環境に推奨されるバージョン
レガシーバージョン: 従来の古いバージョンの安定バージョン
2 、nginx サービスの構築
1. apt を使用して
sudo apt install nginx
2 をインストールします。インストール後の場所:
/ usr/sbin/nginx: メインプログラム
/etc/nginx: 設定ファイルの保存
#/usr/share/nginx: 静的ファイルの保存
/var/log/nginx: ログを保存します
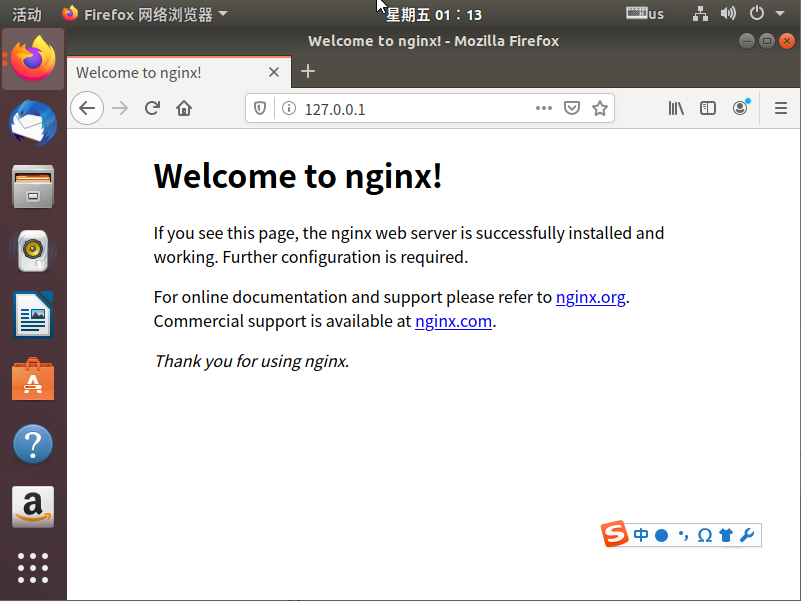
3. 開始して効果を確認します
service nginx start  # 启动nginx
service nginx reload  # 重新加载nginx配置文件
IP を入力してくださいブラウザにアドレスが表示され、nginx に Wellcome が表示されれば、設定は成功です。
他の 2 つのコマンド
nginx -s reopen            # 重启 Nginx
nginx -s stop              # 停止 Nginx
4. バージョン番号を確認します:
~$ nginx -v
 nginx version: nginx/1.14.0 (Ubuntu)
3. nginx 設定ファイルの概要

1. nginx ファイル構造
グローバル ブロック : nginx にグローバルに影響を与える命令を設定します。一般的に、nginxサーバーを実行するためのユーザーグループ、nginxプロセスのpid保存パス、ログ保存パス、設定ファイルの導入、生成可能なワーカープロセスの数などがあります。
イベント ブロック: 設定は、nginx サーバーまたはユーザーへのネットワーク接続に影響します。プロセスごとの接続の最大数、接続要求を処理するためにどのイベント ドリブン モデルを選択するか、複数のネットワーク接続を同時に受け入れることを許可するかどうか、複数のネットワーク接続のシリアル化を有効にするかどうかなどがあります。
http ブロック: 複数のサーバーをネストし、プロキシ、キャッシュ、ログ定義、その他のほとんどの機能を構成し、サードパーティ モジュールを構成できます。ファイルの導入、MIME タイプの定義、ログのカスタマイズ、ファイル転送に sendfile を使用するかどうか、接続タイムアウト、単一接続リクエストの数など。
サーバー ブロック: 仮想ホストの関連パラメーターを構成します。1 つの http 内に複数のサーバーが存在する場合があります。
#location ブロック: リクエストのルーティングとさまざまなページの処理を構成します。
...              # 全局块。配置影响nginx全局的指令。

events {         # events块。配置影响nginx服务器或与用户的网络连接。
   ...
}

http      # http块。可以嵌套多个server,配置代理,缓存,日志定义等绝大多数功能和第三方模块的配置。
{
    ...   # http全局块
    server        # server块。配置虚拟主机的相关参数,一个http中可以有多个server。
    {
        ...       # server全局块
        location [PATTERN]   # location块。配置请求的路由,以及各种页面的处理情况。
        {
            ...
        }
        location [PATTERN]
        {
            ...
        }
    }
    server
    {
      ...
    }
    ...     # http全局块
}
2. デフォルト設定
##
# You should look at the following URL's in order to grasp a solid understanding
# of Nginx configuration files in order to fully unleash the power of Nginx.
# https://www.nginx.com/resources/wiki/start/
# https://www.nginx.com/resources/wiki/start/topics/tutorials/config_pitfalls/
# https://wiki.debian.org/Nginx/DirectoryStructure
#
# In most cases, administrators will remove this file from sites-enabled/ and
# leave it as reference inside of sites-available where it will continue to be
# updated by the nginx packaging team.
#
# This file will automatically load configuration files provided by other
# applications, such as Drupal or Wordpress. These applications will be made
# available underneath a path with that package name, such as /drupal8.
#
# Please see /usr/share/doc/nginx-doc/examples/ for more detailed examples.
##

# Default server configuration
#
server {
    listen 80 default_server;
    listen [::]:80 default_server;

    # SSL configuration
    #
    # listen 443 ssl default_server;
    # listen [::]:443 ssl default_server;
    #
    # Note: You should disable gzip for SSL traffic.
    # See: https://bugs.debian.org/773332
    #
    # Read up on ssl_ciphers to ensure a secure configuration.
    # See: https://bugs.debian.org/765782
    #
    # Self signed certs generated by the ssl-cert package
    # Don't use them in a production server!
    #
    # include snippets/snakeoil.conf;

    root /var/www/html;

    # Add index.php to the list if you are using PHP
    index index.html index.htm index.nginx-debian.html;

    server_name _;

    location / {
        # First attempt to serve request as file, then
        # as directory, then fall back to displaying a 404.
        try_files $uri $uri/ =404;
    }

    # pass PHP scripts to FastCGI server
    #
    #location ~ \.php$ {
    #    include snippets/fastcgi-php.conf;
    #
    #    # With php-fpm (or other unix sockets):
    #    fastcgi_pass unix:/var/run/php/php7.0-fpm.sock;
    #    # With php-cgi (or other tcp sockets):
    #    fastcgi_pass 127.0.0.1:9000;
    #}

    # deny access to .htaccess files, if Apache's document root
    # concurs with nginx's one
    #
    #location ~ /\.ht {
    #    deny all;
    #}
}


# Virtual Host configuration for example.com
#
# You can move that to a different file under sites-available/ and symlink that
# to sites-enabled/ to enable it.
#
#server {
#    listen 80;
#    listen [::]:80;
#
#    server_name example.com;
#
#    root /var/www/example.com;
#    index index.html;
#
#    location / {
#        try_files $uri $uri/ =404;
#    }
#}
3. nginx の基本設定
########### 每个指令必须有分号结束。#################
#user administrator administrators;  #配置用户或者组,默认为nobody nobody。
#worker_processes 2;  #允许生成的进程数,默认为1
#pid /nginx/pid/nginx.pid;   #指定nginx进程运行文件存放地址
error_log log/error.log debug;  #制定日志路径,级别。这个设置可以放入全局块,http块,server块,级别以此为:debug|info|notice|warn|error|crit|alert|emerg
events {
    accept_mutex on;   #设置网路连接序列化,防止惊群现象发生,默认为on
    multi_accept on;  #设置一个进程是否同时接受多个网络连接,默认为off
    #use epoll;      #事件驱动模型,select|poll|kqueue|epoll|resig|/dev/poll|eventport
    worker_connections  1024;    #最大连接数,默认为512
}
http {
    include       mime.types;   #文件扩展名与文件类型映射表
    default_type  application/octet-stream; #默认文件类型,默认为text/plain
    #access_log off; #取消服务日志
    log_format myFormat '$remote_addr–$remote_user [$time_local] $request $status $body_bytes_sent $http_referer $http_user_agent $http_x_forwarded_for'; #自定义格式
    access_log log/access.log myFormat;  #combined为日志格式的默认值
    sendfile on;   #允许sendfile方式传输文件,默认为off,可以在http块,server块,location块。
    sendfile_max_chunk 100k;  #每个进程每次调用传输数量不能大于设定的值,默认为0,即不设上限。
    keepalive_timeout 65;  #连接超时时间,默认为75s,可以在http,server,location块。

    upstream mysvr {
      server 127.0.0.1:7878;
      server 192.168.10.121:3333 backup;  #热备
    }
    error_page 404 https://www.baidu.com; #错误页
    server {
        keepalive_requests 120; #单连接请求上限次数。
        listen       80;   #监听端口
        server_name  127.0.0.1;   #监听地址
        location  ~*^.+$ {       #请求的url过滤,正则匹配,~为区分大小写,~*为不区分大小写。
           #root path;  #根目录
           #index vv.txt;  #设置默认页
           proxy_pass  http://mysvr;  #请求转向mysvr 定义的服务器列表
           deny 127.0.0.1;  #拒绝的ip
           allow 172.18.5.54; #允许的ip
        }
    }
}
4. nginx 仮想ホスト設定
#下面是server虚拟主机的配置段
 server
  {
    listen 80;#监听端口
    server_name localhost;#域名
    index index.html index.htm index.php;
    root /usr/local/webserver/nginx/html;#站点目录
      location ~ .*\.(php|php5)?$
    {
      #fastcgi_pass unix:/tmp/php-cgi.sock;
      fastcgi_pass 127.0.0.1:9000;
      fastcgi_index index.php;
      include fastcgi.conf;
    }
    location ~ .*\.(gif|jpg|jpeg|png|bmp|swf|ico)$
    {
      expires 30d;
    #access_log off;
    }
    location ~ .*\.(js|css)?$
    {
      expires 15d;
     #access_log off;
    }
    access_log off;
  }
設定ファイルを確認します:
root@ubuntu: nginx -t
nginx: the configuration file /etc/nginx/nginx.conf syntax is ok
nginx: configuration file /etc/nginx/nginx.conf test is successful
5. nginx グローバル変数
-
クライアントの IP アドレスを記録するには、$remote_addr と $http_x_forwarded_for
## を使用できます。 - #$remote_user: クライアント ユーザー名を記録するために使用されます;
- $time_local: アクセス時間とタイム ゾーンを記録するために使用されます;
- $request: リクエストの URL と http プロトコルを記録するために使用されます;
- $status: リクエストのステータスを記録するために使用されます; 成功は 200;
- $body_bytes_s ent: クライアントに送信されるファイルの本文コンテンツのサイズを記録します;
- $http_referer: アクセスされたページ リンクを記録するために使用されます。 ;
- $http_user_agent: クライアント ブラウザの関連情報を記録します;
访问链接是:http://localhost:88/test1/test.php
网站路径是:/var/www/html

$host:localhost
$server_port:88
$request_uri:<a href="http://localhost:88/test1/test.php" rel="external nofollow"   target="_blank">http:</a>//localhost:88/test1/test.php
$document_uri:/test1/test.php
$document_root:/var/www/html
$request_filename:/var/www/html/test1/test.php
6. Nginx のメイン設定1.静的 Http サーバーの構成まず、Nginx は、サーバー上の静的ファイル (HTML や画像など) を HTTP プロトコルを通じてクライアントに表示できる HTTP サーバーです。
構成:
server {
listen 80; # 端口
server_name localhost 192.168.1.100; # 域名
location / { # 代表这是项目根目录
root /usr/share/nginx/www; # 虚拟目录
}
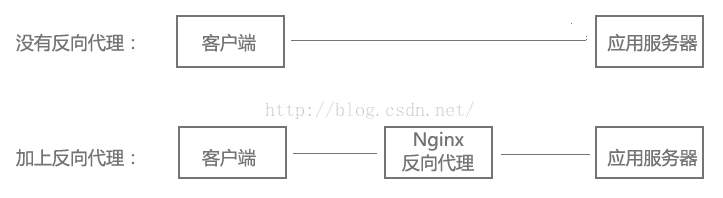
}2. リバース プロキシ サーバーの構成リバース プロキシとは何ですか? クライアントは、HTTP プロトコルを介して Web サイトのアプリケーションサーバーに直接アクセスできます。Web サイト管理者が途中に Nginx を追加すると、クライアントは Nginx を要求し、Nginx はアプリケーションサーバーに要求し、その結果をクライアントに返します。 Nginx はリバース プロキシ サーバーです。
server {
    listen 80;
    location / {
        proxy_pass http://192.168.0.112:8080;   # 应用服务器HTTP地址
    }
}
既然服务器可以直接HTTP访问,为什么要在中间加上一个反向代理,不是多此一举吗?反向代理有什么作用?继续往下看,下面的负载均衡、虚拟主机,都基于反向代理实现,当然反向代理的功能也不仅仅是这些。
3、负载均衡配置
当网站访问量非常大,也摊上事儿了。因为网站越来越慢,一台服务器已经不够用了。因此,可以将同一应用部署在多台服务器上,以将众多用户请求分配至多台机器进行处理。即使其中一台服务器故障,只要其他服务器正常运行,用户仍然可以正常使用,这是多台服务器带来的好处。Nginx可以通过反向代理来实现负载均衡。

负载均衡配置:
upstream myapp {
    server 192.168.0.111:8080;   # 应用服务器1
    server 192.168.0.112:8080;   # 应用服务器2
}
server {
    listen 80;
    location / {
        proxy_pass http://myweb;
    }
}
4、虚拟主机配置
有的网站访问量大,需要负载均衡。然而并不是所有网站都如此出色,有的网站,由于访问量太小,需要节省成本,将多个网站部署在同一台服务器上。
例如将www.aaa.com和www.bbb.com两个网站部署在同一台服务器上,两个域名解析到同一个IP地址,但是用户通过两个域名却可以打开两个完全不同的网站,互相不影响,就像访问两个服务器一样,所以叫两个虚拟主机。
虚拟主机配置:
server {
    listen 80 default_server;
    server_name _;
    return 444;   # 过滤其他域名的请求,返回444状态码
}
server {
    listen 80;
    server_name www.aaa.com;   # www.aaa.com域名
    location / {
        proxy_pass http://localhost:8080;   # 对应端口号8080
    }
}
server {
    listen 80;
    server_name www.bbb.com;   # www.bbb.com域名
    location / {
        proxy_pass http://localhost:8081;   # 对应端口号8081
    }
}
在服务器8080和8081分别开了一个应用,客户端通过不同的域名访问,根据server_name可以反向代理到对应的应用服务器。
虚拟主机的原理是通过HTTP请求头中的Host是否匹配server_name来实现的,有兴趣的同学可以研究一下HTTP协议。
另外,server_name配置还可以过滤有人恶意将某些域名指向你的主机服务器。
以上がUbuntu で Nginx サービスを構築および構成する方法の詳細内容です。詳細については、PHP 中国語 Web サイトの他の関連記事を参照してください。