
ホームページ >Java >&#&チュートリアル >Springboot がShiro を統合してログインと権限の検証を実装する方法
Springboot がShiro を統合してログインと権限の検証を実装する方法

- WBOYWBOYWBOYWBOYWBOYWBOYWBOYWBOYWBOYWBOYWBOYWBOYWB転載
- 2023-05-17 14:55:111141ブラウズ
Springboot-cli開発スキャフォールディングシリーズ
Springbootはログイン検証と権限認証のためにShiroをエレガントに統合します(ソースコードのダウンロード付き)
はじめに
Springbooはログイン検証のためにShiroを構成します、権限認証、デモデモ付属。
はじめに
当社は、開発者が基本的な環境を迅速に構築し、アプリケーションを実行できるようにすることを重視しており、ユーザーが参照できるように使用例を提供し、初心者でもすぐに始められるようにしています。
このブログ プロジェクトのソース コード アドレス:
プロジェクト ソース コード github アドレス
プロジェクト ソース コード国内 gitee アドレス
1. 環境
依存関係
     <!-- Shiro核心框架 -->
        <dependency>
            <groupId>org.apache.shiro</groupId>
            <artifactId>shiro-core</artifactId>
            <version>1.9.0</version>
        </dependency>
        <!-- Shiro使用Spring框架 -->
        <dependency>
            <groupId>org.apache.shiro</groupId>
            <artifactId>shiro-spring</artifactId>
            <version>1.9.0</version>
        </dependency>
        <!-- Thymeleaf中使用Shiro标签 -->
        <dependency>
            <groupId>com.github.theborakompanioni</groupId>
            <artifactId>thymeleaf-extras-shiro</artifactId>
            <version>2.1.0</version>
        </dependency>
        <dependency>
            <groupId>org.springframework.boot</groupId>
            <artifactId>spring-boot-starter-thymeleaf</artifactId>
        </dependency>
yml 設定
server:
port: 9999
servlet:
session:
# Tomcat にセッション情報のみを取得させるfrom COOKIE, このように、Cookie がない場合、URL は自動的に追加されません;jsessionid=…。
tracking-modes: COOKIEspring:
thymeleaf:
# 開発環境のテストを容易にするためにページ キャッシュをオフにします
キャッシュ: false
# 静的リソース パス
prefix : classpath:/templates/
# Web リソースのデフォルトの .html 末尾は
mode: HTML
2. はじめに
Shiro の 3 つの機能モジュール
Subject
認証サブジェクト。通常はユーザーを指します (操作は SecurityManager に任せます)。
- #SecurityManager
- Realm
@Data
@Accessors(chain = true)
public class User {
    /**
     * 用户id
     */
    private Long userId;
    /**
     * 用户名
     */
    private String username;
    /**
     * 密码
     */
    private String password;
    /**
     * 用户别称
     */
    private String name;
}
AuthorizingRealm のログイン検証 doGetAuthenticationInfo メソッドと認可 doGetAuthorizationInfo メソッドを書き換えます。カスタマイズされた検証ロジックをご連絡ください。 /**
* 自定义登录授权
*
* @author ding
*/
public class UserRealm extends AuthorizingRealm {
/**
* 授权
* 此处权限授予
*/
@Override
protected AuthorizationInfo doGetAuthorizationInfo(PrincipalCollection principalCollection) {
SimpleAuthorizationInfo info = new SimpleAuthorizationInfo();
// 在这里为每一个用户添加vip权限
info.addStringPermission("vip");
return info;
}
/**
* 认证
* 此处实现我们的登录逻辑,如账号密码验证
*/
@Override
protected AuthenticationInfo doGetAuthenticationInfo(AuthenticationToken authenticationToken) throws AuthenticationException {
// 获取到token
UsernamePasswordToken token = (UsernamePasswordToken) authenticationToken;
// 从token中获取到用户名和密码
String username = token.getUsername();
String password = String.valueOf(token.getPassword());
// 为了方便,这里模拟获取用户
User user = this.getUser();
if (!user.getUsername().equals(username)) {
throw new UnknownAccountException("用户不存在");
} else if (!user.getPassword().equals(password)) {
throw new IncorrectCredentialsException("密码错误");
}
// 校验完成后,此处我们把用户信息返回,便于后面我们通过Subject获取用户的登录信息
return new SimpleAuthenticationInfo(user, password, getName());
}
/**
* 此处模拟用户数据
* 实际开发中,换成数据库查询获取即可
*/
private User getUser() {
return new User()
.setName("admin")
.setUserId(1L)
.setUsername("admin")
.setPassword("123456");
}
}4. コア構成ShiroConfig.java
/**#* Shir には、インターセプターに関連するインターセプターを実装できるフィルターが組み込まれています。
* よく使用されるフィルター:
* anon: アクセスするのに認証 (ログイン) は必要ありません
* authc:
* にアクセスするには認証が必要です user: rememberMe 関数を使用すると、
* に直接アクセスできます perms: リソースは事前にリソース権限を取得する必要がありますアクセスできます。形式 perms[権限 1,権限 2]
* ロール: このリソースは、
* にアクセスする前にロール権限を取得する必要があります。*/
/**
 * shiro核心管理器
 *
 * @author ding
 */
@Configuration
public class ShiroConfig {
    /**
     * 无需认证就可以访问
     */
    private final static String ANON = "anon";
    /**
     * 必须认证了才能访问
     */
    private final static String AUTHC = "authc";
    /**
     * 拥有对某个资源的权限才能访问
     */
    private final static String PERMS = "perms";
    /**
     * 创建realm,这里返回我们上一把定义的UserRealm
     */
    @Bean(name = "userRealm")
    public UserRealm userRealm() {
        return new UserRealm();
    }
    /**
     * 创建安全管理器
     */
    @Bean(name = "securityManager")
    public DefaultWebSecurityManager getDefaultWebSecurityManager(@Qualifier("userRealm") UserRealm userRealm) {
        DefaultWebSecurityManager securityManager = new DefaultWebSecurityManager();
        //绑定realm对象
        securityManager.setRealm(userRealm);
        return securityManager;
    }
    /**
     * 授权过滤器
     */
    @Bean
    public ShiroFilterFactoryBean getShiroFilterFactoryBean(@Qualifier("securityManager") DefaultWebSecurityManager defaultWebSecurityManager) {
        ShiroFilterFactoryBean bean = new ShiroFilterFactoryBean();
        // 设置安全管理器
        bean.setSecurityManager(defaultWebSecurityManager);
        // 添加shiro的内置过滤器
        Map<String, String> filterMap = new LinkedHashMap<>();
        filterMap.put("/index", ANON);
        filterMap.put("/userInfo", PERMS + "[vip]");
        filterMap.put("/table2", AUTHC);
        filterMap.put("/table3", PERMS + "[vip2]");
        bean.setFilterChainDefinitionMap(filterMap);
        // 设置跳转登陆页
        bean.setLoginUrl("/login");
        // 无权限跳转
        bean.setUnauthorizedUrl("/unAuth");
        return bean;
    }
    /**
     * Thymeleaf中使用Shiro标签
     */
    @Bean
    public ShiroDialect shiroDialect() {
        return new ShiroDialect();
    }
}
5. インターフェイス
IndexController.java
/**
 * @author ding
 */
@Controller
public class IndexController {
    @RequestMapping({"/", "/index"})
    public String index(Model model) {
        model.addAttribute("msg", "hello,shiro");
        return "/index";
    }
    @RequestMapping("/userInfo")
    public String table1(Model model) {
        return "userInfo";
    }
    @RequestMapping("/table")
    public String table(Model model) {
        return "table";
    }
    @GetMapping("/login")
    public String login() {
        return "login";
    }
    @PostMapping(value = "/doLogin")
    public String doLogin(@RequestParam("username") String username, @RequestParam("password") String password, Model model) {
        //获取当前的用户
        Subject subject = SecurityUtils.getSubject();
        //用来存放错误信息
        String msg = "";
        //如果未认证
        if (!subject.isAuthenticated()) {
            //将用户名和密码封装到shiro中
            UsernamePasswordToken token = new UsernamePasswordToken(username, password);
            try {
                // 执行登陆方法
                subject.login(token);
            } catch (Exception e) {
                e.printStackTrace();
                msg = "账号或密码错误";
            }
            //如果msg为空,说明没有异常,就返回到主页
            if (msg.isEmpty()) {
                return "redirect:/index";
            } else {
                model.addAttribute("errorMsg", msg);
                return "login";
            }
        }
        return "/login";
    }
    @GetMapping("/logout")
    public String logout() {
        SecurityUtils.getSubject().logout();
        return "index";
    }
    @GetMapping("/unAuth")
    public String unAuth() {
        return "unAuth";
    }
}
6. Web ページのリソース
ページ リソースを保存するリソース内にテンプレート フォルダーを作成します
index.html
<!DOCTYPE html>
<html xmlns:th="http://www.thymeleaf.org">
<html xmlns:shiro="http://www.pollix.at/thymeleaf/shiro">
<head>
    <meta charset="UTF-8">
    <title>Title</title>
</head>
<body>
<h2>首页</h2>
<!-- 使用shiro标签 -->
<shiro:authenticated>
    <p>用户已登录</p> <a th:href="@{/logout}" rel="external nofollow" >退出登录</a>
</shiro:authenticated>
<shiro:notAuthenticated>
    <p>用户未登录</p>
</shiro:notAuthenticated>
<br/>
<a th:href="@{/userInfo}" rel="external nofollow" >用户信息</a>
<a th:href="@{/table}" rel="external nofollow" >table</a>
</body>
</html>
login.html
<!DOCTYPE html>
<html lang="en" xmlns:th="http://www.thymeleaf.org">
<head>
    <meta charset="UTF-8">
    <title>登陆页</title>
</head>
<body>
<div>
    <p th:text="${errorMsg}"></p>
    <form action="/doLogin" method="post">
        <h3>登陆页</h3>
        <h7>账号:admin,密码:123456</h7>
        <input type="text" id="username"  name="username" placeholder="admin">
        <input type="password" id="password" name="password"  placeholder="123456">
        <button type="submit">登陆</button>
    </form>
</div>
</body>
</html>
userInfo.html
<!DOCTYPE html>
<html lang="en" xmlns:shiro="http://www.pollix.at/thymeleaf/shiro">
<head>
    <meta charset="UTF-8">
    <title>table1</title>
</head>
<body>
<h2>用户信息</h2>
<!-- 利用shiro获取用户信息 -->
用户名:<shiro:principal property="username"/>
<br/>
用户完整信息: <shiro:principal/>
</body>
</html>
table.hetml
<!DOCTYPE html>
<html lang="en">
<head>
    <meta charset="UTF-8">
    <title>table</title>
</head>
<body>
<h2>table</h2>
</body>
</html>
7. エフェクトのデモンストレーション
プロジェクト ブラウザ入力の開始
127.0.0.1:9999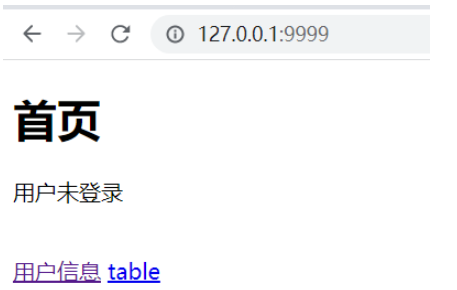 ユーザー情報とテーブルをクリックすると、ログイン ページが自動的にジャンプします。
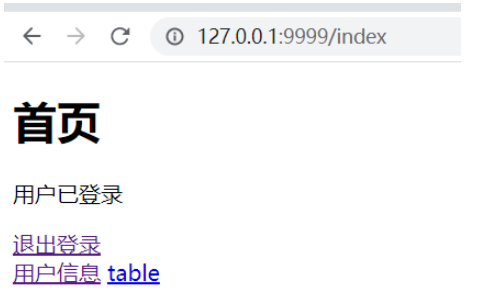
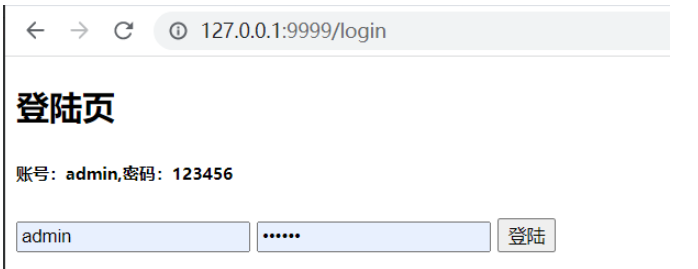 ##ログイン成功後
 ユーザー情報の取得
ここで取得するのは、以前の doGetAuthenticationInfo メソッドによって返されたユーザー情報です。ここではデモンストレーションのために示します。実際の運用ではパスワードを返すことはできません。
以上がSpringboot がShiro を統合してログインと権限の検証を実装する方法の詳細内容です。詳細については、PHP 中国語 Web サイトの他の関連記事を参照してください。