ホームページ  >  記事  >  Java  >  Spring Boot が Thymeleaf を統合する方法

Spring Boot が Thymeleaf を統合する方法

王林
王林転載
2023-05-16 09:22:111279ブラウズ

Thymeleaf

基本的な紹介

Spring Boot では、テンプレート エンジンとして Thymeleaf を使用することを公式に推奨しています。 SpringBoot は、Thymeleaf の一連のデフォルト構成を提供し、Thymeleaf のビュー リゾルバーを提供します。 Thymeleaf の依存関係がプロジェクトにインポートされると、対応する自動構成 (ThymeleafAutoConfiguration) が自動的に有効になるため、Thymeleaf を Spring Boot と完全に統合できます。 Thymeleaf テンプレート エンジンは HTML タグと完全に組み合わせることができ、データのバックエンド レンダリングを容易にします。 Thymeleaf は、静的効果と動的効果をサポートしています。動的なデータがない場合、静的効果が表示されます。テンプレート エンジンは、ユーザー インターフェイスとビジネス データ (コンテンツ) を分離するために作成されます。ドキュメントのフォーマット。Web サイトに使用されるテンプレート エンジンは標準 HTML ドキュメントを生成します。テンプレート ファイルとデータを使用して、テンプレート エンジンを通じて HTML コードを生成します。**一般的なテンプレート エンジンは、jsp、freemarker、velocity、 thymeleafThymeleaf のデフォルト 書き込み場所は、templates ディレクトリ下です。 Thymeleaf 公式 Web サイト: https://www.thymeleaf.org/

<dependency>
  <groupId>org.springframework.boot</groupId>
  <artifactId>spring-boot-starter-thymeleaf</artifactId>
</dependency>
Thymeleaf のデフォルトのビュー パスは、/resources/templates です。このディレクトリに以下の HTML を作成し、thymeleaf
<html lang="en" xmlns:th="http://www.thymleaf.org">

xmlns:th="http://www.thymleaf.org">

基本構文

を導入します。 ${ドメイン属性名}: リクエストドメインのドメイン属性値を取得して表示
${セッション.ドメイン属性名}: セッションドメインのドメイン属性値を取得して表示

< p th:text="${name}">aaa</p>

データを取得できた場合は動的画像、そうでない場合は静止画像(学生管理システムの文字のみが表示されます)
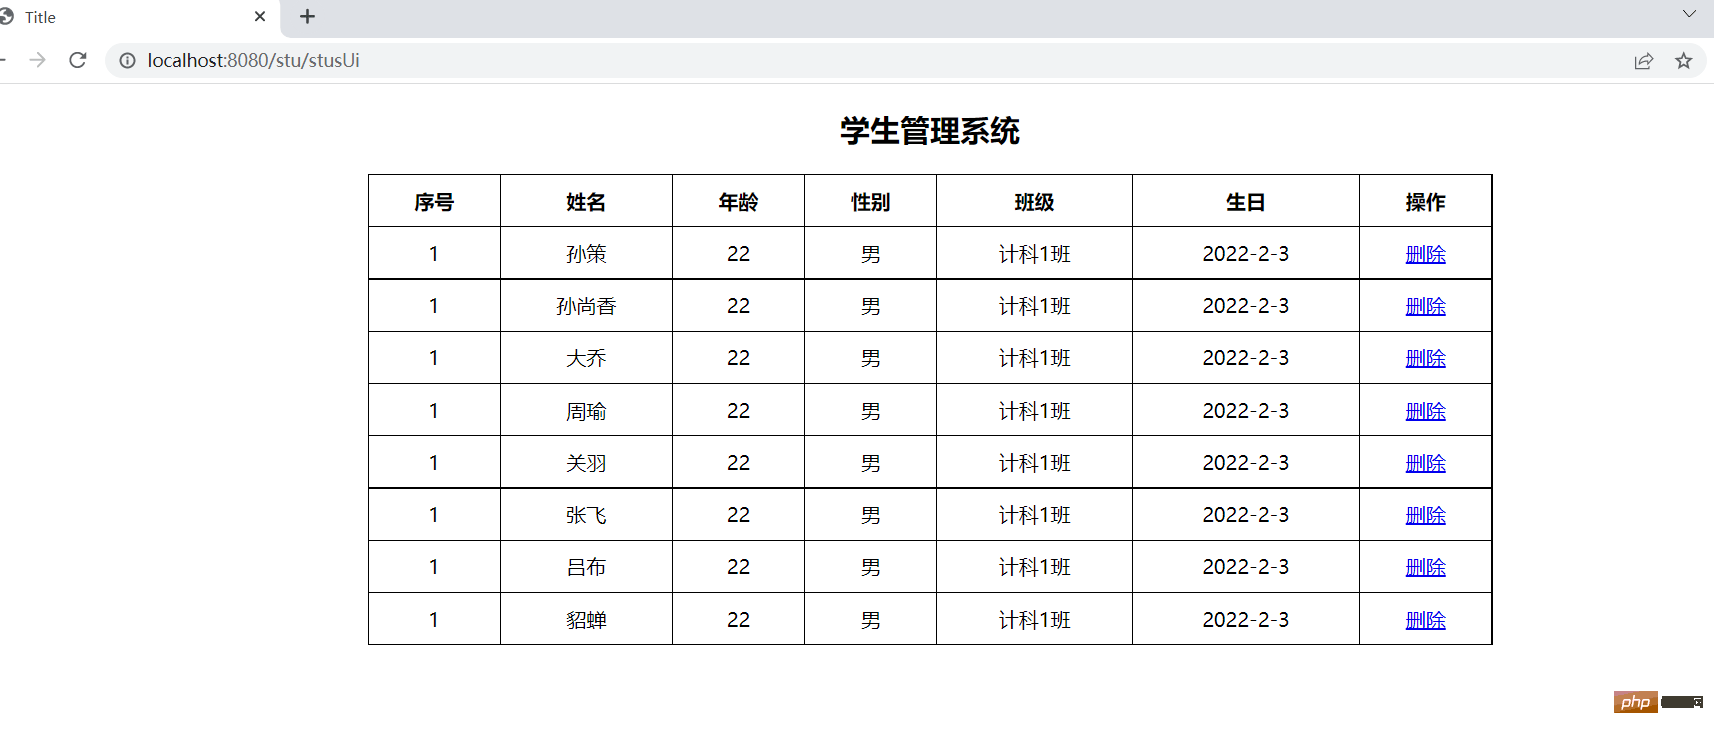
Spring Boot が Thymeleaf を統合する方法

th:text text Replacement

<span th:text="${user.name}">Tom</span>

th:if and th:unless text replace

条件判定には th:if 属性と th:unless 属性を使用します。th:unlessth: until はその逆で、式のみです。 条件が満たされない場合にのみコンテンツが表示されます。

#th:href と @{} リンク式

<h3 th:if="${age>=18}">成年</h3>
<h3 th:unless="${age>=18}">未成年</h3>

th:switch と th:caseSpring Boot が Thymeleaf を統合する方法
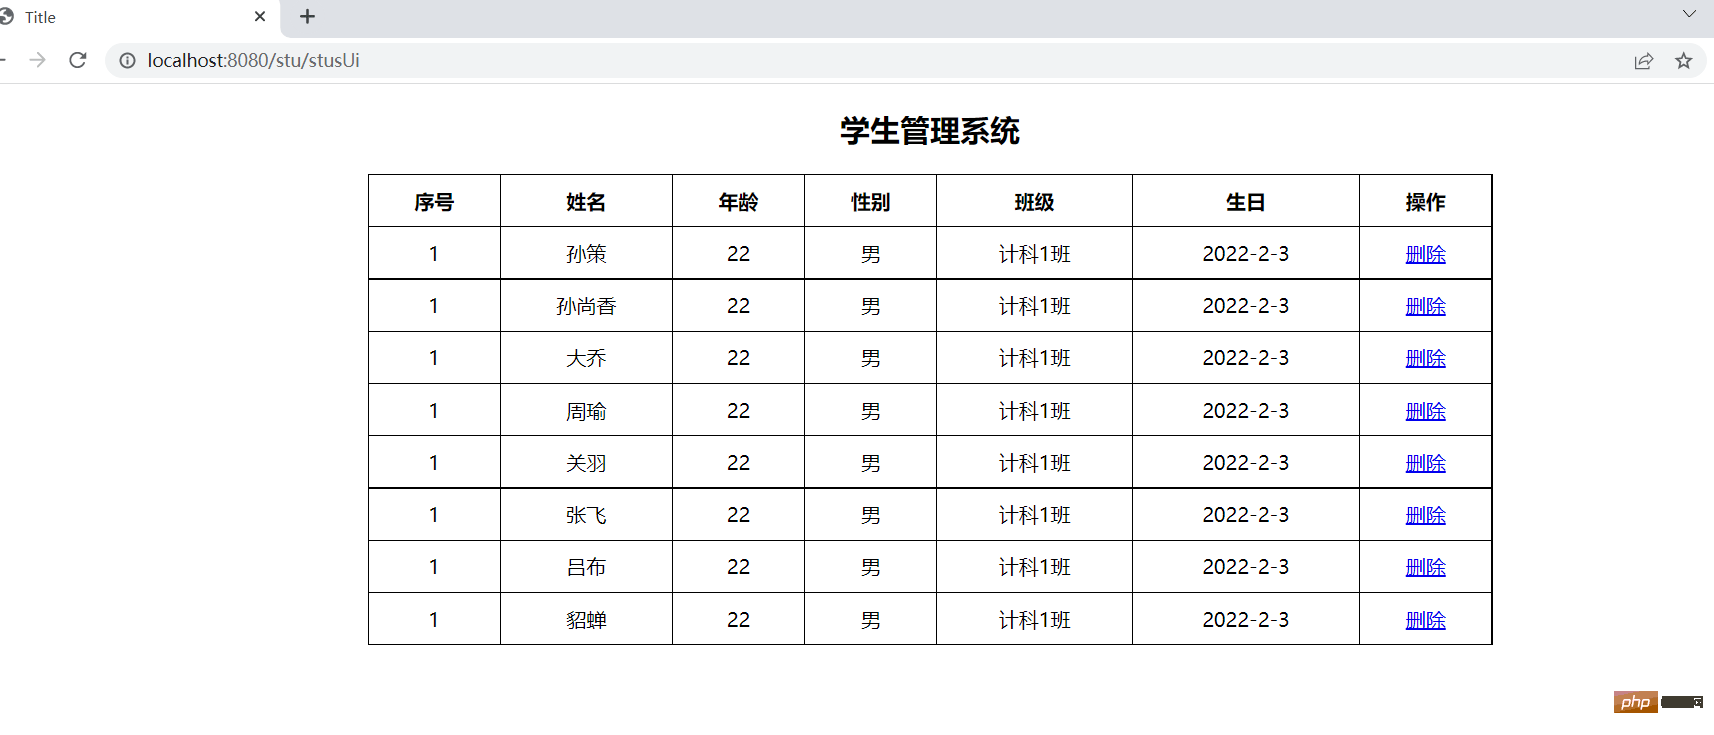

<html lang="en" xmlns:th="http://www.thymleaf.org">

    
    Title


学生管理系统

序号 姓名 年龄 性别 班级 生日 操作
1 aa 22 计科1班 2022-2-3 删除

thymeleaf のデフォルトは変数名 Stat

ステータス変数が明示的に設定されていない場合、thymeleaf はデフォルトで変数名 Stat

のステータスを設定します。

<!--http://localhost:8080/stu/10 -->
<a th:href="${&#39;/stus/&#39;+ stu.id}" rel="external nofollow" >编辑学生1</a>

<!--http://localhost:8080/stu?id=10 -->
<a th:href="@{/stus(id=${stu.id})}" rel="external nofollow" >编辑学生2</a>

<!--http://localhost:8080/stu?id=10&name=abc -->
<a th:href="@{/stus(id=${stu.id},name=${stu.name})}" rel="external nofollow" >编辑学生3</a>
th:id、th:value、th:checked など (およびフォーム関連)

th:object はオブジェクト属性を定義できます

*
{} を th:object と組み合わせて使用​​すると、オブジェクト内の属性を抽出できます

#dates.format() を使用して日付形式をフォーマットできます
<div th:switch="${stu.role}">
  <h3 th:case="banzhang">班长</h3>
  <h3 th:case="tuanzhishu">团支书</h3>
  <h3 th:case="${data}">学委</h3>
  <h3 th:case="*">其他</h3>
  
</div>

Thymeleaf を統合します基本構成
プロジェクトを作成するときは、テンプレート エンジンで Thymeleaf を確認してください。

MySQL ドライバー スコープを削除します。 pom.xml

#ここでは druid 接続プールを使用するため、pom ファイルに関連する依存関係をインポートする必要があります

<tr th:each="stu: ${stus}">
  <td th:text="${stuStat.index}"></td>
  <td th:text="${ stu.name}"></td>
  <td th:text="${ stu.age}"></td>    
</tr>

次に、グローバル構成ファイル アプリケーションで関連する構成を行う必要があります。プロパティ

Spring Boot が Thymeleaf を統合する方法

 <form th:object="${stu}">
        编号:<input type="text" name="id" th:value="*{id}"><br>
        姓名:<input type="text" name="name" th:value="*{name}"><br>
        年龄:<input type="text" name="age" th:value="*{age}"><br>
        性别:<input type="radio" name="gender" value="true" th:checked="*{gender}">男<br>
        性别:<input type="radio" name="gender" value="true" th:checked="*{not gender}">女<br>
        生日:<input type="text" name="birth" th:value="*{#dates.format(birth,&#39;yyyy-MM-dd&#39;)}"><br>
        <input type="submit" value="编辑">
    </form>

データベースの準備Entity クラスに対応するデータベース テーブルと 3 層構造を準備します


#
 <dependency>
            <groupId>com.alibaba</groupId>
            <artifactId>druid-spring-boot-starter</artifactId>
            <version>1.2.11</version>
        </dependency>

3 層アーキテクチャ

#MapperSpring Boot が Thymeleaf を統合する方法

# 指定Mybatis的Mapper接口的xml映射文件的路径
mybatis.mapper-locations=classpath:mapper/*xml
# MySQL数据库驱动
#这个驱动也可以省略,可以根据使用的MySQL自动加载相应的驱动
spring.datasource.driver-class-name=com.mysql.cj.jdbc.Driver
# 数据源名称
spring.datasource.name=com.alibaba.druid.pool.DruidDataSource
# 数据库连接地址
spring.datasource.url=jdbc:mysql://localhost:3306/school?serverTimezone=UTC&zeroDateTimeBehavior=convertToNull
# 数据库用户名和密码
spring.datasource.username=root
spring.datasource.password=a87684009.
# 设置日志级别
logging.level.com.zyh.springboot=debug
# 开启mybatis驼峰命名规则自动转换功能
mybatis.configuration.map-underscore-to-camel-case=true

#ServiceSpring Boot が Thymeleaf を統合する方法

@Data
public class Stu {
    private Integer id;
    private String name;
    private Integer age;
    private Boolean gender;
    private Integer cid;
    @DateTimeFormat(pattern = "yyyy-MM-dd")
    private Date birth;
}

サービス実装クラス

@Mapper
public interface StuMapper {
    /**
     * 查询所有学生信息
     * @return
     * @throws Exception
     */
    @Select("select * from stu")
     List<Stu> queryAllStu() throws Exception;
}

thymeleaf

public interface StuService  {
    /**
     * 查询所有学生信息
     * @return
     */
    List<Stu> queryAllStu() throws Exception;
}

コントローラ

@Service
public class StuServiceImpl implements StuService {
    @Autowired
    private StuMapper stuMapper;
    @Override
    public List<Stu> queryAllStu() throws Exception {
         return stuMapper.queryAllStu();
    }
}

#次に、最初にページを準備しましょう


<html lang="en" xmlns:th="http://www.thymleaf.org">
  
    
    Title


学生管理系统

aaaa

Spring Boot が Thymeleaf を統合する方法

[削除] をクリックすると、バックエンドは ID に基づいてデータベースから対応するデータを削除する必要がありますフロントエンドを通過しました。ここでは、以前学習したおなじみの方法で完成させてから、フロントエンドとバックエンドの分離開発について詳しく説明します Spring Boot が Thymeleaf を統合する方法

削除操作

Spring Boot が Thymeleaf を統合する方法コントローラー(以前のメソッドはここには貼り付けません。出てきてください。そうしないとコードが多くなります)

@Controller
@RequestMapping("/stu")
public class StuController {
    @Autowired
    private StuService stuService;
    /**
    * 显示学生管理系统的画面
    * @return
    */
    @RequestMapping("/stusUi")
    public String stusUi(){
        return "stus";
    }
}

Service

Spring Boot が Thymeleaf を統合する方法

<!DOCTYPE html>
<html lang="en"  xmlns:th="http://www.thymeleaf.org">
<head>
    <meta charset="UTF-8">
    <title>Title</title>
    <style>
        .tb-stus{
            width: 900px;
            margin: 0 auto;
            border: black 1px solid;
            border-collapse: collapse;
        }
        .tb-stus th,td{
            padding: 10px;
            text-align: center;
            border:1px solid black;
        }
    </style>
</head>
<body>
<h3 align="center">学生管理系统</h3>
<table class="tb-stus">
    <thead>
    <tr>
        <th>序号</th>
        <th>姓名</th>
        <th>年龄</th>
        <th>性别</th>
        <th>班级</th>
        <th>生日</th>
        <th>操作</th>
    </tr>
    </thead>
    <tbody>
    <tr th:each="stu,status: ${stuList}">
        <td th:text="${status.index+1}">1</td>
        <td th:text="${stu.name}">aa</td>
        <td th:text="${stu.age}">22</td>
<!--        gender的属性值为1表示性别为男-->
        <td th:if="${stu.gender}">男</td>
        <td th:unless="${stu.gender}">女</td>
        <td th:text="${stu.cid}">计科1班</td>
       <td th:text="${#dates.format(stu.birth,&#39;yyyy-MM-dd&#39;)}">2022-2-3</td>
        <td>
            <!--http://localhost:8080/stu/delete?id=10-->
            <a th:href="@{/stu/delete(id=${stu.id})}" rel="external nofollow"  rel="external nofollow"  rel="external nofollow" >删除</a>
        </td>
    </tr>
    </tbody>
</table>
</body>
</html>

サービス実装クラス

@Controller
@RequestMapping("/stu")
public class StuController {
    @Autowired
    private StuService stuService;
   
    /**根据id删除数据
     * http://localhost:8080/stu/delete?id=10
     * @return
     */
    @RequestMapping("/delete")
    public String deleteById(@RequestParam("id") Integer id){
        try {
            stuService.deleteByid(id);
        } catch (Exception e) {
            e.printStackTrace();
        }
        System.out.println(id);
        return "redirect:/stu/stusUi";
    }


  }

Mapper

public interface StuService  {
    /**
     * 查询所有学生信息
     * @return
     */
    List<Stu> queryAllStu() throws Exception;

    void deleteByid(Integer id);
}
8 のデータを削除します

Spring Boot が Thymeleaf を統合する方法

编辑操作

页面stus.html

<!DOCTYPE html>
<html lang="en"  xmlns:th="http://www.thymeleaf.org">
<head>
    <meta charset="UTF-8">
    <title>Title</title>
    <style>
        .tb-stus{
            width: 900px;
            margin: 0 auto;
            border: black 1px solid;
            border-collapse: collapse;
        }
        .tb-stus th,td{
            padding: 10px;
            text-align: center;
            border:1px solid black;
        }
    </style>
</head>
<body>
<h3 align="center">学生管理系统</h3>
<table class="tb-stus">
    <thead>
    <tr>
        <th>序号</th>
        <th>姓名</th>
        <th>年龄</th>
        <th>性别</th>
        <th>班级</th>
        <th>生日</th>
        <th>操作</th>
    </tr>
    </thead>
    <tbody>
    <tr th:each="stu,status: ${stuList}">
        <td th:text="${stu.id}">1</td>
        <td th:text="${stu.name}">aa</td>
        <td th:text="${stu.age}">22</td>
<!--        gender的属性值为1表示性别为男-->
        <td th:if="${stu.gender}">男</td>
        <td th:unless="${stu.gender}">女</td>
        <td th:text="${stu.cid}">计科1班</td>
         <td th:text="${#dates.format(stu.birth,&#39;yyyy-MM-dd&#39;)}">2022-2-3</td>
        <td>
<!--            localhost:8080/stu/delete/8-->
<!--            <a th:href="${&#39;/stu/delete/&#39;+stu.id}" rel="external nofollow"  rel="external nofollow" >删除</a>-->
            <!--http://localhost:8080/stu/delete?id=10-->
            <a th:href="@{/stu/delete(id=${stu.id})}" rel="external nofollow"  rel="external nofollow"  rel="external nofollow" >删除</a>
            <a th:href="@{/stu/edit(id=${stu.id})}" rel="external nofollow"  rel="external nofollow" >编辑</a>
        </td>
    </tr>
    </tbody>
</table>

</body>
</html>

页面 stu-edit.html

<!DOCTYPE html>
<html lang="en" xmlns:th="http://www.thymeleaf.org">
  <head>
    <meta charset="UTF-8">
    <title>编辑画面</title>
  </head>
  <body>
    <h3 >编辑学生信息</h3>
    <form action="" method="post" th:object="${stu}">
      学号:<input type="text" name="id" th:value="*{id}"  ><br><br>
      姓名:<input type="text" name="name"  th:value="*{name}"><br><br>
      年龄:<input type="text" name="age"  th:value="*{age}"><br><br>
      性别:<input type="radio" name="gender"    th:checked="*{gender}"  >男
      <input type="radio" name="gender"   th:checked="*{!gender}" >女<br><br>
      班级:<input type="text" name="cid" th:value="*{cid}"><br><br>
      生日:<input type="text" name="birth" th:value="*{#dates.format(birth,&#39;yyyy-MM-dd&#39;)}"><br><br>
      <input type="submit" value="编辑">
    </form>
  </body>
</html>

Controller

/**
     * 根据id来修改数据
     * 我们首先得先根据id把数据查询出来,然后把数据展示出来
     * 用户再进行编辑,用户编辑完并且提交以后,跳转到学生管理系统画面,展示所有数据
     * @return
     */
    @RequestMapping("/edit")
    public String edit(@RequestParam("id") Integer id,Model model){
        System.out.println("id"+id);
        try {
            Stu stu=stuService.queryById(id);
            model.addAttribute("stu",stu);
        } catch (Exception e) {
            e.printStackTrace();
        }

        return "stu-edit";
    }

Service

public interface StuService  {
    /**
     * 查询所有学生信息
     * @return
     */
    List<Stu> queryAllStu() throws Exception;

    /**
     * 根据id来删除学生信息
     * @param id
     * @throws Exception
     */
    void deleteByid(Integer id) throws Exception;

    /**
     * 根据id来查询对应学生信息
     * @param id
     * @return
     * @throws Exception
     */
    Stu queryById(Integer id) throws Exception;
}

Service实现类

@Service
public class StuServiceImpl implements StuService {
    @Autowired
    private StuMapper stuMapper;
    @Override
    public List<Stu> queryAllStu() throws Exception {
         return stuMapper.queryAllStu();
    }

    /**
     * 根据id删除数据
     * @param id
     */
    @Override
    public void deleteByid(Integer id) throws Exception {
        stuMapper.deleteById(id);
    }

    @Override
    public Stu queryById(Integer id) throws Exception {
        return stuMapper.queryById(id);
    }
}

Mapper

@Mapper
public interface StuMapper {
    /**
    * 查询所有学生信息
    * @return
    * @throws Exception
    */
    @Select("select * from stu")
    List<Stu> queryAllStu() throws Exception;
    @Delete("delete from stu where id=#{id}")
    void deleteById( Integer id);
    @Select("select * from stu where id=#{id}")
    Stu queryById(Integer id) throws Exception;
}

Spring Boot が Thymeleaf を統合する方法

比如在序号为4中,点击编辑

Spring Boot が Thymeleaf を統合する方法

用户登录

登录页面:

<!DOCTYPE html>
<html lang="en">
<head>
    <meta charset="UTF-8">
    <title>Title</title>
</head>
<body>
    <h3>用户登录</h3>
    <form action="/login" method="post">
        账号:<input type="text" name="username"><br><br>
        密码:<input type="password" name="password"><br><br>
        <input type="submit" value="登录">
    </form>


</body>
</html>

因为需要判断用户是否存在,这是从数据库进行查询的,所以要准备对应的管理员表

# 创建管理员表
CREATE TABLE admin(
	id INT PRIMARY KEY AUTO_INCREMENT,
	username VARCHAR(20),
	`password` VARCHAR(20)
); 

INSERT INTO admin VALUES
	(DEFAULT,&#39;aaa&#39;,111),
	(DEFAULT,&#39;bbb&#39;,222),
	(DEFAULT,&#39;ccc&#39;,333);
# 查询测试
SELECT * FROM admin;	

准备对应的实体类

@Data
public class Admin {
    private String username;
    private String password;
}

Controller

@Controller
@SessionAttributes(names = {"admin"})
public class AdminController {
    @Autowired
    private AdminService adminService;

    /**
     * 显示登录页面
     * @return
     */
    @RequestMapping(value = "/loginUi")
    public String loginUi(){
        return "login";
    }
    @RequestMapping(value = "/login",method = RequestMethod.POST)
    public String login(String username, String password, Model model){
        try {
            Admin admin = adminService.login(username, password);
            //用户名存在说明登录成功
            if (admin!=null){
                //存放到session域中
                model.addAttribute("admin",admin);
                return "redirect:/stu/stusUi";
            }
        } catch (Exception e) {
            e.printStackTrace();
        }
        return "redirect:/loginUi";
    }

}

Service

public interface AdminService {
    Admin login(String username,String password) throws Exception;
}

Service对应的实现类

@Service
public class AdminServiceImpl implements AdminService {
    @Autowired
    private AdminMapper adminMapper;
    @Override
    public Admin login(String username, String password) throws Exception {
        return adminMapper.queryByUsernameAndPassword(username,password);
    }
}

Mapper

@Mapper
public interface AdminMapper {
    @Select("select * from admin where username=#{username} and password=#{password}")
    Admin queryByUsernameAndPassword(@Param("username") String username, @Param("password") String password);
}

Spring Boot が Thymeleaf を統合する方法

Spring Boot が Thymeleaf を統合する方法

<!DOCTYPE html>
<html lang="en"  xmlns:th="http://www.thymeleaf.org">
<head>
    <meta charset="UTF-8">
    <title>Title</title>
    <style>
        .tb-stus{
            width: 900px;
            margin: 0 auto;
            border: black 1px solid;
            border-collapse: collapse;
        }
        .tb-stus th,td{
            padding: 10px;
            text-align: center;
            border:1px solid black;
        }
    </style>
</head>
<body>
    <h3 align="center">学生管理系统</h3>
    <h3 th:if="${session.admin!=null}" th:text="${session.admin.username}">用户名</h3>
    <a th:unless="${session.admin!=null}" href="/loginUi" rel="external nofollow" >登录</a>
    <a th:if="${session.admin!=null}" href="/logout" rel="external nofollow" >注销用户</a>
<table class="tb-stus">
    <thead>
    <tr>
        <th>序号</th>
        <th>姓名</th>
        <th>年龄</th>
        <th>性别</th>
        <th>班级</th>
        <th>生日</th>
        <th>操作</th>
    </tr>
    </thead>
    <tbody>
    <tr th:each="stu,status: ${stuList}">
        <td th:text="${stu.id}">1</td>
        <td th:text="${stu.name}">aa</td>
        <td th:text="${stu.age}">22</td>
<!--        gender的属性值为1表示性别为男-->
        <td th:if="${stu.gender}">男</td>
        <td th:unless="${stu.gender}">女</td>
        <td th:text="${stu.cid}">计科1班</td>
        <td th:text="${#dates.format(stu.birth,&#39;yyyy-MM-dd&#39;)}">2022-2-3</td>
        <td>
<!--            localhost:8080/stu/delete/8-->
<!--            <a th:href="${&#39;/stu/delete/&#39;+stu.id}" rel="external nofollow"  rel="external nofollow" >删除</a>-->
            <!--http://localhost:8080/stu/delete?id=10-->
            <a th:href="@{/stu/delete(id=${stu.id})}" rel="external nofollow"  rel="external nofollow"  rel="external nofollow" >删除</a>
            <a th:href="@{/stu/edit(id=${stu.id})}" rel="external nofollow"  rel="external nofollow" >编辑</a>
        </td>
    </tr>
    </tbody>
</table>

</body>
</html>

Spring Boot が Thymeleaf を統合する方法

Spring Boot が Thymeleaf を統合する方法

Spring Boot が Thymeleaf を統合する方法

用户注销

注销的话,我们把session域中的用户对象取消,然后这个时候就得重新登录,应该要跳转到登录画面

@RequestMapping("/logout")
    public String logout(HttpSession session){
        session.removeAttribute("admin");
        return "redirect:/loginUi";
    }

Spring Boot が Thymeleaf を統合する方法

点击注销用户

Spring Boot が Thymeleaf を統合する方法

以上がSpring Boot が Thymeleaf を統合する方法の詳細内容です。詳細については、PHP 中国語 Web サイトの他の関連記事を参照してください。

声明:
この記事はyisu.comで複製されています。侵害がある場合は、admin@php.cn までご連絡ください。