ホームページ >バックエンド開発 >Python チュートリアル >Python 仮想マシンにおける複素数の実装原理は何ですか?
Python 仮想マシンにおける複素数の実装原理は何ですか?
- 王林転載
- 2023-05-13 10:40:211517ブラウズ
複雑なデータ構造
cpython での複雑なデータ構造の実装は次のとおりです。
typedef struct {
    double real;
    double imag;
} Py_complex;
#define PyObject_HEAD                   PyObject ob_base;
typedef struct {
    PyObject_HEAD
    Py_complex cval;
} PyComplexObject;
typedef struct _object {
    _PyObject_HEAD_EXTRA
    Py_ssize_t ob_refcnt;
    struct _typeobject *ob_type;
} PyObject;
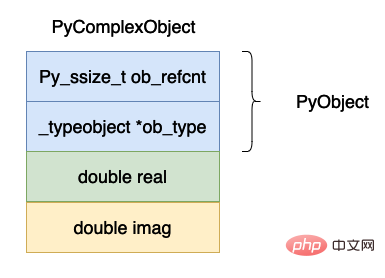
上記のデータ構造図は次のとおりです。

cpython 仮想マシン全体では、複雑なデータは比較的単純である必要があり、PyObject ヘッダーに加えて、実部と虚部があります。
ob_refcnt は、オブジェクトの参照カウントの数を表します。これは、ガベージ コレクションに非常に役立ちます。後で、仮想マシンのガベージ コレクション部分を詳しく分析します。
ob_type, は、このオブジェクトのデータ型を示します。Python では、データのデータ型を判断する必要がある場合があります。たとえば、isinstance と type の 2 つのキーワードは次のようになります。中古フィールドです。
- #real は、複素数の実部を表します。
- imag は、複素数の虚数部を表します。
static PyObject *
complex_add(PyObject *v, PyObject *w)
{
    Py_complex result;
    Py_complex a, b;
    TO_COMPLEX(v, a); // TO_COMPLEX 这个宏的作用就是将一个 PyComplexObject 中的 Py_complex 对象存储到 a 当中
    TO_COMPLEX(w, b);
    result = _Py_c_sum(a, b); // 这个函数的具体实现在下方
    return PyComplex_FromCComplex(result); // 这个函数的具体实现在下方
}

// 真正实现复数加法的函数
Py_complex
_Py_c_sum(Py_complex a, Py_complex b)
{
    Py_complex r;
    r.real = a.real + b.real;
    r.imag = a.imag + b.imag;
    return r;
}

PyObject *
PyComplex_FromCComplex(Py_complex cval)
{
    PyComplexObject *op;

    /* Inline PyObject_New */
    // 申请内存空间
    op = (PyComplexObject *) PyObject_MALLOC(sizeof(PyComplexObject));
    if (op == NULL)
        return PyErr_NoMemory();
    // 将这个对象的引用计数设置成 1
    (void)PyObject_INIT(op, &PyComplex_Type);
    // 将复数结构体保存下来
    op->cval = cval;
    return (PyObject *) op;
}
上記のコードの全体的なプロセスは比較的単純です:
- まず、PyComplexObject から実数部を抽出します。 #抽出した 2 つの複素数を加算します。
- 取得した結果に基づいて PyComplexObject オブジェクトを作成し、このオブジェクトを返します。
- 複素数逆変換
複素数逆変換は実数部と虚数部を反転するだけで、これも比較的簡単です。
static PyObject *
complex_neg(PyComplexObject *v)
{
    Py_complex neg;
    neg.real = -v->cval.real;
    neg.imag = -v->cval.imag;
    return PyComplex_FromCComplex(neg);
}

PyObject *
PyComplex_FromCComplex(Py_complex cval)
{
    PyComplexObject *op;

    /* Inline PyObject_New */
    op = (PyComplexObject *) PyObject_MALLOC(sizeof(PyComplexObject));
    if (op == NULL)
        return PyErr_NoMemory();
    (void)PyObject_INIT(op, &PyComplex_Type);
    op->cval = cval;
    return (PyObject *) op;
}
Repr 関数
ここで、複合型の repr 関数という興味深いメソッドを紹介します。この関数は、クラスの __repr__ 関数と同じ効果があります。複素数の出力を見てください。これは何ですか:
>>> data = complex(0, 1)
>>> data
1j
>>> data = complex(1, 1)
>>> data
(1+1j)
>>> print(data)
(1+1j)
複数形の表現に対応する C 関数は次のとおりです:
static PyObject *
complex_repr(PyComplexObject *v)
{
    int precision = 0;
    char format_code = 'r';
    PyObject *result = NULL;

    /* If these are non-NULL, they'll need to be freed. */
    char *pre = NULL;
    char *im = NULL;

    /* These do not need to be freed. re is either an alias
       for pre or a pointer to a constant.  lead and tail
       are pointers to constants. */
    char *re = NULL;
    char *lead = "";
    char *tail = "";
    // 对应实部等于 0 虚部大于 0 的情况
    if (v->cval.real == 0. && copysign(1.0, v->cval.real)==1.0) {
        /* Real part is +0: just output the imaginary part and do not
           include parens. */
        re = "";
        im = PyOS_double_to_string(v->cval.imag, format_code,
                                   precision, 0, NULL);
        if (!im) {
            PyErr_NoMemory();
            goto done;
        }
    } else {
        /* Format imaginary part with sign, real part without. Include
           parens in the result. */
        // 将实部浮点数变成字符串
        pre = PyOS_double_to_string(v->cval.real, format_code,
                                    precision, 0, NULL);
        if (!pre) {
            PyErr_NoMemory();
            goto done;
        }
        re = pre;
        // 将虚部浮点数变成字符串
        im = PyOS_double_to_string(v->cval.imag, format_code,
                                   precision, Py_DTSF_SIGN, NULL);
        if (!im) {
            PyErr_NoMemory();
            goto done;
        }
        // 用什么括号包围起来
        lead = "(";
        tail = ")";
    }
    result = PyUnicode_FromFormat("%s%s%sj%s", lead, re, im, tail);
  done:
    PyMem_Free(im);
    PyMem_Free(pre);

    return result;
}
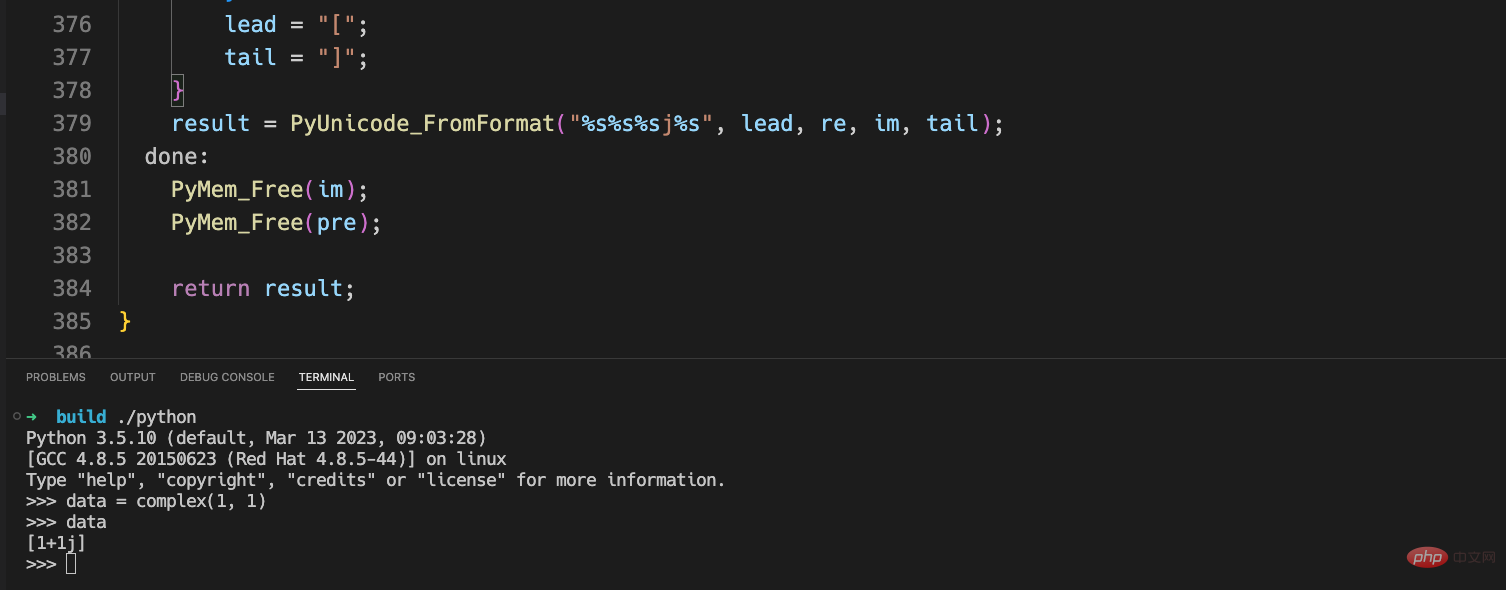
ソース プログラムを変更して、次の 2 つの括弧を変更します。上記の () を [] に変更し、コンパイル後に実行します。 結果は次のようになります。
 #括弧が [] に変わっていることがわかります。
以上がPython 仮想マシンにおける複素数の実装原理は何ですか?の詳細内容です。詳細については、PHP 中国語 Web サイトの他の関連記事を参照してください。
声明:
この記事はyisu.comで複製されています。侵害がある場合は、admin@php.cn までご連絡ください。

