ホームページ >バックエンド開発 >Python チュートリアル >Python がブロックチェーンを構築する方法
Python がブロックチェーンを構築する方法
- WBOYWBOYWBOYWBOYWBOYWBOYWBOYWBOYWBOYWBOYWBOYWBOYWB転載
- 2023-05-12 17:55:061800ブラウズ
ブロックチェーン
ブロックチェーンは、コンピューター ネットワーク内のノード間でデータを共有する台帳 (分散データベース) です。データベースとして、ブロックチェーンは情報を電子形式で保存します。ブロックチェーンの革新性は、(信頼できる第三者を必要とせずに)データ記録のセキュリティ、信頼性、信頼性を保証することです。
ブロックチェーンと一般的なデータベースの違いはデータ構造です。ブロックチェーンは、ブロックの方法で情報を収集します。
block
block は、暗号通貨トランザクション データ (または他の目的) を永続的に記録できるデータ構造です。リンクされたリストに似ています。 ブロックは、まだ検証されていないすべての最新のトランザクションを記録します。データを検証した後、block が閉じられ、新しいトランザクションを入力して検証するために新しい block が作成されます。したがって、一度書き込んだ場合は、永久に変更または削除することはできません。
blockは、ブロックチェーン内で情報が保存され暗号化される場所です。blockBy A以前に暗号化されたブロックの暗号化されたトランザクション情報と新しいトランザクション情報を含む長い数値識別子作成する前に、
ブロックとその中の情報を次のようにする必要があります。ネットワークによって検証
以下は簡単な例です:
block = {
    'index': 1,
    'timestamp': 1506057125.900785,
    'transactions': [
        {
            'sender': "8527147fe1f5426f9dd545de4b27ee00",
            'recipient': "a77f5cdfa2934df3954a5c7c7da5df1f",
            'amount': 5,
        }
    ],
    'proof': 324984774000,
    'previous_hash': "2cf24dba5fb0a30e26e83b2ac5b9e29e1b161e5c1fa7425e73043362938b9824"
}
目標
ブロックチェーンの目標は、デジタル情報を記録し、配布されていますが、編集されていません。このようにして、ブロックチェーンは、変更、削除、破棄できない不変の台帳、つまりトランザクションの記録の基礎となります。
分散化
すべての顧客情報を含むデータベースを維持する 10,000 台のサーバーを備えた会社を想像してください。会社のすべてのサーバーは 1 つの倉庫にあり、各サーバーを完全に制御できます。これにより、単一障害点が発生します。もしその場所で停電したらどうなるでしょうか?彼のインターネット接続が切断されたらどうなるでしょうか?いずれの場合も、データが失われたり破損したりする可能性があります。
Build
ブロックチェーン クラス
BlockChain クラスを作成します。コンストラクターはブロックチェーンを保存する空のリストを作成し、空のリストを作成します。トランザクションを保存するリスト。 block_chain.py
# block_chain.py
class Blockchain:
    def __init__(self) -> None:
        self.chain = []
        self.current_transactions = []
    def new_block(self):
        # Creates a new Block and adds it to the chain
        pass
    def new_transaction(self):
        # Adds a new transaction to the list of transactions
        pass
    @staticmethod
    def hash(block):
        # Hashes a Block
        pass
    @property
    def last_block(self):
        # Returns the last Block in the chain
        pass
トランザクションの追加
トランザクションをブロックに追加する方法が必要です。 new_transaction はこれを担当します
class Blockchain(object):
    ...
    def new_transaction(self, sender, recipient, amount) -> int:
        self.current_transactions.append({
            'sender': sender,
            'recipient': recipient,
            'amount': amount,
        })
        return self.last_block['index'] + 1
new_transaction がトランザクションをリストに追加した後、トランザクションが追加されるブロックのインデックス (次のブロック) を返します。ブロックから採掘される。これは、トランザクションを送信したユーザーにとって後で役立ちます。
新しいブロックの作成
ブロックチェーンがインスタンス化されたら、ジェネシス ブロック (先行するブロックのないブロック) をシードする必要があります。また、ジェネシス ブロックにマイニング (またはプルーフ オブ ワーク) の結果である「プルーフ」を追加する必要もあります。コンストラクターでジェネシス ブロックを作成することに加えて、new_block()、new_transaction()、および hash() メソッドも具体化します。
import hashlib
import json
from time import time
class Blockchain:
    def __init__(self) -> None:
        self.chain = []
        self.current_transactions = []
        # Create the genesis block
        self.new_block(previous_hash=1, proof=100)
    def new_block(self, proof, previous_hash=None) -> dict:
        block = {
            'index': len(self.chain) + 1,
            'timestamp': time(),
            'transactions': self.current_transactions,
            'proof': proof,
            'previous_hash': previous_hash or self.hash(self.chain[-1]),
        }
        self.current_transactions = []
        self.chain.append(block)
        return block
    def new_transaction(self, sender, recipient, amount) -> int:
        self.current_transactions.append(
            {
                'sender': sender,
                'recipient': recipient,
                'amount': amount,
            }
        )
        return self.last_block['index'] + 1
    @property
    def last_block(self) -> dict:
        # Returns the last Block in the chain
        return self.chain[-1]
    @staticmethod
    def hash(block) -> str:
        block_string = json.dumps(block, sort_keys=True).encode()
        return hashlib.sha256(block_string).hexdigest()
この時点で、ブロックチェーン領域の表現はほぼ完了しました。 。しかしこの時点で、新しいブロックがどのように作成、鍛造、または採掘されるのか疑問に思っているはずです。
POW
Proof-of-Work (PoW) は、問題を解決する数値を発見することを目的として、ブロックチェーン上に新しいブロックを作成またはマイニングする方法です。この番号は見つけるのが難しいはずですが、Web 上で誰でも簡単に確認できます。 PoW は、トランザクションの検証と新しいコインのマイニングのために暗号通貨マイニングで広く使用されています。 PoW のおかげで、信頼できるサードパーティを必要とせずに、ビットコインやその他の暗号通貨トランザクションを安全な方法でピアツーピアで処理できます。
同様のアルゴリズムを実装してみましょう:
class Blockchain(object):
    def proof_of_work(self, last_proof) -> int:
        proof = 0
        while self.valid_proof(last_proof, proof) is False:
            proof += 1
        return proof
    @staticmethod
    def valid_proof(last_proof, proof) -> bool:
        guess = f'{last_proof}{proof}'.encode()
        guess_hash = hashlib.sha256(guess).hexdigest()
        return guess_hash[:4] == '0000'
API
ブロックチェーンが対話するには、ブロックチェーンをホストする Web サーバーが必要です。ここでは Flask フレームワークを使用しています。
インストールされていない場合は、インストールする必要がありますflask
pip install flask
私たちのサーバーは次のとおりです。ネットワーク内に単一のノードを形成するには、同じディレクトリに app.py:
from uuid import uuid4
from time import time
from textwrap import dedent
from flask import Flask, jsonify, request
from block_chain import Blockchain
# 实例化应用
app = Flask(__name__)
# 创建随机节点名称
node_identifier = str(uuid4()).replace('_', '')
# 实例化block_chain类
block_chain = Blockchain()
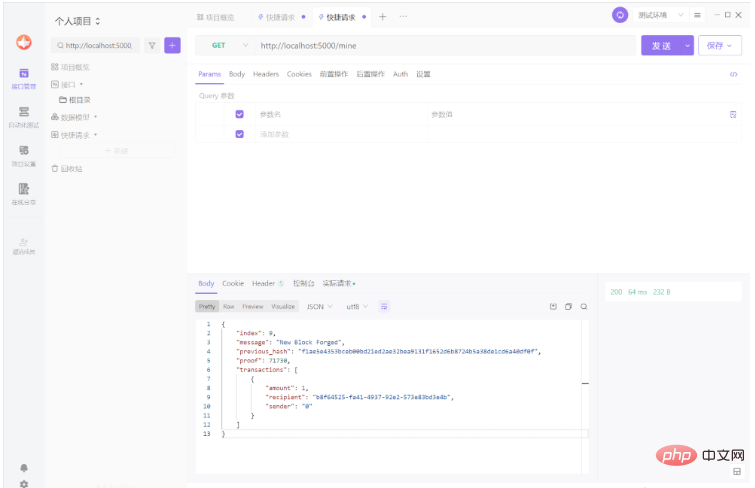
# 创建/mine端点
@app.route('/mine', methods=['GET'])
def mine():
    block_chain.new_transaction(
        sender="0",
        recipient=node_identifier,
        amount=1,
    )
    last_block = block_chain.last_block
    last_proof = last_block['proof']
    proof = block_chain.proof_of_work(last_proof)
    previous_hash = block_chain.hash(last_block)
    block = block_chain.new_block(proof, previous_hash)
    response = {
        'message': "New Block Forged",
        'index': block['index'],
        'transactions': block['transactions'],
        'proof': block['proof'],
        'previous_hash': block['previous_hash'],
    }
    return jsonify(response), 200
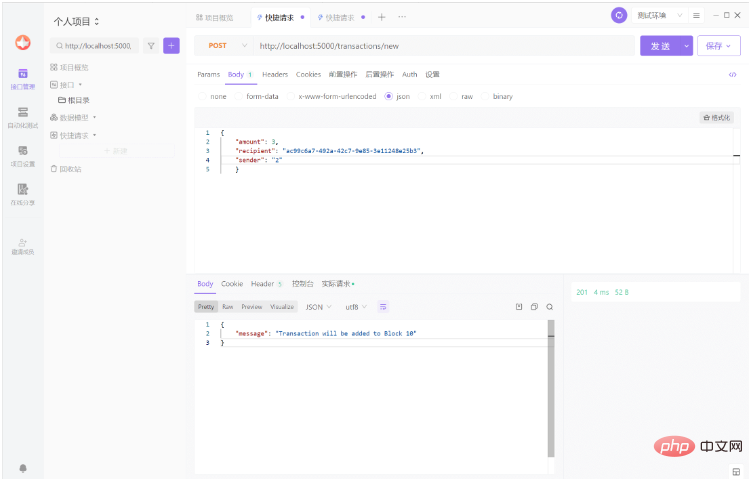
@app.route('/transactions/new', methods=['POST'])
def new_transaction():
    return "We'll add a new transaction"
@app.route('/chain', methods=['GET'])
def full_chain():
    response = {
        'chain': block_chain.chain,
        'length': len(block_chain.chain),
    }
    return jsonify(response), 200
# 修改端口号
if __name__ == '__main__':
    app.run(host='0.0.0.0', port=5000)
を作成し、
#API ソフトウェア経由でリクエストを送信します (今回は API Fox を使用):flask run## を実行します。

 新しいノードを登録します
blockchains の要点は、分散化されるべきであるということです。ネットワーク内に複数のノードを含める場合は、コンセンサス アルゴリズムを使用する必要があります。コンセンサスアルゴリズムを実装する前に、ノードがネットワーク上の隣接ノードを知る方法が必要です。ネットワーク上の各ノードは、ネットワーク上の他のノードのレジストリを維持する必要があります。したがって、より多くのエンドポイントが必要です。
...
from urllib.parse import urlparse
...
class Blockchain:
    def __init__(self) -> None:
        ...
        self.nodes = set()
        ...
    def register_node(self, address) -> None:
        parsed_url = urlparse(address)
        self.nodes.add(parsed_url.netloc)
競合
競合とは、あるノードが別のノードとは異なるチェーンを持つことです。この問題を解決するために、最も長い有効なチェーンが権限であるというルールを開発します。このアルゴリズムを使用して、ネットワーク内のノード間の合意を達成します。
...
import requests
class Blockchain:
...
def valid_chain(self, chain):
last_block = chain[0]
current_index = 1
while current_index < len(chain):
block = chain[current_index]
print(f'{last_block}')
print(f'{block}')
print("\n-----------\n")
# Check that the hash of the block is correct
if block['previous_hash'] != self.hash(last_block):
return False
# Check that the Proof of Work is correct
if not self.valid_proof(last_block['proof'], block['proof']):
return False
last_block = block
current_index += 1
return True
def resolve_conflicts(self):
"""
This is our Consensus Algorithm, it resolves conflicts
by replacing our chain with the longest one in the network.
:return: <bool> True if our chain was replaced, False if not
"""
neighbours = self.nodes
new_chain = None
# We're only looking for chains longer than ours
max_length = len(self.chain)
# Grab and verify the chains from all the nodes in our network
for node in neighbours:
response = requests.get(f'http://{node}/chain')
if response.status_code == 200:
length = response.json()['length']
chain = response.json()['chain']
# Check if the length is longer and the chain is valid
if length > max_length and self.valid_chain(chain):
max_length = length
new_chain = chain
# Replace our chain if we discovered a new, valid chain longer than ours
if new_chain:
self.chain = new_chain
return True
return False第一个方法 valid_chain() 负责通过遍历每个块并验证哈希和证明来检查链是否有效。resolve_conflicts() 是一种循环遍历我们所有相邻节点、下载它们的链并使用上述方法验证它们的方法。如果找到一个有效的链,其长度大于我们的,我们将替换我们的。
让我们将两个端点注册到我们的 API,一个用于添加相邻节点,另一个用于解决冲突:
@app.route('/nodes/register', methods=['POST'])
def register_nodes():
    values = request.get_json()
    nodes = values.get('nodes')
    if nodes is None:
        return "Error: Please supply a valid list of nodes", 400
    for node in nodes:
        blockchain.register_node(node)
    response = {
        'message': 'New nodes have been added',
        'total_nodes': list(blockchain.nodes),
    }
    return jsonify(response), 201
@app.route('/nodes/resolve', methods=['GET'])
def consensus():
    replaced = blockchain.resolve_conflicts()
    if replaced:
        response = {
            'message': 'Our chain was replaced',
            'new_chain': blockchain.chain
        }
    else:
        response = {
            'message': 'Our chain is authoritative',
            'chain': blockchain.chain
        }
    return jsonify(response), 200
在这一点上,如果你愿意,你可以拿一台不同的机器,并在你的网络上启动不同的节点。或者在同一台机器上使用不同的端口启动进程。比如创建两个端口5000和6000来进行尝试。
以上がPython がブロックチェーンを構築する方法の詳細内容です。詳細については、PHP 中国語 Web サイトの他の関連記事を参照してください。

