
ホームページ >Java >&#&チュートリアル >SpringBoot実行処理例分析
SpringBoot実行処理例分析

- PHPz転載
- 2023-05-12 15:19:061478ブラウズ
各 Spring Boot プロジェクトにはメイン プログラムの起動クラスがあり、メイン プログラムの起動クラスにはプロジェクトを起動する main() メソッドがあり、このメソッドでは SpringApplication.run を実行することで Spring Boot プログラム全体を起動できます() 。
質問: SpringApplication.run() メソッドはどのようにして Spring Boot プロジェクトを開始するのでしょうか?
run() メソッド内のソース コードを見てみましょう。コア コードは次のとおりです:
@SpringBootApplication
public class SpringbootDemoApplication {
    public static void main(String[] args) {
        SpringApplication.run(SpringbootDemoApplication.class, args);
    }
}
public static ConfigurableApplicationContext run(Class<?> primarySource, String... args) {
return run(new Class[]{primarySource}, args);
}
public static ConfigurableApplicationContext run(Class<?>[] primarySources, String[] args) {
return (new SpringApplication(primarySources)).run(args);
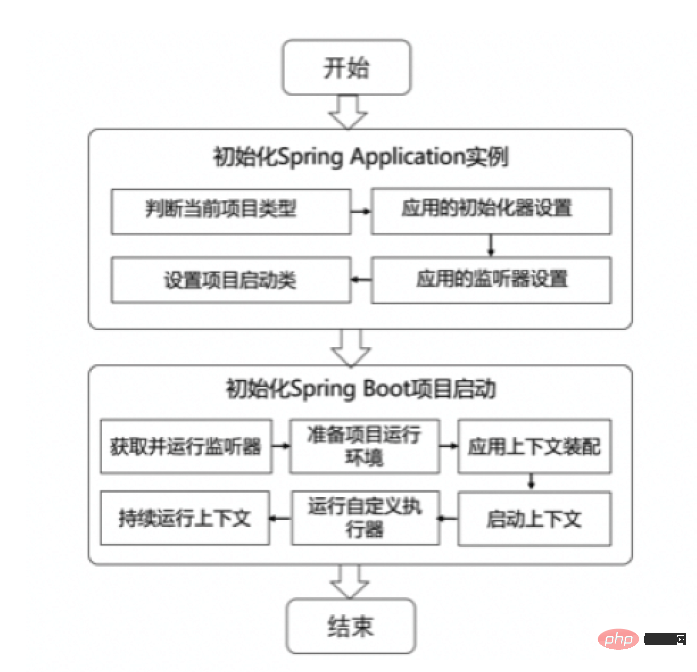
}上記のソース コードからわかるように、SpringApplication.run() メソッドはは、それぞれ 2 つの操作を実行します。これは、SpringApplication インスタンスの最初の作成と、プロジェクトを開始するための run() の呼び出しです。これら 2 つの段階の実装の詳細は、次のとおりです。
1. SpringApplication インスタンスの初期作成
SpringApplication インスタンス オブジェクトの初期化と作成のソース コード情報を表示します。コア コードは次のとおりです
    public SpringApplication(ResourceLoader resourceLoader, Class... primarySources) {
        this.sources = new LinkedHashSet();
        this.bannerMode = Mode.CONSOLE;
        this.logStartupInfo = true;
        this.addCommandLineProperties = true;
        this.addConversionService = true;
        this.headless = true;
        this.registerShutdownHook = true;
        this.additionalProfiles = new HashSet();
        this.isCustomEnvironment = false;
        this.resourceLoader = resourceLoader;
        Assert.notNull(primarySources, "PrimarySources must not be null");
    // 把项目启动类.class设置为属性存储起来
        this.primarySources = new LinkedHashSet(Arrays.asList(primarySources));
    // 判断当前webApplicationType应用的类型
        this.webApplicationType = WebApplicationType.deduceFromClasspath();
    // 设置初始化器(Initializer),最后会调用这些初始化器
        this.setInitializers(this.getSpringFactoriesInstances(ApplicationContextInitializer.class));
    // 设置监听器(Listener)
        this.setListeners(this.getSpringFactoriesInstances(ApplicationListener.class));
    // 用于推断并设置项目main()方法启动的主程序启动类
        this.mainApplicationClass = this.deduceMainApplicationClass();
上記のソース コードからわかるように、初期化SpringApplication の処理は主に 4 つの部分で構成されており、詳細は以下のとおりです。
(1) this.webApplicationType = WebApplicationType.deduceFromClasspath()
は、現在の webApplicationType アプリケーションの種類を決定するために使用されます。 deduceFromClasspath() メソッドは、特定のフィーチャークラスが Classpath クラスパスの下に存在するかどうかをチェックし、現在の webApplicationType タイプが SERVLET アプリケーション (Spring 5 より前の従来の MVC アプリケーション) であるか REACTIVE アプリケーション (WebFlux 対話型アプリケーション) であるかを判断するために使用されます。 Spring 5 で登場し始めた)
(2) this.setInitializers(this.getSpringFactoriesInstances(ApplicationContextInitializer.class))
SpringApplication アプリケーションの初期化設定。イニシャライザの設定プロセス中に、Spring クラス ローダ SpringFactoriesLoader を使用して、META-INF/spring.factories クラス パスの META-INF にある spring.factores ファイルから利用可能なすべてのアプリケーション初期化クラス ApplicationContextInitializer を取得します。
(3) this.setListeners(this.getSpringFactoriesInstances(ApplicationListener.class))
SpringApplicationアプリケーションのリスナー設定に使用されます。リスナーの設定プロセスは、前のステップのイニシャライザの設定プロセスと基本的に同じです。SpringFactoriesLoader は、META-INF/spring.factories クラス パスの META-INF の下にある spring.factores ファイルから、利用可能なすべてのリスナー クラス ApplicationListener を取得するためにも使用されます。 。
(4) this.mainApplicationClass = this.deduceMainApplicationClass()
プロジェクトの main() メソッドによって開始されるメイン プログラムの起動クラスを推論して設定するために使用されます
2.プロジェクトの初期化起動
(new SpringApplication(primarySources)).run(args) ソース コードの前の部分で SpringApplication インスタンス オブジェクトの初期化と作成を分析した後、プロジェクトの初期化起動プロセスを確認し、 run(args) メソッドによって実行されるコア コード 詳細は次のとおりです。
  public ConfigurableApplicationContext run(String... args) {
        StopWatch stopWatch = new StopWatch();
        stopWatch.start();
        ConfigurableApplicationContext context = null;
        Collection<SpringBootExceptionReporter> exceptionReporters = new ArrayList();
        this.configureHeadlessProperty();
    // 第一步:获取并启动监听器
        SpringApplicationRunListeners listeners = this.getRunListeners(args);
        listeners.starting();
        Collection exceptionReporters;
        try {
            ApplicationArguments applicationArguments = new DefaultApplicationArguments(args);
    // 第二步:根据SpringApplicationRunListeners以及参数来准备环境
            ConfigurableEnvironment environment = this.prepareEnvironment(listeners, applicationArguments);
            this.configureIgnoreBeanInfo(environment);
    // 准备Banner打印器 - 就是启动Spring Boot的时候打印在console上的ASCII艺术字体
            Banner printedBanner = this.printBanner(environment);
    // 第三步:创建Spring容器
            context = this.createApplicationContext();
            exceptionReporters = this.getSpringFactoriesInstances(SpringBootExceptionReporter.class, new Class[]{ConfigurableApplicationContext.class}, new Object[]{context});
    // 第四步:Spring容器前置处理
            this.prepareContext(context, environment, listeners, applicationArguments, printedBanner);
    // 第五步:刷新容器
            this.refreshContext(context);
    // 第六步:Spring容器后置处理
            this.afterRefresh(context, applicationArguments);
            stopWatch.stop();
            if (this.logStartupInfo) {
                (new StartupInfoLogger(this.mainApplicationClass)).logStarted(this.getApplicationLog(), stopWatch);
            }
    // 第七步:发出结束执行的事件
            listeners.started(context);
    // 返回容器
            this.callRunners(context, applicationArguments);
        } catch (Throwable var10) {
            this.handleRunFailure(context, var10, exceptionReporters, listeners);
            throw new IllegalStateException(var10);
        }
        try {
            listeners.running(context);
            return context;
        } catch (Throwable var9) {
            this.handleRunFailure(context, var9, exceptionReporters, (SpringApplicationRunListeners) null);
            throw new IllegalStateException(var9);
        }
    }
上記のソース コードからわかるように、プロジェクトの初期化起動プロセスには通常、次の部分が含まれます。ステップ 1: リスナーの取得と開始
#this.getRunListeners (args) メソッドと listens.starting() メソッドは、主に、SpringApplication インスタンスの初期化プロセス中に初期化された SpringApplicationRunListener リスナーを取得して実行するために使用されます。
2 番目のステップ: SpringApplicationRunListeners とパラメーターに基づいて環境を準備する
This.prepareEnvironment(listeners, applicationArguments) メソッドは主にプロジェクトの実行環境をプリセットするために使用され、同時にこれを通じて.configureIgnoreBeanInfo(environment ) メソッドを使用して、不要な実行環境を除外します。
ステップ 3: Spring コンテナを作成します
webApplicationType に基づいてコンテナのタイプを決定します。タイプが SERVLET タイプの場合、対応するコンテナは、リフレクション バイトコード、つまり AnnotationConfigServletWebServerApplicationContext を通じてロードされ、以前に初期化されたコンテキスト (アプリケーション コンテキスト環境)、環境 (プロジェクト実行環境)、リスナー (実行リスナー)、applicationArguments (プロジェクト パラメーター)、printedBanner (プロジェクト アイコン) を使用します。情報) を使用して、アプリケーション コンテキストを作成します。 構成をアセンブルし、構成を更新します。
ステップ 4: Spring コンテナーの前処理
このステップは主に、コンテナーが更新される前の準備アクションです。さまざまな変数などを含むコンテナ環境をセットアップします。これには非常に重要な操作が含まれます。スタートアップ クラスをコンテナに挿入して、後続の自動構成の基礎を築く
ステップ 5: コンテナを更新する
Spring コンテナのリフレッシュを開始し、リフレッシュ メソッドを通じて IOC コンテナ全体を初期化し (Bean リソースの配置、解析、登録などを含む)、JVM ランタイムにシャットダウン フックを登録します。このコンテキストは、JVM が終了すると閉じられます。その時点でない限りシャットダウンされます すでに閉じられています
ステップ 6: Spring コンテナの後処理
拡張インターフェイス、デザイン モードのテンプレート メソッド、デフォルトは空の実装です。カスタム要件がある場合は、このメソッドをオーバーライドできます。たとえば、起動ログと完了ログ、またはその他の後処理を出力します。
ステップ 7: 実行を終了するイベントを発行する
EventPublishingRunListener リスナーを取得してその開始メソッドを実行し、作成した Spring コンテナを渡して ApplicationStartedEvent イベントを作成し、ConfigurableApplicationContext を実行します
publishEvent メソッド、つまりイベントは SpringApplication ではなく Spring コンテナーに発行されます。これは前回の開始とは異なります。前回の開始は SpringApplication のリスナーに直接発行されます。イベントを開始します。
ステップ 8: ランナーの実行
プロジェクト内のカスタム エグゼキュータ XxxRunner クラスを呼び出して、プロジェクトの開始直後に特定のプログラムを実行するために使用されます。 Spring Boot が提供する Executor インターフェイスには、ApplicationRunner と CommandLineRunner があり、使用する場合は、いずれかのインターフェイスを実装するように Executor クラスをカスタマイズし、対応する run() メソッドのインターフェイスを書き換えるだけで、Spring Boot プロジェクトが完成します。これらの特定のプログラムを実行します。
以下の Spring Boot 実行フローチャートを通じて、Spring Boot の全体的な実行プロセスと主な起動段階をより明確に理解してください:
以上がSpringBoot実行処理例分析の詳細内容です。詳細については、PHP 中国語 Web サイトの他の関連記事を参照してください。