ホームページ >バックエンド開発 >Python チュートリアル >すぐに使える 8 つの Python 自動化スクリプト!
すぐに使える 8 つの Python 自動化スクリプト!
- WBOYWBOYWBOYWBOYWBOYWBOYWBOYWBOYWBOYWBOYWBOYWBOYWB転載
- 2023-04-13 18:10:031560ブラウズ

毎日、ニュースを読む、メールを送信する、天気を確認する、フォルダーを掃除するなど、多くの反復的なタスクを実行することがあります。自動スクリプトを使用すると、その必要がなくなります。これらの作業を何度も手動で完了できると非常に便利です。ある意味、Python は自動化の同義語です。
今日は、8 つの非常に便利な Python 自動化スクリプトを共有します。気に入ったら、忘れずに収集し、フォローし、「いいね」をしてください。
1. Web ニュースを自動で読む
このスクリプトは、Web ページからテキストをキャプチャし、それを自動的に音声で読み上げることができます。これは悪くない選択です。
コードは 2 つの部分に分かれており、1 つは Web ページのテキストをクロールする部分、もう 1 つは読み上げツールを使用してテキストを読み上げる部分です。
必要なサードパーティ ライブラリ:
Beautiful Soup - クロールされた Web ページ情報を抽出するために使用される、古典的な HTML/XML テキスト パーサー。
requests - Web ページにリクエストを送信してデータを取得するための非常に便利な HTTP ツールです。
Pyttsx3 - テキストを音声に変換し、速度、周波数、音声を制御します。
import pyttsx3
import requests
from bs4 import BeautifulSoup
engine = pyttsx3.init('sapi5')
voices = engine.getProperty('voices')
newVoiceRate = 130 ## Reduce The Speech Rate
engine.setProperty('rate',newVoiceRate)
engine.setProperty('voice', voices[1].id)
def speak(audio):
 engine.say(audio)
 engine.runAndWait()
text = str(input("Paste articlen"))
res = requests.get(text)
soup = BeautifulSoup(res.text,'html.parser')
articles = []
for i in range(len(soup.select('.p'))):
 article = soup.select('.p')[i].getText().strip()
 articles.append(article)
text = " ".join(articles)
speak(text)
# engine.save_to_file(text, 'test.mp3') ## If you want to save the speech as a audio file
engine.runAndWait()
2. 自動化されたデータ探索
データ探索はデータ サイエンス プロジェクトの最初のステップです。より深い価値をさらに分析するには、データの基本情報を理解する必要があります。
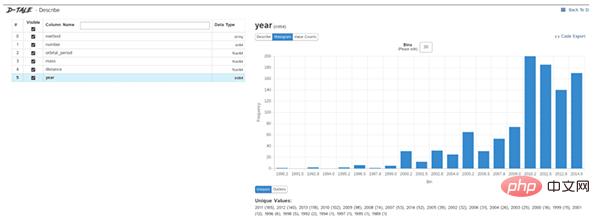
通常、データの探索には pandas や matplotlib などのツールを使用しますが、多くのコードを自分で記述する必要があるため、効率を向上させたい場合は Dtale が最適です。
Dtale は、1 行のコードで自動分析レポートを生成するのが特徴で、Flask バックエンドと React フロントエンドを組み合わせて、Pandas データ構造を簡単に表示および分析する方法を提供します。
Jupyter 上で Dtale を使用できます。
必要なサードパーティ ライブラリ:
Dtale - 分析レポートを自動的に生成します。
### Importing Seaborn Library For Some Datasets
import seaborn as sns
### Printing Inbuilt Datasets of Seaborn Library
print(sns.get_dataset_names())
### Loading Titanic Dataset
df=sns.load_dataset('titanic')
### Importing The Library
import dtale
#### Generating Quick Summary
dtale.show(df)
3. 複数の電子メールを自動的に送信する
このスクリプトは、電子メールをバッチで定期的に送信するのに役立ちます。電子メールのコンテンツと添付ファイルカスタマイズも可能で、調整は非常に実用的です。
電子メール クライアントと比較した場合、Python スクリプトの利点は、電子メール サービスをインテリジェントに、バッチで、高度なカスタマイズで展開できることです。
必要なサードパーティ ライブラリ:
Email - 電子メール メッセージの管理用
Smtlib - SMTP サーバーに電子メールを送信するための定義SMTP または ESMTP リスナーを使用してインターネット上の任意のコンピューターにメールを送信できる SMTP クライアント セッション オブジェクト
Pandas - データ分析およびクリーニング用のツール。
import smtplib
from email.message import EmailMessage
import pandas as pd
def send_email(remail, rsubject, rcontent):
 email = EmailMessage()## Creating a object for EmailMessage
 email['from'] = 'The Pythoneer Here'## Person who is sending
 email['to'] = remail## Whom we are sending
 email['subject'] = rsubject ## Subject of email
 email.set_content(rcontent) ## content of email
with smtplib.SMTP(host='smtp.gmail.com',port=587)as smtp:
 smtp.ehlo() ## server object
 smtp.starttls() ## used to send data between server and client
 smtp.login("deltadelta371@gmail.com","delta@371") ## login id and password of gmail
 smtp.send_message(email)## Sending email
 print("email send to ",remail)## Printing success message
if __name__ == '__main__':
 df = pd.read_excel('list.xlsx')
 length = len(df)+1
 for index, item in df.iterrows():
 email = item[0]
 subject = item[1]
 content = item[2]
 send_email(email,subject,content)
4. PDF をオーディオ ファイルに変換する
スクリプトは PDF をオーディオ ファイルに変換できます。原理も非常に単純です。最初に PyPDF を使用して PDF 内のテキストを抽出します。次に、Pyttsx3 Convert text to speech を使用します。
import pyttsx3,PyPDF2
pdfreader = PyPDF2.PdfFileReader(open('story.pdf','rb'))
speaker = pyttsx3.init()
for page_num in range(pdfreader.numPages):
text = pdfreader.getPage(page_num).extractText()## extracting text from the PDF
cleaned_text = text.strip().replace('n',' ')## Removes unnecessary spaces and break lines
print(cleaned_text)## Print the text from PDF
#speaker.say(cleaned_text)## Let The Speaker Speak The Text
speaker.save_to_file(cleaned_text,'story.mp3')## Saving Text In a audio file 'story.mp3'
speaker.runAndWait()
speaker.stop()
5. リストからランダムな音楽を再生します
このスクリプトは、再生する曲を曲フォルダーからランダムに選択します。 Windows システムのみをサポートします。
import random, os
music_dir = 'G:\new english songs'
songs = os.listdir(music_dir)
song = random.randint(0,len(songs))
print(songs[song])## Prints The Song Name
os.startfile(os.path.join(music_dir, songs[0]))
6. インテリジェントな気象情報
National Weather Service Web サイトは、天気予報を取得するための API を提供しており、気象データを JSON 形式で直接返します。したがって、必要なのは、json から対応するフィールドを抽出することだけです。
以下は指定都市(郡、地区)の天気のURLです。URLを直接開くと該当都市の天気データが返されます。例:
http://www.weather.com.cn/data/cityinfo/101021200.html 上海市徐匯区に対応する天気予報の URL。
#具体的なコードは次のとおりです:
mport requests
import json
import logging as log
def get_weather_wind(url):
r = requests.get(url)
if r.status_code != 200:
log.error("Can't get weather data!")
info = json.loads(r.content.decode())
# get wind data
data = info['weatherinfo']
WD = data['WD']
WS = data['WS']
return "{}({})".format(WD, WS)
def get_weather_city(url):
# open url and get return data
r = requests.get(url)
if r.status_code != 200:
log.error("Can't get weather data!")
# convert string to json
info = json.loads(r.content.decode())
# get useful data
data = info['weatherinfo']
city = data['city']
temp1 = data['temp1']
temp2 = data['temp2']
weather = data['weather']
return "{} {} {}~{}".format(city, weather, temp1, temp2)
if __name__ == '__main__':
msg = """**天气提醒**:

{} {}
{} {}

来源: 国家气象局
""".format(
get_weather_city('http://www.weather.com.cn/data/cityinfo/101021200.html'),
get_weather_wind('http://www.weather.com.cn/data/sk/101021200.html'),
get_weather_city('http://www.weather.com.cn/data/cityinfo/101020900.html'),
get_weather_wind('http://www.weather.com.cn/data/sk/101020900.html')
)
print(msg)
実行結果は次のとおりです:

import contextlib
from urllib.parse import urlencode
from urllib.request import urlopen
import sys
def make_tiny(url):
request_url = ('http://tinyurl.com/api-create.php?' +
 urlencode({'url':url}))
 with contextlib.closing(urlopen(request_url)) as response:
return response.read().decode('utf-8')
def main():
 for tinyurl in map(make_tiny, sys.argv[1:]):
print(tinyurl)
if __name__ == '__main__':
 main()
このスクリプトは非常に実用的です。たとえば、コンテンツ プラットフォームがパブリック アカウントの記事をブロックしている場合、パブリック アカウントの記事のリンクを短いリンクに変更し、そのリンクに挿入することで、次のことを実現できます。 import os
import threading
import time
def get_file_list(file_path):
#文件按最后修改时间排序
dir_list = os.listdir(file_path)
if not dir_list:
return
else:
dir_list = sorted(dir_list, key=lambda x: os.path.getmtime(os.path.join(file_path, x)))
return dir_list
def get_size(file_path):
"""[summary]
Args:
file_path ([type]): [目录]
Returns:
[type]: 返回目录大小,MB
"""
totalsize=0
for filename in os.listdir(file_path):
totalsize=totalsize+os.path.getsize(os.path.join(file_path, filename))
#print(totalsize / 1024 / 1024)
return totalsize / 1024 / 1024
def detect_file_size(file_path, size_Max, size_Del):
"""[summary]
Args:
file_path ([type]): [文件目录]
size_Max ([type]): [文件夹最大大小]
size_Del ([type]): [超过size_Max时要删除的大小]
"""
print(get_size(file_path))
if get_size(file_path) > size_Max:
fileList = get_file_list(file_path)
for i in range(len(fileList)):
if get_size(file_path) > (size_Max - size_Del):
print ("del :%d %s" % (i + 1, fileList[i]))
#os.remove(file_path + fileList[i])以上がすぐに使える 8 つの Python 自動化スクリプト!の詳細内容です。詳細については、PHP 中国語 Web サイトの他の関連記事を参照してください。

