ホームページ >ウェブフロントエンド >jsチュートリアル >Angular 学習チャット通知 (カスタム サービス)
Angular 学習チャット通知 (カスタム サービス)
- 青灯夜游転載
- 2022-12-01 20:45:522768ブラウズ
この記事では、angular の学習を継続し、angular でのカスタム サービス通知について簡単に理解することができます。

前の記事では、
サービスは API リクエストの処理に使用できるだけでなく、他の用途にも使用できると述べました
たとえば、この記事で説明する notification の実装です。 [関連チュートリアルの推奨事項: "angular チュートリアル"]
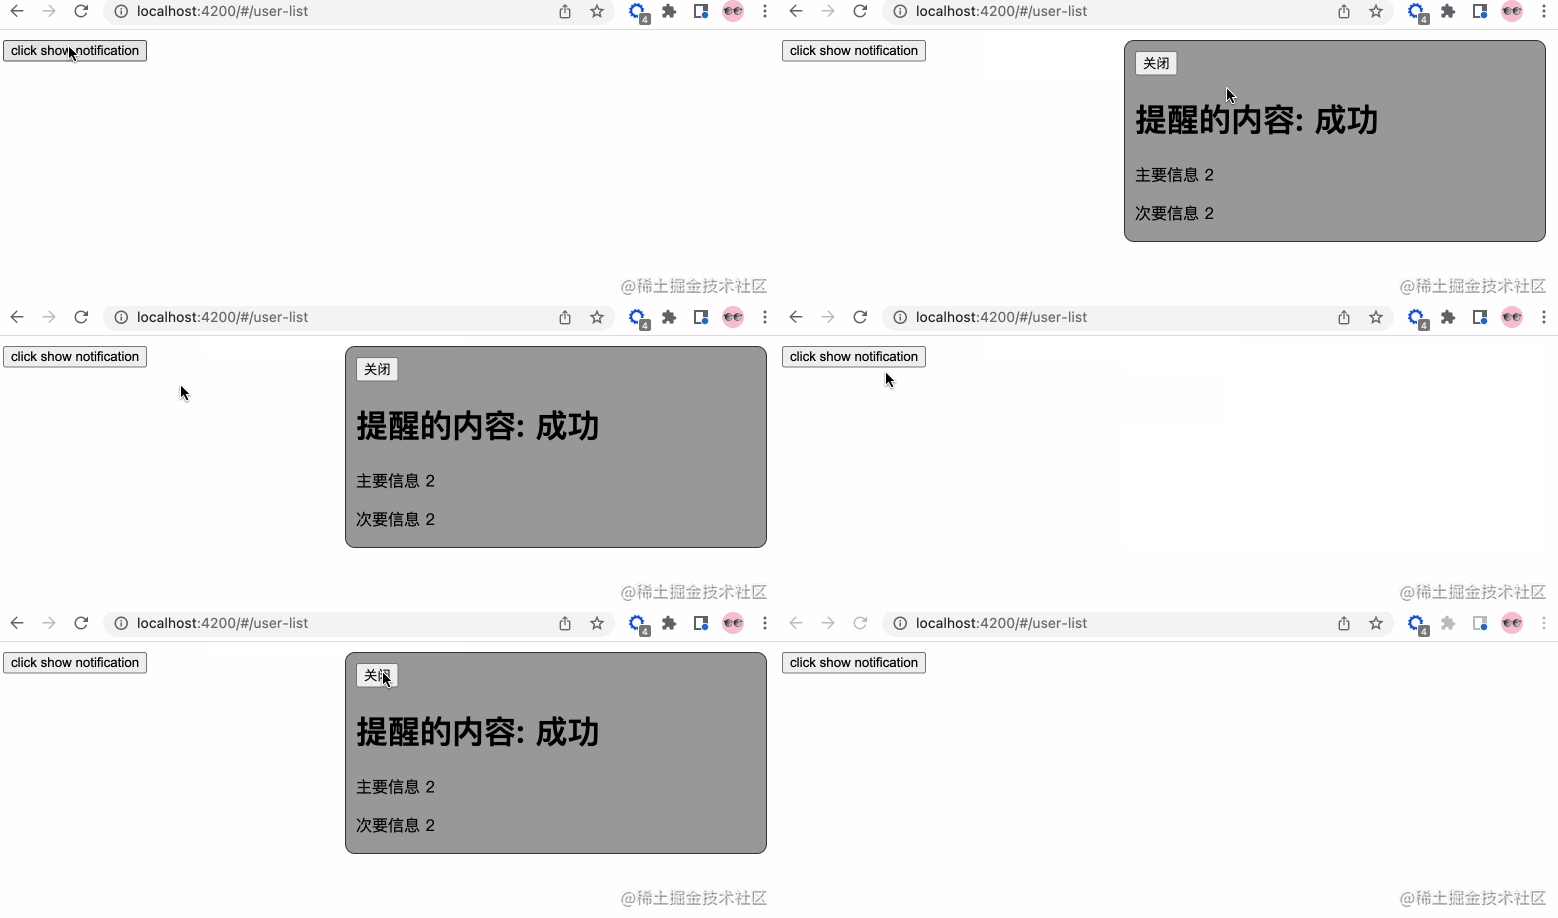
レンダリングは次のとおりです:

UI これは次のとおりです。後で調整
それでは、段階的に見ていきましょう。
サービスの追加
notification.service.ts サービス ファイルを app/services に追加します (コマンドライン生成)、関連するコンテンツを追加します:
// notification.service.ts
import { Injectable } from '@angular/core';
import { Observable, Subject } from 'rxjs';
// 通知状态的枚举
export enum NotificationStatus {
Process = "progress",
Success = "success",
Failure = "failure",
Ended = "ended"
}
@Injectable({
providedIn: 'root'
})
export class NotificationService {
private notify: Subject<NotificationStatus> = new Subject();
public messageObj: any = {
primary: '',
secondary: ''
}
// 转换成可观察体
public getNotification(): Observable<NotificationStatus> {
return this.notify.asObservable();
}
// 进行中通知
public showProcessNotification() {
this.notify.next(NotificationStatus.Process)
}
// 成功通知
public showSuccessNotification() {
this.notify.next(NotificationStatus.Success)
}
// 结束通知
public showEndedNotification() {
this.notify.next(NotificationStatus.Ended)
}
// 更改信息
public changePrimarySecondary(primary?: string, secondary?: string) {
this.messageObj.primary = primary;
this.messageObj.secondary = secondary
}
constructor() { }
}わかりやすいですか...
notify を監視可能なオブジェクトに入れて、さまざまなステータス情報を公開します。
コンポーネントの作成
パブリック コンポーネントが保存されている app/components に新しい notification コンポーネントを作成します。したがって、次の構造が得られます。
notification
├── notification.component.html                     // 页面骨架
├── notification.component.scss                     // 页面独有样式
├── notification.component.spec.ts                  // 测试文件
└── notification.component.ts                       // javascript 文件
notification のスケルトンを定義します。
<!-- notification.component.html -->

<!-- 支持手动关闭通知 -->
<button (click)="closeNotification()">关闭</button>
<h1>提醒的内容: {{ message }}</h1>
<!-- 自定义重点通知信息 -->
<p>{{ primaryMessage }}</p>
<!-- 自定义次要通知信息 -->
<p>{{ secondaryMessage }}</p>
次に、スケルトンを変更して次のスタイルを追加します。
// notification.component.scss

:host {
  position: fixed;
  top: -100%;
  right: 20px;
  background-color: #999;
  border: 1px solid #333;
  border-radius: 10px;
  width: 400px;
  height: 180px;
  padding: 10px;
  // 注意这里的 active 的内容,在出现通知的时候才有
  &.active {
    top: 10px;
  }
  &.success {}
  &.progress {}
  &.failure {}
  &.ended {}
}
success、progress、failure、ended これら 4 つのクラス名は、通知サービスによって定義された列挙に対応します。独自の設定に従って、関連するスタイルを追加できます。
最後に、動作に関する javascript コードを追加します。
// notification.component.ts

import { Component, OnInit, HostBinding, OnDestroy } from '@angular/core';
// 新的知识点 rxjs
import { Subscription } from 'rxjs';
import {debounceTime} from 'rxjs/operators';
// 引入相关的服务
import { NotificationStatus, NotificationService } from 'src/app/services/notification.service';

@Component({
  selector: 'app-notification',
  templateUrl: './notification.component.html',
  styleUrls: ['./notification.component.scss']
})
export class NotificationComponent implements OnInit, OnDestroy {

  // 防抖时间,只读
  private readonly NOTIFICATION_DEBOUNCE_TIME_MS = 200;

  protected notificationSubscription!: Subscription;
  private timer: any = null;
  public message: string = ''

  // notification service 枚举信息的映射
  private reflectObj: any = {
    progress: "进行中",
    success: "成功",
    failure: "失败",
    ended: "结束"
  }

  @HostBinding('class') notificationCssClass = '';

  public primaryMessage!: string;
  public secondaryMessage!: string;

  constructor(
    private notificationService: NotificationService
  ) { }

  ngOnInit(): void {
    this.init()
  }

  public init() {
    // 添加相关的订阅信息
    this.notificationSubscription = this.notificationService.getNotification()
      .pipe(
        debounceTime(this.NOTIFICATION_DEBOUNCE_TIME_MS)
      )
      .subscribe((notificationStatus: NotificationStatus) => {
        if(notificationStatus) {
          this.resetTimeout();
          // 添加相关的样式
          this.notificationCssClass = `active ${ notificationStatus }`
          this.message = this.reflectObj[notificationStatus]
          // 获取自定义首要信息
          this.primaryMessage = this.notificationService.messageObj.primary;
          // 获取自定义次要信息
          this.secondaryMessage = this.notificationService.messageObj.secondary;
          if(notificationStatus === NotificationStatus.Process) {
            this.resetTimeout()
            this.timer = setTimeout(() => {
              this.resetView()
            }, 1000)
          } else {
            this.resetTimeout();
            this.timer = setTimeout(() => {
              this.notificationCssClass = ''
              this.resetView()
            }, 2000)
          }
        }
      })
  }

  private resetView(): void {
    this.message = ''
  }

  // 关闭定时器
  private resetTimeout(): void {
    if(this.timer) {
      clearTimeout(this.timer)
    }
  }

  // 关闭通知
  public closeNotification() {
    this.notificationCssClass = ''
    this.resetTimeout()
  }

  // 组件销毁
  ngOnDestroy(): void {
    this.resetTimeout();
    // 取消所有的订阅消息
    this.notificationSubscription.unsubscribe()
  }

}ここでは、rxjs のナレッジポイントを紹介します。RxJS は、Observables を使用したリアクティブ プログラミング ライブラリであり、非同期またはコールバックの記述を可能にします。ベースのコードの方が簡単です。これは素晴らしいライブラリです。今後のいくつかの記事で詳しく説明します。
ここでは、debounce アンチシェイク関数を使用します。 関数アンチシェイクは、イベントがトリガーされた後、n 秒後に 1 回だけ実行できることを意味します。 n 秒以内にイベントが再度トリガーされると、関数の実行時間が再計算されます。簡単に言うと、アクションが連続してトリガーされると、最後に実行されたものだけが実行されます。
ps:
throttleスロットル関数: 関数の実行を一定期間内に 1 回のみに制限します。
面接中、面接官はよく尋ねます...
電話について
これはグローバル サービスであるため、私たちは電話します。 app.component.html のこのコンポーネント:
// app.component.html

<router-outlet></router-outlet>
<app-notification></app-notification>
デモを容易にするために、user-list.component.html にボタンを追加して、デモのトリガー:
// user-list.component.html

<button (click)="showNotification()">click show notification</button>
トリガー関連コード:
// user-list.component.ts

import { NotificationService } from 'src/app/services/notification.service';

// ...
constructor(
  private notificationService: NotificationService
) { }

// 展示通知
showNotification(): void {
  this.notificationService.changePrimarySecondary('主要信息 1');
  this.notificationService.showProcessNotification();
  setTimeout(() => {
    this.notificationService.changePrimarySecondary('主要信息 2', '次要信息 2');
    this.notificationService.showSuccessNotification();
  }, 1000)
}この時点で完了です。notification の機能を正常にシミュレートしました。実際のニーズに応じて関連するサービス コンポーネントを変更し、ビジネス ニーズに合わせてカスタマイズできます。社内で使用するシステムを開発している場合は、成熟した UI ライブラリを使用することをお勧めします。これらのライブラリは、さまざまなコンポーネントやサービスをカプセル化するのにすでに役立ち、開発時間を大幅に節約できます。
【終了】✅
プログラミング関連の知識については、プログラミング教育をご覧ください。 !
以上がAngular 学習チャット通知 (カスタム サービス)の詳細内容です。詳細については、PHP 中国語 Web サイトの他の関連記事を参照してください。

